1. Introduction
Thank you for choosing the Yorqimi Smart Biometric Gun Safe, Model SSGS05. This device is designed to provide secure storage for your valuables and firearms, featuring multiple quick access methods, integrated wireless charging, and a digital display with environmental monitoring. Please read this manual thoroughly before setup and operation to ensure proper use and safety.
2. Safety Information
- Always store firearms unloaded and with the safety engaged.
- Keep the safe's mechanical keys, digital PIN codes, and registered fingerprints confidential and out of reach of unauthorized individuals, especially children.
- Do not store the mechanical keys inside the safe.
- Ensure the safe is securely mounted to prevent unauthorized removal.
- Do not expose the safe to extreme temperatures or humidity.
- Use only the specified power adapter and batteries.
3. Package Contents
Verify that all items are present in your package:
- Yorqimi Smart Biometric Gun Safe (Model SSGS05)
- Power Adapter × 1
- Expansion Screw Kit × 4
- Non-slip Rubber Feet × 4
- Security Cable × 1
- User Manual × 1
- Mechanical Keys × 2
4. Product Overview
The Yorqimi Smart Biometric Gun Safe combines advanced security features with modern conveniences, including a digital display and wireless charging capabilities.

Figure 1: Top Panel Introduction. This diagram highlights the various features on the safe's top panel, including the biometric scanner, digital keypad, wireless charging zones for AirPods, Apple Watch, and smartphone, along with the digital display showing time, temperature, humidity, and battery level.

Figure 2: Compact Size and Included Accessories. The image illustrates the safe's dimensions (13.3 inches wide, 9.8 inches deep, 3.7 inches high) and the accessories provided, such as the power adapter, mounting screws, security cable, and keys.
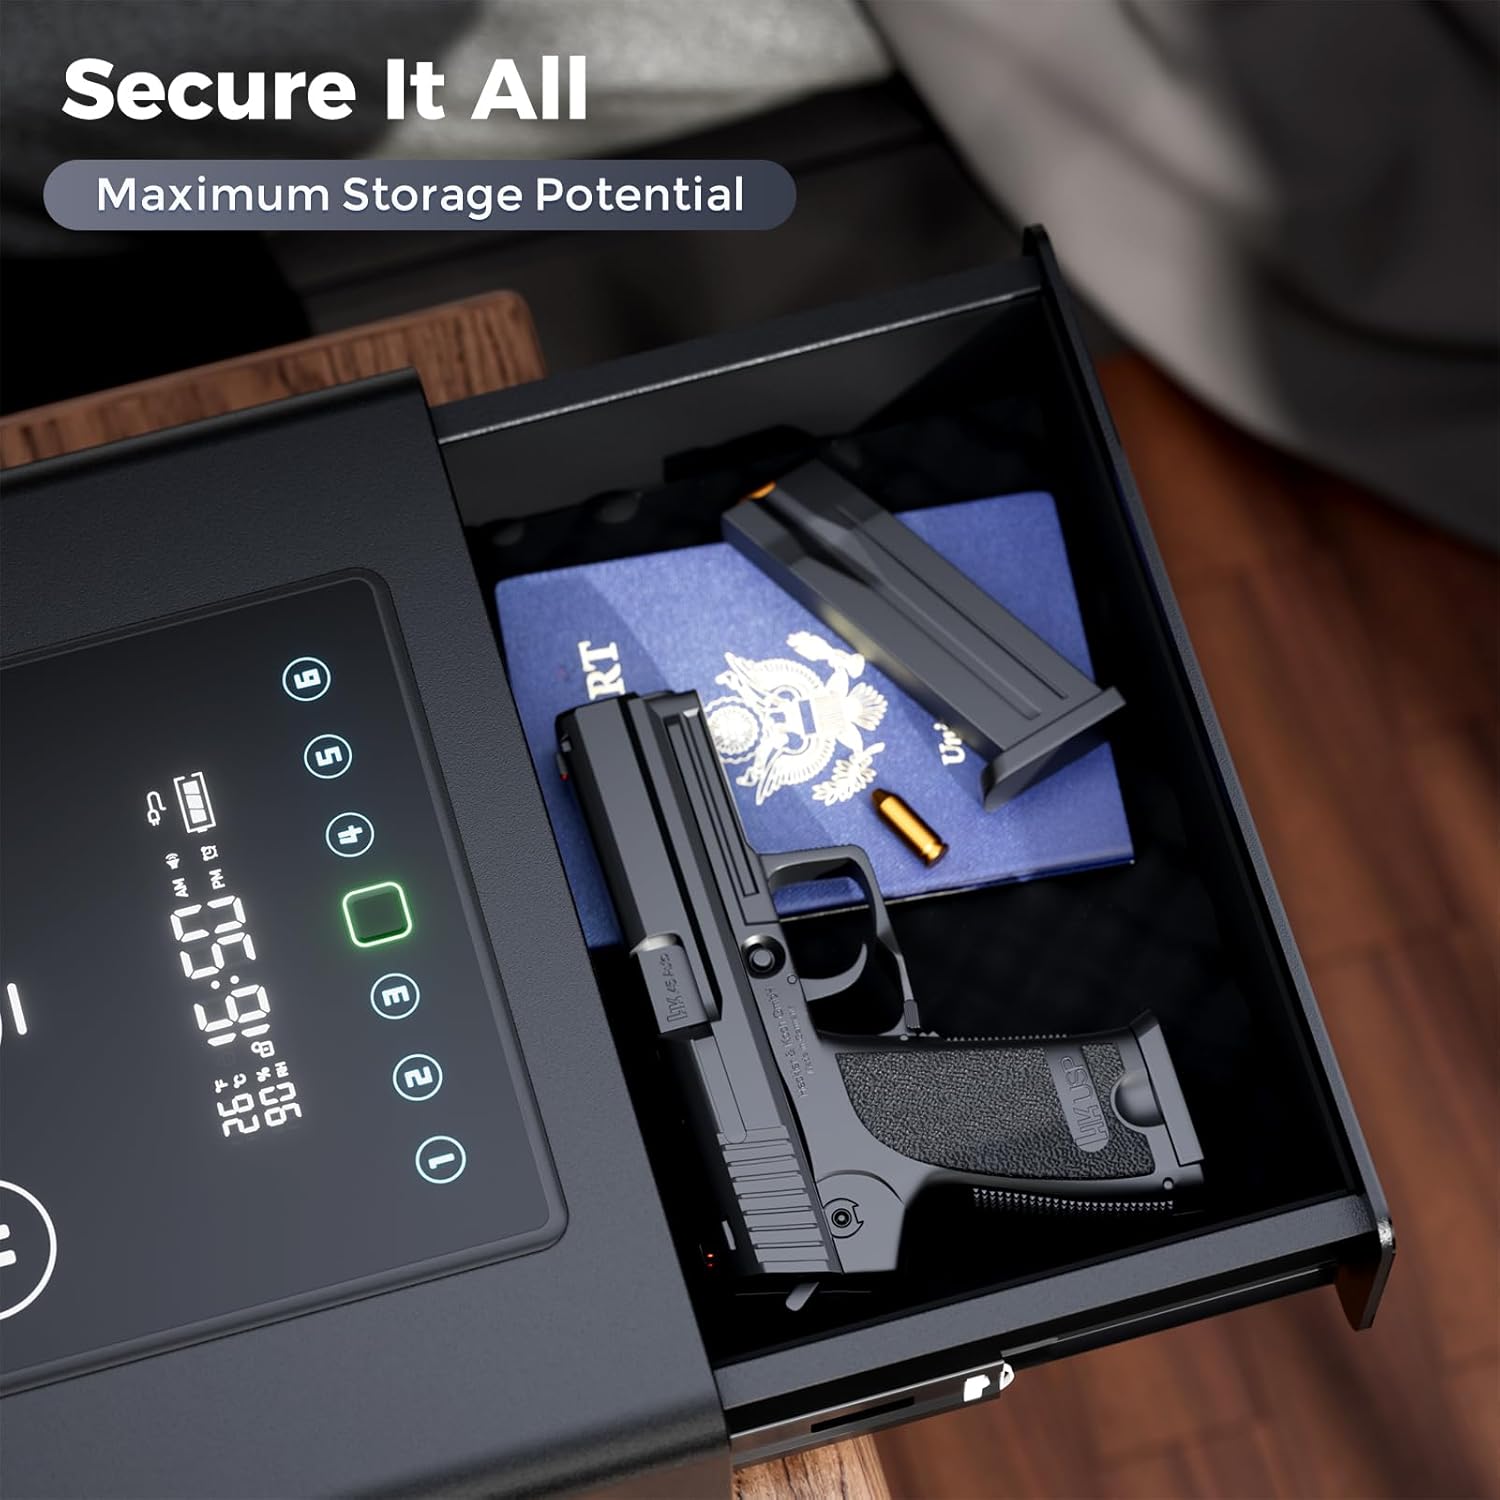
Figure 3: Spacious Interior. The felt-lined interior of the safe drawer is shown, capable of holding handguns up to 8.5 inches, along with spare magazines or other valuables like a passport and jewelry.
5. Setup
5.1. Battery Installation
The safe operates on AC power but requires 4 x AAA batteries for backup power. The battery compartment is located on the side of the safe. Ensure batteries are inserted with correct polarity.
5.2. Power Connection
Connect the provided power adapter to the safe's power input port and then to a wall outlet. The digital display will activate upon successful power connection.
5.3. Mounting the Safe
For enhanced security, the safe can be floor-mounted using the provided expansion screw kit. To access the mounting holes, the drawer must first be removed.
- Open the safe drawer using any access method.
- Locate the white plastic latches on the drawer rails on both sides.
- On one side, pull the latch upwards. On the other side, push the latch downwards.
- Carefully slide the drawer out from the safe. Note the spring mechanism that assists in drawer ejection; ensure it does not get damaged.
- Once the drawer is removed, you will see the mounting holes inside the safe's cabinet.
- Position the safe in the desired location and mark the drilling points through the mounting holes.
- Drill pilot holes and secure the safe using the provided expansion screws.
- To reinsert the drawer, align the rails and carefully push the drawer back into the safe until the latches engage. Ensure the spring mechanism is correctly positioned.
Video 1: Drawer Removal and Mounting Hole Access. This video demonstrates the process of opening the safe, disengaging the drawer latches, and removing the drawer to reveal the internal mounting holes for secure installation.
6. Operating Instructions
6.1. Access Methods
The safe offers three ways to access its contents:
- Biometric Fingerprint: Quick access in less than 0.5 seconds.
- Digital PIN Code: Secure access using a personalized code.
- Mechanical Key: Emergency backup access.

Figure 4: Three Ways to Access. This image visually represents the three primary methods for opening the safe: using the biometric fingerprint scanner, entering a digital PIN code on the keypad, or utilizing the mechanical backup key.
Video 2: Product Overview and Features. This video provides a general overview of the Yorqimi Fingerprint Clock Safe, highlighting its 3-in-1 wireless charging capability and quick access features.
Video 3: Quick Access Demonstration. This short video demonstrates the rapid opening of the safe's drawer using the biometric fingerprint scanner, showcasing its instant access capability.
6.2. Setting Up Fingerprints
The safe can store over 30 unique fingerprints. To register a new fingerprint:
- Open the safe drawer.
- Locate the 'SET' button inside the drawer (refer to Figure 1 for location). Press and hold the 'SET' button for 2 seconds until the fingerprint scanner illuminates blue.
- Place your finger on the scanner. Lift and repeat several times (typically 4-5 times) from different angles to ensure a comprehensive scan. The safe will beep to confirm each successful scan.
- Once registration is complete, the scanner will flash green, and the safe will emit two short beeps.
- Test the newly registered fingerprint to ensure it unlocks the safe.
6.3. Setting Up Digital PIN Code
You can set a personalized digital PIN code for access.
- Open the safe drawer.
- Press and hold the 'SET' button for 3 seconds until the digital keypad illuminates.
- Enter your desired PIN code (4-8 digits) followed by the '#' key.
- Re-enter the same PIN code followed by the '#' key to confirm. The safe will beep to confirm successful registration.
- Test the new PIN code to ensure it unlocks the safe.
6.4. Using Wireless Charging
The top panel features a 3-in-1 wireless charging hub.
- Place your Qi-compatible smartphone on the designated 15W charging zone.
- Place your Apple Watch on the 5W charging spot.
- Place your AirPods on the 2.5W charging spot.
- Ensure devices are properly aligned for optimal charging. The charging icons on the display will light up when a device is charging.

Figure 5: 3-in-1 Wireless Charging Hub. This image demonstrates the simultaneous wireless charging of a smartphone (up to 15W), an Apple Watch (up to 5W), and AirPods (up to 2.5W) on the integrated charging pad.
6.5. Digital Display Features
The large LCD display provides real-time information:
- Time: Displays current time (24-hour format).
- Temperature: Shows internal temperature in Fahrenheit.
- Humidity: Displays internal humidity percentage.
- Lock Status: Indicates if the safe is locked or unlocked.
- Battery Level: Shows the current battery charge for the backup power.
6.6. Adjusting Screen Brightness (Stealth Mode)
The screen brightness can be adjusted to 4 levels, including a discreet 'Stealth Mode' for bedside use.

Figure 6: 4-Level Adjustable Screen Brightness. This image illustrates the four different brightness settings for the digital display, allowing users to adjust visibility for various environments, including a low-light 'Stealth Mode'.
7. Maintenance
- Cleaning: Wipe the exterior with a soft, damp cloth. Avoid abrasive cleaners.
- Battery Replacement: Replace AAA backup batteries annually or when the low battery indicator appears on the display.
- Drawer Mechanism: Keep the drawer rails clean and free of debris to ensure smooth operation.
8. Troubleshooting
| Problem | Possible Cause | Solution |
|---|---|---|
| Safe does not open with fingerprint. | Finger not properly placed; unregistered fingerprint; dirty sensor. | Ensure finger covers the entire sensor. Re-register fingerprint if necessary. Clean the sensor with a soft, dry cloth. |
| Safe does not open with PIN code. | Incorrect PIN entered; PIN not set. | Verify the PIN code. Re-enter the correct PIN. If forgotten, use mechanical key and reset PIN. |
| Wireless charging not working. | Device not Qi-compatible; improper alignment; foreign objects; power issue. | Ensure device supports Qi wireless charging. Realign device on the charging pad. Remove any objects between device and pad. Check power connection. |
| Display is dim or off. | Stealth mode activated; power saving mode; power outage. | Adjust screen brightness (Section 6.6). Check AC power connection and backup batteries. |
| Drawer is stiff or jammed. | Debris in rails; drawer overloaded. | Clean drawer rails. Ensure contents do not obstruct drawer movement. |
9. Specifications
| Feature | Detail |
|---|---|
| Brand | Yorqimi |
| Model Number | SSGS05 |
| Product Dimensions (D x W x H) | 13.39" x 9.9" x 3.78" |
| Lock Type | Biometric, Key, Keypad |
| Color | Black |
| Capacity | 0.23 Cubic Feet |
| Material | Alloy Steel |
| Mounting Type | Floor Mount |
| Item Weight | 11.9 Pounds |
| Wireless Charging | 3-in-1 (15W/5W/2.5W) |
| Display Features | Time, Battery Level, Temperature, Humidity, Lock Status |
| Power Source | AC Power, 4 x AAA Battery Backup |
10. Warranty and Support
For warranty information, technical support, or any questions regarding your Yorqimi Smart Biometric Gun Safe, please refer to the contact information provided on the product packaging or the official Yorqimi website. Keep your purchase receipt as proof of purchase for warranty claims.