1. Introduction
This manual provides essential instructions for the safe and efficient operation, installation, and maintenance of your MMTSEWW 3.5KW Type 1 Portable EV Charger. Please read this manual thoroughly before using the product and retain it for future reference.
2. Safety Instructions
Observe the following safety precautions to prevent injury or damage to the product:
- Ensure the charging cable and plug are free from damage before each use. Do not use if damaged.
- Connect the charger only to a properly grounded electrical outlet.
- Do not immerse the charging control box or connectors in water.
- Keep children and pets away from the charging area during operation.
- Avoid touching the charging pins directly.
- Do not attempt to open, disassemble, or modify the charger.
- In case of abnormal operation, disconnect the charger immediately and contact support.
- The charger features B-type RCD leakage protection and 8-layer protection against overvoltage, overcurrent, short circuit, and lightning strike.

Image: The control box displays various protection features, including lightning, short circuit, overcurrent, leakage, overvoltage, undervoltage, over-temperature, and electrostatic protection, ensuring a secure charging process.
3. Product Overview
The MMTSEWW 3.5KW Type 1 Portable EV Charger is designed for convenient and efficient charging of electric vehicles. It features a robust control box with an OLED screen for real-time data display and multiple safety mechanisms.
Key Features:
- AI analysis of charging data and battery health reports.
- Automatic adaptation to 110V-250V (US/Europe/Asia universal).
- Built-in B-type RCD leakage protection and 8-layer protection against overvoltage, overcurrent, short circuit, and lightning strike.
- OLED screen displays real-time voltage, current, and charging amount.
- IP67 waterproof rating for outdoor use.
- Folding plug and car-grade cable designed for durability.

Image: An overview of the portable EV charger, showing the EU plug, the central control box with its display and buttons, and the Type 1 connector for the electric vehicle.
4. Setup
Follow these steps to set up your portable EV charger:
- Inspect the Charger: Before each use, visually inspect the charging cable, control box, and connectors for any signs of damage, wear, or foreign objects.
- Connect to Power Outlet: Insert the EU plug of the charger into a compatible, properly grounded 80V-260V electrical outlet. Ensure the connection is secure.
- Connect to Electric Vehicle: Open the charging port cover on your electric vehicle. Insert the Type 1 connector firmly into the vehicle's charging inlet until it clicks into place.
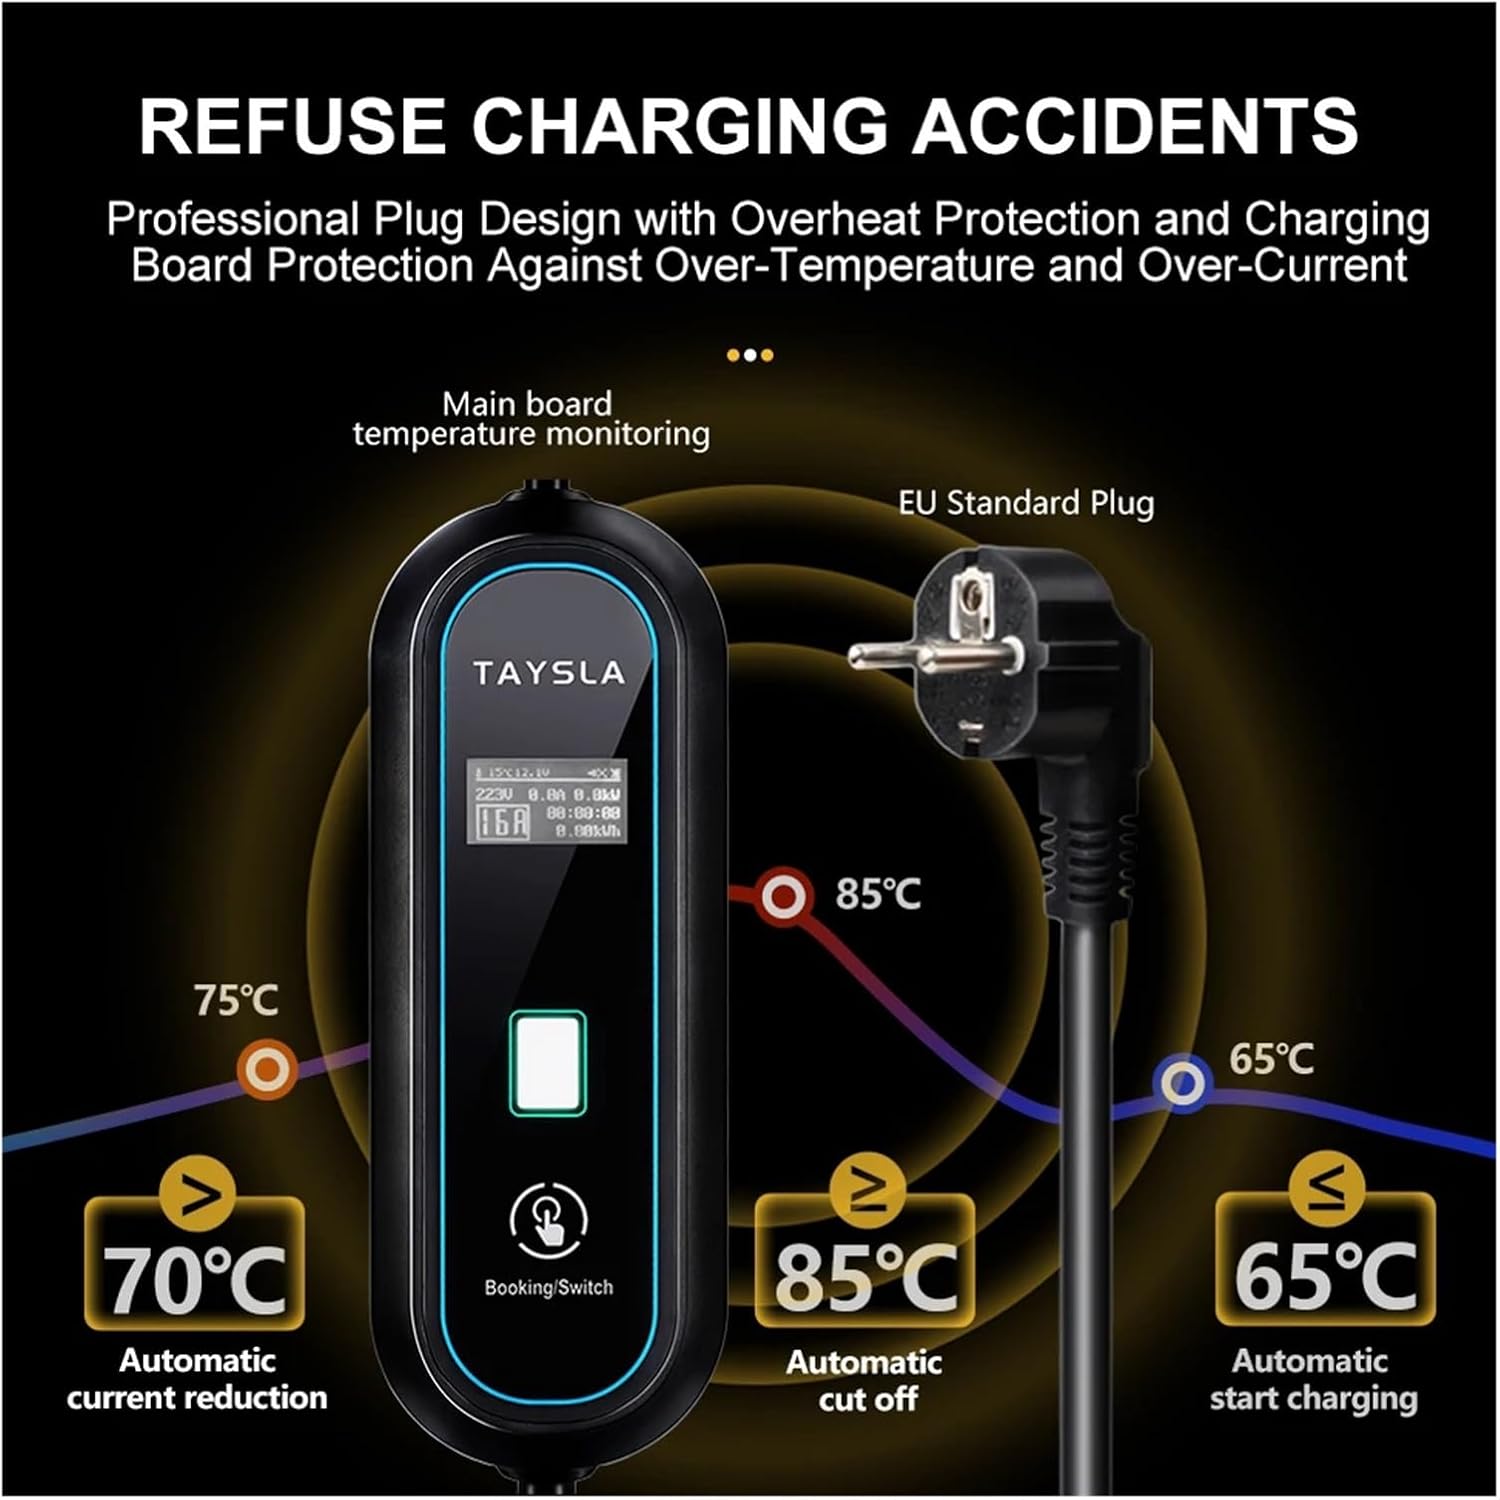
Image: A detailed view of the EU plug and the Type 1 EV charging connector, illustrating their design for proper connection.
5. Operating Instructions
Once the charger is connected to both the power outlet and your vehicle, the OLED screen on the control box will activate.
5.1. Starting a Charge
- The charger will automatically begin charging after a brief self-check.
- The OLED screen will display real-time charging data, including voltage (V), current (A), charging time, and transferred energy (kWh).
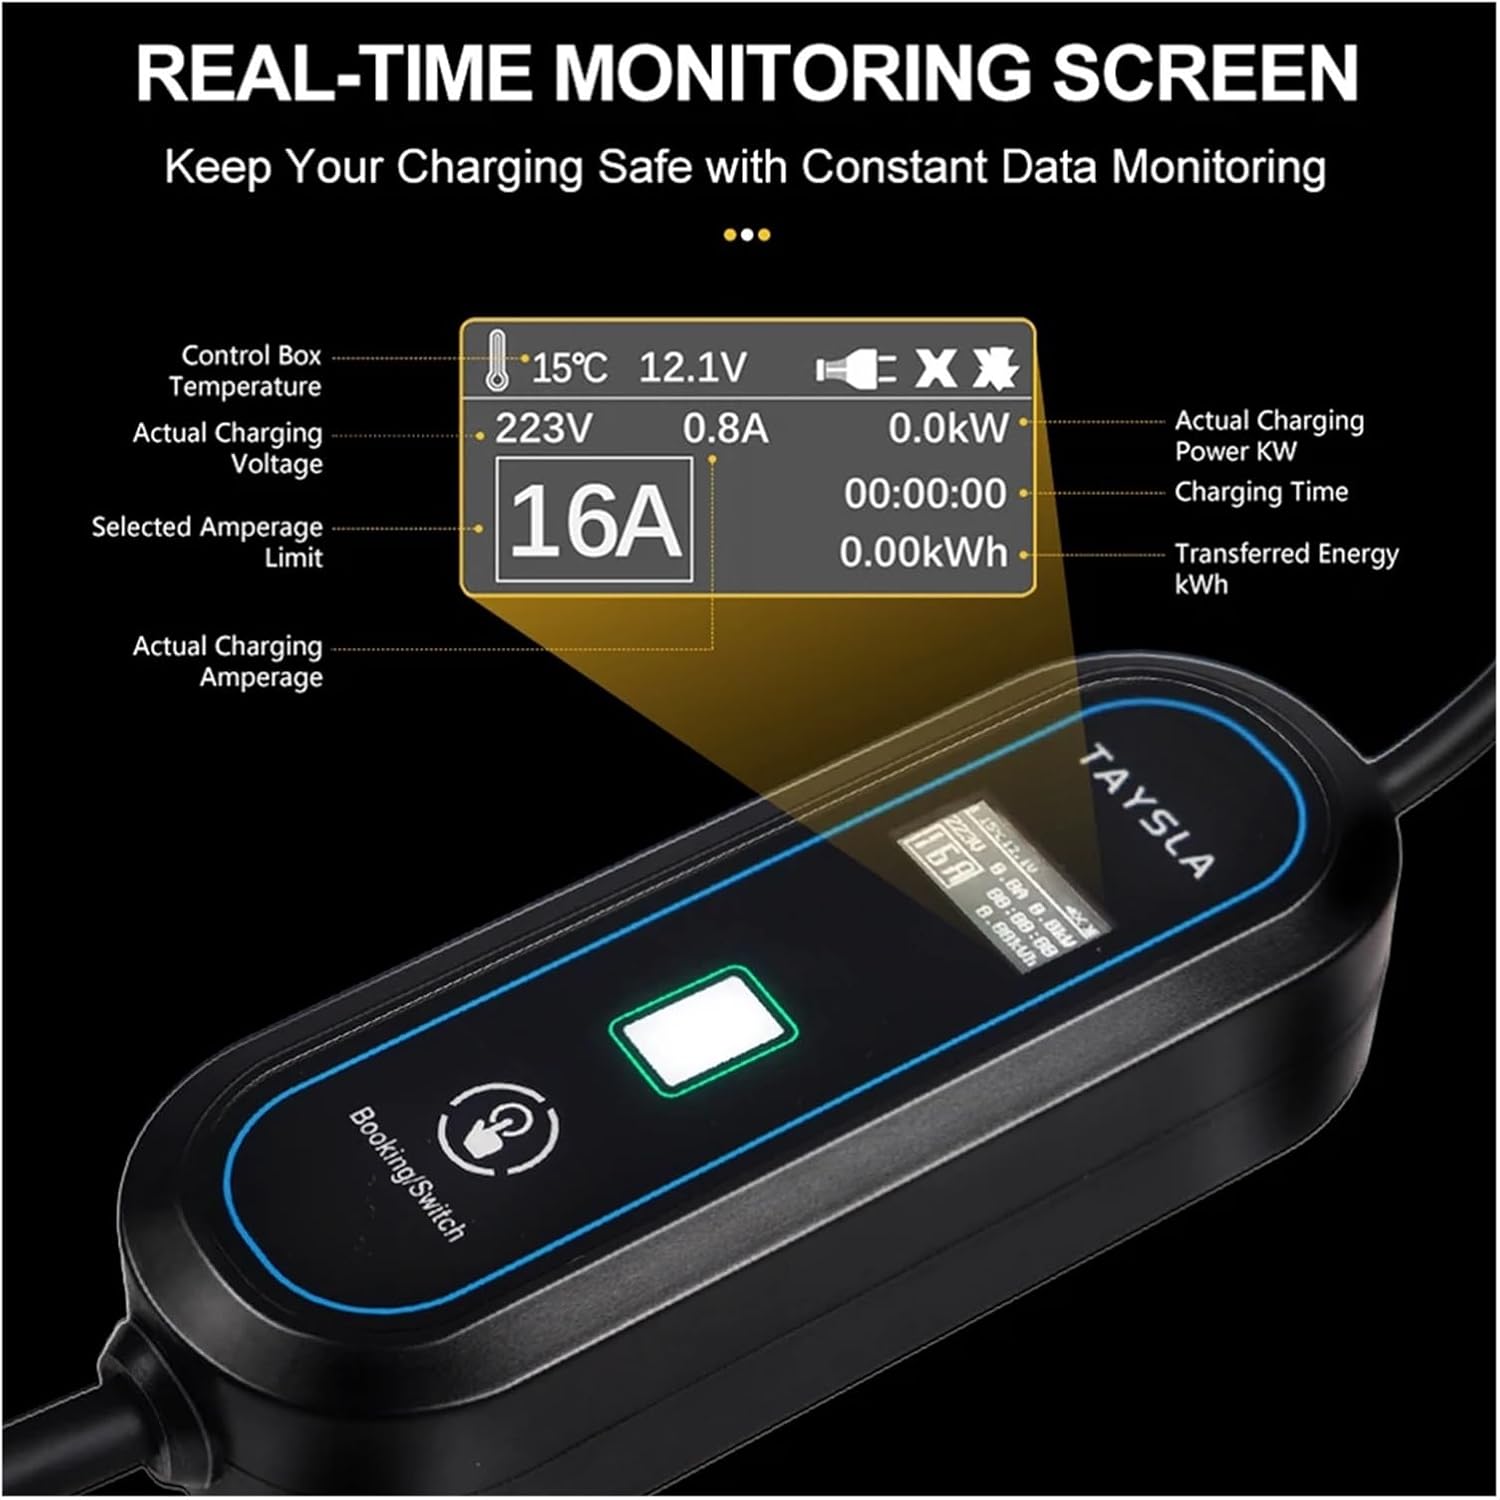
Image: The OLED screen provides real-time monitoring of charging parameters, including control box temperature, actual voltage, actual current, selected amperage limit, actual charging power, charging time, and transferred energy.
5.2. Adjusting Charging Current
The charger allows you to adjust the charging current to suit your needs, typically between 8A, 10A, 13A, and 16A.
- Press the 'Booking/Switch' button on the control box to cycle through available current settings.
- Select the desired amperage. The screen will update to reflect the new setting.
5.3. Delay Start / Scheduled Charging
To utilize off-peak electricity rates, you can schedule a delayed start for charging:
- After connecting the charger to the vehicle, press and hold the 'Booking/Switch' button.
- The display will show options for setting a delay time. Follow the on-screen prompts to set your desired charging start time.

Image: The control box allows for adjustable charging current (8A, 10A, 13A, 16A) and features a 'Booking/Switch' button for setting a delay start to optimize charging during low-cost electricity periods.
5.4. Stopping a Charge
- To stop charging, disconnect the Type 1 connector from your electric vehicle first.
- Then, unplug the charger from the electrical outlet.
6. Maintenance
Proper maintenance ensures the longevity and safe operation of your charger:
- Cleaning: Wipe the control box and cables with a soft, dry cloth. Do not use abrasive cleaners or solvents. Ensure the charger is unplugged before cleaning.
- Storage: When not in use, store the charger in a dry, cool place, away from direct sunlight and extreme temperatures. Coil the cable neatly to prevent kinks or damage.
- Inspection: Regularly inspect the cable and connectors for any signs of damage, corrosion, or loose connections.

Image: The complete MMTSEWW 3.5KW Type 1 Portable EV Charger, illustrating its components for proper handling and storage.
7. Troubleshooting
If you encounter issues with your charger, refer to the following common problems and solutions:
- Charger Not Activating:
- Ensure the EU plug is fully inserted into the power outlet.
- Verify the power outlet is functional.
- Check if the Type 1 connector is securely plugged into the vehicle's charging port.
- Charging Interrupted:
- Check the OLED screen for error messages or indicators.
- Ensure there are no loose connections at either end of the cable.
- The charger may automatically stop if it detects over-temperature (e.g., above 85°C) or other faults. Allow it to cool down or check for obstructions.
- Slow Charging:
- Verify the selected charging current setting on the control box. Adjust to a higher amperage if desired and supported by your vehicle and power supply.
- Ensure the vehicle's charging settings are not limiting the input current.
- No Display on OLED Screen:
- Confirm the charger is properly connected to a live power source.
- If the issue persists, contact customer support.
Image: A detailed view of the EU plug and the Type 1 EV charging connector, which should be checked for secure connection during troubleshooting.
8. Specifications
| Feature | Specification |
|---|---|
| Model | 3.5KW Type 1 |
| Input Voltage | 80V-260V |
| Maximum Current | 16A |
| Maximum Power | 3.5kW |
| Connector Type (Vehicle) | Type 1 |
| Plug Type (Wall) | EU Plug |
| Waterproof Rating | IP67 |
| Safety Features | B-type RCD, Overvoltage, Overcurrent, Short Circuit, Lightning, Over-temperature, Undervoltage, Electrostatic Protection |
| Display | OLED Screen |
| Item Weight | 1.76 ounces (Note: This value may be a placeholder and not reflect actual product weight.) |
| Package Dimensions | 0.39 x 0.39 x 0.39 inches (Note: This value may be a placeholder and not reflect actual product dimensions.) |
9. Warranty and Support
For warranty information, technical support, or service inquiries, please refer to the contact details provided with your purchase or visit the official MMTSEWW website. Keep your purchase receipt as proof of purchase for warranty claims.