1. Introduction
This manual provides instructions for the installation, operation, and maintenance of the Ubiquiti UniFi G6 PTZ Camera (UVC-G6-PTZ). Please read this manual thoroughly before using the device to ensure proper setup and functionality. The UniFi G6 PTZ is a high-performance surveillance camera designed for comprehensive area monitoring with advanced pan, tilt, and zoom capabilities.
2. Product Overview
The UniFi G6 PTZ Camera offers 4K resolution, 10x hybrid zoom, and advanced AI detections for people, vehicles, and animals. It features two-way audio, IR night vision up to 30 meters, and robust weatherproofing (IP66) and tamper resistance (IK04) for outdoor deployment.
Key Features:
- 4K Resolution: Captures detailed video at 3840 x 2160 (8MP).
- 10x Hybrid Zoom: Provides clear magnification for distant objects.
- Pan-Tilt Functionality: 350° pan and 100° tilt range for wide area coverage.
- Smart Detections: Identifies people, vehicles, and animals.
- IR Night Vision: Effective surveillance in low-light conditions up to 30 meters.
- Two-Way Audio: Enables communication through the camera.
- PoE+ Power: Simplifies installation with power and data over a single Ethernet cable.
Package Contents:
- UniFi G6 PTZ Camera (UVC-G6-PTZ)
- Mounting Screw(s)
- Quick Start Guide (refer to this manual for detailed instructions)
Camera Components:

Figure 2.1: Front View. This image shows the front of the UniFi G6 PTZ Camera, highlighting the main lens and IR illuminators.
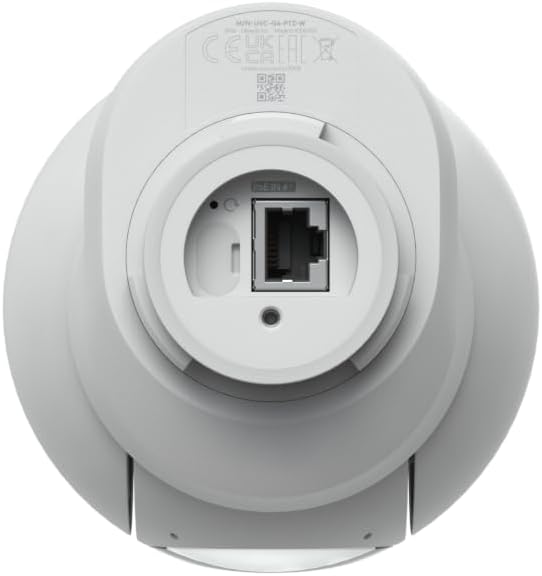
Figure 2.2: Bottom View. This image displays the bottom of the camera, featuring the Ethernet port for network and power connection, and the factory reset button.

Figure 2.3: MicroSD Card Slot. This image illustrates the front of the camera with the protective cover opened, revealing the microSD card slot for local storage.

Figure 2.4: Side View with Mounting Arm. This image shows the side profile of the camera, including the integrated arm mount for various installation options.
3. Setup and Installation
Proper installation is crucial for optimal performance. The UniFi G6 PTZ Camera supports various mounting options.
3.1 Site Selection
- Choose a location that provides the desired field of view and is within range of your network infrastructure.
- Ensure the mounting surface is strong enough to support the camera's weight (approx. 1.1 kg / 2.4 lb with arm mount).
- Consider environmental factors such as direct sunlight, which can affect image quality, and potential obstructions.
3.2 Mounting the Camera
The camera includes hardware for wall, surface, ceiling, and pole mounting. Optional mounts are available for corner, in-ceiling, pendant, and conduit adapter installations.
- Prepare the Mounting Surface: Depending on your chosen mounting method, drill pilot holes as necessary.
- Secure the Mount: Attach the camera's arm mount or an optional mount securely to the prepared surface using the provided mounting screws or appropriate hardware for your specific installation.
- Attach the Camera: Connect the camera body to the secured mount. Ensure it is firmly locked into place.
3.3 Power and Network Connection
The UniFi G6 PTZ Camera is powered via Power over Ethernet Plus (PoE+).
- Connect Ethernet Cable: Insert a standard Ethernet cable (Cat5e or higher) into the RJ45 port located at the bottom of the camera.
- Connect to PoE+ Switch: Connect the other end of the Ethernet cable to a PoE+ enabled switch or PoE+ injector.
- Verify Power: The camera will power on automatically. Observe the status LED (if present) for power indication.
3.4 Initial Configuration
The camera integrates with the UniFi Protect application suite.
- Install UniFi Protect: Ensure you have a UniFi Protect controller (e.g., UniFi Dream Machine Pro, Cloud Key Gen2 Plus) set up and running on your network.
- Adopt the Camera: Open the UniFi Protect application. The camera should appear as a discoverable device. Follow the on-screen prompts to adopt and configure the camera.
- Firmware Update: It is recommended to update the camera's firmware to the latest version after adoption for optimal performance and security.
4. Operating Instructions
Once installed and configured, the UniFi G6 PTZ Camera can be controlled and monitored via the UniFi Protect interface.
4.1 Pan, Tilt, and Zoom (PTZ) Control
Access the live view of the camera in UniFi Protect to control its movement.
- Pan: Drag the video feed horizontally or use the directional controls in the interface to rotate the camera 350° left or right.
- Tilt: Drag the video feed vertically or use the directional controls to adjust the camera's vertical angle up or down within its 100° range.
- Zoom: Use the zoom controls (e.g., slider or buttons) in the interface to adjust the 10x hybrid zoom.
- Presets: Configure and save specific PTZ positions as presets for quick navigation to frequently monitored areas.
- Patrol Mode: Set up automated patrol routes where the camera cycles through predefined presets.
4.2 Smart Detections
The camera's AI capabilities allow for intelligent event detection.
- Configuration: In UniFi Protect settings, enable and configure detection zones for people, vehicles, and animals.
- Alerts: Set up notifications for specific detection events to be alerted when activity occurs in monitored areas.
- Face Recognition & LPR: If enabled and configured, the camera can perform face recognition and license plate recognition.
4.3 Night Vision
The camera automatically switches to night mode in low-light conditions.
- IR Illuminators: Built-in IR LEDs provide illumination for clear black-and-white video up to 30 meters.
- IR Cut Filter: An automatic IR cut filter ensures accurate color representation during the day.
4.4 Two-Way Audio
The integrated microphone and speaker enable two-way communication.
- Live Audio: Listen to audio from the camera's location via the UniFi Protect live view.
- Speak: Use the microphone function in UniFi Protect to speak through the camera's speaker.
5. Maintenance
Regular maintenance helps ensure the longevity and optimal performance of your camera.
- Cleaning: Periodically clean the camera lens and housing with a soft, damp cloth. Avoid abrasive cleaners or solvents.
- Firmware Updates: Regularly check for and apply firmware updates through the UniFi Protect interface. Updates often include performance improvements, new features, and security patches.
- Physical Inspection: Inspect mounting hardware and cables periodically for any signs of wear, damage, or loosening.
- MicroSD Card: If using a microSD card for local storage, ensure it is functioning correctly and replace it if errors occur.
6. Troubleshooting
This section addresses common issues you might encounter with the UniFi G6 PTZ Camera.
6.1 Camera Not Powering On
- Check PoE+ Source: Ensure the Ethernet cable is connected to a functional PoE+ switch or injector. Verify the PoE+ port is active.
- Cable Integrity: Inspect the Ethernet cable for damage. Try a different cable.
- Power Cycle: Disconnect and reconnect the Ethernet cable from the PoE+ source to power cycle the camera.
6.2 Camera Not Appearing in UniFi Protect
- Network Connectivity: Verify the camera has a network connection. Check the link lights on the Ethernet port.
- UniFi Protect Controller: Ensure your UniFi Protect controller is running and accessible on the same network segment as the camera.
- Firewall: Check if any firewall rules are blocking communication between the camera and the UniFi Protect controller.
- Factory Reset: If the camera was previously adopted or configured, perform a factory reset by pressing and holding the reset button (located near the Ethernet port) for approximately 10 seconds until the LED flashes.
6.3 Poor Image Quality
- Clean Lens: Ensure the camera lens is clean and free from dust or smudges.
- Lighting Conditions: Evaluate ambient lighting. Excessive backlight or insufficient light can affect image quality.
- Focus Adjustment: While the camera has auto-focus, ensure it is properly focused, especially after zoom operations.
- Resolution Settings: Verify the camera's resolution settings in UniFi Protect are set to the desired level (e.g., 4K).
6.4 PTZ Controls Unresponsive
- Network Latency: High network latency can cause delays in PTZ commands. Check your network performance.
- Firmware: Ensure the camera has the latest firmware installed.
- Reboot Camera: Power cycle the camera to resolve temporary software glitches.
7. Specifications
| Feature | Detail |
|---|---|
| Model | UVC-G6-PTZ |
| Dimensions | 4.2 x 4.8 x 8 inches (106.7 x 121.9 x 203.2 mm) |
| Weight | 1.1 kg (2.4 lb) with arm mount |
| Enclosure Material | Aluminum alloy, polycarbonate |
| Mount Material | Arm mount: polycarbonate | Pole mount: aluminum alloy |
| Networking Interface | 10/100 MbE RJ45 port |
| Sensor | Wide: 1/1.8" 8MP | Tele: 1/1.8" 8MP |
| Lens | Wide: F 4.46 mm; ƒ/1.65 | Tele: F 16.3 mm; ƒ/2.4 |
| Resolution | 8MP 3840 × 2160 (16:9) |
| Max. Frame Rate | 30 FPS |
| Field of View | Wide: H 109.9°, V 56.7°, D 134.1° / Tele: H 26.6°, V 15.1°, D 30.4° |
| Pan-Tilt Range | Pan: 350° | Tilt: 100° |
| IR Night Vision | 30 m (98 ft) |
| Zoom Mode | 10× Hybrid |
| Audio | Two-way audio |
| Weatherproofing | IP66 |
| Tamper Resistance | IK04 |
| Power Method | PoE+ |
| Supported Voltage Range | 42.5—57 V DC |
| Max. Power Consumption | 24.5 W |
| Processor | Quad-core Arm Cortex-A53 based chip |
| Expansion Slot | MicroSD card |
| Button | Factory-reset |
8. Warranty and Support
For warranty information and technical support, please refer to the official Ubiquiti Networks website or contact their customer service. Keep your proof of purchase for warranty claims.
Online Resources:
- Ubiquiti Networks Official Website: www.ui.com
- UniFi Protect Documentation: Refer to the UniFi Protect application or Ubiquiti support pages for the latest software documentation and guides.