1. Introduction
The Sakerplus 360° 4 Channel Dash Cam System is designed to provide comprehensive video surveillance for your vehicle. This system records from four distinct angles—front, rear, left, and right—ensuring a complete view around your vehicle. Equipped with 1080P Full HD recording, infrared night vision, and a 64GB SD card for continuous loop recording, it serves as a reliable tool for capturing driving incidents and enhancing vehicle security.
Important Usage Notice: The Sakerplus dash cam does not support wireless connection, WiFi, or smartphone pairing. Video playback is only available via the SD card on a computer or compatible device. Please confirm this setup meets your needs before purchase.
2. What's in the Box
Please verify that all components are present upon opening the package:
- Sakerplus Dash Cam Unit with integrated front and cabin cameras
- Suction Cup Mount
- 64GB Memory Card (pre-installed or separate)
- Car Power Adapter (cigarette lighter type)
- Rear Camera with connecting cable

Image: Infographic showing the dash cam unit, 64GB memory card, car power adapter, and rear camera.
3. Product Features
- 1080P Four-Camera Coverage: Records simultaneously from front, rear, left, and right angles with adjustable 1080P lenses, minimizing blind spots and providing comprehensive evidence.
- 360° Total Protection: The system's design ensures wide-angle coverage around the entire vehicle, with specific angles for each camera to maximize surveillance.
- Continuous Recording with Plug-in Power: Designed for reliability, the dash cam connects directly to your vehicle’s power supply. It utilizes loop recording to ensure uninterrupted video storage on the included 64GB SD card.
- Infrared Night Vision: Equipped with infrared sensors for clear cabin recordings in dark environments, and exterior lenses that capture sharp footage at night.
- HDR Function: High Dynamic Range technology enhances image quality, providing clearer recordings in varying light conditions, from dark shadows to bright highlights.
- Impact Detection and File Protection (G-Sensor): A built-in G-sensor automatically detects collisions or sudden impacts. Important recordings are locked and stored in a protected folder to prevent overwriting.
- 24 Hour Parking Surveillance: When activated, the parking monitor uses its high-sensitivity G-sensor to detect motion or impacts and automatically record, providing security even when the vehicle is parked.
- Versatile for Personal and Commercial Use: Suitable for family cars, taxis, fleet vehicles, and professional drivers, offering reliable all-around monitoring.

Image: Simultaneous views from front, rear, left, and right cameras.

Image: Diagram showing 360-degree camera coverage angles.

Image: Illustration of Super Night Vision capability.

Image: Comparison of video quality with and without HDR.

Image: Illustration of 24-hour parking surveillance with motion detection and emergency lock.
4. Setup and Installation
Follow these steps to properly install your Sakerplus Dash Cam System:
- Fix the Dashcam: Securely attach the main dashcam unit to your vehicle's windshield using the provided suction cup mount. Position it to ensure a clear view for the front camera and easy access to controls.
- Connect Power Cable: Connect the power cable to the device.
- Route Power Cable: Carefully route the power cable along the junction between the ceiling and the glass, then downward along the trim line of your vehicle's interior.
- Continue Routing: Route the power cable through the door gap to the bottom of the storage box or glove compartment area.
- Insert Power Plug: Insert the power plug into your vehicle's cigarette lighter socket.
- Install Rear Camera: Install the rear camera in a suitable location, typically on the rear windshield, ensuring it has a clear view. Connect its cable to the main dashcam unit.

Image: Visual guide for dash cam installation steps.
5. Operation
This section outlines basic operations for your dash cam:
- Time Setting:
- Press the OK button to pause recording.
- Press the 'M' button twice.
- Navigate to 'Time Setting'.
- Press the OK button to save the device settings.
- Video Playback:
- Press the OK button to pause recording.
- Press the 'M' button once.
- Press OK to take a photo (if desired).
- Press the 'M' button to play/pause the video.
- Memory Formatting:
- Press the OK button to pause recording.
- Press the 'M' button once.
- Navigate to 'Format'.
- Press the OK button to confirm formatting.
- Loop Recording Setup:
- Press the OK button to pause recording.
- Press the 'M' button to enter the menu.
- Navigate to 'Loop video'.
- Press the OK button to confirm the time setting for loop recording segments.
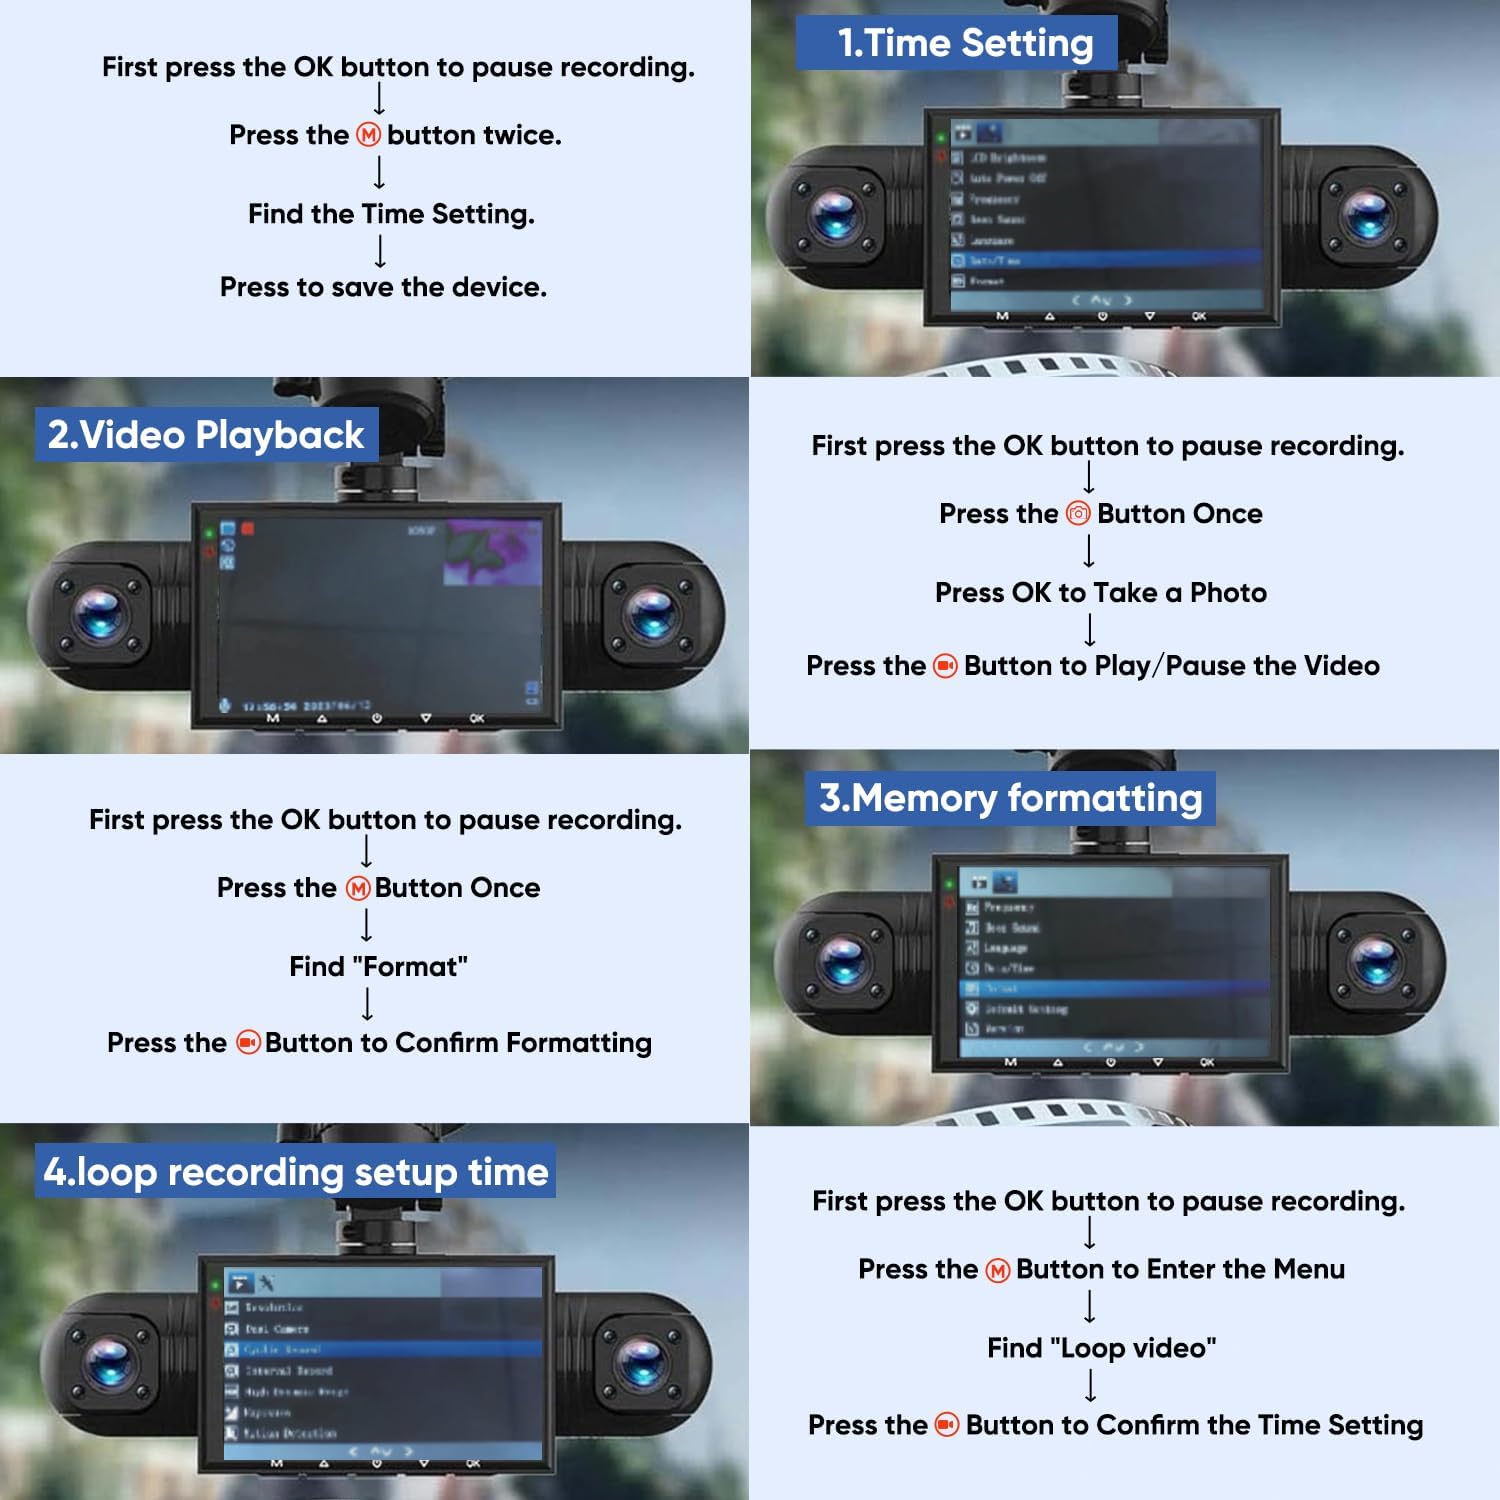
Image: Dash cam screen showing menu options for time setting, video playback, memory formatting, and loop recording setup.
6. Specifications
| Feature | Specification |
|---|---|
| Product Dimensions | 4.8 x 7.95 x 7.2 inches |
| Item Model Number | 64G |
| Connectivity Technology | HDMI (for output) |
| Special Features | Built-In Microphone, G-Sensor, Loop Recording, Infrared Night Vision, HDR |
| Video Capture Resolution | 1080p |
| Mounting Type | Windshield Mount |
| Field Of View | 170 Degrees (Front Camera) |
| Optical Sensor Technology | CMOS |
| Included Components | Dash Cam Unit, 64GB SD Card, Car Power Adapter, Rear Camera |
7. Troubleshooting
If you encounter issues with your dash cam, please refer to the following common solutions:
- Device Not Powering On:
- Ensure the car power adapter is securely plugged into both the dash cam and the vehicle's cigarette lighter socket.
- Verify that the vehicle's cigarette lighter socket is receiving power (check vehicle's fuse box if necessary).
- Remember the device requires continuous plug-in power and does not operate on an internal battery when the car is off.
- Unable to Access Menu/Set Clock/Format SD Card:
- Ensure recording is paused by pressing the OK button before attempting to navigate menus.
- Refer to Section 5 (Operation) for detailed steps on menu navigation and specific functions like time setting and formatting.
- If the SD card repeatedly requests formatting or fails to format, try using a different high-quality Class 10 or U3 microSD card.
- Poor Video Quality/Night Vision:
- Ensure all camera lenses are clean and free from dirt, dust, or smudges.
- Verify that the protective film has been removed from all lenses.
- For night vision, ensure the cabin is not excessively bright, which can interfere with infrared performance.
- Loop Recording Not Working:
- Ensure the SD card is formatted correctly (refer to Section 5).
- Check the loop recording settings in the menu to ensure it is enabled and set to your desired segment length.
- If the SD card is full of locked files (from G-sensor events), these will not be overwritten. Periodically review and delete unnecessary locked files or format the card.
8. Maintenance
Proper maintenance ensures the longevity and optimal performance of your dash cam:
- Cleaning Lenses: Regularly clean the camera lenses with a soft, lint-free cloth to ensure clear video recordings. Avoid abrasive materials that could scratch the lenses.
- SD Card Care: Format the SD card regularly (e.g., once a month) to maintain its performance and prevent data corruption. Always use a high-quality Class 10 or U3 microSD card.
- Device Placement: Ensure the dash cam is securely mounted and not exposed to extreme temperatures for prolonged periods, which can affect its electronic components.
- Cable Management: Periodically check power and camera cables for any signs of wear or damage. Ensure they are not interfering with vehicle operation.
9. Warranty and Support
For warranty information, please refer to the documentation included with your purchase or contact the retailer. For technical support or further assistance, please reach out to Sakerplus customer service through the contact information provided on their official website or product packaging.