CyclingDeal CD-KT12
CyclingDeal Floor to Ceiling 2-Bike Storage Stand Instruction Manual
Model: CD-KT12
Brand: CyclingDeal
1. Product Overview
The CyclingDeal Floor to Ceiling 2-Bike Storage Stand is an adjustable aluminum rack designed to securely store up to two bicycles indoors. This stand utilizes a tension-mounted pole system, extending from floor to ceiling, to maximize space efficiency in garages, apartments, or other living areas. It features a patented locking mechanism for stability and EVA-coated hooks to protect bicycle frames.

Image 1.1: The CyclingDeal Floor to Ceiling 2-Bike Storage Stand, fully assembled.
2. Safety Information
- Weight Capacity: This stand is designed to hold a maximum total weight of 40 kg (88 lbs), with a maximum of 20 kg (44 lbs) per bicycle. Do not exceed these limits.
- E-Bike Compatibility: This stand is not compatible with heavy e-bikes due to weight limitations.
- Secure Installation: Ensure the stand is securely tensioned between the floor and ceiling before hanging any bicycles. Improper installation can lead to instability and potential damage or injury.
- Surface Protection: The rubber-covered foot and top are designed to protect surfaces. However, regularly check for any signs of wear or slippage.
- Optional Mounting: For enhanced stability, consider using the optional floor and ceiling mounting holes. Mounting bolts are not included and must be appropriate for your specific floor and ceiling materials.
- Children and Pets: Keep children and pets away from the stand, especially during installation and when bikes are being placed or removed.
3. Package Contents
Verify that all components are present before beginning assembly:
- Main Adjustable Pole Assembly (includes upper and lower sections)
- 2 x Bike Cradles (with EVA-coated hooks)
- Pre-installed Knobs for Height Adjustment
- Pre-installed Mounting Brackets for Cradles
- Rubber-covered Top Cap
- Rubber-covered Base with Locking Mechanism
4. Setup and Assembly
Assembly of the CyclingDeal bike stand is designed to be straightforward. A second person may be helpful for initial alignment and securing.
4.1. Determine Installation Location
Choose a location with a stable floor and ceiling. Ensure the ceiling height is within the stand's adjustable range of 1.5m (5 ft) to 3.3m (10 ft 10 inches).

Image 4.1: Illustration of the adjustable height range (5 ft to 10 ft 10 inches).
4.2. Assemble the Main Pole
- Unpack all components and identify the upper and lower pole sections.
- Connect the upper pole section to the lower pole section. Ensure they are securely joined.
- Attach the rubber-covered top cap to the top of the upper pole.
- Ensure the rubber-covered base with the locking mechanism is securely attached to the bottom of the lower pole.

Image 4.2: Close-up of the protective rubber foot and top cap.
4.3. Position and Secure the Pole
- Place the assembled pole in the desired location, ensuring the top cap is against the ceiling and the base is on the floor.
- Loosen the pre-installed knobs on the pole to allow for height adjustment.
- Extend the upper pole section until it makes contact with the ceiling. Tighten the knobs to hold this initial height.
- At the base of the pole, locate the "Easy to Use" locking mechanism (a lever). Rotate this lever to apply tension, extending the pole further until it is firmly secured between the floor and ceiling. Ensure the pole is vertical and stable.

Image 4.3: Detail of the patented locking mechanism for tensioning the pole.

Image 4.4: Demonstrating the adjustment of the base locking mechanism.
4.4. Install Bike Cradles
- The stand includes 2 bike cradles and 3 pre-installed mounting brackets. Choose the appropriate brackets for your desired bike positions.
- Attach each bike cradle to a mounting bracket using the provided hardware. Ensure the EVA-coated hooks are facing outwards.
- Adjust the angle and height of each cradle to accommodate your bicycles. Tighten the knobs on the mounting brackets to secure the cradles in place.
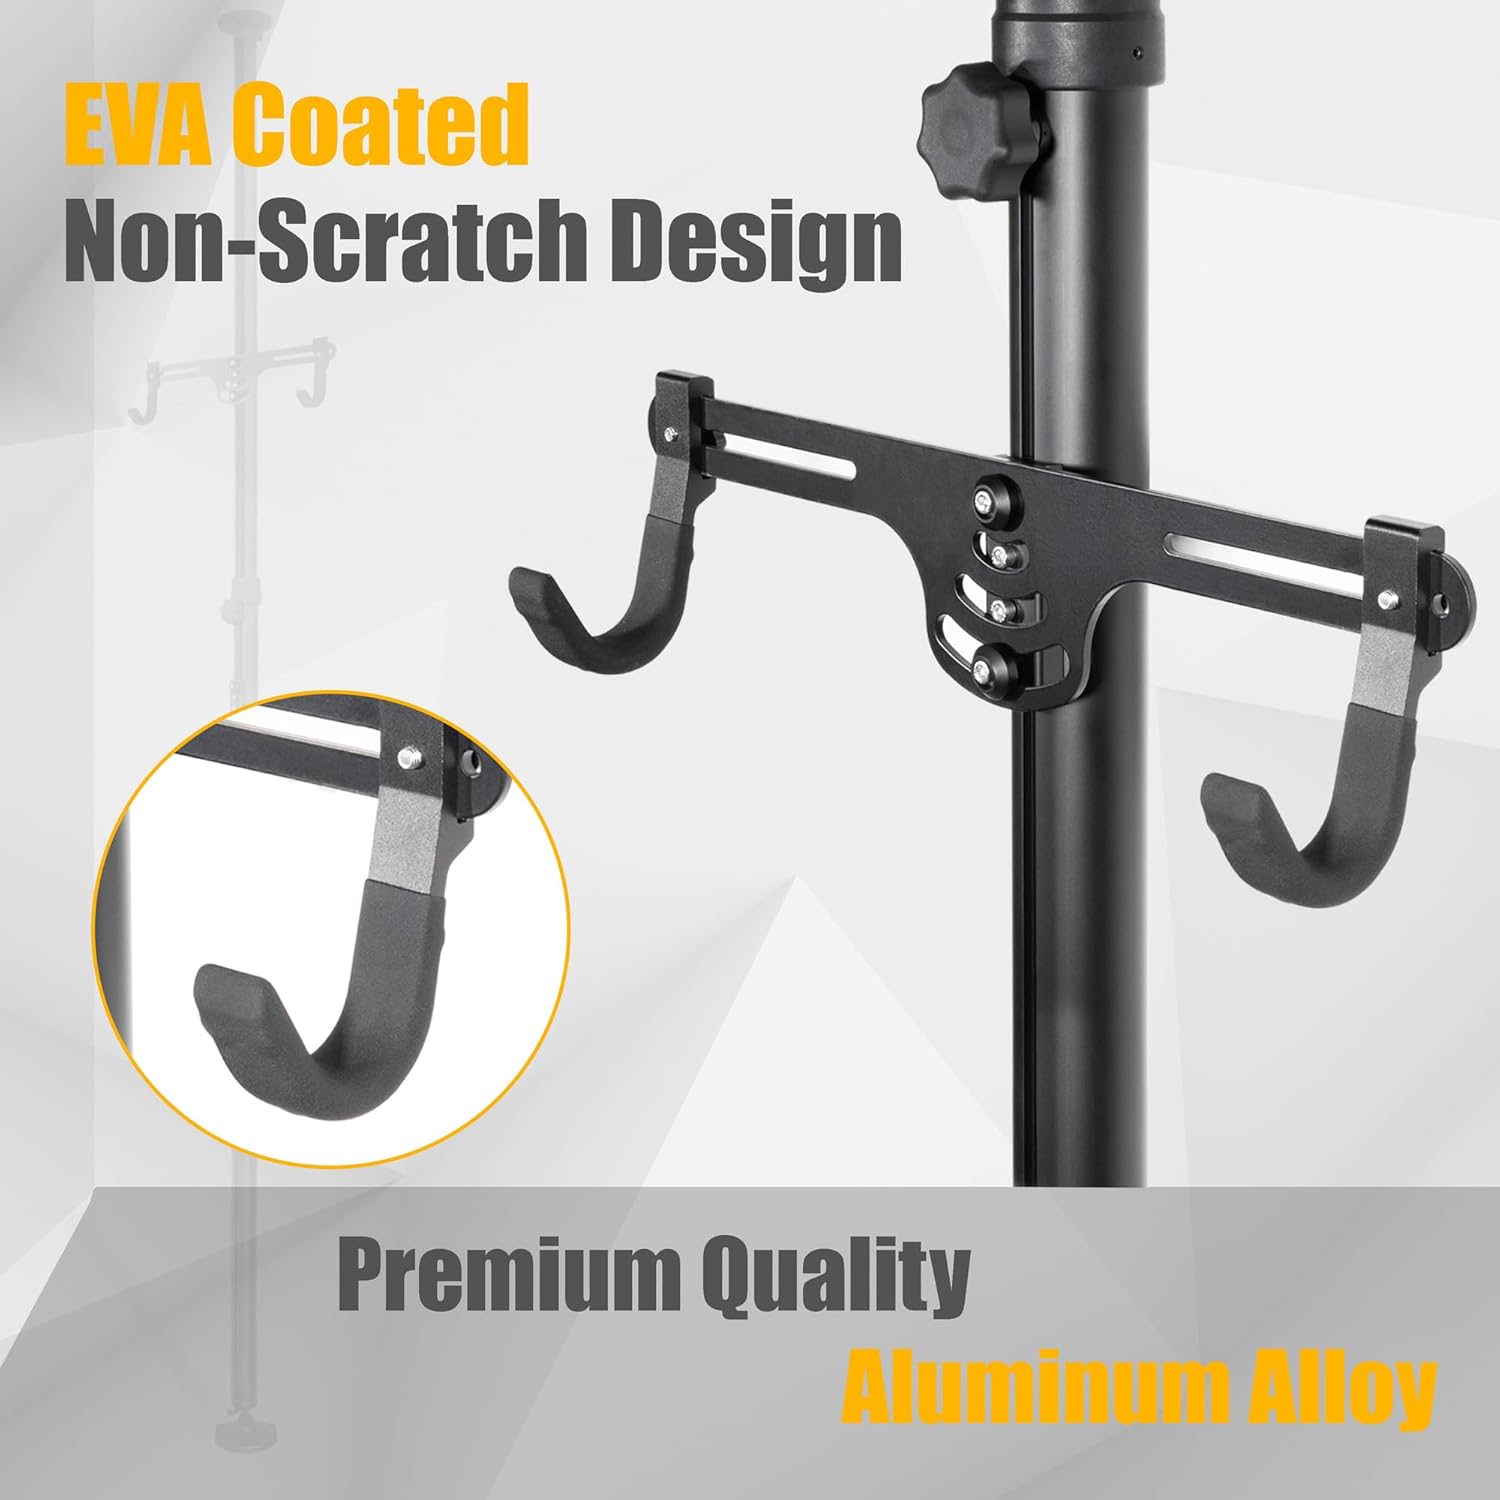
Image 4.5: Detail of the EVA-coated hooks designed to prevent scratches.
4.5. Optional Permanent Mounting
For maximum security, the base and top cap include holes for permanent mounting to the floor and ceiling. Mounting bolts are not supplied. Consult a professional if unsure about appropriate hardware for your surfaces.
5. Operating Instructions
5.1. Placing Bicycles on the Stand
- Ensure the stand is stable and securely tensioned.
- Carefully lift your bicycle and position its top tube onto the EVA-coated hooks of a bike cradle.
- Adjust the cradle's position if necessary to ensure the bike is balanced and not touching the main pole or other parts of the stand. The EVA coating helps prevent scratches.
- Repeat for the second bicycle, ensuring the total weight does not exceed 40 kg (88 lbs).

Image 5.1: The stand holding two bicycles, demonstrating its capacity.

Image 5.2: An alternative perspective of two bikes mounted on the stand.
5.2. Removing Bicycles
Carefully lift each bicycle off the hooks, ensuring not to dislodge the stand or other bikes.
6. Maintenance
- Regular Inspection: Periodically check all connections, knobs, and the tensioning mechanism to ensure they remain tight and secure.
- Cleanliness: Wipe down the aluminum pole and plastic components with a damp cloth as needed. Avoid abrasive cleaners.
- Hook Condition: Inspect the EVA coating on the hooks for wear or damage. Replace cradles if the coating is compromised to prevent bike frame scratches.
- Rubber Pads: Check the rubber foot and top cap for signs of deterioration or slippage. Ensure they maintain good contact with the floor and ceiling.
7. Troubleshooting
| Issue | Possible Cause | Solution |
|---|---|---|
| Stand feels wobbly or unstable. | Insufficient tension; uneven floor/ceiling; loose connections. | Ensure the base locking mechanism is fully engaged and applying maximum tension. Check that all adjustment knobs are tightened. Verify the floor and ceiling surfaces are flat and stable. Consider optional permanent mounting. |
| Bikes are touching the main pole. | Cradle position is too close to the pole; bike frame shape. | Adjust the angle and position of the bike cradles on their mounting brackets to provide adequate clearance. Ensure bikes are centered on the hooks. |
| Stand is slipping on floor/ceiling. | Insufficient tension; dirty rubber pads; unsuitable surface. | Increase tension using the base locking mechanism. Clean the rubber pads and the contact surfaces on the floor and ceiling. Ensure surfaces are dry. If slipping persists, consider permanent mounting. |
| Cannot extend pole to desired height. | Knobs are too tight; obstruction. | Loosen the height adjustment knobs completely. Check for any internal obstructions. Ensure your ceiling height is within the product's specified range (1.5m to 3.3m). |
8. Specifications
- Model: CD-KT12
- Material: Aluminum Alloy
- Adjustable Height: 1.5m (5 ft) to 3.3m (10 ft 10 inches)
- Bike Capacity: 2 Bicycles
- Maximum Total Weight Capacity: 40 kg (88 lbs)
- Maximum Weight Per Bike: 20 kg (44 lbs)
- Package Dimensions (L x W x H): 57.63 x 5.25 x 5.13 inches
- Package Weight: 5.83 kg (12.85 lbs)
9. Warranty and Support
CyclingDeal offers a lifetime warranty for this product. For warranty claims, technical support, or any inquiries, please refer to the contact information provided with your purchase or visit the official CyclingDeal website.
Ask a question about this manual
Ask about setup, troubleshooting, compatibility, parts, safety, or missing instructions. Manuals+ will review the question and use this page’s manual context to help answer it.