1. Introduction
This manual provides detailed instructions for the installation, operation, and maintenance of the MVIVDUY EKTM-20A Digital Programmable Timer Switch. Please read this manual thoroughly before use to ensure correct operation and to prevent damage.
2. Safety Information
WARNING: Risk of electric shock. Installation and servicing should only be performed by qualified personnel.
- Ensure power is disconnected before installation or maintenance.
- Do not exceed the specified voltage and current ratings (AC 220V-230V, 20A).
- Install the device in a dry, well-ventilated area, away from direct sunlight and extreme temperatures.
- Verify all connections are secure before applying power.
3. Product Overview
The MVIVDUY EKTM-20A is a modular, 7-day programmable digital timer switch designed for controlling electrical circuits. It features a clear LCD display and intuitive buttons for setting schedules.
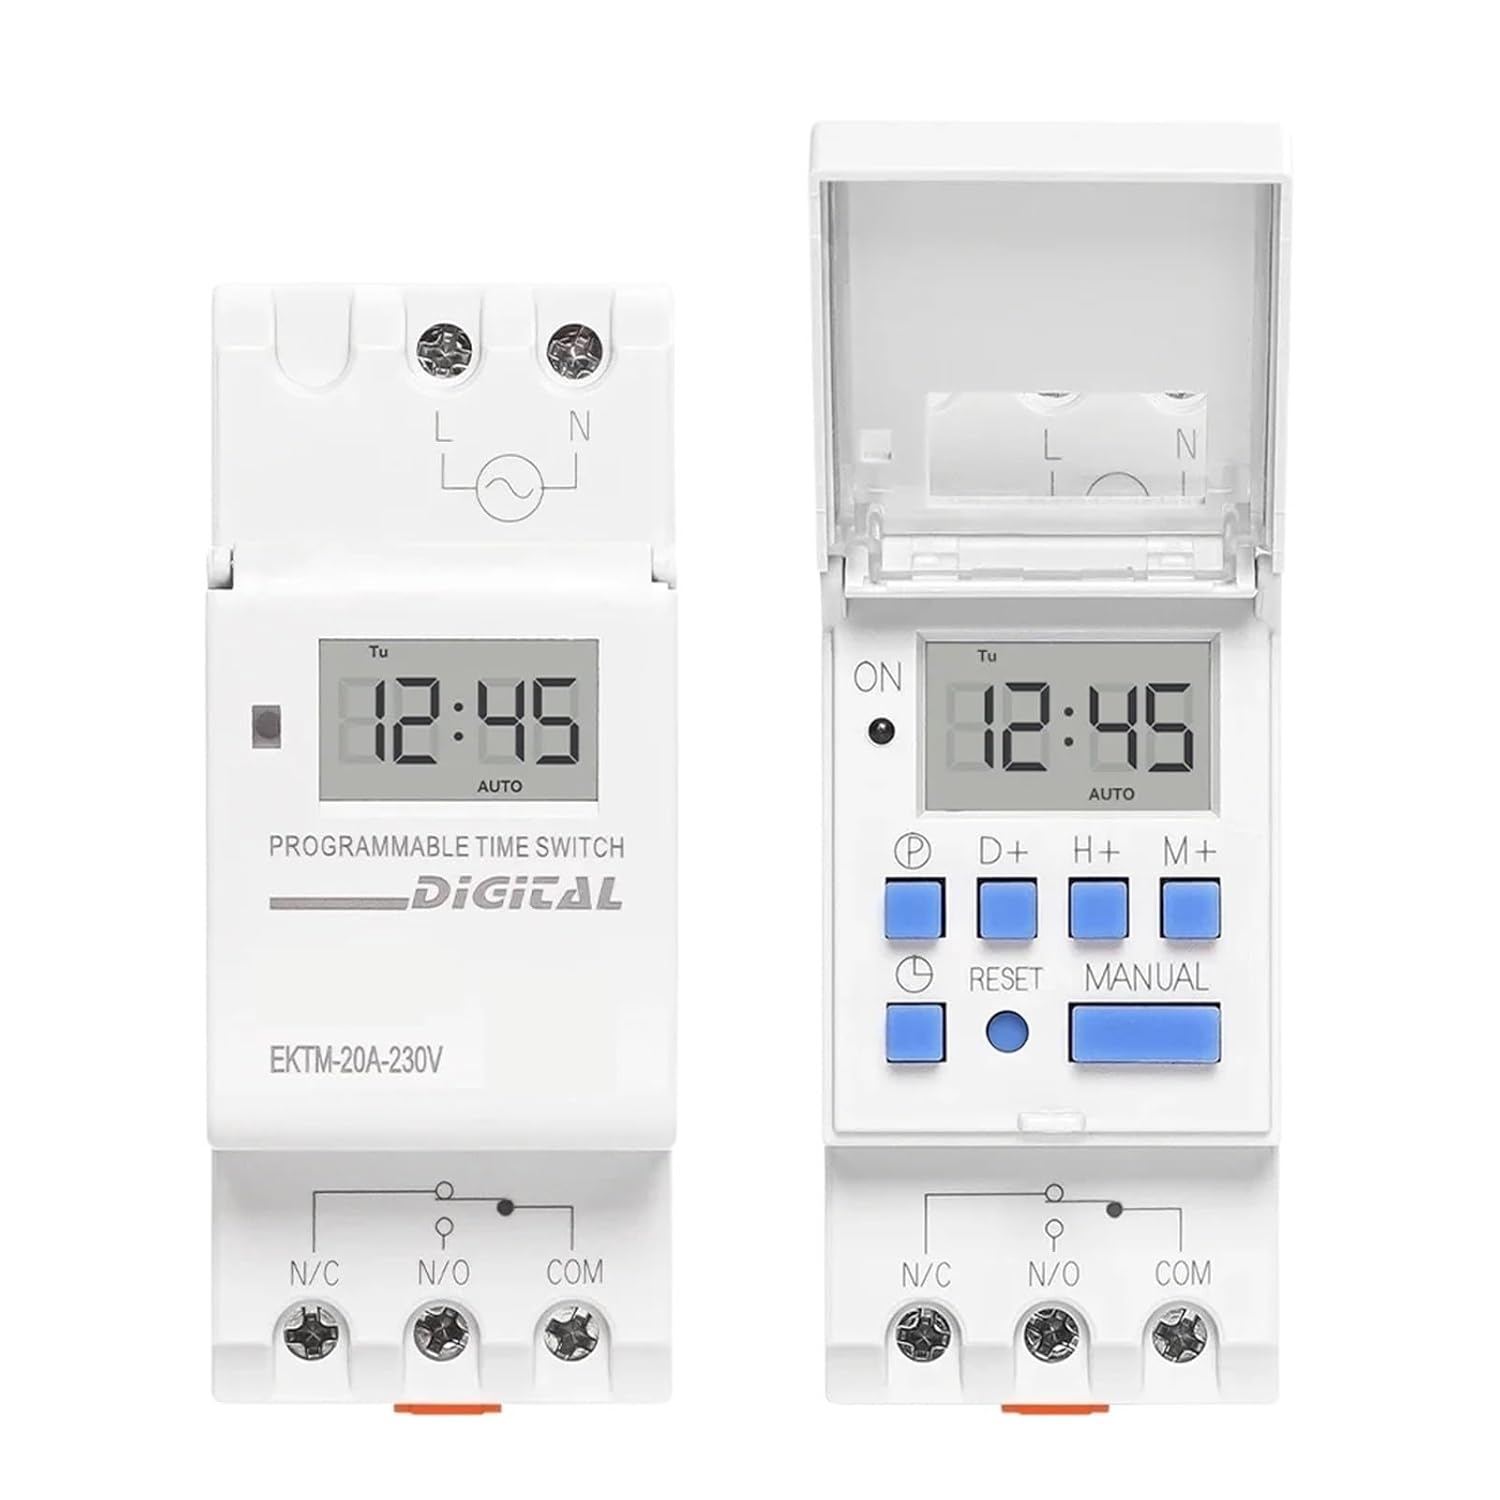
Image 3.1: Front view of the EKTM-20A timer switch, showing the LCD display, control buttons, and terminal connections. The left unit is closed, and the right unit shows the protective cover open, revealing the programming buttons.
Key Features:
- 7-day programmable schedule.
- Digital display for precise time setting.
- Modular design for DIN rail mounting.
- High current capacity (20A).
- Manual override function.
4. Setup and Installation
4.1 DIN Rail Mounting
The EKTM-20A is designed for easy installation on a standard 35mm DIN rail.

Image 4.1: Side view of the EKTM-20A timer switch showing its compatibility with a standard DIN rail. The orange clip at the bottom secures the device to the rail.
- Locate a suitable position on your DIN rail.
- Align the timer switch with the DIN rail.
- Press the orange clip at the bottom of the timer switch and push the device onto the rail until it clicks into place.
- Ensure the timer switch is securely fastened.
4.2 Wiring Diagram
Refer to the diagram below for correct wiring connections. Ensure all power is off before wiring.

Image 4.2: Detailed wiring diagram for the EKTM-20A timer switch. It illustrates the connections for Line (L), Neutral (N), Normally Open (N/O), Normally Closed (N/C), and Common (COM) terminals. The diagram shows how to connect the power supply and the load.
- L (Line): Connect to the live wire of the AC 220V-230V power supply.
- N (Neutral): Connect to the neutral wire of the AC 220V-230V power supply.
- N/C (Normally Closed): Output terminal, closed when the timer is off.
- N/O (Normally Open): Output terminal, open when the timer is off.
- COM (Common): Connect to the live wire of the load.
Note: The timer switch acts as a relay. The load's power supply should be connected through the COM and N/O (or N/C) terminals.
5. Operating Instructions
5.1 Initial Power-Up and Time Setting
- After connecting power, the LCD display will illuminate.
- Press the CLOCK button (often labeled with a clock icon) to enter time setting mode.
- Use the D+ (Day), H+ (Hour), and M+ (Minute) buttons to set the current day, hour, and minute.
- Press CLOCK again to save and exit.
5.2 Programming ON/OFF Schedules
The timer allows for multiple ON/OFF programs over a 7-day cycle.
- Press the P (Program) button to enter programming mode. The display will show "1 ON".
- Use D+, H+, M+ to set the desired ON time for the first program.
- Press P again. The display will show "1 OFF".
- Use D+, H+, M+ to set the desired OFF time for the first program.
- Repeat steps 1-4 for additional programs (e.g., "2 ON", "2 OFF", etc.).
- After setting all desired programs, press the CLOCK button to exit programming mode and return to the current time display.
5.3 Manual Override
The MANUAL button allows you to temporarily override the programmed schedule.
- Press MANUAL once: Switches from AUTO to ON (output is continuously ON).
- Press MANUAL again: Switches from ON to OFF (output is continuously OFF).
- Press MANUAL a third time: Switches from OFF to AUTO (timer resumes programmed schedule).
5.4 Reset Function
To clear all settings and return the timer to its factory default state, press the RESET button (usually a small recessed button requiring a pointed object).
6. Maintenance
- Keep the device clean and free from dust. Use a soft, dry cloth for cleaning.
- Do not use abrasive cleaners or solvents.
- Periodically check wiring connections for tightness.
- The internal battery (if present) is typically non-replaceable by the user and is designed for long-term retention of settings during power outages.
7. Troubleshooting
| Problem | Possible Cause | Solution |
|---|---|---|
| Display is blank. | No power supply. | Check power connections (L and N). Ensure circuit breaker is on. |
| Load does not turn ON/OFF as programmed. | Incorrect programming; Manual override active; Wiring error. | Review program settings. Check if MANUAL mode is set to AUTO. Verify load wiring (COM, N/O). |
| Time is incorrect. | Time not set correctly; Power interruption. | Reset and set the current time. The internal battery should maintain time during short power outages. |
8. Specifications
| Feature | Detail |
|---|---|
| Model Number | EKTM-20A |
| Brand | MVIVDUY |
| Operating Voltage | AC 220V-230V |
| Current Rating | 20A |
| Programmability | 7 Days (Weekly) |
| Mounting Type | DIN Rail |
| Product Dimensions | 0.39 x 0.39 x 0.39 inches (approx. 10 x 10 x 10 mm) |
| Item Weight | 1.76 ounces (approx. 50 grams) |