1. Introduction
Thank you for purchasing the VIFLYKOO Bluetooth 5.4 Turntable. This device combines classic vinyl playback with modern connectivity, featuring integrated stereo speakers, Bluetooth 5.4 for both receiving and transmitting audio, USB recording, and multiple audio outputs. This manual provides essential information for safe operation, setup, and maintenance of your turntable.

Image: The VIFLYKOO Bluetooth 5.4 Turntable, showcasing its mahogany finish and classic design.
2. Safety Instructions
Please read these safety instructions carefully before using the product and retain them for future reference. Incorrect use may result in electric shock, fire, or other hazards.
- Do not expose the unit to rain, moisture, or extreme temperatures.
- Ensure the power adapter is compatible with your local power supply.
- Do not open the casing; refer all servicing to qualified personnel.
- Keep the unit away from heat sources, direct sunlight, and strong magnetic fields.
- Clean only with a dry cloth. Do not use liquid cleaners or aerosols.
- Place the turntable on a stable, level surface to prevent vibrations and ensure proper playback.
3. Package Contents
Verify that all items are present in the package:
- VIFLYKOO Bluetooth 5.4 Turntable
- Power Adapter
- Instruction Manual
- 45 RPM Adapter (for 7-inch records)
4. Product Overview
Familiarize yourself with the main components and features of your turntable.
4.1 Key Features
- Bluetooth 5.4 Connectivity: Supports both receiving audio from external devices and transmitting audio to Bluetooth speakers or headphones.
- Integrated Stereo Speakers: Two 5W speakers provide clear and authentic sound directly from the unit.
- 3-Speed Turntable: Plays 33 1/3, 45, and 78 RPM records.
- USB Functionality: Allows recording vinyl to MP3/WAV files and playing digital audio from a USB drive.
- Multiple Audio Connections: RCA output for external amplifiers, 3.5mm AUX input for external audio sources, and a headphone output for private listening.
- Auto-Stop Function: Automatically lifts the tonearm at the end of a record to protect the stylus and vinyl.
- Removable Dust Cover: Protects the platter and stylus from dust accumulation.
- Anti-Resonance Belt Drive: Minimizes vibrations for improved sound quality.
4.2 Components
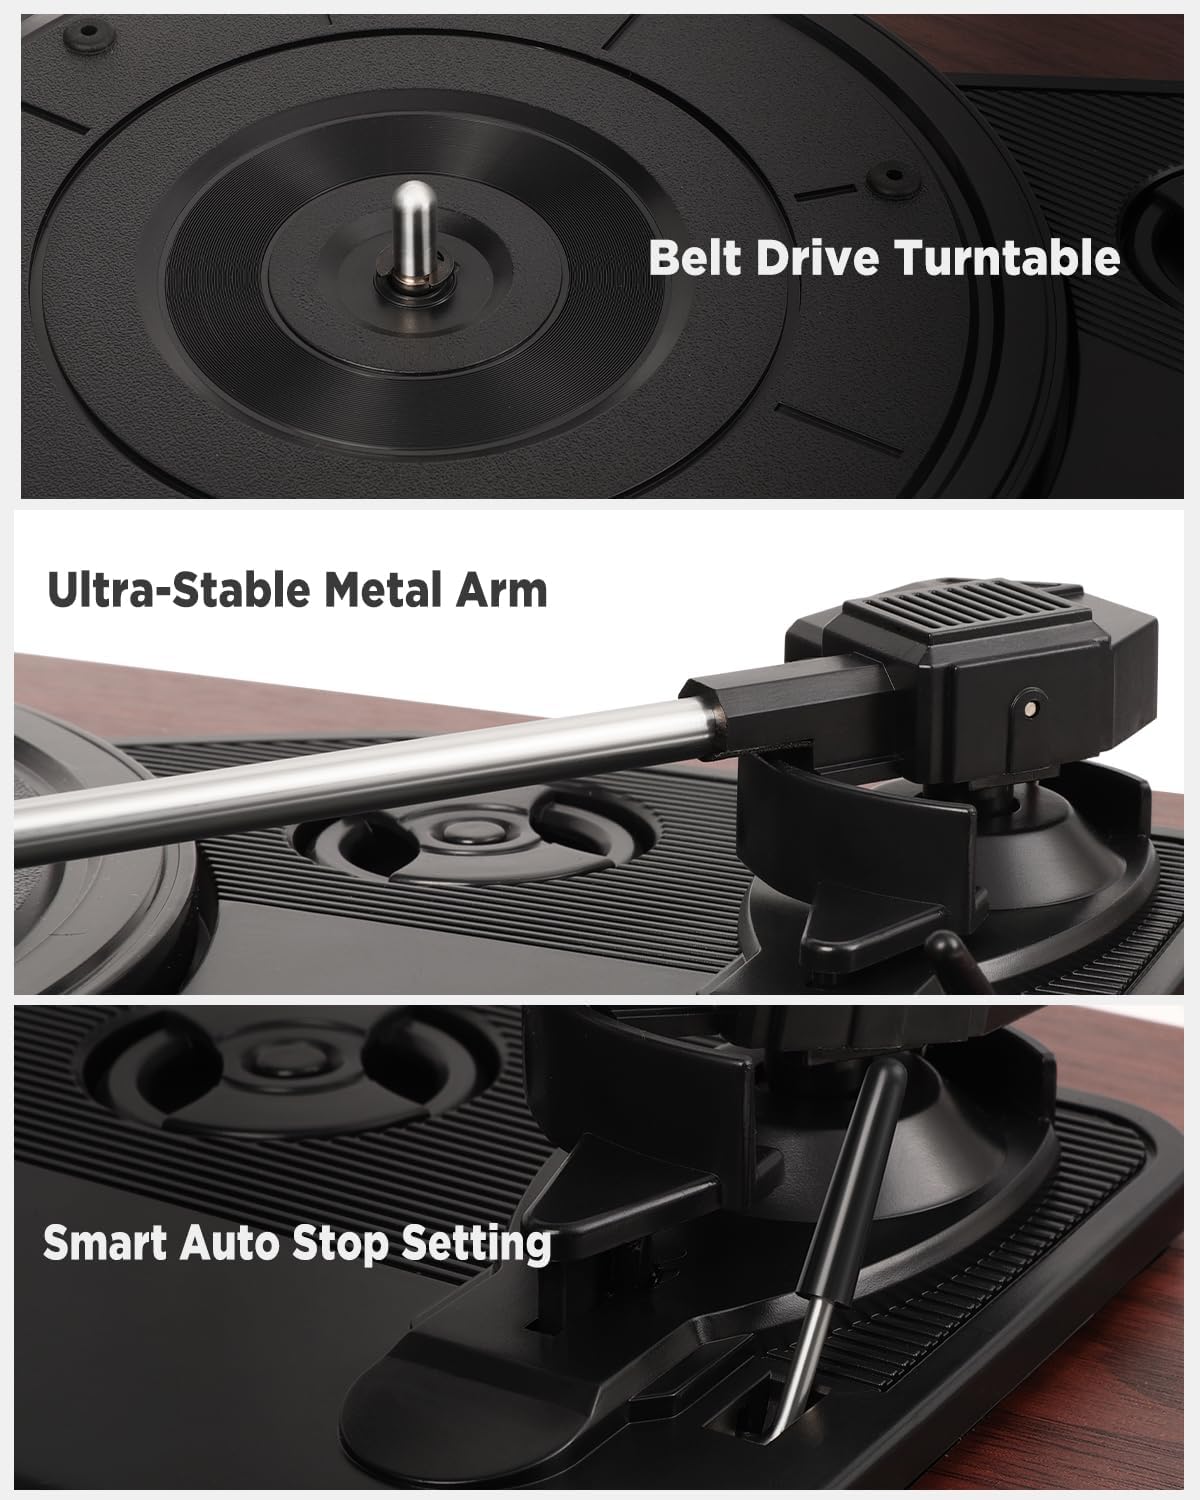
Image: Detailed views of the belt drive system, the ultra-stable metal tonearm, and the smart auto-stop setting.

Image: An exploded diagram illustrating the internal structure of the integrated stereo speakers, highlighting the HiFi sound components.

Image: The rear panel of the turntable, showing the RCA output, AUX-in port, USB port, and headphone port, along with their respective functions.
5. Setup
Follow these steps to set up your turntable for the first time.
- Unpack the Turntable: Carefully remove all components from the packaging.
- Position the Turntable: Place the unit on a flat, stable, and vibration-free surface. Ensure there is adequate ventilation around the unit.
- Install the Dust Cover: If not already installed, carefully attach the removable dust cover to the hinges at the back of the unit.
- Remove Stylus Protector: Gently remove the protective cap from the stylus (needle). Be careful not to touch the stylus itself.
- Connect Power: Insert the DC plug of the power adapter into the DC IN port on the back of the turntable, then plug the adapter into a wall outlet.
- Initial Power On: Turn the volume knob to power on the unit.
6. Operating Instructions
6.1 Playing Vinyl Records
- Open the dust cover.
- Place a vinyl record on the platter. If playing a 7-inch record, use the included 45 RPM adapter.
- Select the appropriate speed (33, 45, or 78 RPM) using the speed selector switch.
- Gently lift the tonearm using the cueing lever.
- Move the tonearm over the desired starting groove of the record.
- Slowly lower the tonearm using the cueing lever. The record will begin to play.
- Adjust the volume using the volume knob.
- At the end of the record, the auto-stop function will automatically lift the tonearm and stop the platter rotation. Manually return the tonearm to its rest.
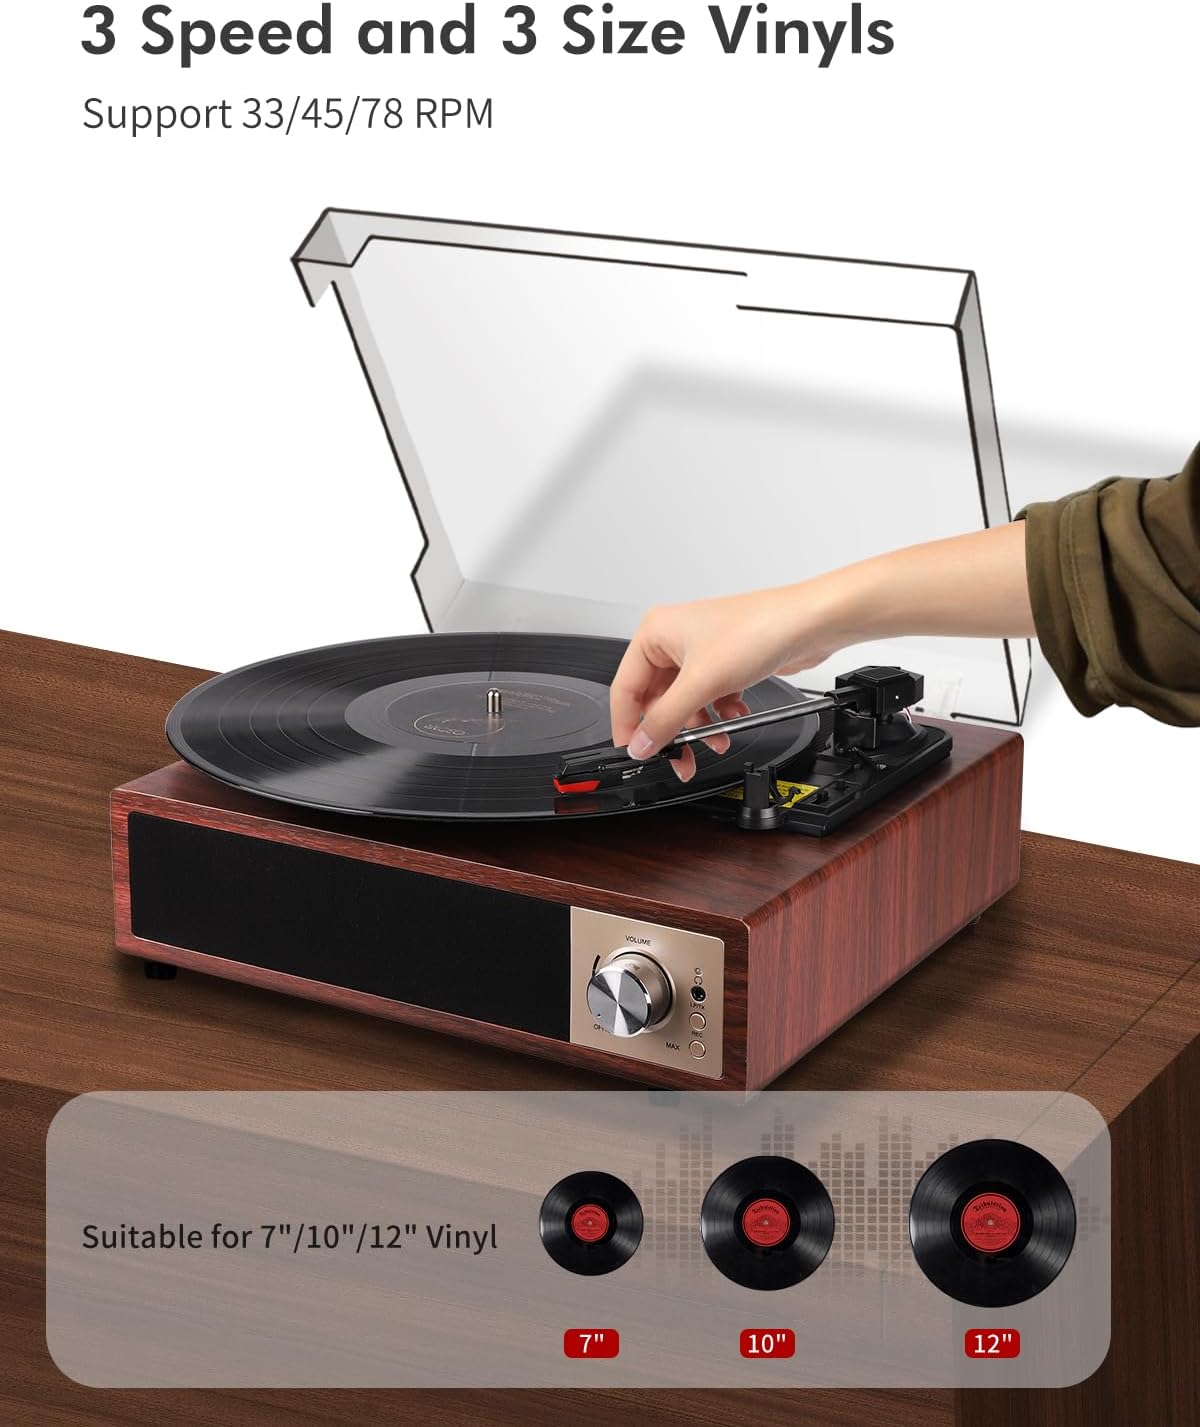
Image: A hand placing a record on the turntable, with visual representations of 7-inch, 10-inch, and 12-inch vinyl records, indicating support for all three sizes and 33/45/78 RPM speeds.
6.2 Bluetooth Operation
The turntable supports Bluetooth 5.4 for both receiving and transmitting audio.
6.2.1 Bluetooth Receiving (Playing music from your phone)
- Turn on the turntable.
- Switch the function mode to Bluetooth (BT). The Bluetooth indicator light will flash.
- Enable Bluetooth on your smartphone, tablet, or other Bluetooth device.
- Search for "VIFLYKOO" in the list of available devices and select it to pair.
- Once paired, the indicator light will stop flashing. You can now play music from your device through the turntable's speakers.
6.2.2 Bluetooth Transmitting (Playing vinyl through external Bluetooth speakers/headphones)
- Ensure your external Bluetooth speaker or headphones are in pairing mode.
- Turn on the turntable and select the desired input source (e.g., Phono for vinyl).
- Press and hold the Bluetooth button on the turntable to activate transmitting mode. The Bluetooth indicator will flash rapidly.
- The turntable will automatically search for and connect to nearby Bluetooth audio devices.
- Once connected, the indicator light will stop flashing, and audio from the turntable will play through your external Bluetooth device.

Image: Two scenarios demonstrating Bluetooth 5.4 functionality: a user receiving music from a smartphone to the turntable, and the turntable transmitting vinyl audio to external Bluetooth speakers and headphones.
6.3 USB Function (Recording & Playback)
The USB port allows you to convert your vinyl records to digital files or play audio files from a USB drive.
6.3.1 Recording Vinyl to USB
- Insert a USB drive into the USB port on the back of the turntable.
- Select the Phono input mode.
- Start playing your vinyl record.
- Press the 'REC' button (usually near the USB port or control panel) to start recording. The indicator light will confirm recording is active.
- Press the 'REC' button again to stop recording. The recorded audio will be saved as an MP3 or WAV file on the USB drive.
6.3.2 Playing Audio from USB
- Insert a USB drive containing MP3 or WAV audio files into the USB port.
- Switch the function mode to USB.
- The turntable will automatically detect and begin playing the audio files. Use the control buttons (if available) to skip tracks or pause playback.

Image: The turntable with a USB drive inserted, illustrating the process of recording vinyl to digital files (MP3 or WAV) and playing music files from the USB drive.
6.4 AUX Input
Connect external audio devices like MP3 players or smartphones via the 3.5mm AUX IN port.
- Connect one end of a 3.5mm audio cable (not included) to the AUX IN port on the turntable.
- Connect the other end to the headphone jack or audio output of your external device.
- Switch the function mode to AUX.
- Play audio from your external device, and it will be output through the turntable's speakers.
6.5 RCA Output
Connect your turntable to an external amplifier or powered speakers for enhanced sound.
- Connect an RCA cable (not included) to the RCA OUT ports (Red for Right, White for Left) on the back of the turntable.
- Connect the other end of the RCA cable to the corresponding audio input on your amplifier or powered speakers.
- Ensure the amplifier/speakers are powered on and set to the correct input.
- Play your vinyl record, and the audio will be routed through the external system.
6.6 Headphone Output
For private listening, connect headphones to the dedicated headphone jack.
- Plug your headphones into the 3.5mm headphone jack on the front or side of the turntable.
- The integrated speakers will typically mute when headphones are connected.
- Adjust the volume to a comfortable listening level.
7. Maintenance
Proper maintenance ensures the longevity and optimal performance of your turntable.
- Cleaning the Unit: Wipe the turntable's surface with a soft, dry, lint-free cloth. Avoid using abrasive cleaners, waxes, or solvents.
- Cleaning the Stylus: Use a soft brush designed for stylus cleaning, brushing gently from back to front. Avoid touching the stylus with your fingers.
- Dust Cover Care: The removable acrylic dust cover can be cleaned with a soft, damp cloth. Avoid harsh chemicals that may scratch or cloud the acrylic.
- Record Care: Keep your vinyl records clean and free of dust to prevent damage to both the records and the stylus. Store them vertically in their sleeves.
- Stylus Replacement: The stylus has a limited lifespan. If you notice a decrease in sound quality or increased skipping, consider replacing the stylus. Consult VIFLYKOO support for compatible replacement styli.
8. Troubleshooting
If you encounter any issues, refer to the following troubleshooting guide.
| Problem | Possible Cause | Solution |
|---|---|---|
| No power | Power adapter not connected or faulty outlet. | Ensure power adapter is securely connected and the outlet is functional. |
| No sound from speakers | Volume too low; headphones connected; incorrect input mode. | Increase volume; disconnect headphones; select correct input mode (Phono, BT, AUX, USB). |
| Record skips or sound distortion | Dirty record; dirty or worn stylus; turntable not level. | Clean record; clean or replace stylus; ensure turntable is on a level surface. |
| Bluetooth pairing fails | Device too far; incorrect mode; device not in pairing mode. | Ensure devices are close; select correct Bluetooth mode (receiving/transmitting); put external device in pairing mode. |
| USB recording not working | USB drive full or incompatible format; incorrect recording procedure. | Use a formatted USB drive (FAT32); ensure enough space; follow recording steps carefully. |
9. Specifications
Technical details of the VIFLYKOO Bluetooth 5.4 Turntable.
- Brand: VIFLYKOO
- Model Number: 3388651
- ASIN: B0FP57JZHX
- GTIN/UPC: 774882248156
- Rotation Speeds: 33 1/3, 45, 78 RPM
- Motor Type: Belt-driven
- Connectivity Technology: Bluetooth 5.4 (Receive & Transmit), Auxiliary (3.5mm), USB, RCA
- Integrated Speakers: Yes, 2 x 5W Stereo
- Audio Outputs: RCA, 3.5mm Headphone Jack
- Audio Inputs: 3.5mm AUX-in, Bluetooth
- USB Function: MP3/WAV Recording, MP3/WAV Playback
- Special Features: Anti-resonance design, Automatic belt drive, Auto-stop function, Removable dust cover
- Material: Engineered Wood, Metal
- Item Weight: 2.15 Kilograms
- Item Dimensions (L x W x H): 35 cm x 29 cm x 12 cm
- Power Source: Electric Cable (DC Adapter)
- Signal Format: Analog, Digital
10. Warranty and Support
Your VIFLYKOO Turntable is covered by a manufacturer's warranty and dedicated customer support.
- Warranty: This product comes with a 2-year manufacturer's warranty from the date of purchase. Please retain your proof of purchase for warranty claims.
- Customer Support: For technical assistance, troubleshooting not covered in this manual, or warranty inquiries, please contact VIFLYKOO customer service through the retailer's platform or the official VIFLYKOO website.