1. Product Overview
The My Little Pony Wireless Mechanical Keyboard is designed for both gaming and productivity, featuring a 101-key layout with custom linear switches. It offers versatile connectivity options and dynamic RGB lighting. This manual provides detailed instructions for setup, operation, and maintenance.

Image 1.1: Overview of the My Little Pony Wireless Mechanical Keyboard, highlighting its design and key layout.
2. Package Contents
Verify that all items are present in the package:
- My Little Pony Wireless Mechanical Keyboard
- USB-C Cable
- 2.4GHz USB-A Dongle (stored within the keyboard)
- Keycap Puller (for hot-swapping switches)
- Switch Puller (for hot-swapping switches)
- Spare Switches (typically 2-3)
- User Manual (this document)
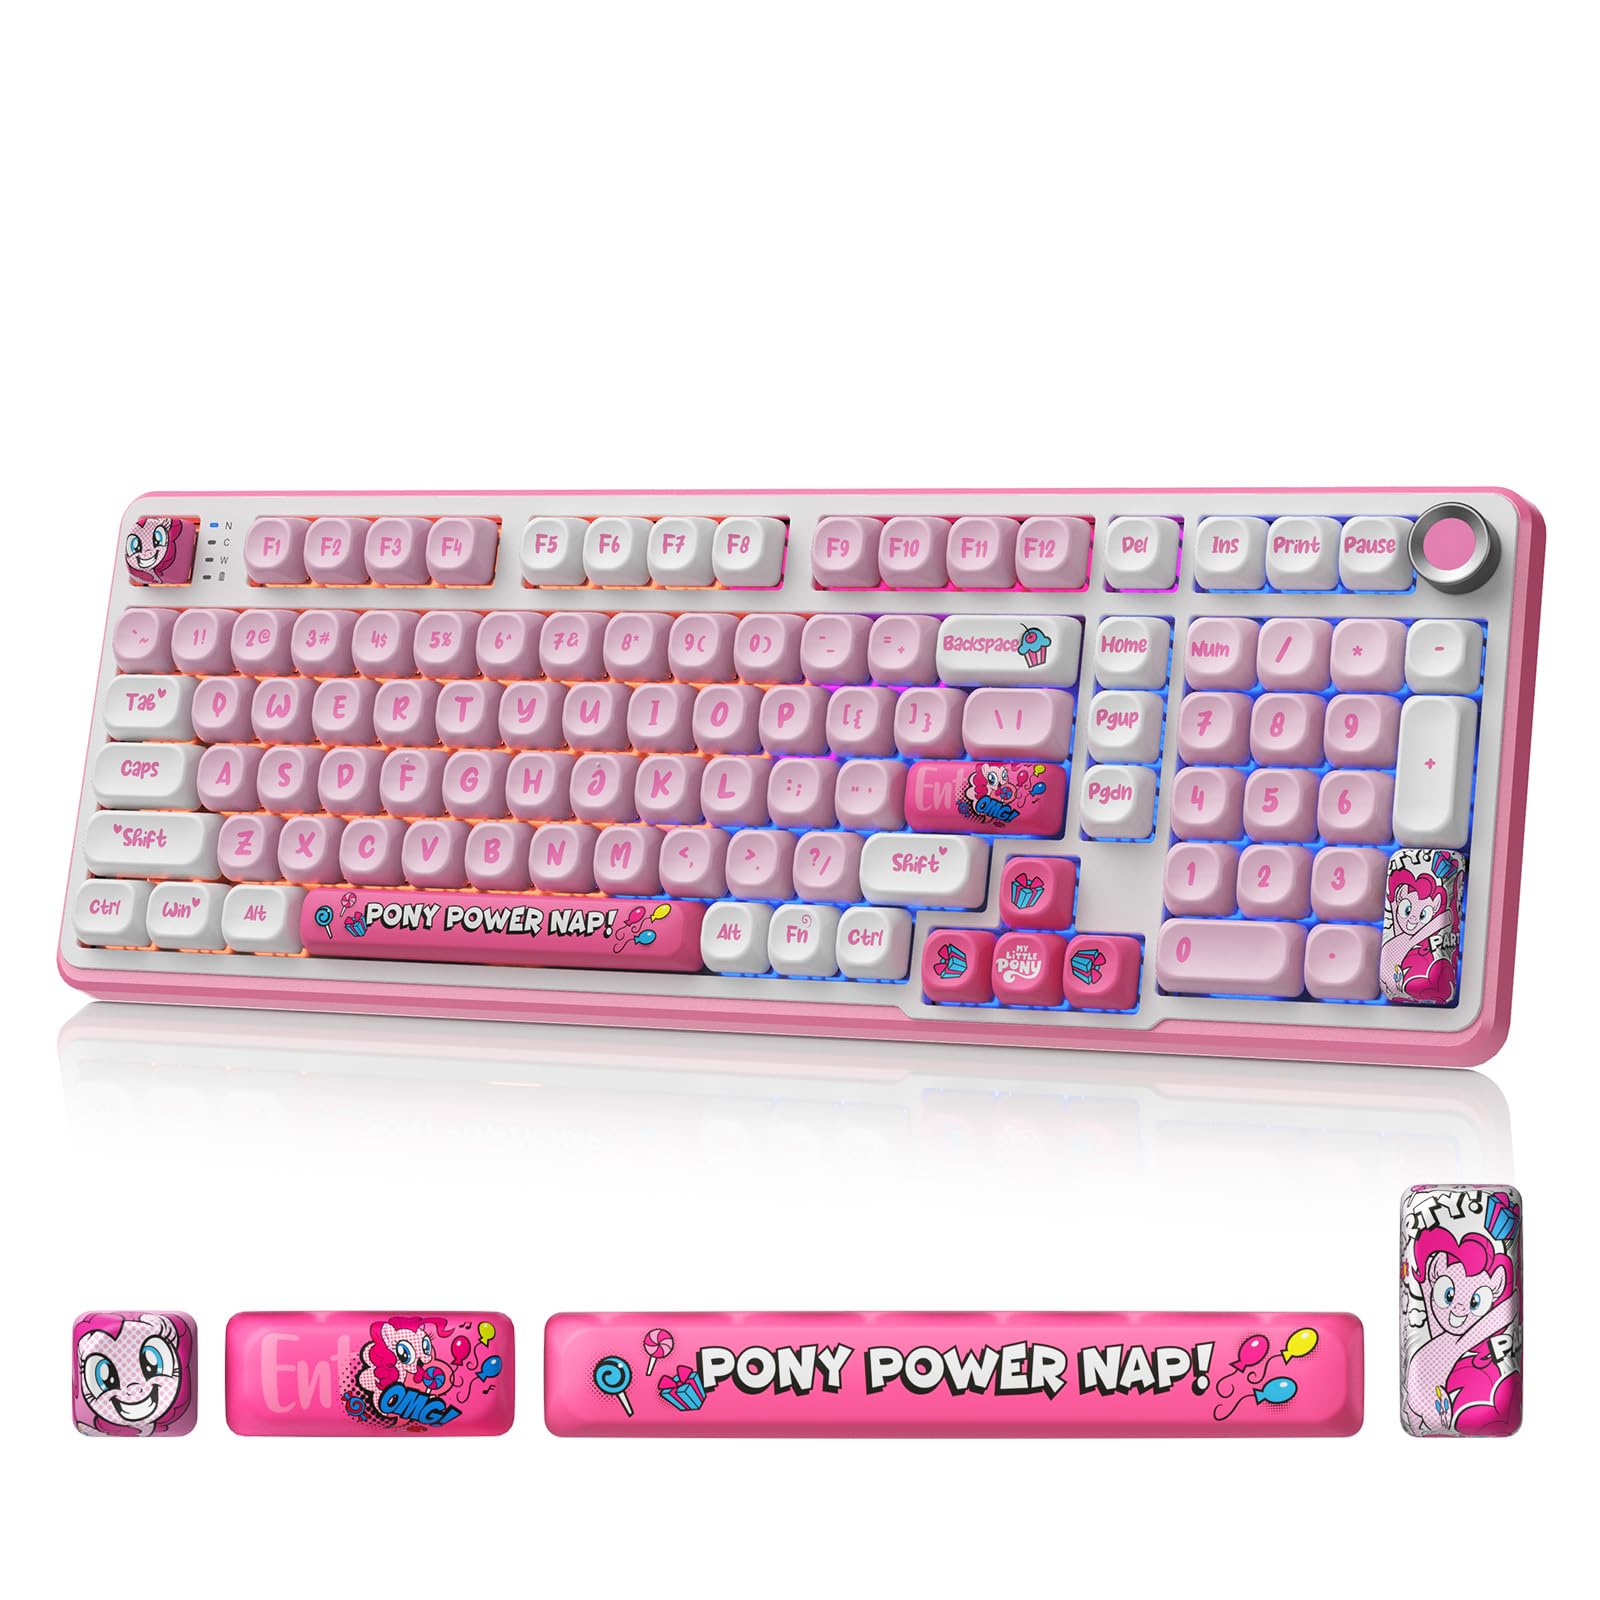
Image 2.1: The My Little Pony Wireless Mechanical Keyboard with included accessories like the USB cable and switch puller.
3. Setup and Connectivity
The keyboard supports three connection modes: Bluetooth 5.0, 2.4GHz wireless, and USB-C wired. It is compatible with Windows, macOS, iOS, Android, and Linux operating systems.
3.1. Wired Connection (USB-C)
- Locate the USB-C port on the keyboard.
- Connect the provided USB-C cable to the keyboard and the other end to your computer's USB port.
- The keyboard will automatically be recognized and ready for use. This mode also charges the keyboard's internal battery.
3.2. 2.4GHz Wireless Connection
- Locate the 2.4GHz USB-A dongle, typically stored in a compartment on the underside of the keyboard.
- Insert the dongle into an available USB-A port on your computer.
- Switch the keyboard's connectivity mode to 2.4GHz using the dedicated switch (usually labeled "2.4G" or similar).
- The keyboard should connect automatically.
3.3. Bluetooth 5.0 Connection
- Switch the keyboard's connectivity mode to Bluetooth (usually labeled "BT" or with a Bluetooth icon).
- On your device (PC, tablet, phone), open Bluetooth settings and search for new devices.
- Select "My Little Pony Keyboard" (or similar name) from the list of available devices.
- Follow any on-screen prompts to complete the pairing process.
- The keyboard can store up to 4 Bluetooth profiles, allowing quick switching between devices using a dedicated button.
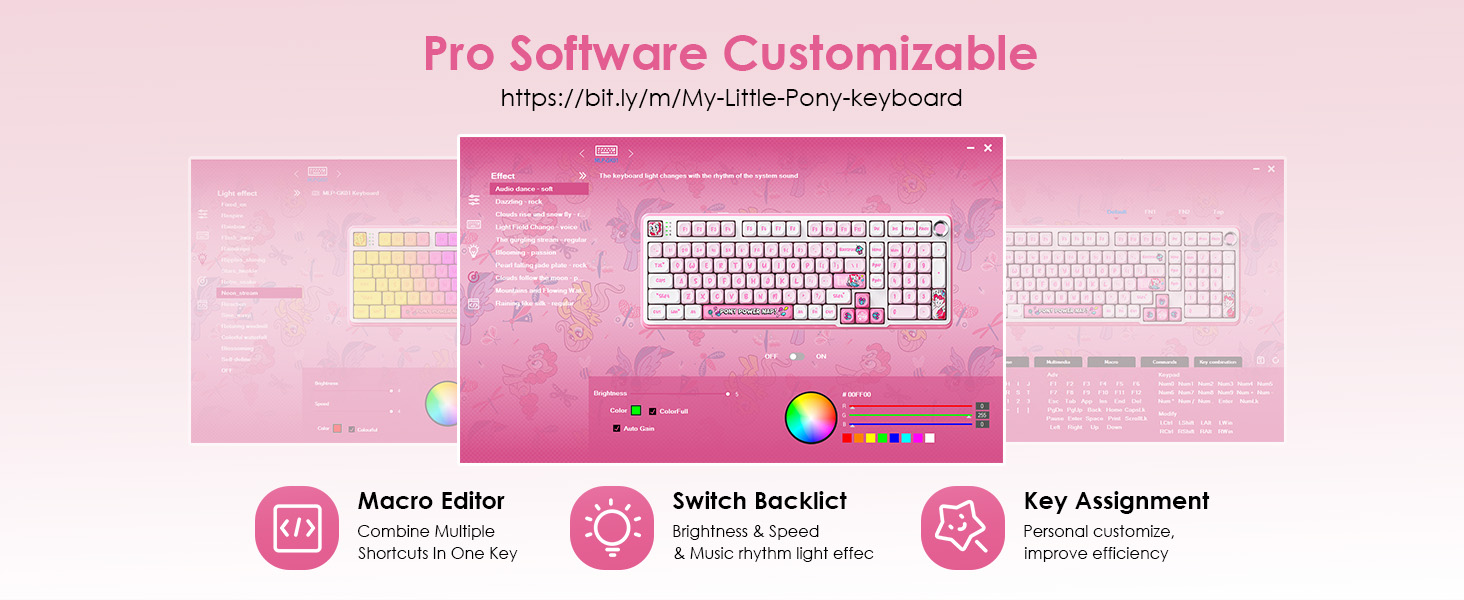
Image 3.1: Illustration of the keyboard's triple-mode connectivity, including Bluetooth, 2.4GHz, and USB-C options.
Video 3.1: A short video demonstrating the My Little Pony Wireless Mechanical Keyboard, including its physical features and connectivity options.
4. Operating Instructions
4.1. RGB Lighting Control
The keyboard features over 16 preset RGB lighting modes. These modes can be adjusted for brightness, speed, and color. Some modes react to typing or music. Refer to the quick guide for specific key combinations to cycle through modes and adjust settings.
- Changing Modes: Use the designated function key combination (e.g., Fn + specific key) to cycle through lighting effects.
- Adjusting Brightness/Speed: The integrated knob can adjust brightness or volume, depending on the selected mode.
- Customization: Advanced per-key RGB customization is available via the driver software.
Image 4.1: The keyboard displaying its vibrant 16.8 million color RGB lighting, which can be customized.
4.2. Knob Control
The integrated knob on the keyboard provides quick access to multimedia controls. It can be used to adjust volume, switch tracks, or modify RGB lighting brightness, depending on the active function.
4.3. Macro Functions
The keyboard supports one-touch macros for enhanced productivity and gaming. Complex commands or shortcuts can be assigned to any key using the driver software. A dedicated macro column on the left side of the keyboard provides quick access to these programmed functions.
To access the driver software for macro programming and advanced customization, visit: https://bit.ly/m/My-Little-Pony-keyboard

Image 4.2: The software interface for customizing macros, RGB lighting, and key assignments.
5. Maintenance
5.1. Cleaning
Regular cleaning helps maintain the keyboard's performance and appearance. Use a soft, dry cloth to wipe the surface. For deeper cleaning, use a keycap puller to remove keycaps and a brush or compressed air to clear debris from between the switches.
5.2. Hot-Swappable Switches
The keyboard features hot-swappable switches, allowing you to change them without soldering. This enables customization of typing feel and sound. Use the provided switch puller to carefully remove existing switches and insert new compatible 3-pin or 5-pin mechanical switches.
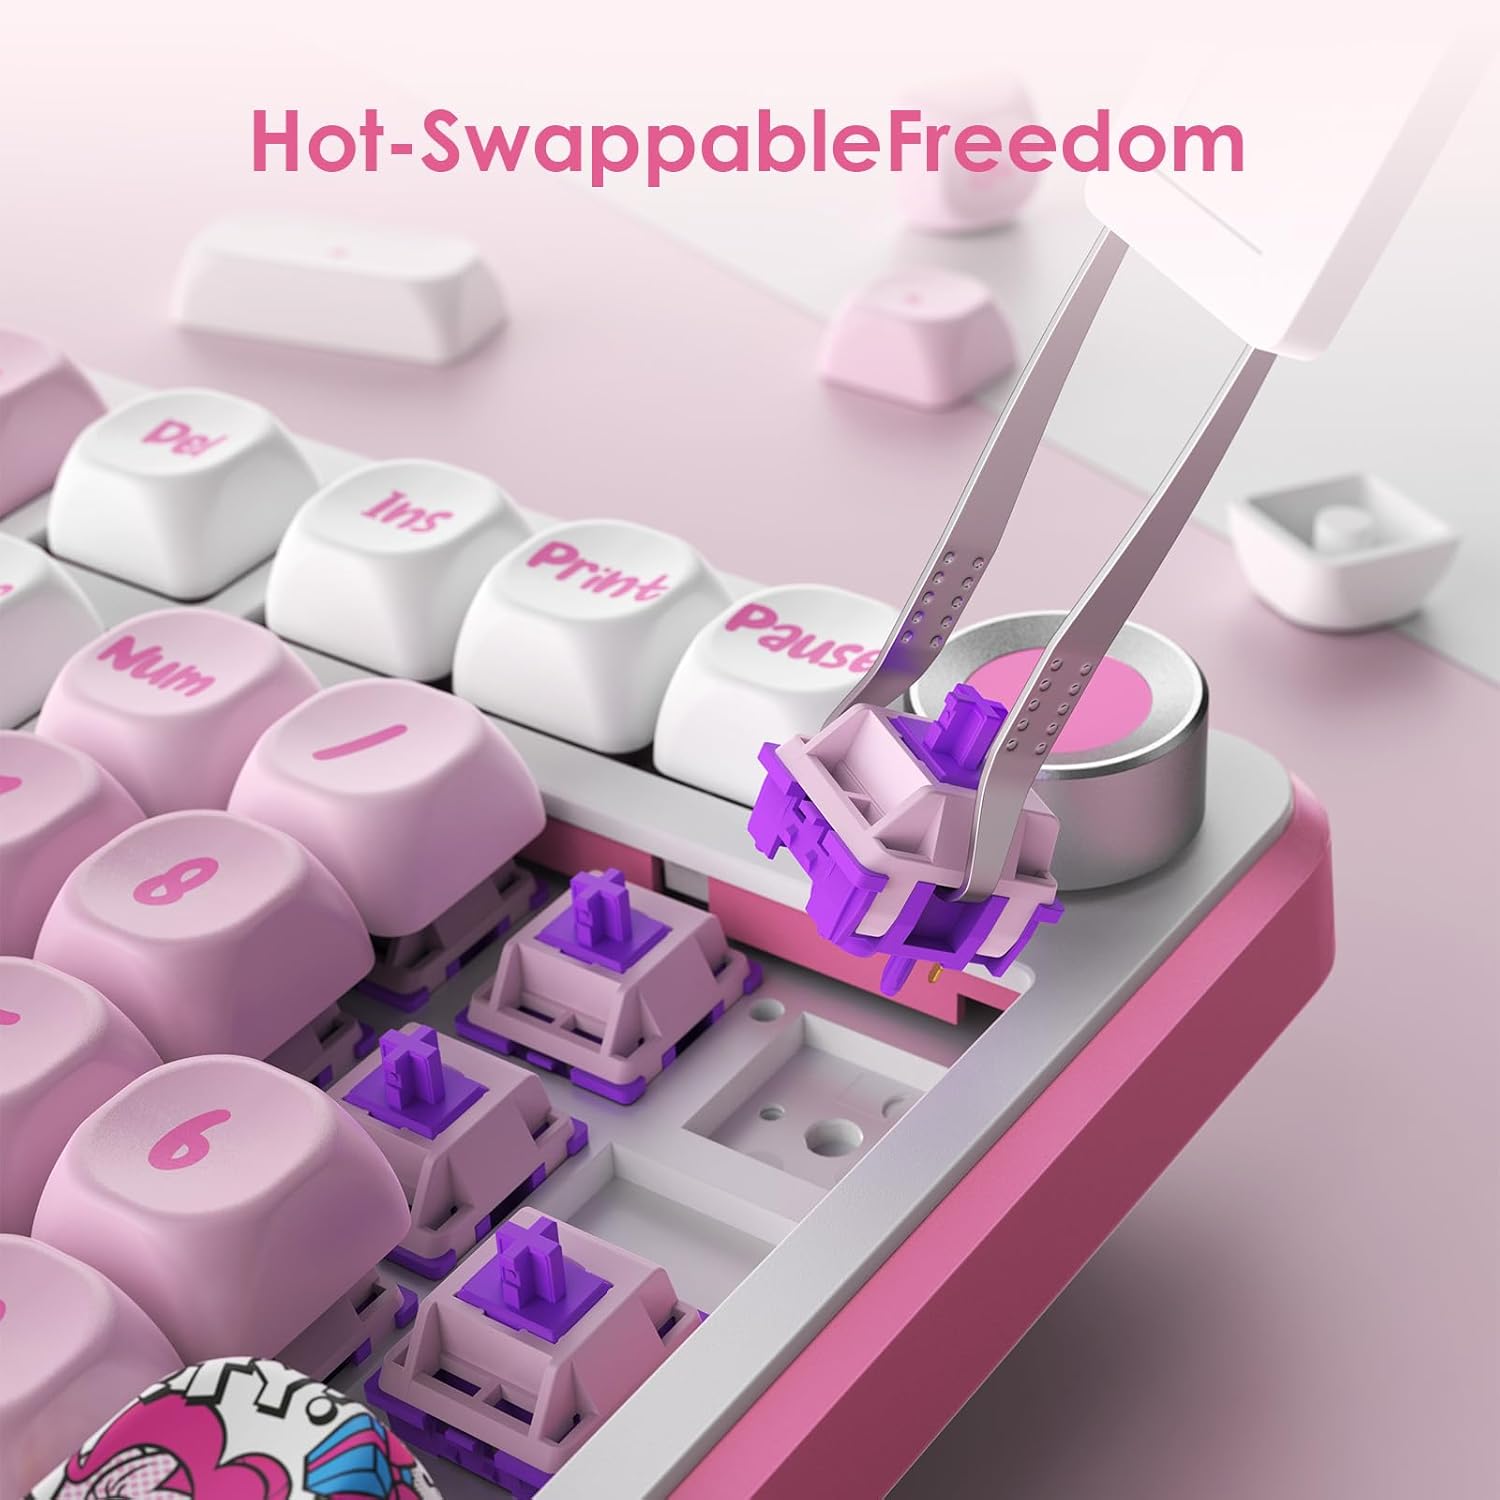
Image 5.1: A close-up view demonstrating the hot-swappable switch feature, allowing for easy switch replacement.

Image 5.2: The keyboard's hot-swappable design, illustrating how switches can be easily changed.
6. Troubleshooting
If you encounter issues with your keyboard, refer to the following common solutions:
- Keyboard Not Responding:
- Ensure the keyboard is charged or connected via USB-C.
- Check the connection mode switch (Bluetooth, 2.4GHz, or Wired).
- For wireless connections, ensure the dongle is properly inserted or Bluetooth is paired.
- Try restarting your computer or device.
- RGB Lighting Not Working:
- Ensure the keyboard is powered on.
- Check if the lighting is turned off via a function key combination.
- Adjust brightness using the knob or function keys.
- Keys Not Registering:
- Remove the keycap and switch to check for debris.
- If a switch is faulty, replace it with a spare hot-swappable switch.
- Connectivity Issues:
- For Bluetooth, try unpairing and re-pairing the keyboard.
- For 2.4GHz, try a different USB port for the dongle.
- Ensure no strong interference sources are nearby.
7. Specifications
| Feature | Detail |
|---|---|
| Model | B0FP553BRP |
| Keys | 101 Keys |
| Switch Type | Custom Linear Switches (Hot-Swappable) |
| Connectivity | Bluetooth 5.0, 2.4GHz Wireless, USB-C Wired |
| RGB Lighting | 16+ Modes, Per-key customization via software |
| Battery Capacity | 4000mAh |
| Compatibility | Gaming Console, Laptop, PC (Windows, macOS, iOS, Android, Linux) |
| Material | Polybutylene Terephthalate (Keycaps) |
| Weight | 3.14 pounds |
| Dimensions | 17.6 x 7.72 x 2.05 inches |
8. Warranty and Support
For warranty information and technical support, please refer to the manufacturer's official website or contact their customer service. Keep your purchase receipt as proof of purchase for any warranty claims.
Typical return policy: 30 days for refund/replacement.