1. Introduction
This manual provides detailed instructions for the safe operation, setup, and maintenance of your OYDL RC ERA A60 Mini Bell206 RC Helicopter. The A60 is a 1:42 scale, 6-channel remote-controlled helicopter featuring 6-axis gyro stabilization, altitude hold, and one-key takeoff/landing, designed for both beginners and experienced users. Please read this manual thoroughly before operating the helicopter to ensure proper function and safety.
2. Safety Precautions
Operating a remote-controlled helicopter requires caution. Failure to follow these safety guidelines may result in injury or damage to the product or property.
- Age Recommendation: This product is recommended for users aged 15 years and above. Adult supervision is advised for younger users.
- Flight Environment: Fly in open, clear areas away from people, animals, buildings, power lines, and water. Avoid flying in strong winds or adverse weather conditions.
- Battery Safety:
- Use only the provided charging cable and battery.
- Do not overcharge or over-discharge the battery.
- Do not expose batteries to extreme temperatures or direct sunlight.
- If the battery swells or shows signs of damage, discontinue use immediately.
- Propeller Safety: Keep hands, face, and loose clothing away from rotating propellers. The helicopter features intelligent anti-jamming protection, which automatically stops propellers if blocked, but caution is still necessary.
- Low Voltage Alarm: Pay attention to the low voltage alarm. Land the helicopter immediately when the alarm sounds to prevent loss of control.
- Out-of-Control Protection: The helicopter is equipped with out-of-control protection. If signal is lost, the helicopter will attempt a controlled landing.

Figure 2.1: Intelligent anti-jamming protection helps prevent propeller damage by stopping rotation if blocked.
3. Package Contents
Verify that all items are present in your package:
- RC ERA A60 Mini Bell206 Helicopter (1)
- Remote Controller (1)
- 3.7V 220mAh Lithium Battery (Quantity may vary based on purchase, e.g., 2 batteries)
- Charging Cable (1)
- Instruction Manual (1)
- Spare Propellers (Main and Tail)
- Tools (e.g., screwdriver, hex wrench)

Figure 3.1: Included components in the RC ERA A60 Mini Bell206 package.
4. Product Overview
The RC ERA A60 Mini Bell206 is a high-fidelity model aircraft designed for stable and enjoyable flight. Key features include a 6-axis gyroscope for stability, pressure constant height (altitude hold), and a modular battery system.

Figure 4.1: RC ERA A60 Mini Bell206 Helicopter design.

Figure 4.2: Core technical functions of the A60 helicopter.
5. Setup
5.1 Charging the Helicopter Battery
The helicopter uses a 3.7V 220mAh lithium battery. Ensure the battery is fully charged before each flight.
- Remove the modular battery from the helicopter.
- Connect the battery to the provided USB charging cable.
- Plug the USB charging cable into a suitable USB power source (e.g., computer USB port, USB wall adapter).
- The charging indicator light on the cable will show the charging status (refer to charger instructions for specific light behavior).
- Charging typically takes about 40 minutes. Disconnect once fully charged.

Figure 5.1: Modular battery system for easy charging and replacement.
5.2 Installing Remote Controller Batteries
The remote controller requires batteries (type not specified in product data, typically 4x AA batteries).
- Open the battery compartment on the back of the remote controller.
- Insert the batteries, ensuring correct polarity (+/-).
- Close the battery compartment securely.
5.3 Pairing the Helicopter and Remote Controller
Follow these steps to establish a connection between the helicopter and the remote controller:
- Place the helicopter on a flat, level surface.
- Ensure the helicopter's battery is fully charged and installed.
- Turn on the helicopter's power switch. The indicator lights will flash.
- Turn on the remote controller.
- Move the throttle stick (left stick) all the way up, then all the way down.
- The indicator lights on both the helicopter and remote controller will become solid, indicating successful pairing.
6. Operating Instructions
6.1 Basic Flight Controls
Familiarize yourself with the remote controller layout and functions:
- Throttle Stick (Left Stick):
- Up/Down: Controls altitude (ascend/descend).
- Left/Right: Controls yaw (rotate left/right).
- Directional Stick (Right Stick):
- Up/Down: Controls pitch (forward/backward flight).
- Left/Right: Controls roll (sideways flight left/right).
- One-Key Takeoff/Landing Button: Initiates automatic takeoff or landing.
- Speed Adjustment Button: Cycles through low, medium, and high-speed modes.
6.2 One-Key Takeoff and Landing
After successful pairing, press the One-Key Takeoff button. The helicopter will automatically ascend to a stable hovering altitude. To land, press the One-Key Landing button, and the helicopter will descend and land automatically.
6.3 Altitude Hold
The A60 features a pressure constant height system, allowing it to maintain a stable altitude without continuous throttle input. This enhances stability and reduces the risk of collisions.
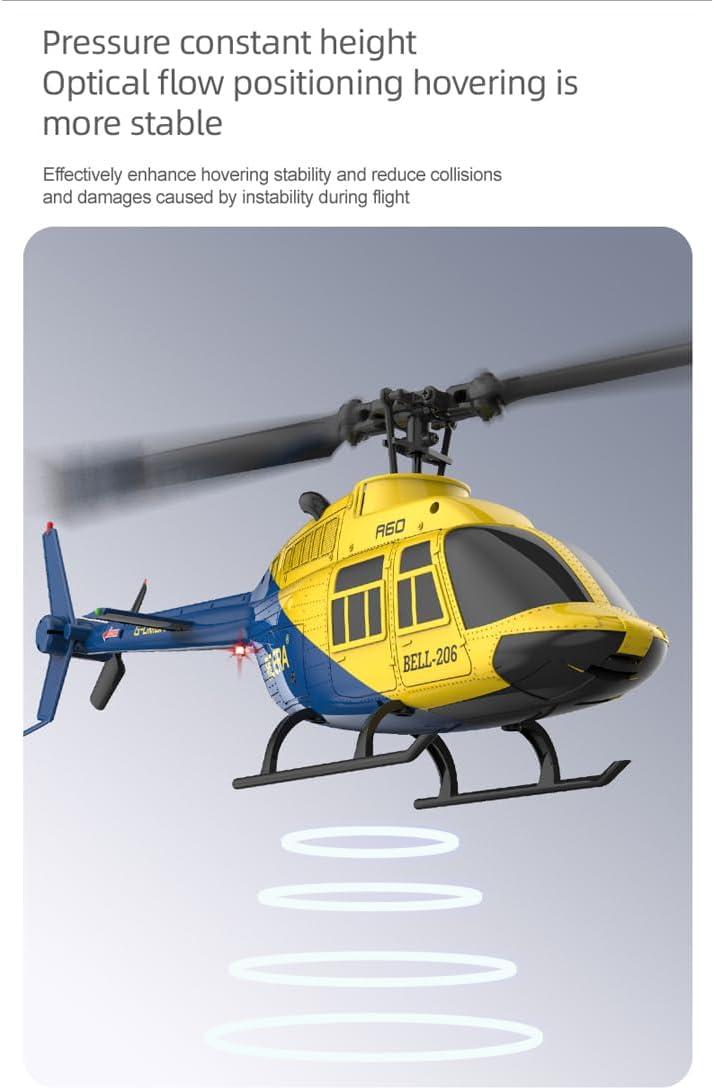
Figure 6.1: Altitude hold feature for stable flight.
6.4 Three-Speed Adjustment
The helicopter offers three flight speed settings (low, medium, high) to accommodate different skill levels and flight environments. Press the speed adjustment button on the remote controller to cycle through these modes.

Figure 6.2: Three-speed adjustment for varied flight experience.
6.5 Multi-Directional Flight
Once the flight mode is activated, the helicopter can be controlled for multi-directional flight using the directional stick. This includes forward, backward, left, and right movements.

Figure 6.3: Multi-directional flight control.

Figure 6.4: Smooth flight and control feel.
7. Maintenance
Regular maintenance ensures the longevity and optimal performance of your helicopter.
- Cleaning: Use a soft, dry cloth to clean the helicopter after each flight. Avoid water or solvents.
- Propeller Inspection: Regularly check propellers for damage (cracks, bends). Replace damaged propellers immediately using the provided spare parts and tools.
- Battery Care: Store batteries in a cool, dry place. Do not store fully charged or completely depleted batteries for extended periods. Charge them to about 50% for long-term storage.
- Storage: When not in use, store the helicopter and remote controller in a safe place, away from direct sunlight and extreme temperatures.
8. Troubleshooting
If you encounter issues, refer to the following common problems and solutions:
| Problem | Possible Cause | Solution |
|---|---|---|
| Helicopter does not respond to remote controller. | Not paired; low battery in helicopter or remote; remote not powered on. | Ensure both devices are powered on. Re-pair the helicopter and remote. Charge/replace batteries. |
| Helicopter cannot take off or flies weakly. | Helicopter battery low; damaged propellers; motor issue. | Charge helicopter battery fully. Inspect and replace damaged propellers. Contact support if motor issue suspected. |
| Helicopter drifts during hover. | Not calibrated on a flat surface; environmental interference (wind). | Ensure helicopter is placed on a flat surface during power-on/pairing. Fly in calm conditions. Use trim adjustments on remote if available (refer to remote manual). |
| Propellers stop unexpectedly. | Propeller blocked (anti-jamming protection activated); low battery. | Clear any obstructions. Check helicopter battery level. |
9. Specifications
| Feature | Detail |
|---|---|
| Product Name | A60 Remote-Control Helicopter |
| Product Scale | 1:42 |
| Material | Engineering materials / Electronic components |
| Applicable Age | 15 years and above |
| Remote Control Distance | 80 - 120 meters |
| Rotor Diameter | 227mm (8.9 inches) |
| Fuselage Length | 238mm (9.4 inches) |
| Fuselage Height | 80mm (3.1 inches) |
| Flight Time | About 8 - 10 minutes |
| Battery Capacity | 3.7V 220mAh lithium battery |
| Charging Time | About 40 minutes |
| Gyroscope | 6-Axis Gyro |
| Special Features | Altitude Hold, One-Key Takeoff/Landing, Low Voltage Alarm, Locked Rotor Protection, Out-of-Control Protection, Three-Speed Adjustment |
10. Warranty and Support
For warranty information, technical support, or replacement parts, please contact OYDL customer service through the retailer where the product was purchased or visit the official OYDL brand store.
OYDL Brand Store: Visit OYDL Store on Amazon


