Introduction
This manual provides detailed instructions for the installation, operation, and maintenance of your VVERKUI 4K DashCam DVR-B46P. Please read this manual thoroughly before using the device to ensure proper functionality and to maximize your user experience. This dashcam is designed to record driving footage, offering features such as 4K video resolution, GPS logging, Wi-Fi connectivity, and support for a 1080P rearview camera.
Package Contents
- VVERKUI 4K DashCam (Main Unit)
- Power Cable (Corded Electric)
- Rearview Camera (1080P) with 6-meter cable (if included in your package)
- Mounting Bracket
- User Manual
Product Overview
The VVERKUI 4K DashCam DVR-B46P features a compact design with a built-in display and integrated GPS and Wi-Fi modules. The front camera utilizes a Sony IMX678PL image sensor with an F1.6 aperture and a 170° wide-angle 7-element glass lens, capable of recording in Ultra 4K (2160P) resolution. The device is powered by a Hisilicon chip for stable performance.

Image: Front view of the VVERKUI 4K DashCam main unit, showing the lens and GPS module.
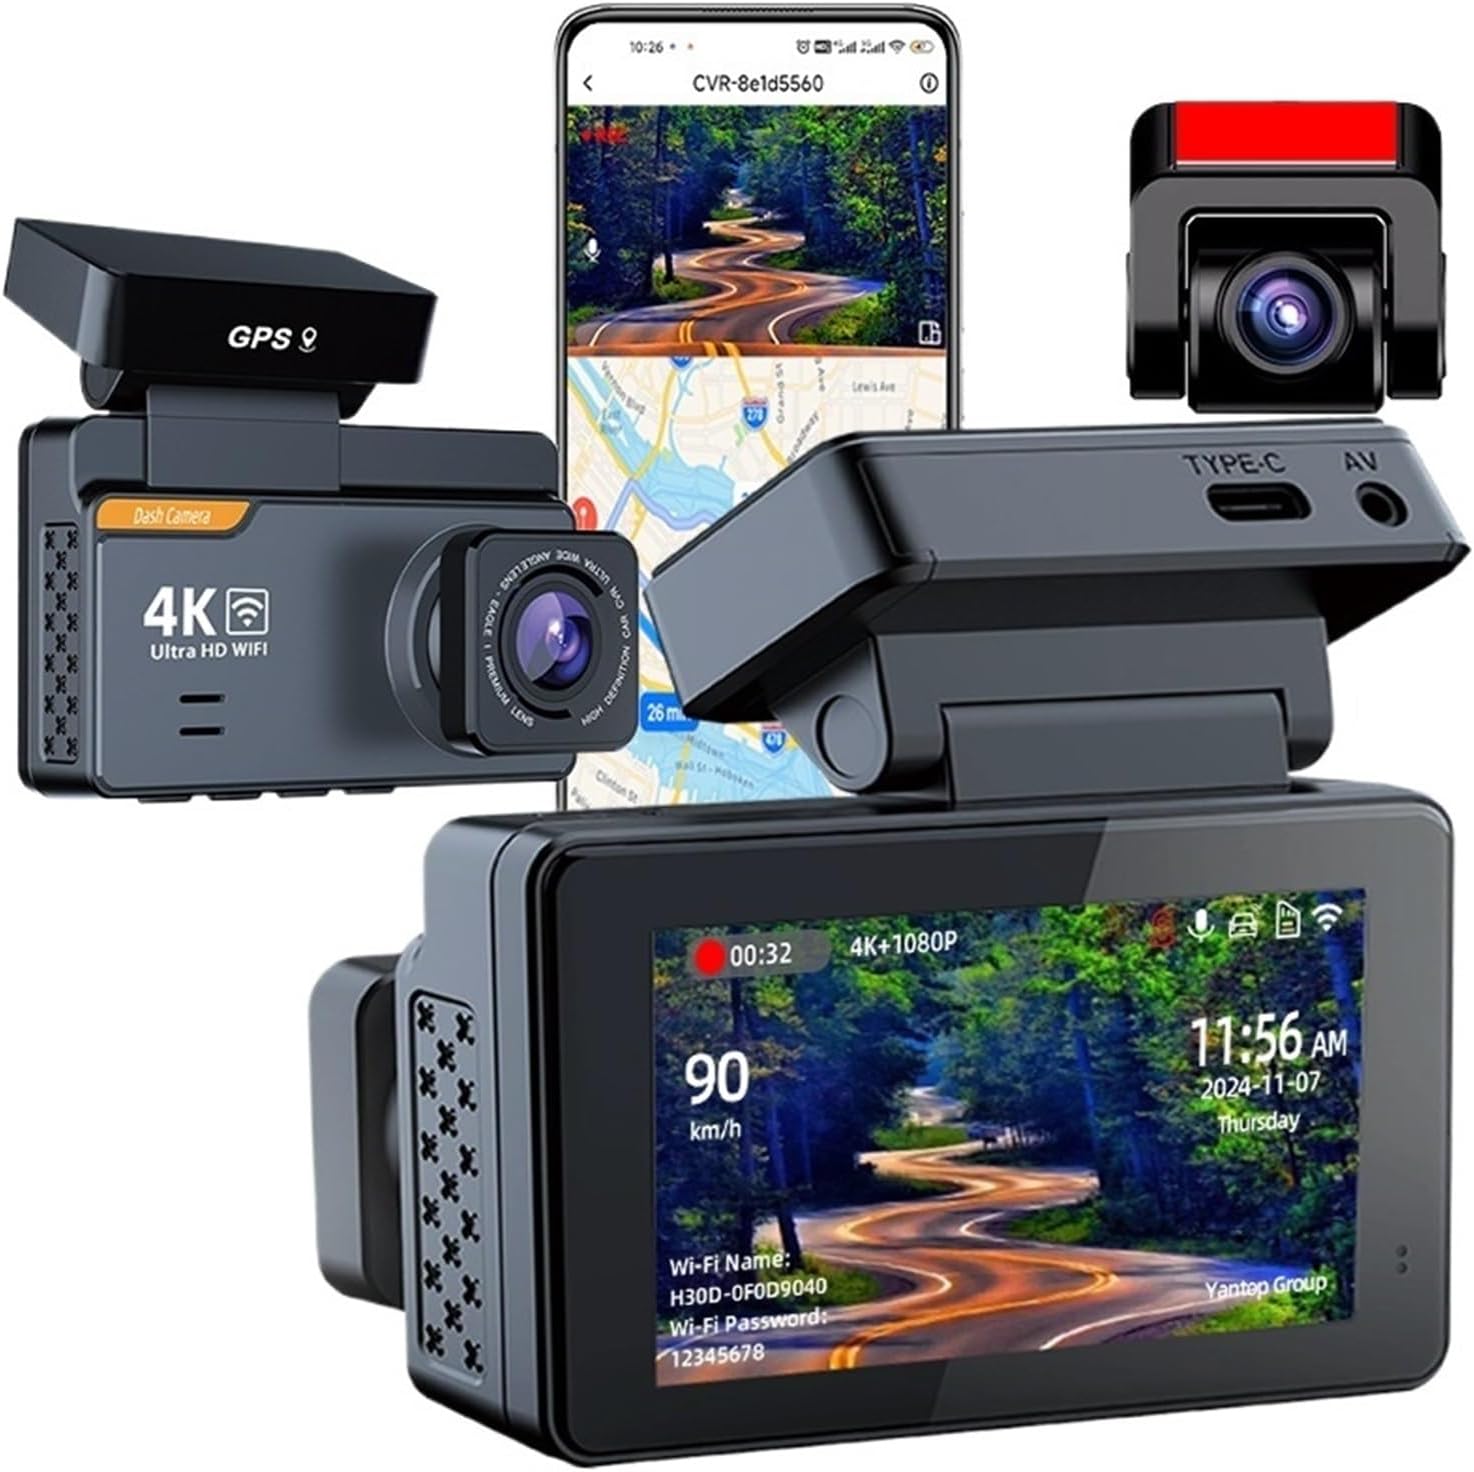
Image: The dashcam unit displayed alongside a smartphone showing the companion application interface, indicating connectivity and remote viewing capabilities.

Image: Diagram illustrating the physical dimensions of the dashcam unit, showing measurements in centimeters.
Setup
1. Memory Card Installation
Insert a Class 10 or higher speed MicroSD card (up to 512GB) into the designated slot. Ensure the card is inserted correctly until it clicks into place. The dashcam will automatically format the card upon first use or if prompted.
2. Mounting the DashCam
- Clean the windshield area where the dashcam will be mounted.
- Attach the mounting bracket to the dashcam.
- Securely affix the dashcam to the windshield, ensuring a clear view of the road. Adjust the lens angle for optimal recording coverage.
3. Power Connection
Connect the power cable to the dashcam's Type-C port and plug the other end into your vehicle's 12V power outlet. Route the cable neatly to avoid obstructing your view or interfering with driving controls.
4. Rearview Camera Installation (Optional)
If your package includes a rearview camera, connect its cable to the AV port on the main dashcam unit. Mount the rearview camera at the rear of your vehicle, typically above the license plate or inside the rear window, ensuring a clear view. Route the 6-meter cable carefully.
5. Initial Power On and Settings
Once powered, the dashcam will turn on automatically. Follow the on-screen prompts to set the date, time, and preferred language. Ensure GPS is enabled for location logging.
Operating Instructions
1. Automatic Recording
The dashcam begins recording automatically when the vehicle's ignition is turned on. Recording will stop when the ignition is turned off. Video files are saved in AVI or TS format.
2. Loop Recording
The dashcam supports loop-cycle recording. When the memory card is full, the oldest unlocked files will be overwritten by new recordings. Adjust loop recording duration in the settings menu.
3. G-Sensor (Emergency Recording)
The built-in G-sensor detects sudden impacts or collisions. When triggered, the current video segment is automatically locked and protected from being overwritten, serving as crucial evidence. Adjust G-sensor sensitivity in the settings.
4. Parking Monitoring (24h Parking)
With the parking monitor feature enabled, the dashcam can detect impacts or motion while the vehicle is parked and automatically record a short video. This requires a continuous power supply (e.g., hardwire kit, sold separately) to function for 24 hours.
5. Night Vision
The dashcam is equipped with a NightShot function to enhance video clarity in low-light conditions, ensuring clear recordings even at night.

Image: Diagram highlighting the Sony IMX678PL front camera image sensor, F1.6 aperture, and 170° wide-angle 7-element glass lens, emphasizing 4K resolution and night vision capabilities.

Image: A visual comparison demonstrating the difference in clarity and detail between 1080P and 2160P (4K) video resolutions, showing road signs and vehicle details.
6. Wi-Fi Connectivity and App Usage
The dashcam features built-in Wi-Fi for seamless connection to your smartphone via the 'Viidure' app (available on App Store and Google Play). This allows you to:
- Live View: Stream real-time footage from the dashcam to your phone.
- Replay: Playback recorded videos directly on your phone.
- Share: Easily share video clips.
- Download: Transfer video files to your phone for backup or sharing.
- GPS Tracking: View your driving route and speed data.

Image: Illustration detailing the built-in Wi-Fi and GPS functionalities, showing the dashcam display with Wi-Fi name and password, and screenshots of the 'Viidure' mobile application for live view, replay, sharing, and GPS tracking.
7. GPS Logger
The internal GPS logger records your driving speed and location data, which can be viewed during video playback via the mobile app or dedicated PC player.

Image: Internal view of the dashcam highlighting the Hisilicon chip, indicating its role in stable performance and advanced processing technology.
Maintenance
1. Memory Card Formatting
It is recommended to format the MicroSD card regularly (e.g., once a month) to ensure optimal performance and prevent data corruption. This can typically be done through the dashcam's settings menu.
2. Lens Cleaning
Keep the camera lenses clean to ensure clear video recordings. Use a soft, lint-free cloth to gently wipe the lenses. Avoid abrasive materials or harsh chemicals.
3. Firmware Updates
Periodically check the manufacturer's website for available firmware updates. Updating the firmware can improve performance, add new features, or fix bugs. Follow the provided instructions carefully when performing updates.
Troubleshooting
- Dashcam not powering on: Ensure the power cable is securely connected to both the dashcam and the vehicle's power outlet. Check the vehicle's fuse for the power outlet.
- Recording stops or freezes: Format the MicroSD card. Ensure you are using a Class 10 or higher speed card. Try a different memory card.
- Poor video quality: Clean the camera lens. Ensure the protective film has been removed from the lens. Check video resolution settings.
- Wi-Fi connection issues: Ensure the dashcam's Wi-Fi is enabled. Restart both the dashcam and your smartphone. Ensure you are within range of the dashcam's Wi-Fi signal.
- GPS not working: Ensure the dashcam has a clear view of the sky. Verify GPS is enabled in the settings.
If issues persist, please refer to the support section for assistance.
Specifications
| Feature | Specification |
|---|---|
| Front Camera Resolution | 3840x2160 (4K) |
| Rear Camera Resolution | 1080P (if included) |
| View Angle | 170° |
| Aperture | F1.6 |
| Pixels | 1200 Mega |
| Chipset Manufacturer | HISILICON |
| Max External Memory | 512G |
| Memory Card Required Reading Speed | Class 10 |
| Video Format | AVI, TS |
| Video Code | H.264 |
| Maximum Video Frame Rate | 30 FPS |
| Display Size | 3"-5" (Built-in Screen) |
| Screen Ratio | 16:9 |
| GPS Logger | Internal |
| APP Compatibility | Yes (Viidure App) |
| Loop-Cycle Recording Feature | Yes |
| Audio Recorded | Yes |
| NightShot Function | Yes |
| Working Temperature | -20~70°C |
| Power Source | Corded Electric |
| Item Weight | 1.76 pounds (approx. 0.8 kg) |
| Package Dimensions | 5.91 x 3.94 x 3.94 inches |
Warranty and Support
Warranty Information
This VVERKUI DashCam DVR-B46P comes with a 365-day warranty from the date of purchase, covering manufacturing defects. Please retain your proof of purchase for warranty claims.
Customer Support
For technical assistance, troubleshooting, or warranty inquiries, please contact VVERKUI customer support through the retailer where the product was purchased or visit the official VVERKUI website for contact details.