1. Introduction
Thank you for choosing the moseiny Android 14 Car Radio Head Unit. This manual provides detailed instructions for the installation, operation, and maintenance of your new 10-inch touch screen car stereo, compatible with Chrysler Town & Country models from 2008 to 2012. Please read this manual thoroughly before installation and use to ensure proper functionality and safety.
2. Included Components
Verify that all components listed below are present in your package:
- 1 x Car MP5 Player (Main Head Unit)
- 1 x Power Cable
- 1 x GPS Antenna
- 1 x AHD Backup Camera
- 1 x RCA Input and Output Cable Set
- 1 x External Microphone
- 2 x USB Cables
- 1 x Instruction Manual (this document)

Image: Overview of the moseiny car radio head unit and its included accessories, such as the power cable, GPS antenna, backup camera, RCA cables, external microphone, and USB cables.
3. Product Specifications
| Feature | Specification |
|---|---|
| Operating System | Android 14 |
| Display Size | 10 Inches |
| Memory Storage Capacity | 64 GB |
| Connectivity Technology | Bluetooth, USB, Wi-Fi |
| Special Feature | Touchscreen, Wireless CarPlay, Android Auto, GPS Navigation |
| Audio Output Mode | Stereo |
| Vehicle Service Type | Minivan (Chrysler Town & Country 2008-2012) |
| Item Weight | 3.72 pounds |
| Package Dimensions | 14.29 x 10.51 x 4.76 inches |
4. Installation Guide
Important Note: This head unit is NOT plug-and-play. Installation requires cutting and connecting wires. Professional installation is highly recommended to avoid damage to the unit or your vehicle's electrical system.
4.1 Pre-Installation Checklist
- Ensure the vehicle's battery is disconnected before starting.
- Gather all necessary tools (wire strippers, crimpers, electrical tape, multimeter, etc.).
- Review the wiring diagram provided with your unit.
4.2 Installation Steps
Follow these general steps for installation. Specific wiring details will be found in the included wiring diagram.
- Carefully remove the factory radio and trim panels from your Chrysler Town & Country.
- Connect the power cable, speaker wires, and other necessary connections according to the wiring diagram. Ensure all connections are secure and properly insulated.
- Install the GPS antenna in a location with a clear view of the sky, typically on the dashboard or under the windshield.
- Route the AHD backup camera cable from the rear of the vehicle to the head unit, connecting it to the designated input. Mount the camera securely.
- Connect the external microphone for hands-free calling.
- Carefully mount the new head unit into the dashboard opening.
- Reconnect the vehicle's battery and test all functions before reassembling the trim panels.
Video: This video demonstrates the installation process for the moseiny Android 14 Car Radio Head Unit. It covers steps from removing the old unit to connecting the new one and its peripherals.
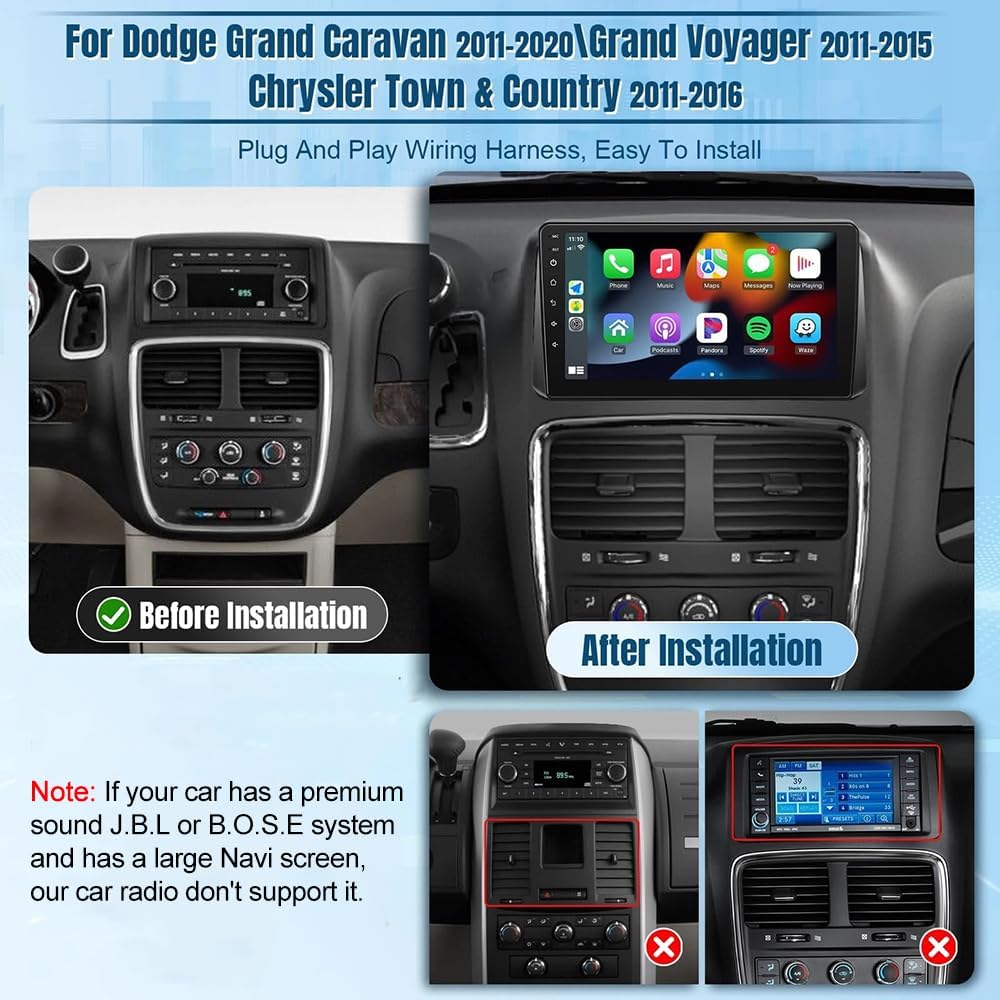
Image: A visual comparison showing the vehicle's dashboard before and after the installation of the moseiny Android 14 Car Radio Head Unit, highlighting the integrated appearance.
5. Operating Instructions
This section details the operation of various features of your moseiny Android 14 Car Radio Head Unit.
5.1 Wireless CarPlay & Android Auto
The head unit supports both Wireless CarPlay for iOS devices and Android Auto for Android devices, providing seamless integration for navigation, music, calls, and more. Connect your smartphone via Bluetooth and/or USB to enable these features. Voice assistant support ensures hands-free operation for enhanced driving safety.

Image: The CarPlay user interface shown on the 10-inch touch screen, displaying various applications like Phone, Music, Maps, and Messages.
Video: This video demonstrates how to connect your smartphone via Bluetooth and activate Wireless CarPlay or Android Auto on the head unit, showcasing the user interface and key functionalities.
5.2 Bluetooth Connectivity
Pair your smartphone with the head unit via Bluetooth to make and receive hands-free calls and stream audio directly to the car's speakers. Access the Bluetooth settings on the head unit to search for and connect to your device.
5.3 GPS Navigation
The unit comes with pre-installed North American maps. After connecting the GPS antenna, you can use the navigation application to plan routes and receive turn-by-turn directions. The Android 14 system ensures smooth and responsive map performance.

Image: The GPS navigation system in action, displaying a detailed map with route guidance and current location information.
5.4 WiFi Connectivity
Connect the head unit to a Wi-Fi hotspot (e.g., from your smartphone) to access online navigation, download apps from the Play Store, and stream content. The unit supports 5G Wi-Fi for faster internet speeds.

Image: The Wi-Fi connection screen, illustrating how to connect to a network and access online features and applications.
5.5 Steering Wheel Control (SWC)
Utilize your vehicle's existing steering wheel buttons to control the car audio system, including volume, track changes, and call management. This feature enhances convenience and safety by allowing you to operate the unit without taking your hands off the wheel.

Image: A visual representation of how steering wheel controls can be used to manage audio and other functions on the head unit, promoting safer driving.
5.6 Backup Camera Functionality
The included AHD backup camera provides clear, waterproof night vision, automatically displaying the rear view on the screen when the vehicle is in reverse. This assists with parking and maneuvering, improving safety.

Image: The backup camera display on the head unit, showing a wide-angle view behind the vehicle with dynamic trajectory lines for parking assistance.
5.7 Audio and Sound Settings
Customize your audio experience with the built-in 32-band Equalizer (EQ) and FM RDS support. Adjust sound frequencies, balance, and fade to optimize audio output. The FM RDS feature provides real-time traffic updates and station information.

Image: The audio settings interface, showcasing the 32-band equalizer for fine-tuning sound and the FM radio display with RDS information.
5.8 Mirror Link & Split Screen
The Mirror Link function allows you to synchronize your smartphone's content wirelessly or via a wired connection to the 1280x800 HD IPS touch screen, providing clearer images and richer colors. Additionally, the Split Screen function enables you to run two applications simultaneously, such as navigation and music, for enhanced multitasking.

Image: A demonstration of the Mirror Link feature, showing a smartphone screen being mirrored onto the car radio's display.

Image: The Split Screen feature in use, displaying two different applications side-by-side on the head unit's screen, such as navigation and a video player.
6. Maintenance
To ensure the longevity and optimal performance of your moseiny car radio, follow these maintenance guidelines:
- Cleaning the Screen: Use a soft, lint-free cloth specifically designed for electronics to clean the touch screen. Avoid abrasive cleaners or harsh chemicals that can damage the display.
- Software Updates: Periodically check for software updates through the unit's settings menu to ensure you have the latest features and bug fixes. A stable internet connection is required for updates.
- Environmental Care: Avoid exposing the unit to extreme temperatures, direct sunlight for prolonged periods, or excessive moisture.
- Cable Connections: Regularly check all cable connections to ensure they are secure and free from damage. Loose connections can lead to intermittent functionality.
7. Troubleshooting
If you encounter any issues with your head unit, refer to the following common troubleshooting steps:
- No Power: Check the power cable connections and the vehicle's fuse box. Ensure the unit is properly wired to the vehicle's power supply.
- No Sound: Verify speaker connections, volume settings, and audio source selection. Check the EQ settings to ensure no frequencies are muted.
- Bluetooth Connection Issues: Ensure Bluetooth is enabled on both the head unit and your smartphone. Delete previous pairings and attempt to reconnect. Restarting both devices can often resolve minor connectivity problems.
- GPS Signal Loss: Ensure the GPS antenna is properly installed and has a clear view of the sky. Move the vehicle to an open area if signal is weak.
- Touch Screen Unresponsive: Try restarting the head unit. If the issue persists, a factory reset might be necessary (note: this will erase all user data).
- CarPlay/Android Auto Not Connecting: Ensure your phone's operating system is up to date. Check USB cable integrity if using a wired connection. For wireless, ensure Bluetooth and Wi-Fi are active and correctly paired.
If these steps do not resolve the issue, please contact customer support for further assistance.
8. Warranty and Support
Your moseiny Android 14 Car Radio Head Unit is covered by a standard manufacturer's warranty against defects in materials and workmanship. The warranty period typically begins from the date of purchase. Please retain your proof of purchase for warranty claims.
For technical support, warranty inquiries, or service requests, please refer to the contact information provided on the product packaging or the official moseiny website. Our support team is available to assist you with any questions or concerns you may have regarding your product.