Introduction
This manual provides detailed instructions for the installation, operation, and maintenance of the EasQjK F722-BT V3 Flight Controller. This flight controller is designed for use in RC FPV drones, supporting 3-6S LiPo power systems. Please read this manual thoroughly before use to ensure proper functionality and safety.
Safety Information
- Always disconnect power before performing any installation, maintenance, or repair.
- Ensure correct polarity when connecting power to avoid damage to the flight controller and other components.
- Handle the flight controller with care to prevent electrostatic discharge (ESD) damage.
- Verify all connections are secure and correct before applying power.
- Operate FPV drones responsibly and in accordance with local regulations.
Product Overview
The EasQjK F722-BT V3 Flight Controller is a high-performance unit featuring an STM32F722 MCU and ICM42688-P IMU. It includes an integrated OSD with AT7456E chip, dual BECs (5V@3A, 9V@2.5A), and supports 3-6S LiPo input. A 512M onboard black box is included for flight data logging. The board also features a Type-C USB interface for configuration and an integrated LC power filter.

Figure 1: Top view of the F722-BT V3 Flight Controller. This image displays the layout of the main components, including the STM32F722 microcontroller, USB Type-C port, and various solder pads for connections such as BT, MCU, 5V, LED, RCS, CUR, M1-M4, BAT, G, CAM, VTX, and T1.

Figure 2: Bottom view of the F722-BT V3 Flight Controller. This perspective highlights the AT7456E OSD chip, additional capacitors, and solder pads for connections like VTX, 9V, 5V, LED, DM, DP, BOOT, and motor outputs M1-M4.
Specifications

Figure 3: Detailed specifications of the F722-BT V3 Flight Controller.
| Feature | Detail |
|---|---|
| MCU | STM32F722 |
| IMU | ICM42688-P (SPI) |
| Black Box | 512M onboard |
| Bluetooth | Supported |
| Barometer | Supported |
| USB Interface | Type-C |
| OSD | BetaFlight OSD w/ AT7456E chip |
| BEC | 5V@3A, 9V@2.5A dual BEC |
| Firmware Target | F722_BT_V3 |
| Size | 36.9mm x 36.9mm |
| Mounting Hole | 30.5mm x 30.5mm (M4, convertible to M3 with grommets) |
| Input Voltage | 3-6S LiPo |
| UART | 5 groups (UART4 fixed for Bluetooth) |
| Power Filter | Integrated LC filter |
| Weight | 8.2g |
| Product Dimensions (approx.) | 0.39 x 0.39 x 0.39 inches |
| Item Model Number | EasQjK77521 |
Setup
1. Physical Installation
- Mount the flight controller onto your drone frame using the provided grommets and nylon nuts. Ensure the arrow on the FC points towards the front of the drone.
- Use the shock-absorbing rings if converting M4 mounting holes to M3.
2. Wiring Connections
Refer to the pinout diagrams (not provided in this manual, consult product page or manufacturer's website) for specific connections. General connections include:
- Power Input: Connect your 3-6S LiPo battery directly to the BAT and G pads.
- ESCs: Connect motor signal wires (M1-M4) to the corresponding pads.
- Receiver (RX): Connect your receiver to an available UART (e.g., SBUS, CRSF, PPM). UART4 is fixed for Bluetooth.
- Video Transmitter (VTX): Connect VTX power (9V or 5V) and video signal to the VTX pads.
- Camera (CAM): Connect camera power (5V) and video signal to the CAM pads.
- GPS (Optional): Connect GPS module to an available UART.
- Air Unit (e.g., DJI Air Unit): Direct plugging into DJI Air Unit is supported. Use the provided Air Unit Cable.
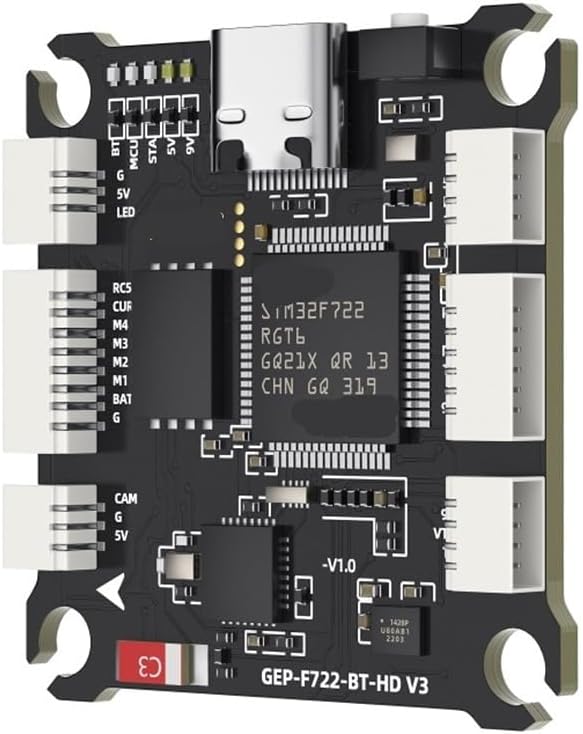
Figure 4: F722-BT V3 Flight Controller with connectors. This image illustrates the various white connector ports and solder pads, indicating where external components like motors, receivers, and video systems can be connected.
Operating Instructions
1. Firmware Flashing
- Download the latest BetaFlight Configurator software from the official BetaFlight website.
- Connect the flight controller to your computer using a USB Type-C cable.
- In BetaFlight Configurator, navigate to the "Firmware Flasher" tab.
- Select the target "F722_BT_V3" and choose the desired firmware version.
- Click "Load Firmware [Online]" and then "Flash Firmware".
2. Initial Configuration (BetaFlight)
After flashing, connect to the flight controller in BetaFlight Configurator.
- Ports Tab: Configure UARTs for your receiver, VTX, GPS, etc. Remember UART4 is for Bluetooth.
- Configuration Tab: Set up ESC protocol (DShot, OneShot), accelerometer calibration, board alignment, and other basic settings.
- Receiver Tab: Verify receiver input and channel mapping.
- Modes Tab: Configure arming, flight modes, and other switches.
- OSD Tab: Customize the on-screen display elements.
- Blackbox Tab: Configure logging rates and parameters for the 512M onboard black box.
3. Bluetooth Functionality
The integrated Bluetooth allows for wireless configuration via a mobile app (e.g., SpeedyBee App or similar BetaFlight mobile configurators). Ensure Bluetooth is enabled on your mobile device and connect to the flight controller.
Maintenance
- Regular Inspection: Periodically check all solder joints and wire connections for looseness or damage.
- Cleaning: Keep the flight controller free from dust, dirt, and moisture. Use a soft brush or compressed air for cleaning.
- Firmware Updates: Regularly check for new firmware releases for performance improvements and bug fixes.
- Environmental Protection: Avoid exposing the flight controller to extreme temperatures, humidity, or direct sunlight.
Troubleshooting
- FC Not Powering On:
- Check battery connection and polarity.
- Verify power input voltage is within 3-6S LiPo range.
- No Connection to BetaFlight Configurator:
- Ensure USB Type-C cable is functional and properly connected.
- Install necessary VCP (Virtual COM Port) drivers.
- Try a different USB port on your computer.
- OSD Not Displaying:
- Check OSD settings in BetaFlight Configurator.
- Verify video signal connections from camera to FC and FC to VTX.
- Motors Not Spinning:
- Ensure the drone is armed (check arming conditions in BetaFlight).
- Verify ESC connections and protocol settings.
- Calibrate ESCs if necessary.
- Unstable Flight:
- Check IMU calibration and board alignment in BetaFlight.
- Inspect for vibrations affecting the flight controller.
- Review PID tuning settings.
Warranty Information
This product is covered by a standard manufacturer's warranty against defects in materials and workmanship. The warranty period typically begins from the date of purchase. Please retain your proof of purchase for warranty claims. Damage resulting from improper installation, misuse, unauthorized modification, or accidents is not covered under warranty. For specific warranty terms and conditions, please refer to the manufacturer's official website or contact your retailer.
Support
For technical assistance, troubleshooting, or further inquiries regarding the EasQjK F722-BT V3 Flight Controller, please visit the official EasQjK support website or contact their customer service. Online resources, community forums, and video tutorials may also provide valuable information for setup and configuration.
Manufacturer: EasQjK77521
Model Number: EasQjK77521
ASIN: B0FP26SCG5


