1. Product Overview
The MAST TATTOO A1 Pro Cordless Tattoo Gun Kit is designed for both beginners and experienced artists. This rotary machine features a 2200mAh battery, a 3.5mm stroke, and an upgraded LED digital display for precise control. Its lightweight design ensures comfort during extended use.

Image: Two A1 Pro machines showcasing the new generation wireless battery design.
2. Kit Contents
The A1 Pro Kit includes the following components:
- 1 x A1 Pro Cordless Rotary Tattoo Pen
- 20 x Cartridge Needles (5RL/5RS)
- 1 x Black Tattoo Ink
- 20 x Ink Cups
- 1 x Practice Skin
- 1 x Bandage Wrap
- 1 x Pair of Disposable Gloves
- 1 x Type-C Charging Cable

Image: Overview of all items included in the A1 Pro Tattoo Kit.
3. Features
3.1 Upgraded LED Digital Display
The A1 Pro features a bright LED display that clearly shows real-time voltage and remaining battery power. Voltage can be adjusted in 0.1V increments for precise control during lining and shading.

Image: High-resolution color screen displaying operational parameters.
3.2 Long-Lasting Cordless Design
Weighing 194g, the pen is designed for comfort during long sessions. The 2200mAh battery provides up to 12 hours of continuous use on a single charge. Charging is done via a Type-C port.

Image: Type-C charging port and battery capacity details.
3.3 Stable Mcore-A Motor
Equipped with an innovative Mcore-A motor and integrated chip, the pen operates at a stable 12V/12000Rpm with minimal noise and vibration. This ensures fast color saturation and clean, smooth lines.
3.4 Universal Cartridge Compatibility
The A1 Pro is compatible with all mainstream standard cartridge needles available on the market, offering flexibility for various tattoo styles.

Image: Illustrates compatibility with standard cartridge needles and rotary grip for needle length adjustment.
4. Setup
- Charge the Device: Before first use, fully charge the A1 Pro tattoo pen using the provided Type-C cable. The LED display will show battery percentage.
- Attach Cartridge Needle: Insert a compatible cartridge needle into the front end of the tattoo pen. Twist gently until it clicks into place.
- Adjust Needle Depth: Rotate the grip of the tattoo pen to adjust the needle protrusion (depth). Turn clockwise to decrease depth, counter-clockwise to increase.
- Prepare Ink: Pour a small amount of tattoo ink into an ink cup.

Image: Demonstrates the rotary mechanism for stroke adjustment.
5. Operating Instructions
- Power On/Off: Press and hold the power button (located below the display) for a few seconds to turn the device on or off.
- Adjust Voltage: Use the '+' and '-' buttons on either side of the display to increase or decrease the voltage. The voltage is displayed in real-time on the LED screen.
- Begin Tattooing: Once the desired voltage and needle depth are set, the machine is ready for use. Dip the needle into the ink cup and begin applying to the practice skin or prepared surface.
- Pause/Resume: A short press of the power button will pause or resume operation.
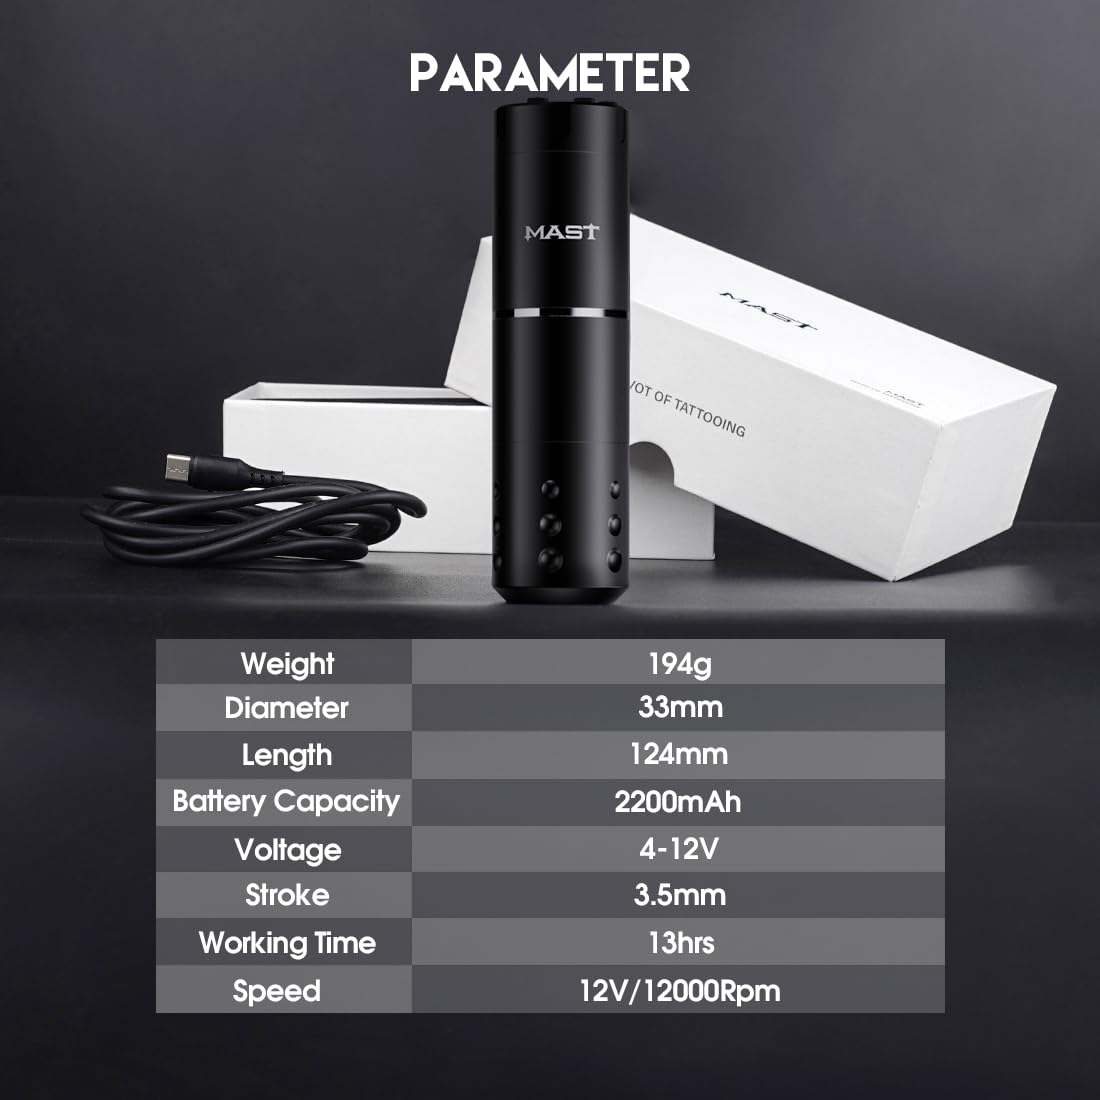
Image: Easy-to-use operating system with power and voltage controls.
6. Maintenance
- Cleaning: After each use, wipe down the exterior of the tattoo pen with a sterile wipe or alcohol solution. Ensure no liquids enter the internal components.
- Needle Disposal: Always dispose of used cartridge needles in a proper sharps container.
- Storage: Store the tattoo pen and accessories in a clean, dry place away from direct sunlight and extreme temperatures.
- Battery Care: To prolong battery life, avoid fully discharging the battery frequently. Charge the device regularly, even if not in use for extended periods.
7. Troubleshooting
| Problem | Possible Cause | Solution |
|---|---|---|
| Device does not turn on. | Low battery or device is off. | Charge the device fully. Press and hold the power button to turn on. |
| Needle not moving correctly. | Improperly installed cartridge or damaged needle. | Ensure the cartridge is securely attached. Replace with a new cartridge if damaged. |
| Voltage display is erratic. | Internal electrical issue. | Contact customer support if the issue persists after restarting the device. |
| Short battery life. | Battery degradation or incomplete charging. | Ensure full charge cycles. If battery life significantly decreases, consider contacting support. |
8. Specifications
| Parameter | Value |
|---|---|
| Weight | 194g |
| Diameter | 33mm |
| Length | 124mm |
| Battery Capacity | 2200mAh |
| Voltage | 4-12V |
| Stroke | 3.5mm |
| Working Time | Up to 13 hours |
| Speed | 12V/12000Rpm |

Image: Detailed technical specifications of the A1 Pro machine.
9. Safety Information
This product is for external use only. Always ensure proper sterilization of all equipment before use. Consult with a professional for proper tattooing techniques and safety protocols. Keep out of reach of children.
10. Warranty and Support
For warranty information or technical support, please refer to the manufacturer's official website or contact your retailer. Keep your purchase receipt for warranty claims.


