1. Introduction
This manual provides detailed instructions for the assembly, installation, operation, and maintenance of your VEVOR 22U Server Rack Cabinet, Model SPT-604-22. This cabinet is designed to house 19-inch IT and A/V equipment, offering a secure and organized solution for network infrastructure in various environments such as offices, classrooms, and retail spaces. Please read this manual thoroughly before installation and use to ensure proper function and safety.

Image: VEVOR 22U Server Rack Cabinet integrated into an office environment, demonstrating its capacity to organize various IT devices.
2. Safety Instructions
- Always ensure the cabinet is placed on a stable, level surface or securely mounted to a wall capable of supporting its weight and the weight of all installed equipment.
- Do not exceed the maximum weight capacity of 300 lbs (136 kg).
- Exercise caution during assembly and installation. It is recommended to have at least two people for lifting and positioning the cabinet.
- Keep all ventilation openings clear to prevent overheating of equipment.
- Ensure all electrical connections are made according to local codes and standards.
- Use appropriate personal protective equipment (PPE) during assembly, such as gloves, to prevent injury.
3. Package Contents
Verify that all components are present before beginning assembly:
- 1 x VEVOR 22U Server Rack Cabinet Frame
- 4 x Caster Wheels with Screw Set
- 1 x Grounding Wire
- 40 x Self-tapping Screws
- 4 x Expansion Bolts
- 12 x Cage Nuts & Bolts
- 1 x Tray
- 4 x Keys
- 2 x Front Door Locks
- 1 x User Manual (this document)

Image: Detailed diagram illustrating the cabinet's dimensions and a comprehensive list of all included accessories for assembly.
4. Setup and Assembly
4.1 Assembly Instructions
The VEVOR 22U Server Rack Cabinet requires assembly. Follow the included graphical instructions carefully. Ensure all screws and bolts are tightened securely. The adjustable square-hole mounting rails facilitate easy installation of various equipment.
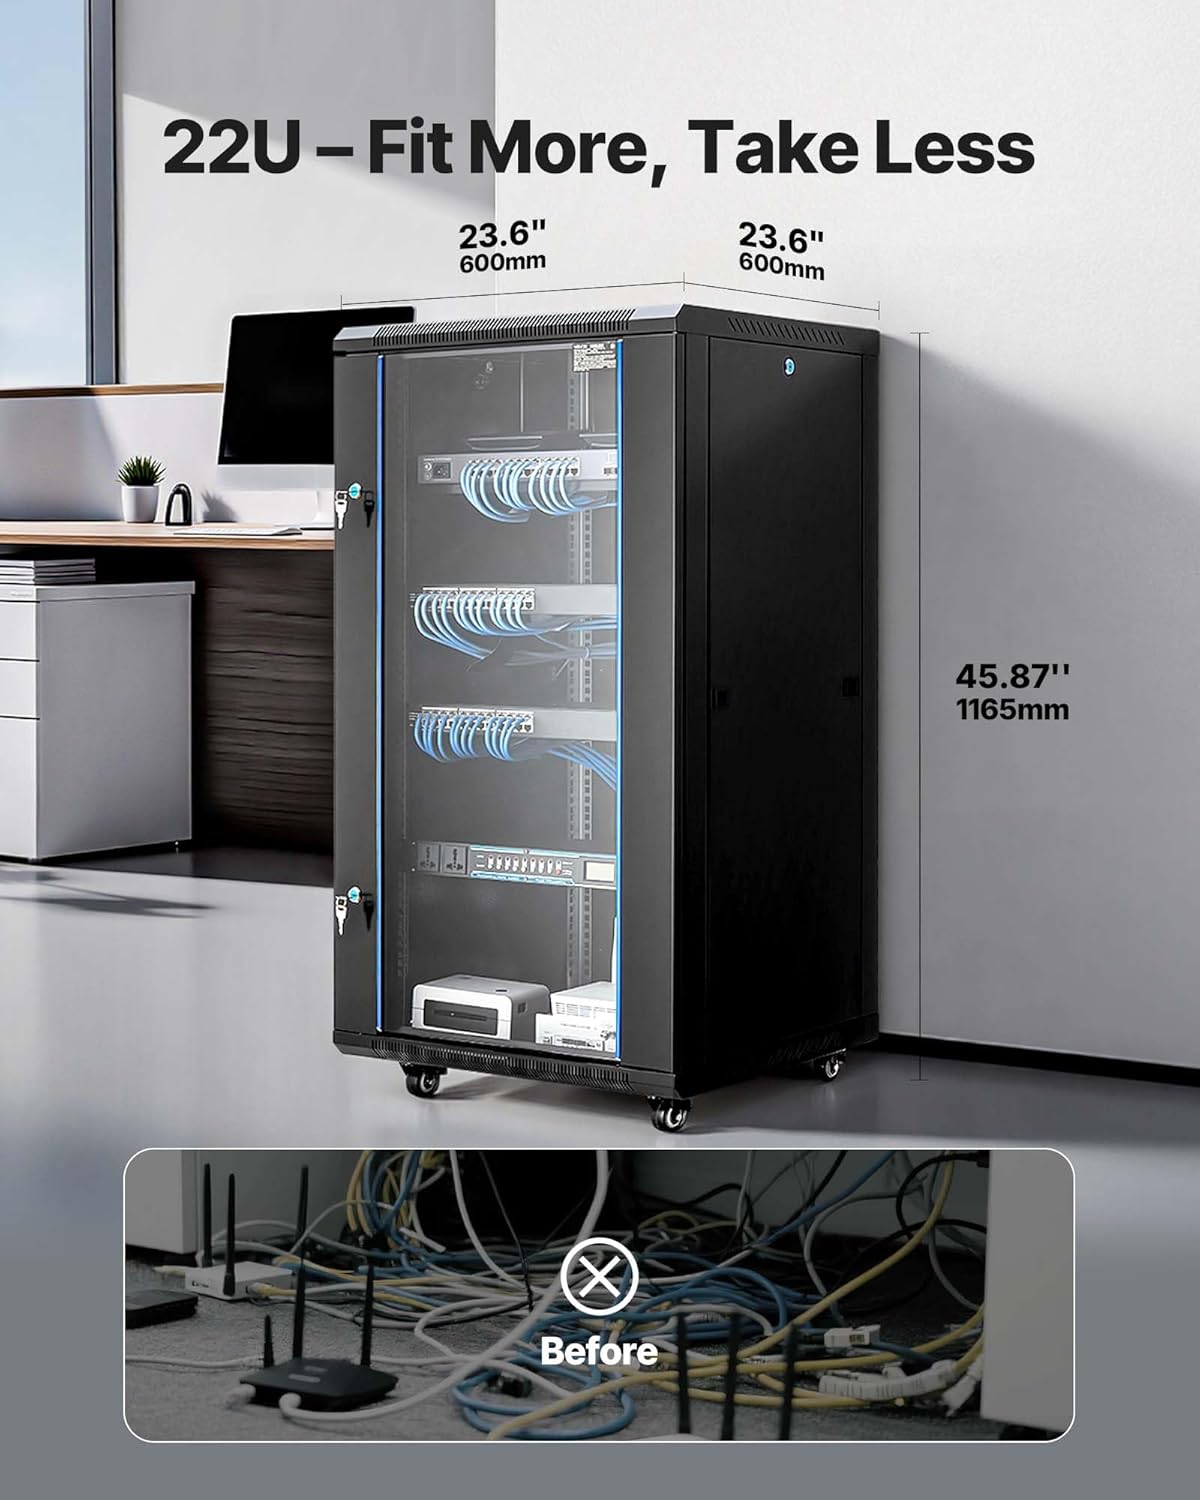
Image: The 22U server rack cabinet with its dimensions (23.6 inches depth, 45.87 inches height) and a visual comparison of cable organization before and after using the cabinet.
4.2 Mounting Options
This cabinet supports both floor-standing and wall-mount configurations. For floor standing, attach the included caster wheels for mobility. For wall mounting, ensure the wall structure can safely support the cabinet's weight (88.18 lbs / 40 kg) plus the weight of all installed equipment, up to a maximum of 300 lbs (136 kg). Use the provided expansion bolts for secure wall attachment.

Image: A person demonstrating the mobility and robust construction of the VEVOR 22U Server Rack Cabinet, emphasizing its 300 lbs maximum weight capacity.
5. Operating the Cabinet
5.1 Equipment Installation
Install your 19-inch IT and A/V equipment onto the adjustable square-hole mounting rails using the provided cage nuts and bolts. Ensure equipment is evenly distributed to maintain balance and stability.
5.2 Cable Management
The cabinet features multiple wiring holes on the top, rear, and bottom panels to facilitate organized cable routing. Utilize these openings to manage cables neatly, preventing tangles and improving airflow.

Image: Illustration of the cabinet's design with dedicated wiring holes on the top, rear, and bottom panels, demonstrating effective cable organization.
5.3 Security Features
The cabinet is equipped with a locking tempered glass front door and lockable side panels to secure your devices and data from unauthorized access. Use the provided keys to lock and unlock the doors.

Image: Detailed view of the secure locking mechanisms on both the front door and side panels, ensuring protection for enclosed equipment.
5.4 Heat Dissipation
The cabinet features strategically placed ventilation vents and cooling holes to ensure optimal airflow and prevent equipment overheating. Ensure these vents are not obstructed.

Image: Visual representation of the cabinet's ventilation system, highlighting wide vents and heat sink holes designed for efficient heat dissipation.
6. Maintenance
- Cleaning: Regularly clean the exterior surfaces with a soft, damp cloth. Avoid abrasive cleaners. For the tempered glass door, use a glass cleaner.
- Ventilation: Periodically check that all ventilation openings are free from dust and obstructions to ensure proper airflow.
- Hardware Inspection: Annually inspect all screws, bolts, and mounting hardware to ensure they remain tight and secure.
- Lock Mechanism: Lubricate the lock mechanisms periodically with a suitable lubricant to ensure smooth operation.
7. Troubleshooting
- Cabinet Wobbles: Ensure the cabinet is on a level surface. If using caster wheels, ensure they are locked. If wall-mounted, verify all expansion bolts are securely fastened. Check that all assembly screws are tightened.
- Doors Not Closing/Locking Properly: Check for any obstructions. Ensure the cabinet frame is square and not bent. Adjust hinges if necessary.
- Overheating Equipment: Verify that all ventilation vents and cooling holes are clear. Ensure there is adequate space around the cabinet for airflow. Consider adding active cooling solutions if necessary.
- Difficulty with Assembly: Refer to the graphical instructions provided with the product. Ensure all parts are correctly oriented before tightening screws. If parts appear bent, contact customer support.
8. Specifications
| Feature | Specification |
|---|---|
| Model Number | SPT-604-22 |
| Height | 22U |
| Depth | 23.6 in (600 mm) |
| Standard Mounting Width | 19 inches (internal) / 23.6 in (600 mm) (external) |
| Max Weight Capacity | 300 lbs (136 kg) |
| Material | Q235 Alloy Steel |
| Net Weight | 88.18 lbs (40 kg) |
| Product Dimensions (L x W x H) | 23.62 x 23.62 x 45.87 in (600 x 600 x 1165 mm) |
| Mounting Type | Floor Mount / Wall Mount |
| Compatible Devices | Servers, IT Equipment, A/V Devices |
9. Warranty Information
The VEVOR 22U Server Rack Cabinet (Model SPT-604-22) comes with a 1-Year Warranty from the date of purchase. This warranty covers manufacturing defects and material flaws under normal use. It does not cover damage resulting from improper installation, misuse, accidents, modifications, or unauthorized repairs. Please retain your proof of purchase for warranty claims.
10. Support & Contact
For technical assistance, troubleshooting, or warranty inquiries, please contact VEVOR customer support. Refer to the official VEVOR website or your purchase documentation for the most current contact information.
VEVOR Official Website: www.vevor.com