
Introduction
This manual provides detailed instructions for the installation, operation, and maintenance of the A&A Manufacturing 230069 2-Inch Low Profile 6-Port T-Valve Rebuild Gear Kit. This kit is designed to restore the functionality of your in-floor cleaning system's 6-port T-valve by replacing worn internal components. Please read all instructions carefully before beginning the rebuild process.
Kit Components
The A&A Manufacturing 230069 rebuild kit typically includes the following components:
- Complete Gear Assembly
- Flow Director / Shutter Plate
- O-rings and Seals
- Impeller / Drive Gear

Image 1: Complete Gear Assembly. This image shows the full gear mechanism, which is responsible for rotating the flow director.

Image 2: Blue Flow Director / Shutter Plate. This component directs water flow to different cleaning zones.

Image 3: O-rings and Disc Plate. These are critical for sealing and smooth operation within the valve.
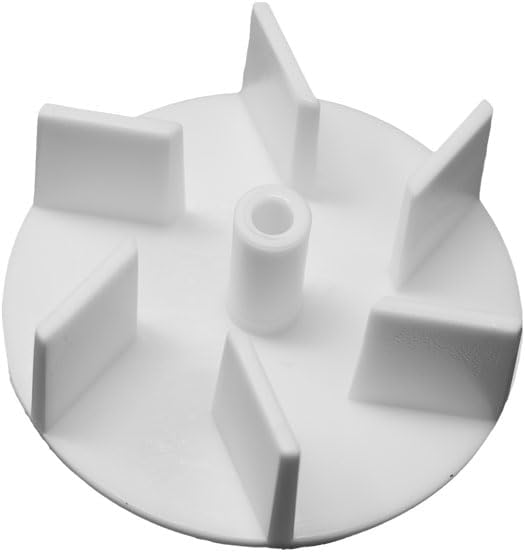
Image 4: White Impeller / Drive Gear. This gear is often driven by water flow to power the rotation of the valve's internal mechanism.
Setup and Installation
Before starting, ensure the pool pump is turned off and the system is depressurized. It is recommended to have a clean workspace and appropriate tools (e.g., screwdrivers, pliers, silicone lubricant for O-rings).
- Access the T-Valve: Locate the 6-port T-valve in your in-floor cleaning system. Depending on your installation, this may require removing a cover or accessing an underground vault.
- Remove Valve Lid: Carefully unfasten the screws or clamps securing the valve lid. Lift the lid to expose the internal components.
- Remove Old Components: Extract the old gear assembly, flow director, impeller, and any worn O-rings or seals. Note their orientation for proper reassembly. Dispose of old parts responsibly.
- Clean Valve Body: Thoroughly clean the inside of the valve body, removing any debris, sand, or mineral deposits. Ensure all surfaces where new seals will sit are clean and smooth.
- Install New O-rings and Seals: Apply a thin layer of silicone lubricant to all new O-rings and seals. Carefully place them into their respective grooves within the valve body and on the new components. This ensures a proper seal and prevents damage during installation. Refer to Image 3 for typical O-ring and disc plate components.
- Install New Impeller / Drive Gear: Place the new impeller (Image 4) into its designated position. Ensure it can spin freely.
- Install New Gear Assembly: Carefully lower the new complete gear assembly (Image 1) into the valve body, aligning it with the impeller and any guide pins. Ensure the gears mesh correctly and the assembly sits flush.
- Install New Flow Director: Position the new flow director (Image 2) onto the gear assembly. Ensure it aligns with the output ports and can rotate freely when the gear assembly is manually turned.
- Replace Valve Lid: Carefully place the valve lid back onto the valve body, ensuring the O-ring or gasket is properly seated. Fasten the screws or clamps securely, but do not overtighten.
- Test System: Turn on the pool pump and check for any leaks around the valve lid. Observe the in-floor cleaning system to ensure the cleaning heads are cycling through the zones correctly.
Operation
After successful installation of the rebuild kit, the 6-port T-valve will resume its function of automatically directing pressurized water to different zones of your pool's in-floor cleaning system. The internal gear assembly, driven by water flow, rotates the flow director, sequentially activating cleaning heads in various areas of the pool. No manual operation is typically required for this valve once properly installed and the pool pump is running.
Maintenance
Regular maintenance helps prolong the life of your T-valve and its rebuild kit components:
- Periodic Inspection: Annually inspect the T-valve for proper rotation and any signs of wear or leaks.
- Cleanliness: Keep the valve area free of debris, sand, and other foreign objects that could interfere with the gear mechanism.
- O-Ring Lubrication: If the valve is disassembled for any reason, inspect and re-lubricate O-rings with silicone lubricant to maintain a good seal and prevent cracking.
- Water Chemistry: Maintain proper pool water chemistry to prevent scale buildup and corrosion, which can affect plastic and rubber components.
Troubleshooting
| Problem | Possible Cause | Solution |
|---|---|---|
| Valve not rotating or stuck on one zone |
|
|
| Water leaking from valve lid |
|
|
| Cleaning heads not popping up |
|
|
Specifications
- Model Number: 230069
- Brand: A & A MANUFACTURING
- Inlet Connection Size: 2 Inches
- Outlet Connection Size: 2 Inches
- Number of Ports: 6
- Valve Type: Multi Port Valve
- Item Weight: 16 ounces
- Item Dimensions (L x W x H): 20 x 11 x 2 inches
- UPC: 818965012002
Warranty and Support
For specific warranty information or technical support regarding your A&A Manufacturing 230069 T-Valve Rebuild Gear Kit, please refer to the documentation provided with your original product purchase or contact A&A Manufacturing directly. This manual does not provide warranty details.