1. Introduction
This manual provides detailed instructions for the installation, operation, and maintenance of the Generic A320M-K Gaming Motherboard. Please read this manual thoroughly before proceeding with installation to ensure proper setup and optimal performance.

Figure 1: Overview of the A320M-K Gaming Motherboard.
2. Product Specifications
The A320M-K motherboard is designed to support a wide range of desktop processors and components. Key specifications are outlined below:

Figure 2: Detailed product specifications for the A320M-K Motherboard.
| Feature | Description |
|---|---|
| Part # | A320M-K Motherboard |
| Processor | AMD Socket AM4 CPU (Ryzen 3000, 4000 G, 5000, 5000 G series) |
| Chipset | AMD A320 |
| Display Output | 1x HDMI (3840x2160/60 Hz), 1x VGA (1920x1080/60 Hz) |
| Memory | 2x UDIMM DDR4 slots, 2132/2400/2666/3200 MHz (based on CPU), Dual channel, up to 64GB |
| Storage | 4x SATA3.0 Ports, 1x M.2 2280 NVMe x4 3.0 port, 1x M.2 WiFi slot |
| USB Ports | 8x USB2.0 Ports (4 rear, 4 via headers), 4x USB3.0 Ports (2 rear, 2 via header) |
| LAN | 1x RTL8111H, 1000Mbps Ethernet |
| Audio | ALC897 5.1 Channel Audio Chip |
| BIOS | AMI EFI BIOS |
| Expansion Slots | 1x PCIe 3.0 x16, 1x PCIe 2.0 x1 |
| Form Factor | Micro-ATX (218mm x 170mm) |
3. Key Features
The A320M-K motherboard incorporates several features designed for reliable performance and expandability:
- Processor Support: Compatible with AMD AM4 Socket processors, including Ryzen 3000, 4000 G series, and 5000, 5000 G series.
- M.2 Interface: Features a Serial ATA M.2 (NGFF M.2) interface supporting the AHCI protocol for data transfer speeds up to 6Gbps, offering a high-speed alternative to traditional 2.5-inch solid-state drives.
- High Definition Video Output: Equipped with both VGA and HDMI outputs, supporting up to 4K video and sound for versatile display options.
- Stable Power Supply: Utilizes a 3+1 phase power supply configuration to ensure consistent and stable power delivery to components.
- High Performance Design: Constructed with a 4-layer PCB for enhanced stability and faster operational speeds. Full solid capacitors contribute to a reliable power supply for the CPU.

Figure 3: Visual representation of key motherboard features.
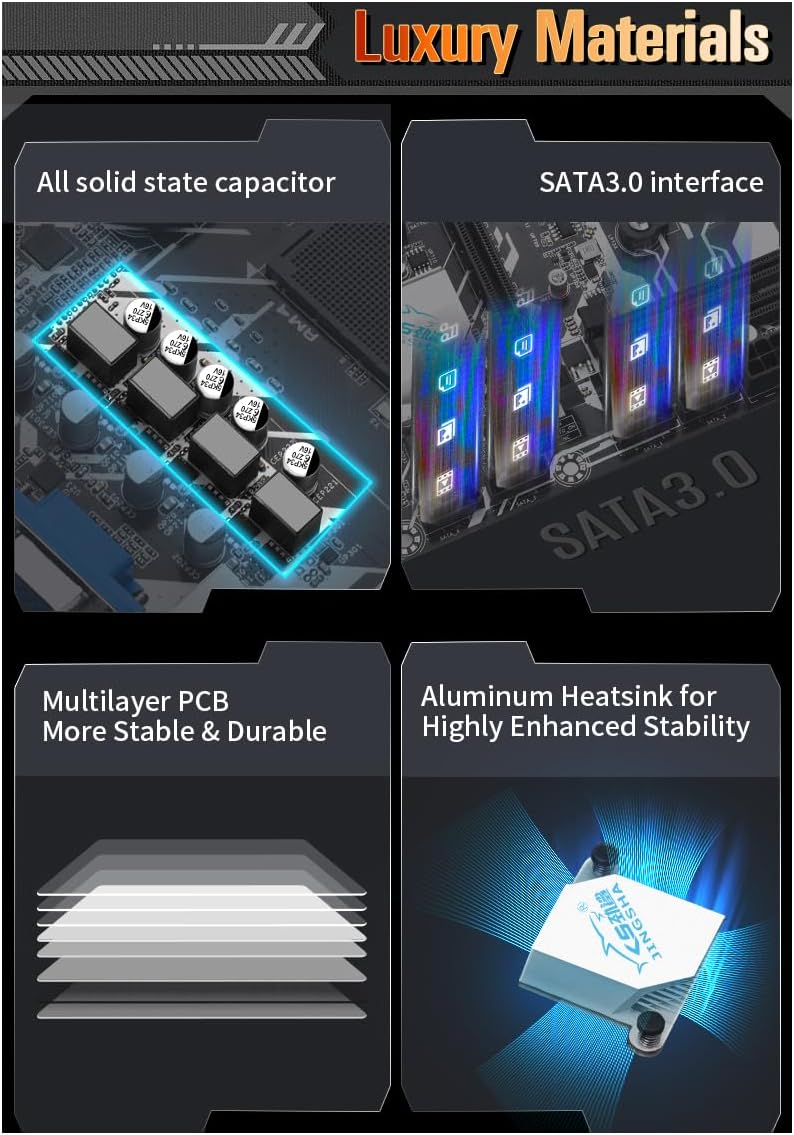
Figure 4: Illustration of the motherboard's quality components and construction.

Figure 5: Overview of A320M-K features and performance capabilities.
4. Setup and Installation
Before installing the motherboard, ensure your system is powered off and disconnected from the power source. Handle the motherboard by its edges to avoid static discharge.
4.1 Motherboard Layout
Familiarize yourself with the motherboard's layout to identify key connectors and components.
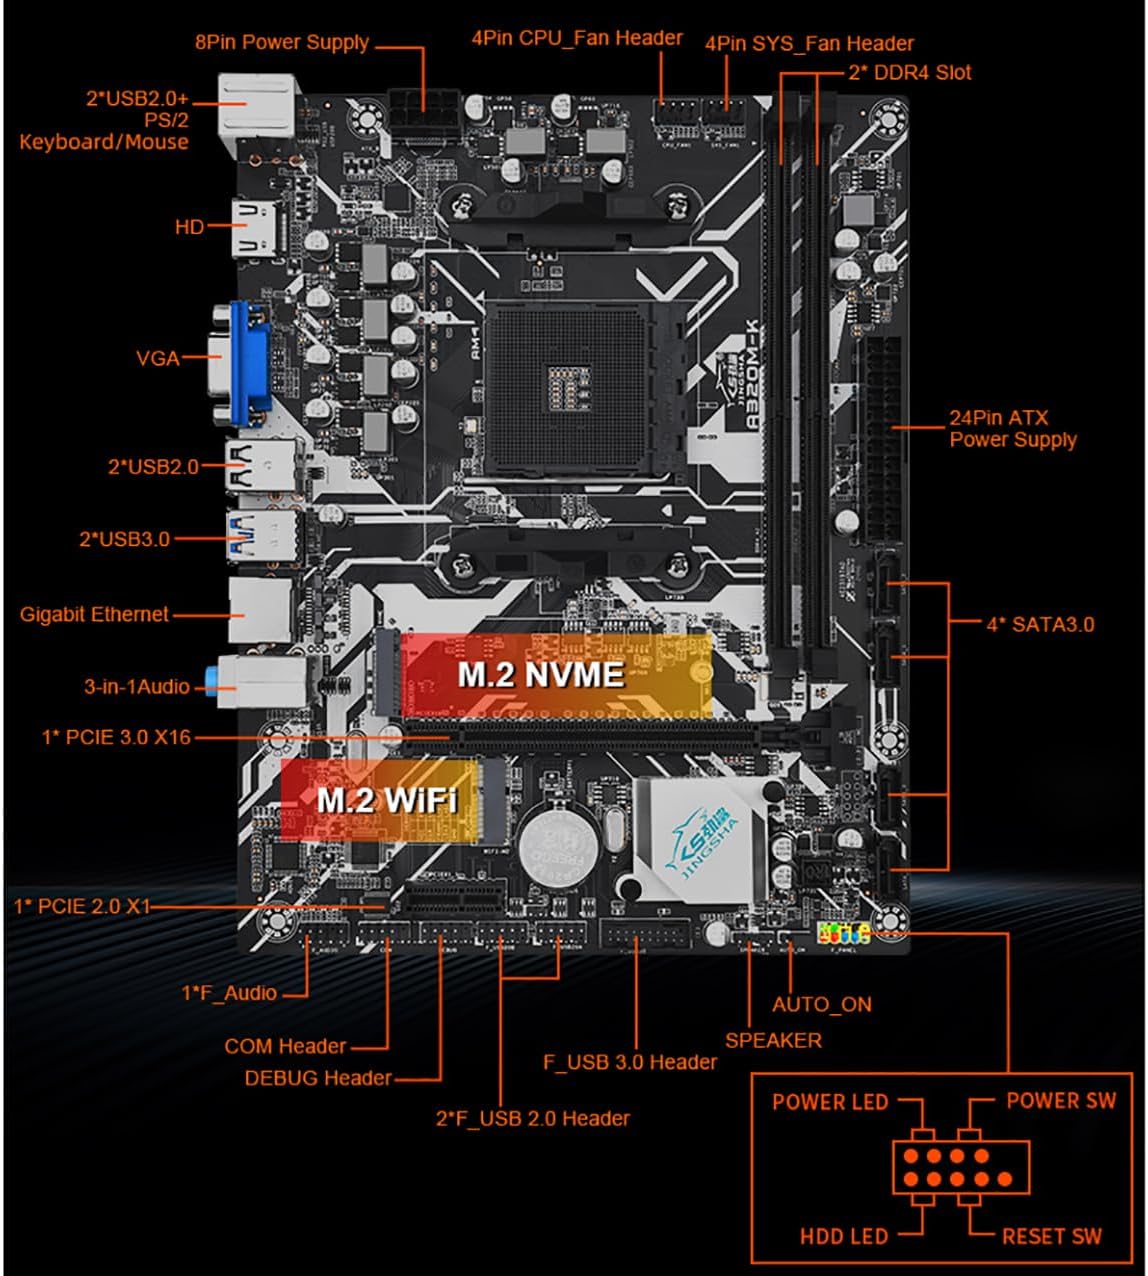
Figure 6: Labeled diagram of the A320M-K motherboard showing component locations.
4.2 Back Panel Connectors
The back panel provides various ports for connecting peripherals.
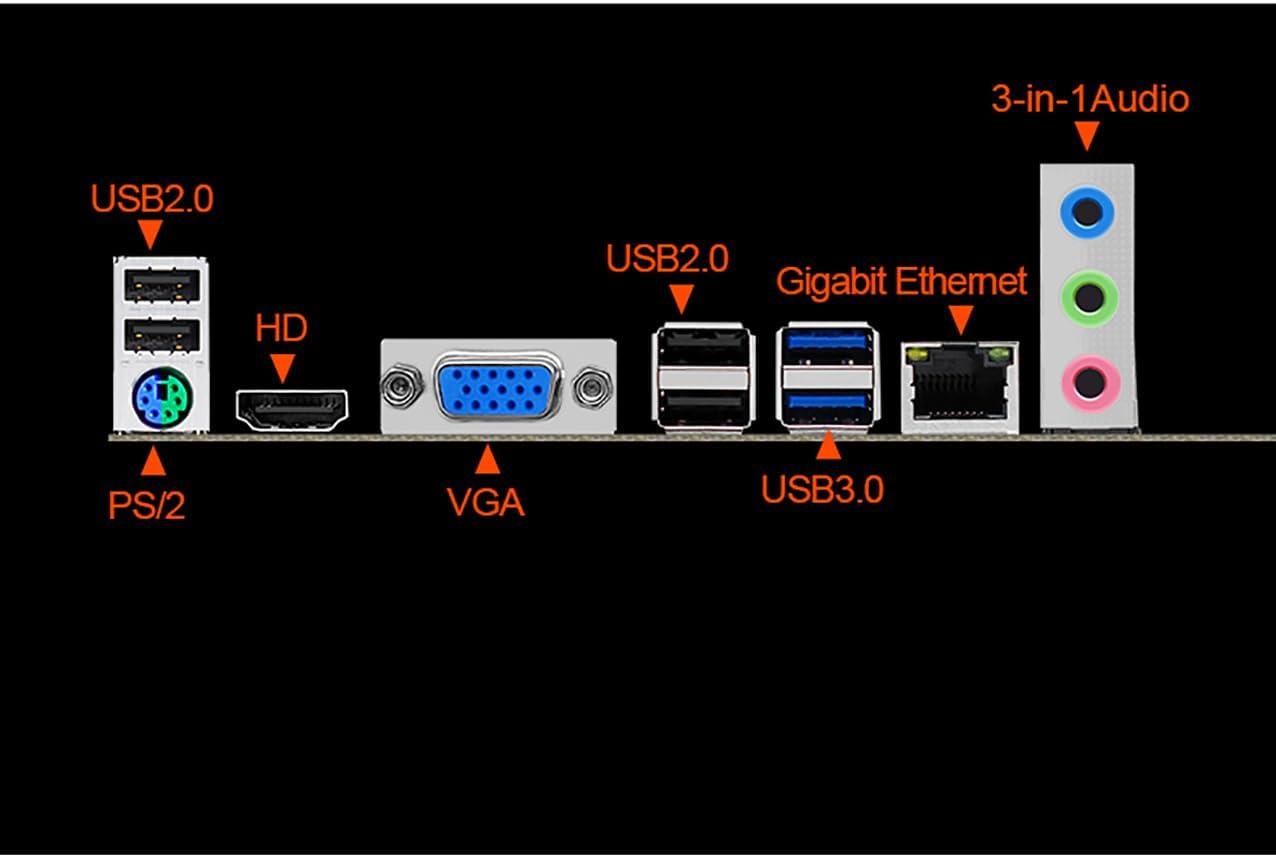
Figure 7: Close-up view of the motherboard's back panel connectors.
4.3 Installation Steps (General)
- Install CPU: Carefully place the AMD AM4 CPU into the socket, aligning the triangle markers. Secure the retention arm.
- Install CPU Cooler: Mount the CPU cooler according to its manufacturer's instructions.
- Install RAM: Insert DDR4 memory modules into the DIMM slots until they click into place. Ensure dual-channel configuration if using two modules.
- Mount Motherboard: Secure the motherboard into your PC case using standoffs and screws.
- Connect Power: Connect the 24-pin ATX power connector and the 8-pin 12V CPU power connector from your power supply to the motherboard.
- Install Storage Devices: Connect SATA drives to the SATA3.0 ports. Install M.2 NVMe SSDs into the M.2 slot if applicable.
- Install Expansion Cards: Insert graphics cards into the PCIe 3.0 x16 slot and other expansion cards into the PCIe 2.0 x1 slot as needed.
- Connect Front Panel Cables: Connect the power switch, reset switch, HDD LED, power LED, USB, and audio cables from your PC case to the corresponding headers on the motherboard (refer to Figure 6).
- Connect Peripherals: Connect your monitor, keyboard, mouse, and other peripherals to the back panel ports.
5. Operating Instructions
After successful installation, you can power on your system.
5.1 Initial Boot-up
- Press the power button on your PC case.
- The system should boot and display the BIOS/UEFI splash screen.
- If installing a new operating system, ensure your installation media (USB drive or DVD) is connected and set as the primary boot device in the BIOS/UEFI settings.
5.2 BIOS/UEFI Setup
To enter the BIOS/UEFI setup utility, press the DEL or F2 key repeatedly during the initial boot-up sequence. Within the BIOS/UEFI, you can configure various system settings, including boot order, CPU settings, memory timings, and fan controls.
5.3 Driver Installation
After installing your operating system, install the necessary drivers for the motherboard's chipset, LAN, audio, and any integrated graphics. These drivers are typically provided on a support CD or can be downloaded from the manufacturer's website.
6. Maintenance
Proper maintenance helps ensure the longevity and stable operation of your motherboard.
- Keep Clean: Regularly clean dust from inside your PC case, especially around the motherboard, CPU cooler, and fan vents. Use compressed air for best results.
- BIOS/UEFI Updates: Periodically check the manufacturer's website for BIOS/UEFI updates. Updates can improve compatibility, stability, and performance. Follow update instructions carefully to avoid damaging the motherboard.
- Driver Updates: Keep your system drivers updated to ensure optimal performance and compatibility with new software and hardware.
- Environmental Control: Operate the system in a well-ventilated area with stable temperature and humidity to prevent overheating and component degradation.
7. Troubleshooting
If you encounter issues with your motherboard, consider the following troubleshooting steps:
- No Power:
- Ensure all power cables (24-pin ATX, 8-pin CPU) are securely connected.
- Verify the power supply is functional and switched on.
- Check front panel power switch connections to the motherboard.
- No Display:
- Confirm the monitor is connected to the correct video output (integrated or discrete graphics card).
- Reseat the graphics card and memory modules.
- Test with a different monitor or display cable.
- System Instability/Crashes:
- Check CPU and GPU temperatures to ensure they are within safe operating limits.
- Verify memory modules are correctly installed and compatible.
- Update BIOS/UEFI and all system drivers.
- Run memory diagnostic tools to check for RAM errors.
- Peripheral Not Detected:
- Ensure the peripheral is properly connected to the correct port.
- Install or update drivers for the peripheral.
- Test the peripheral on another system or try a different port.
- BIOS Reset: If system settings become unstable, you can reset the BIOS to default settings by clearing the CMOS. This usually involves removing the CMOS battery for a few minutes or using a dedicated jumper on the motherboard (refer to Figure 6 for CMOS header location).
8. Warranty and Support
The Generic A320M-K Gaming Motherboard comes with a 3-year warranty from the date of purchase. This warranty covers defects in materials and workmanship under normal use.
For technical support or warranty claims, please contact your retailer or the manufacturer's customer service. Keep your proof of purchase for warranty validation.
Note: The warranty does not cover damage caused by improper installation, misuse, unauthorized modifications, accidents, or natural disasters.