1. Introduction
Thank you for choosing the BUSBYR 3600W Hybrid Solar Inverter with WiFi. This manual provides essential information for the safe and efficient installation, operation, and maintenance of your inverter. This device is designed to convert 24V DC power into 110V/120V AC pure sine wave power, suitable for various applications including home backup, RVs, cabins, and off-grid systems. It integrates a 120A MPPT solar charge controller and offers WiFi monitoring capabilities for enhanced system management.

Figure 1: Front view of the BUSBYR 3600W Hybrid Solar Inverter, showcasing its compact design and display panel.
The inverter supports up to 4200W PV input and features flexible charging and output modes to ensure uninterrupted power supply. Please read this manual thoroughly before installation and operation to ensure proper use and to prevent damage to the unit or connected equipment.
2. Safety Instructions
Always observe the following safety precautions to reduce the risk of electric shock, fire, or injury.
- Qualified Personnel: Installation and maintenance must be performed by qualified personnel familiar with electrical systems and safety standards.
- Disconnect Power: Before installing or servicing, ensure all power sources (AC, DC, battery, solar) are disconnected.
- Proper Grounding: The inverter must be properly grounded according to local electrical codes.
- Ventilation: Install the inverter in a well-ventilated area to prevent overheating. Do not block ventilation openings.
- Environment: Avoid installation in areas with excessive dust, moisture, corrosive gases, or flammable materials.
- Battery Safety: Work with batteries carefully. Wear eye protection and remove metal jewelry. Ensure proper battery type and voltage compatibility (24V).
- Overload Protection: Do not exceed the inverter's rated output power (3600W continuous, 7200W peak).
- Emergency Shutdown: Familiarize yourself with the emergency shutdown procedures for your entire solar power system.
- Internal Components: Do not attempt to open or repair the inverter yourself. Refer all servicing to qualified service personnel.

Figure 2: Visual representation of the inverter's multi-functional safety protections, including overload, short circuit, battery, overheating, overcurrent, and high/low voltage protection.
3. Product Features
The BUSBYR 3600W Hybrid Solar Inverter offers a range of advanced features for reliable power management:
- High Power Output: Converts 24V DC to 110V/120V AC pure sine wave, providing 3600W continuous and 7200W peak output.
- Integrated MPPT Controller: Features a built-in 120A MPPT solar charge controller, maximizing solar energy harvesting with up to 30% improved charging efficiency. Supports up to 4200W PV input (max 500V DC).
- WiFi Monitoring: Includes a WiFi module for remote monitoring and smart system management via a mobile application, accessible anytime, anywhere.
- Smart LCD Screen & App Control: Equipped with a responsive LCD screen and LEDs for real-time system updates. Allows configuration of settings like charging current, voltage thresholds, and priority modes directly on the screen or through the WiFi app.
- Flexible Charging Modes: Supports four distinct charging modes:
- Solar Only
- AC Priority
- Solar Priority
- Hybrid
- Versatile Output Modes: Offers three output modes for power delivery:
- Mains Priority
- PV Priority
- Inverter Output
- Robust Compatibility: Compatible with 24V AGM, GEL, Lead-acid, Li-ion, and LiFePO4 batteries. Also supports a no-battery mode for direct solar-to-load use.
- Durable Design: IP65 dustproof design with smart cooling fans ensures durability and reliable operation in various environmental conditions.
- Comprehensive Safety: Provides multi-functional safety protections including overload, short circuit, battery, overheating, overcurrent, and high/low voltage protection.

Figure 3: An internal view highlighting the two intelligent cooling fans and various safety components designed for high inductive loads, ensuring multi-safety protection.
4. Setup & Installation
Proper installation is crucial for the inverter's performance and safety. Ensure all safety instructions are followed.
4.1 Unpacking and Inspection
Upon receiving the inverter, carefully unpack it and inspect for any shipping damage. Report any damage to your supplier immediately. Ensure all components are present.
4.2 Mounting the Inverter
- Choose a suitable mounting location that is dry, well-ventilated, and protected from direct sunlight, rain, and dust.
- Ensure there is sufficient clearance around the inverter for proper airflow (at least 20 cm on all sides).
- Mount the inverter vertically on a sturdy wall or surface using appropriate fasteners.

Figure 4: The hybrid solar inverter mounted on a wall, demonstrating its integration into a household environment. This image emphasizes its long service life, multiple protection features, voltage stability, and universal applicability.
4.3 Wiring Connections
All wiring must comply with local electrical codes and standards. Use appropriate wire gauges for all connections.
- Battery Connection: Connect the 24V battery bank to the inverter's battery terminals. Ensure correct polarity (+ to + and - to -). The inverter is compatible with AGM, GEL, Lead-acid, Li-ion, and LiFePO4 batteries.
- PV Array Connection: Connect the solar panel array to the MPPT solar input terminals. Ensure the PV input voltage is within the specified range (60-500V DC) and the maximum PV array power does not exceed 4200W.
- AC Input Connection: Connect the AC grid or generator input to the inverter's AC input terminals. The inverter supports 100/110/120VAC input with a frequency range of 50Hz/60Hz.
- AC Output Connection: Connect your loads (appliances) to the inverter's AC output terminals.
- Grounding: Connect the inverter's ground terminal to a reliable earth ground.
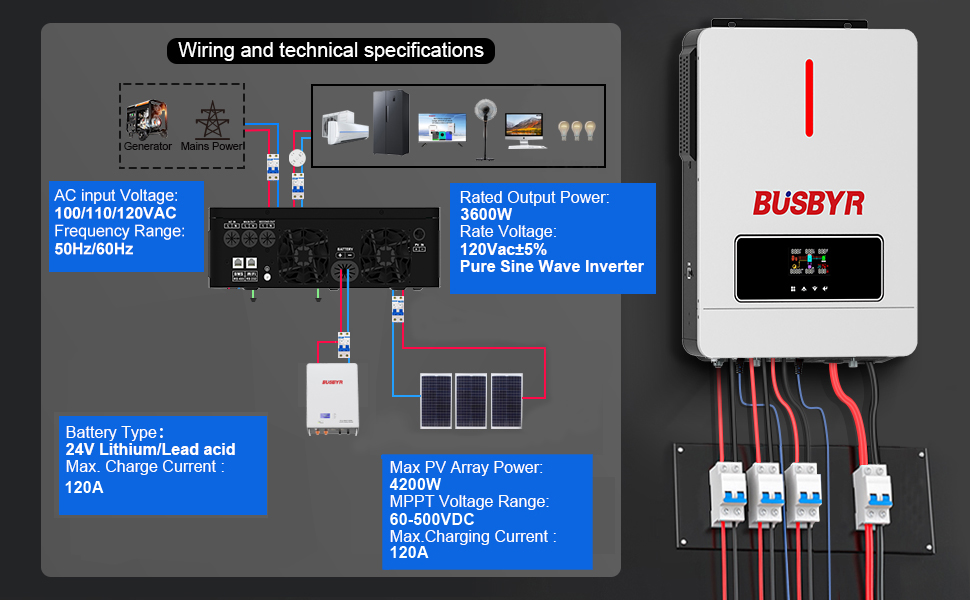
Figure 5: A detailed wiring diagram illustrating connections for generator/mains power, battery bank, solar PV array, and AC loads. Key technical specifications such as AC input voltage, rated output power, battery type compatibility, max PV array power, and MPPT voltage range are also displayed.
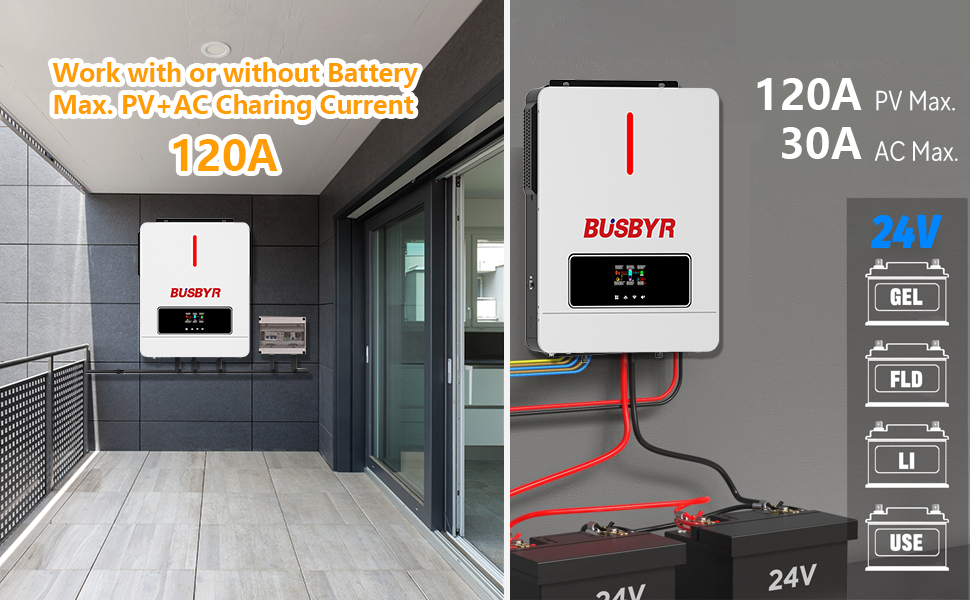
Figure 6: An illustration demonstrating the inverter's flexibility to operate with or without a battery, highlighting its maximum PV+AC charging current of 120A and compatibility with various 24V battery types (GEL, FLD, LI, USE).
5. Operating Instructions
Once installed, the inverter can be configured and operated using its LCD screen or the mobile application.
5.1 Initial Power-Up
- Ensure all wiring connections are secure and correct.
- Turn on the battery breaker first.
- Turn on the solar PV array breaker.
- Turn on the AC input breaker (if connected to grid/generator).
- The inverter will power on and display its status on the LCD screen.
5.2 LCD Display and Buttons
The LCD screen provides real-time information about the system status, including input/output voltage, current, power, battery status, and operating mode. Use the buttons below the screen to navigate menus and adjust settings.
- Menu Button: Access the main menu.
- Up/Down Buttons: Navigate through menu options or adjust values.
- Enter Button: Confirm selections or save settings.
- Escape Button: Exit a menu or cancel an action.
5.3 Configuring Charging and Output Modes
The inverter offers flexible modes to optimize power usage. These can be configured via the LCD screen or the WiFi app.
- Charging Modes:
- Solar Only: Prioritizes solar power for battery charging.
- AC Priority: Prioritizes AC utility power for charging.
- Solar Priority: Uses solar power first, then AC if solar is insufficient.
- Hybrid: Intelligent combination of solar and AC charging.
- Output Modes:
- Mains Priority: Loads are powered by AC utility first.
- PV Priority: Loads are powered by solar PV first.
- Inverter Output: Loads are powered by the inverter (battery/solar).
5.4 WiFi Monitoring and App Control
The integrated WiFi module allows for convenient remote monitoring and control. (Registration may be required for the app).
- Download the official BUSBYR monitoring app from your device's app store.
- Follow the in-app instructions to connect your inverter to your local WiFi network.
- Once connected, you can monitor real-time system status, power flow, historical data, and adjust settings remotely.

Figure 7: A user monitoring their hybrid inverter via a mobile application, demonstrating the convenience of the integrated WiFi module. The separate WiFi transmitter is also shown.
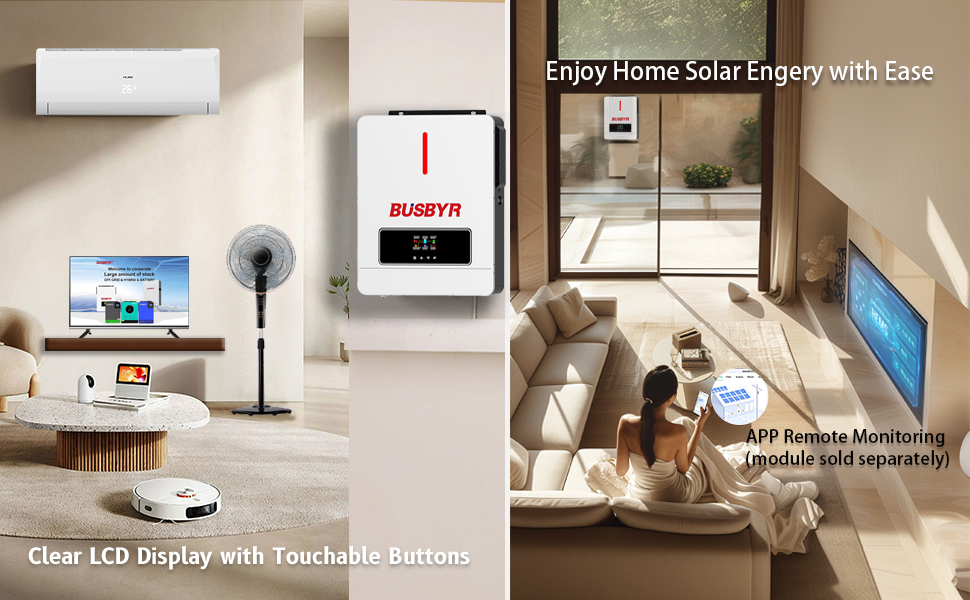
Figure 8: An illustration of the inverter seamlessly integrated into a modern home, with a user remotely monitoring their solar energy system via a mobile application. This highlights the ease of managing home solar energy.
6. Maintenance
Regular maintenance ensures the longevity and optimal performance of your inverter.
- Cleaning: Periodically clean the exterior of the inverter with a dry cloth. Ensure ventilation openings are free from dust and debris.
- Connections: Annually check all electrical connections for tightness and corrosion. Loose connections can cause overheating and damage.
- Battery Inspection: Regularly inspect your battery bank for any signs of damage, corrosion, or leakage. Ensure battery terminals are clean and tight.
- Environmental Check: Verify that the installation environment remains within recommended temperature and humidity ranges.
- Firmware Updates: Check the manufacturer's website or app for any available firmware updates for your inverter.
- Professional Inspection: Consider having a qualified technician inspect your system periodically, especially if you notice any unusual behavior.
Always disconnect all power sources before performing any maintenance.
7. Troubleshooting
This section provides solutions to common issues you might encounter. For problems not listed here, contact customer support.
| Problem | Possible Cause | Solution |
|---|---|---|
| Inverter not powering on | No battery connection; Battery voltage too low; Loose wiring; Blown fuse/breaker. | Check battery connections and voltage; Ensure all breakers are ON; Inspect fuses. |
| No AC output | Overload; Short circuit; Low battery voltage; Inverter fault. | Reduce load; Check for short circuits; Charge battery; Check inverter error codes on LCD. |
| Solar charging not working | PV array disconnected; Insufficient sunlight; PV voltage too low/high; MPPT controller fault. | Check PV connections; Ensure clear sky; Verify PV voltage within range (60-500V DC); Check inverter status. |
| Overheating warning | Blocked ventilation; Excessive ambient temperature; Overload. | Clear ventilation openings; Ensure proper airflow; Reduce load; Relocate inverter if necessary. |
| WiFi monitoring not connecting | Incorrect WiFi password; Router too far; Inverter WiFi module issue; App configuration error. | Verify WiFi credentials; Move router closer; Restart inverter and router; Reconfigure app connection. |
8. Specifications
Key technical specifications for the BUSBYR 3600W Hybrid Solar Inverter:
| Parameter | Value |
|---|---|
| Model Name | Busbyr 3600 WIFI |
| Rated Output Power | 3600W |
| Peak Output Power | 7200W |
| DC Input Voltage | 24V DC |
| AC Output Voltage | 110V/120V AC Pure Sine Wave |
| AC Input Voltage Range | 100/110/120VAC |
| Frequency Range | 50Hz/60Hz |
| MPPT Solar Charge Controller | 120A |
| Max PV Input Power | 4200W |
| MPPT Voltage Range | 60-500V DC |
| Max Charging Current (PV+AC) | 120A |
| Battery Compatibility | 24V AGM, GEL, Lead-acid, Li-ion, LiFePO4 |
| Dimensions (L x W x H) | 13.7 x 4.3 x 16.7 inches |
| Item Weight | 21.1 pounds |
| Protection Rating | IP65 Dustproof |
| Recommended Uses | Home, RV, Off-Grid Systems |
9. Warranty & Support
For warranty information and technical support, please refer to the documentation included with your product or visit the official BUSBYR website. Keep your purchase receipt as proof of purchase for warranty claims.
If you encounter any issues that cannot be resolved using the troubleshooting guide, please contact BUSBYR customer service for assistance.


