Introduction
This manual provides detailed instructions for the installation, operation, and maintenance of your Acmefun Saker Full View Car Dashcam System. This device is designed to record video footage from multiple angles around and within your vehicle, enhancing driving safety and providing evidence in case of incidents. Please read this manual thoroughly before using the product to ensure proper functionality and to avoid damage.
Safety Information
- Do not operate the dashcam or access its settings while driving. Always pull over to a safe location before making adjustments.
- Ensure the dashcam is securely mounted and does not obstruct your view of the road or interfere with airbag deployment.
- Use only the provided power adapter and cables to prevent damage to the device and your vehicle's electrical system.
- Keep the device away from extreme temperatures, direct sunlight for prolonged periods, and moisture.
- Do not attempt to disassemble or repair the dashcam yourself. Contact customer support for assistance.
- Format the memory card regularly to maintain optimal recording performance.
Package Contents
Verify that all items listed below are included in your package:
- 1 x Acmefun Saker Full View Car Dashcam System
- 1 x Car Power Adapter
- 1 x 64GB Memory Card
- 1 x Rear Camera
- 1 x User Manual (this document)

Figure 1: Package Contents. This image displays the main dashcam unit, a 64GB memory card, the car power adapter, and the separate rear camera, illustrating all components included in the product package.
Product Overview
The Acmefun Saker Full View Car Dashcam System features a multi-camera setup for comprehensive vehicle surveillance. It includes a main unit with front, left, and right cameras, and a separate rear camera.
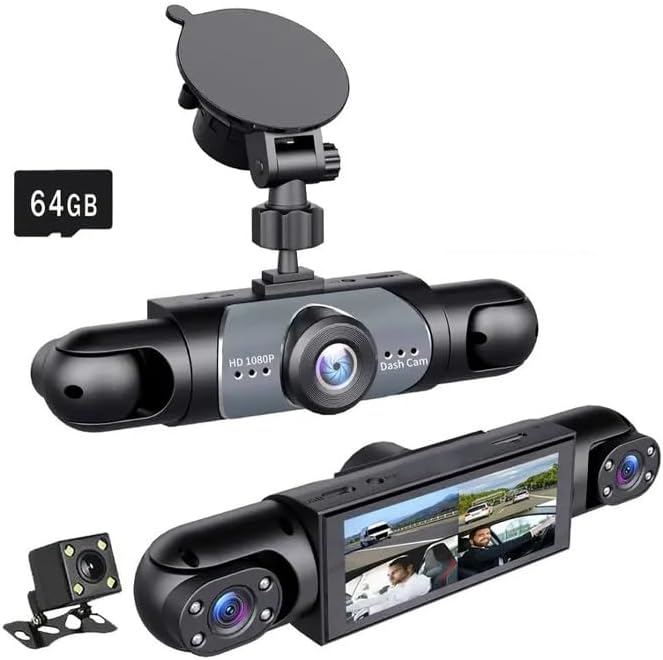
Figure 2: Dashcam System Components. This image shows the main dashcam unit with its suction cup mount, displaying the front-facing lens and the two adjustable side cameras. A 64GB memory card is also visible, indicating its inclusion.

Figure 3: 360° Coverage Diagram. This diagram illustrates the wide-angle coverage provided by the four cameras: front (150°), left (120°), right (120°), and rear (150°), ensuring comprehensive surveillance around the vehicle.
Setup
1. Memory Card Preparation
- Insert the included 64GB memory card into the dashcam's designated slot.
- Before first use, it is crucial to format the memory card within the dashcam's settings menu. This ensures compatibility and optimal performance. Refer to the "Operation" section for menu navigation.
2. Mounting the Dashcam
- Clean the chosen area on your windshield thoroughly.
- Attach the suction cup mount to the main dashcam unit.
- Securely mount the dashcam on the windshield, ensuring it does not obstruct your view. Position it centrally for optimal front camera coverage.
- Adjust the angle of the main unit and the side cameras to capture the desired views (front, left interior, right interior).
3. Connecting Power
- Connect the car power adapter to the dashcam's power input port.
- Plug the other end of the car power adapter into your vehicle's 12V power outlet (cigarette lighter socket).
- Route the power cable neatly along the windshield and dashboard edges to avoid interference with driving.
4. Rear Camera Installation
- Identify a suitable mounting location for the rear camera, typically on the rear windshield or near the license plate.
- Connect the rear camera cable to the main dashcam unit.
- Route the rear camera cable discreetly through the vehicle's interior trim to the chosen mounting location.
- Secure the rear camera in place and adjust its angle for optimal rear view coverage.
Operation
1. Basic Recording
Once powered on, the dashcam will automatically begin recording. The system records simultaneously from all four cameras (front, rear, left interior, right interior) in 1080P resolution.

Figure 4: Four-Channel Simultaneous Recording. This image demonstrates the dashcam's ability to display and record footage from all four cameras concurrently, showing views from the front, rear, and both interior sides of the vehicle.
2. Loop Recording
The dashcam utilizes loop recording. When the memory card is full, the system automatically overwrites the oldest unprotected files to ensure continuous recording. This feature prevents the memory card from running out of space.

Figure 5: Loop Recording Function. This graphic depicts the circular nature of loop recording, where the dashcam continuously records and, once the memory card capacity is reached, automatically replaces the oldest video files with new ones.
3. G-Sensor (Collision Detection)
The built-in G-sensor detects sudden impacts or collisions. When triggered, it automatically locks the current video segment, preventing it from being overwritten by loop recording. These locked files are stored in a separate folder on the memory card.
4. Enhanced Night Vision and HDR
The interior and rear cameras are equipped with IR (Infrared) technology for clear recording in low-light or dark conditions. The system also features HDR (High Dynamic Range) functionality to improve image clarity in varying light environments, such as bright sunlight or shadows.
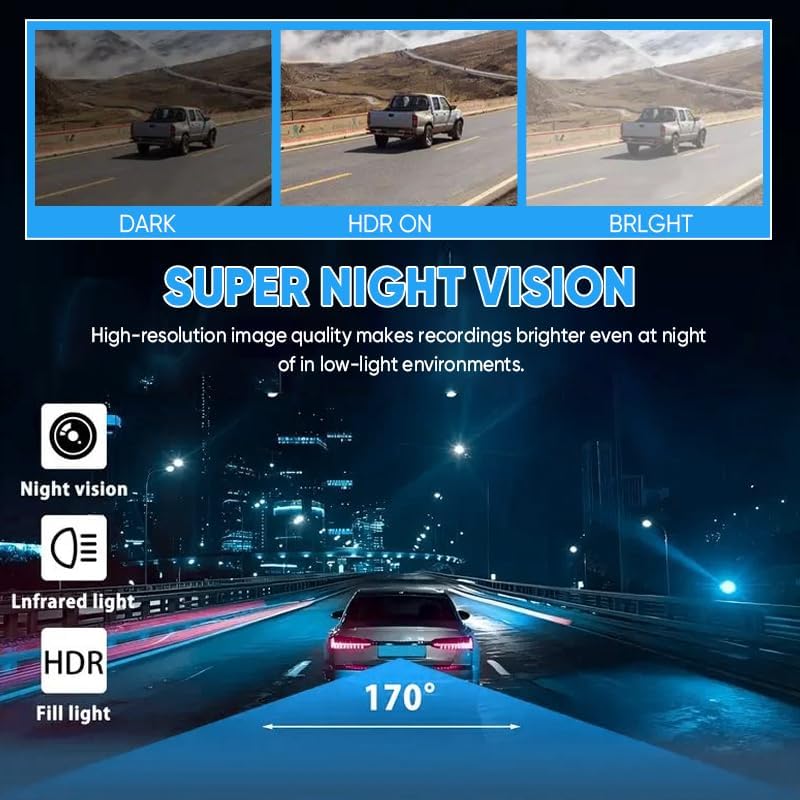
Figure 6: Super Night Vision Performance. This image compares three scenarios: a dark road, the same road with HDR enabled, and a bright road, highlighting how the dashcam's night vision and HDR features enhance video clarity in low-light conditions.

Figure 7: HDR Functionality. Similar to night vision, this image illustrates the effect of HDR by comparing a dark scene, an HDR-enabled scene, and a bright scene, showing improved detail and exposure balance in challenging lighting.
5. 24-Hour Parking Surveillance
When the vehicle is parked, the parking monitor feature is automatically activated. Utilizing its high-sensitivity G-sensor, the dashcam will begin recording if it detects motion or an impact, providing surveillance even when the vehicle is off.
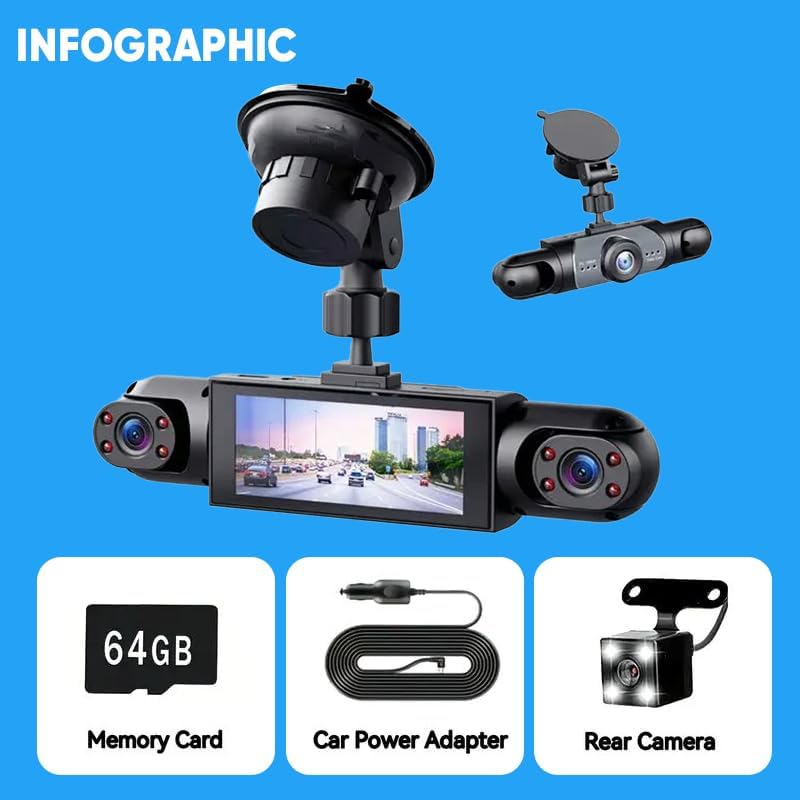
Figure 8: Parking Surveillance. This graphic shows a car protected by a hexagonal shield, with smaller images depicting scenarios like a person attempting to break into a car and a car being bumped, illustrating the dashcam's 24-hour parking surveillance capabilities.
6. Reversing Assist
When the vehicle is shifted into reverse gear, the dashcam automatically switches its display to a full-screen view of the rear camera, often with parking guidelines, to assist with safe reversing maneuvers.
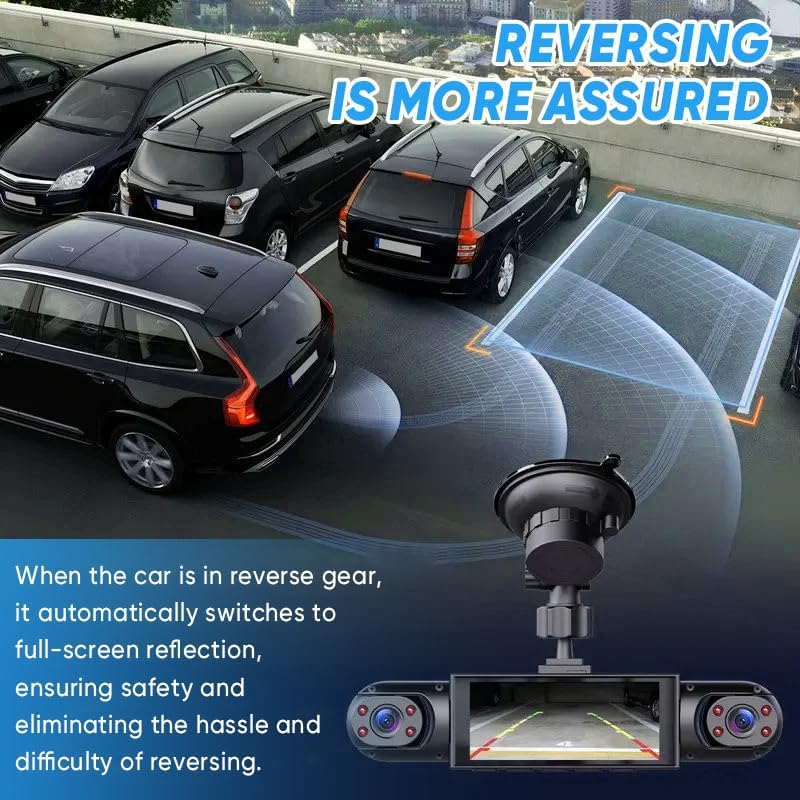
Figure 9: Reversing Assist Feature. This image shows a car reversing in a parking lot, with the dashcam display showing a full-screen view from the rear camera, complete with overlaid parking guidelines to aid the driver.
7. Control Methods
The dashcam supports control via a dedicated mobile application and voice commands. Refer to the app's instructions for detailed setup and usage of app control. Voice commands allow for hands-free operation of key functions.
Maintenance
1. Cleaning the Dashcam
- Gently wipe the camera lenses with a soft, lint-free cloth to remove dust or smudges. Avoid abrasive materials.
- Clean the main unit's screen and body with a slightly damp cloth. Do not use harsh chemicals or solvents.
2. Memory Card Management
- Regularly format the memory card (e.g., once a month) through the dashcam's settings menu to ensure optimal performance and prevent data corruption.
- Back up important video files to a computer or external storage before formatting the card.
- If the memory card shows signs of degradation or errors, replace it with a new, high-quality card.
Troubleshooting
| Problem | Possible Cause | Solution |
|---|---|---|
| Dashcam does not power on. | No power supply; faulty cable/adapter. | Check power connection. Ensure car power adapter is securely plugged in. Test with another 12V outlet if available. |
| Recording stops unexpectedly. | Memory card full or corrupted; faulty memory card. | Format the memory card. If issue persists, try a new memory card. Ensure loop recording is enabled. |
| Video quality is poor. | Dirty lens; protective film still on lens; low light conditions. | Clean camera lenses. Remove any protective film. Ensure HDR and Night Vision features are active in settings if applicable. |
| G-sensor is too sensitive/not sensitive enough. | G-sensor sensitivity setting. | Adjust the G-sensor sensitivity in the dashcam's settings menu. |
| Rear camera not displaying. | Loose connection; faulty camera/cable. | Check the connection of the rear camera cable to the main unit. Ensure the cable is not damaged. |
Specifications
| Feature | Detail |
|---|---|
| Model Number | EC99171-X66216 |
| Product Dimensions | 7.8 x 2.8 x 4.3 inches |
| Item Weight | 11.8 ounces |
| Video Capture Resolution | 1080p (for all four channels) |
| Camera Coverage | 360° all sides (Front, Rear, Left Interior, Right Interior) |
| Special Features | Driver Fatigue Monitoring System, G-Sensor, Loop Recording, Enhanced Night Vision, HDR, 24-Hour Parking Surveillance, Reversing Assist |
| Connectivity Technology | 5GHz Wi-Fi |
| Control Method | App, Voice |
| Mounting Type | Windshield Mount |
| Included Memory Card | 64GB (removable) |
| Manufacturer | Acmefun |
Warranty and Support
For warranty information and technical support, please refer to the contact details provided on the product packaging or visit the official Acmefun website. Keep your purchase receipt as proof of purchase for warranty claims.


