1. Introduction
This manual provides essential information for the safe operation, assembly, and maintenance of your RubiQ sports G2 Electric Scooter. Please read it thoroughly before your first ride to ensure optimal performance and safety.
The RubiQ sports G2 Electric Scooter is designed for adults, featuring a powerful 1600W motor, a top speed of 35 MPH, and a range of 40-45 miles. It is equipped with 10-inch off-road tires and dual suspension for a comfortable ride across various terrains.

Image: The RubiQ sports G2 Electric Scooter, showcasing its robust design and off-road tires.
Video: An overview of the RubiQ sports G2 Electric Scooter in action, highlighting its off-road capabilities and general use.
2. Safety Guidelines
Your safety is paramount. Always adhere to the following guidelines:
- Always wear a helmet and appropriate safety gear (knee pads, elbow pads, gloves) when riding.
- Familiarize yourself with local laws and regulations regarding electric scooter use.
- Perform a pre-ride inspection before each use: check brakes, tire pressure, and ensure all fasteners are tight.
- Do not ride in heavy rain, snow, or icy conditions.
- Avoid riding on uneven surfaces, potholes, or obstacles that could cause loss of control.
- Maintain a safe distance from other vehicles and pedestrians.
- Do not exceed the maximum weight limit of 330 lbs.
- Ensure the scooter is properly folded and secured when transporting.
3. Package Contents
Upon opening the box, verify that all items are present:
- RubiQ sports G2 Electric Scooter
- Charger
- Hand Bag
- User Manual (this document)
- Tool Kit

Image: The RubiQ sports G2 Electric Scooter and its included accessories: hand bag, charger, tool kit, and user manual.
4. Assembly
Your RubiQ sports G2 Electric Scooter arrives 90% pre-assembled. The remaining steps primarily involve attaching the handlebar. Follow these instructions carefully:
- Carefully remove the scooter and all packaging materials from the box.
- Unfold the main stem of the scooter and secure the folding mechanism.
- Attach the handlebar to the stem, ensuring all cables are properly connected and not pinched.
- Use the provided tool kit to tighten all screws on the handlebar and stem securely.
- Perform a final check to ensure all parts are firmly in place before riding.
Video: Detailed unboxing and assembly instructions for the G2 Electric Scooter.
5. Operating Your Scooter
5.1 Power On/Off
- To Power On: Press and hold the power button on the display until the screen lights up.
- To Power Off: Press and hold the power button until the display turns off.
5.2 Display Overview
The smart digital display provides real-time information:
- Speed Display
- Battery Level
- Mileage
- Cruise Control Indicator
- Speed Gear (ECO, RACE, SPORT)
- LED Lighting Status

Image: The Smart LCD Display showing various indicators like speed, battery, mileage, and control buttons.
5.3 Speed Limit Management
The scooter may have a speed limit enabled by default (indicated by "ECO" on the display, max 15 mph). To disable the speed limit and reach the maximum speed of 35 mph:
- Press and hold the "-" button until "ECO" disappears from the display.
5.4 Unit Conversion (km/h to mph)
To switch between kilometers per hour (km/h) and miles per hour (mph):
- Press and hold the "M" button to enter P-setting mode.
- Use the "+" button to navigate to P04.
- Press "M" once until the number flashes.
- Use "+" or "-" to select 0 for km/h or 1 for mph.
- Press "M" to save the setting.
5.5 Start Mode (Zero vs. Non-Zero Start)
To change the start mode:
- Press and hold the "M" button to enter P-setting mode.
- Use the "+" button to navigate to P05.
- Press "M" once until the number flashes.
- Use "+" or "-" to select 0 for zero start (immediate throttle response) or 1 for non-zero start (requires a kick-off).
- Press "M" to save the setting.
5.6 Cruise Control Activation
To enable cruise control:
- Press and hold the "M" button to enter P-setting mode.
- Use the "+" button to navigate to P06.
- Press "M" once until the number flashes.
- Use "+" or "-" to select 1 to enable cruise control.
- Press "M" to save the setting.
- While riding, maintain a constant speed for approximately 5 seconds until the cruise icon appears on the display. The scooter will then maintain this speed.
5.7 Speed Gear Selection
The scooter offers three speed gears:
- ECO: Approximately 14 MPH (for energy efficiency)
- RACE: Approximately 27 MPH (for balanced performance)
- SPORT: Approximately 35 MPH (for maximum speed)
Use the "+" and "-" buttons on the handlebar to cycle through these speed gears.

Image: Illustration of the three speed modes: ECO, RACE, and SPORT, with their respective approximate speeds.
5.8 Lighting System
The G2 scooter features a 360° lighting system for enhanced visibility:
- Headlights: Activate for forward illumination.
- Brake Lights: Illuminate when brakes are applied.
- Ambient Lights: Side lights for increased visibility.
- Turn Signals: Front and rear indicators for signaling turns.

Image: Diagram showing the headlights, brake lights, ambient lights, and turn signals of the scooter.
5.9 Folding and Unfolding
The scooter features a quick-fold design for portability and storage:
- To Fold: Loosen the safety knob and release the folding latch on the stem. Carefully fold the stem downwards until it locks into place.
- To Unfold: Release the folding latch, raise the stem until it clicks into the upright position, and secure the safety knob.

Image: The scooter in its folded and unfolded states, demonstrating its portable design for easy transport and storage.
Video: A comprehensive guide to the G2 Electric Scooter's function settings, including power, speed limit, unit conversion, start mode, cruise control, speed gears, and lighting controls.
6. Riding Tips
- Balance: Practice balancing at low speeds before attempting higher speeds.
- Braking: Use both brakes simultaneously for effective stopping. Practice emergency braking in a safe area.
- Visibility: Always use the scooter's lights, especially at night or in low-light conditions. Wear reflective clothing.
- Terrain: While equipped for off-road, exercise caution on rough terrain. Reduce speed and maintain a firm grip on the handlebars.
- Awareness: Be aware of your surroundings, including traffic, pedestrians, and potential hazards.
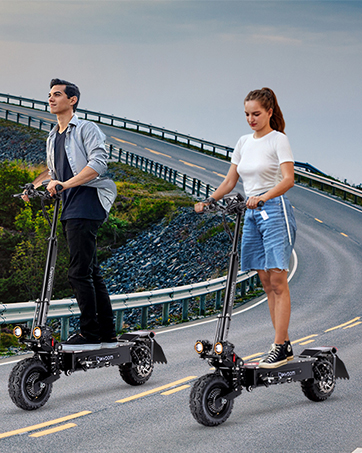
Image: A person riding the RubiQ sports G2 Electric Scooter on a paved city street, demonstrating urban use.
7. Maintenance
Regular maintenance ensures the longevity and safe operation of your scooter:
- Battery Care: Charge the battery fully before first use. Do not overcharge or completely drain the battery. Store in a cool, dry place. Charge regularly even if not in use.
- Tire Pressure: Check tire pressure regularly. Maintain recommended PSI for optimal performance and safety.
- Brakes: Inspect brake pads and discs for wear. Adjust brakes as needed to ensure responsive stopping power.
- Cleaning: Clean the scooter with a damp cloth. Avoid using high-pressure water or harsh chemicals.
- Fasteners: Periodically check and tighten all screws and bolts.

Image: Illustration of the 48V 23.4Ah lithium battery, emphasizing its long range and Smart BMS protection.
8. Troubleshooting
Here are solutions to common issues:
| Problem | Possible Cause | Solution |
|---|---|---|
| Scooter does not power on | Low battery, loose connection, power button issue | Charge the battery fully. Check all cable connections. Ensure power button is pressed correctly. |
| Reduced speed/range | Low battery, incorrect speed gear, speed limit active, tire pressure, heavy load | Charge battery. Select a higher speed gear. Disable speed limit (refer to section 5.3). Check tire pressure. Reduce load. |
| Brakes not effective | Worn brake pads, loose brake cable, air in hydraulic system (if applicable) | Inspect and replace brake pads. Adjust brake cable tension. Consult a professional for hydraulic brake issues. |
| Unusual noises | Loose components, debris in wheels, motor issue | Check and tighten all fasteners. Remove any debris from wheels/brakes. If motor noise persists, contact support. |
For issues not listed here or if solutions do not resolve the problem, please contact customer support.
9. Specifications
| Feature | Detail |
|---|---|
| Brand | RubiQ sports |
| Model Name | G2 |
| Motor Power | 1600W |
| Top Speed | 35 MPH |
| Max Distance Range | 40-45 Miles |
| Battery | 48V 23.4Ah Lithium Battery with Smart BMS |
| Charging Time | 6-8 Hours |
| Tires | 10-inch Off-Road Tubeless Tires |
| Suspension Type | Dual Suspension (Front & Rear Spring Suspension, Front & Rear Shock Arms) |
| Brake Style | Dual Mechanical Disc Brakes + Electronic Braking (E-ABS) |
| Frame Material | Alloy Steel |
| Weight Limit | 330 Pounds |
| Product Dimensions (Unfolded) | 48.8"L x 23.6"W x 49.2"H |
| Age Range (Description) | Adult |
| Special Features | Anti-Puncture Tire, Cruise Control, Digital Display, Dual Braking System, Foldable, 360° Lighting System |
10. Warranty and Customer Support
RubiQ sports offers a warranty on various parts of your scooter, ranging from 90 days to 1 year, excluding damage caused by misuse or stains. For specific warranty details on individual components, please refer to the warranty card included with your product or contact customer service.
For any product issues, technical support, or to inquire about replacement parts, please contact RubiQ sports customer service. We aim to provide a solution within 24 hours.
- Contact Method: Reach us through Amazon's messaging system or via the official email provided in your product manual.
- Parts Availability: A full range of parts is available. Contact us for purchase links for specific components.

Image: Customer service representatives ready to assist with product inquiries and support.


