Introduction
This manual provides essential instructions for the safe and efficient operation of your Telbum 5-in-1 LED DJ Lighting System, model PL-31P12. This versatile lighting system integrates multiple effects, including LED RGBW par lights, RGBW LED Derby lights, and a center bar light with UV and white strobe LEDs, designed for various event settings.

Image: The Telbum 5-in-1 LED DJ Lighting System, including the main light bar with integrated effects, adjustable stand, remote control, and two carry bags for transport and storage.
Setup Instructions
1. Unpacking and Inspection
Carefully unpack all components and inspect for any signs of damage. Retain the packaging for future transport or storage.
- Main 5-in-1 light unit
- Adjustable lighting stand (two-section: triangular base and extension pole)
- Power cord
- IR remote control
- Carry bag for light unit
- Carry bag for lighting stand
- User manual (this document)
2. Assembling the Stand
- Extend the legs of the triangular base to form a stable foundation. Secure any locking mechanisms.
- Insert the extension pole into the base. Adjust the height to your desired level, up to 2.2 meters (7.2 feet), and secure it with the provided locking pin or knob.
3. Mounting the Light Unit
- Carefully lift the main 5-in-1 light unit and place it onto the top of the assembled stand.
- Secure the light unit to the stand using the integrated mounting hardware. Ensure it is firmly attached to prevent accidental dislodgement.

Image: The Telbum 5-in-1 LED DJ Lighting System fully assembled on its stand, with the included carry bags shown in the foreground, highlighting its portability and ease of setup.
4. Power Connection
Connect the provided power cord to the power input on the light unit and then to a suitable AC power outlet (AC110-240V, 50/60Hz).
Operating Instructions
The Telbum PL-31P12 offers multiple control options for flexible operation.
1. Control Panel Operation
The integrated LED control panel allows direct access to various settings and modes.

Image: A detailed view of the light unit's control panel, showing the DMX IN/OUT ports, power input, LED display, microphone, and navigation buttons (MENU, UP, DOWN, ENTER).
- MENU: Cycles through main menu options.
- UP/DOWN: Navigates through options or adjusts values.
- ENTER: Confirms selection.
2. IR Remote Control
The included IR remote provides convenient wireless control over basic functions.
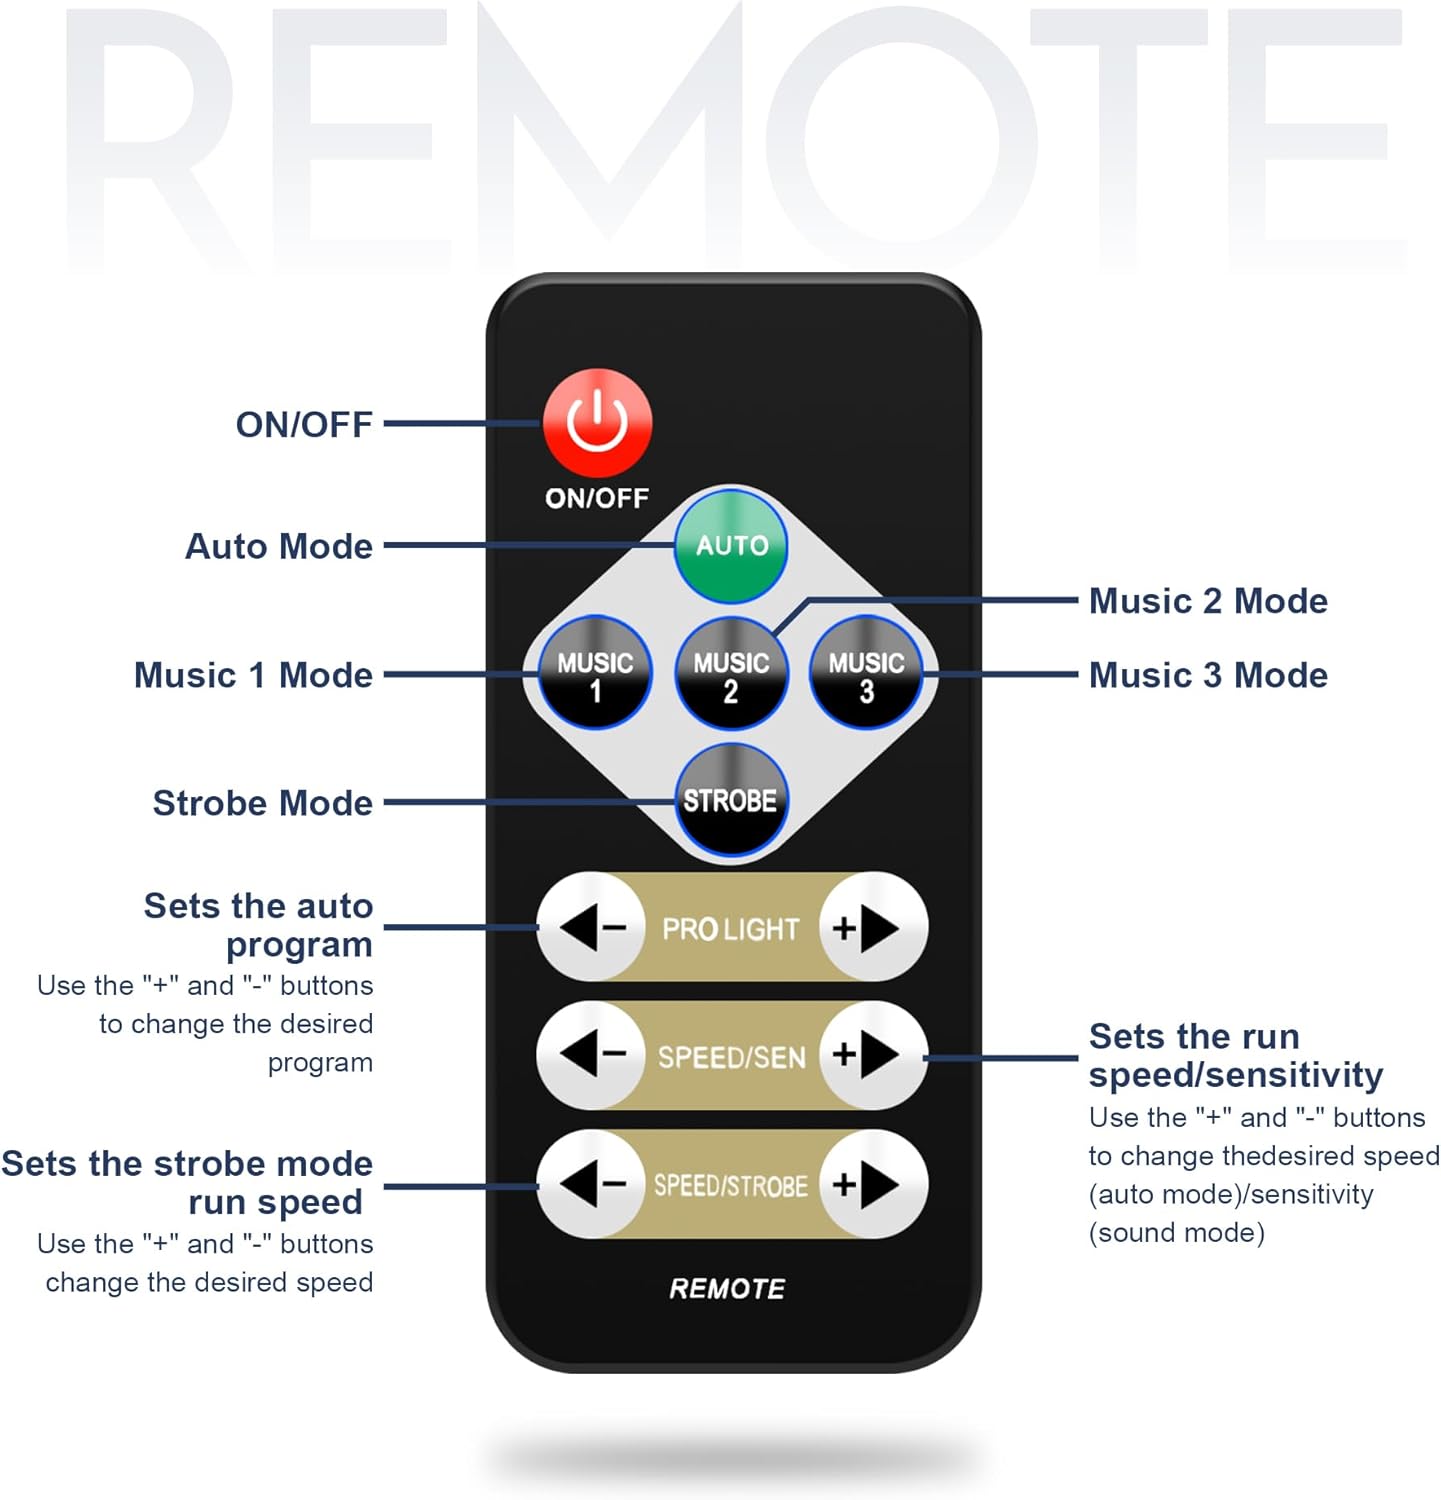
Image: A diagram illustrating the functions of the IR remote control. Buttons include ON/OFF, Auto Mode, Music 1/2/3 Modes, Strobe Mode, Program Selection (PRO LIGHT +/-), Speed/Sensitivity (SPEED/SEN +/-), and Strobe Speed (SPEED/STROBE +/-).
- ON/OFF: Powers the unit on or off.
- AUTO: Activates automatic program mode.
- MUSIC 1/2/3: Selects different sound-activated modes.
- STROBE: Activates strobe effect.
- PRO LIGHT +/-: Changes the auto program.
- SPEED/SEN +/-: Adjusts speed for auto modes or sensitivity for sound modes.
- SPEED/STROBE +/-: Adjusts strobe speed.
3. Sound Activated Mode
The built-in microphone allows the lights to synchronize with music.
- Press the "MENU" button on the control panel.
- Use "UP" and "DOWN" to display "So01" on the LED display.
- Press "ENTER".
- Use "UP" and "DOWN" to choose between So01, So02, or So03 (different sound modes).
- Press "ENTER" to confirm.
- To exit, press "MENU".

Image: A visual representation of the lighting system responding to music, with sound waves emanating from speakers towards the light unit, demonstrating the sound activation feature.
4. DMX512 Control
For advanced lighting programming, connect the unit to a DMX controller.
- Connect a DMX cable from your DMX controller's output to the "DMX IN" port on the light unit.
- To set the DMX address, press the "MENU" button on the control panel.
- Use "UP" and "DOWN" to display "d001" on the LED display.
- Press "ENTER".
- Use "UP" and "DOWN" to set the required DMX address.
- Press "ENTER" to confirm.

Image: The lighting system connected to a DMX512 controller, illustrating its compatibility with professional lighting setups for precise control and synchronization.
5. Master-Slave Function
Synchronize multiple PL-31P12 units for coordinated lighting effects.
- Connect the "DMX OUT" of the master unit to the "DMX IN" of the first slave unit using a DMX cable. Continue connecting "DMX OUT" to "DMX IN" for all subsequent slave units.
- Set the master unit to an automatic or sound-activated mode.
- Set all slave units to slave mode (refer to the control panel menu for specific slave mode settings, typically indicated by 'SLAV' or similar).
Maintenance
Regular maintenance ensures optimal performance and longevity of your lighting system.
- Cleaning: Periodically clean the lenses and exterior surfaces with a soft, dry cloth. Do not use abrasive cleaners or solvents. Ensure the unit is unplugged before cleaning.
- Storage: When not in use, store the light unit and stand in their respective carry bags in a cool, dry place, away from direct sunlight and extreme temperatures.
- Cable Inspection: Regularly check power and DMX cables for any signs of wear, cuts, or damage. Replace damaged cables immediately.
Troubleshooting
If you encounter issues, refer to the following common problems and solutions:
| Problem | Possible Cause | Solution |
|---|---|---|
| No power | Power cord not connected; outlet not active; unit fuse blown | Check power cord connection; test outlet with another device; inspect and replace fuse if necessary. |
| Lights not responding to remote | Remote battery low/dead; IR sensor blocked; remote out of range | Replace remote battery; ensure clear line of sight to IR sensor; operate remote within specified range. |
| Sound activation not working | Microphone blocked; sensitivity too low; incorrect mode selected | Ensure microphone is clear; adjust sensitivity using remote or control panel; select a sound-activated mode (e.g., Music 1, So01). |
| DMX control issues | Incorrect DMX address; faulty DMX cable; DMX controller issue | Verify DMX address setting; test DMX cable; check DMX controller functionality. |
| Master-Slave synchronization failure | Incorrect mode settings; faulty DMX cable connection | Ensure master is in an active mode and slaves are in slave mode; check DMX cable connections between units. |
Specifications

Image: A graphic displaying key technical specifications of the lighting system, such as power supply, light sources, control modes, power consumption, beam angle, and dimensions.
- Model: PL-31P12
- Power Supply: AC110-240V, 50/60Hz
- Power Consumption: 110 Watts
- Light Source Type: LED (RGBW)
- Light Sources: (2) 12x1W LED RGBW Par Lights, (2) 4x3W RGBW LED Derby Lights, (1) Center Bar Light with 6 UV LEDs and 6 White Strobe LEDs
- Control Modes: IR Remote, DMX512, Auto Run, Master/Slave, Sound Active
- DMX Channels: 3/16 channels selectable
- Beam Angle: 40 degrees
- Dimming: 0-100%
- IP Rate: IP20 (Indoor use only)
- Lamp Rated Life: >50,000 Hours
- Working Temperature: -10°C to 40°C (14°F to 104°F)
- Material: Iron
- Product Dimensions (Light Unit): Approximately 34"L x 17"W x 8"H (86cm L x 43cm W x 20cm H)
- Max Stand Height: 2.2 meters (7.2 feet / 87 inches)
- Item Weight: 21.3 pounds (9.7 kg)
- Included Components: 5-in-1 DJ light set with carry bag, lighting stand with carry bag, power cord, remote, user manual
Warranty Information
This product is covered by a standard manufacturer's warranty. Please refer to the warranty card included in your package or contact Telbum customer support for specific details regarding warranty duration and terms. Keep your purchase receipt as proof of purchase for any warranty claims.
Customer Support
For technical assistance, troubleshooting beyond this manual, or warranty inquiries, please contact Telbum customer support. Contact information can typically be found on the product packaging, the official Telbum website, or through your retailer.
Online Resources: Visit the Telbum Store on Amazon for additional product information and support.