Introduction
This manual provides comprehensive instructions for the installation, operation, and maintenance of your WXWBFAO HP OMEN GT21 GT22 Desktop Motherboard (models M81915-601, M75026-001) with Z690 chipset and LGA1700 socket. Please read this manual thoroughly before proceeding with installation to ensure proper functionality and to prevent damage to the component.
Safety Precautions and Important Notes
- Electrostatic Discharge (ESD) Prevention: Always discharge static electricity from your body before handling the motherboard. Incorrect handling can cause irreparable damage to sensitive electronic components. Use an anti-static wrist strap or touch a grounded metal object.
- Part Number Verification: Before installation, carefully compare the part number on your existing motherboard with the part numbers indicated in this manual (e.g., M81915-601, M75026-001). If there is a discrepancy, consult your seller to verify compatibility with your specific system configuration.
- Product Condition: This motherboard is new. However, due to necessary pre-shipment testing to ensure all functions are operational, there may be minor traces of recent usage. This is part of our quality assurance process.
- Packaging: The motherboard will be shipped in sturdy and waterproof packaging, as original retail boxes are not included due to unboxing for testing purposes.
- Professional Installation Recommended: If you are unfamiliar with computer hardware installation, it is highly recommended to seek assistance from a qualified technician.
Product Overview
The WXWBFAO HP OMEN GT21 GT22 Desktop Motherboard is designed for high-performance desktop systems, featuring an LGA1700 socket for compatible CPUs and DDR4 memory support. Below is an image illustrating the general layout of the motherboard.
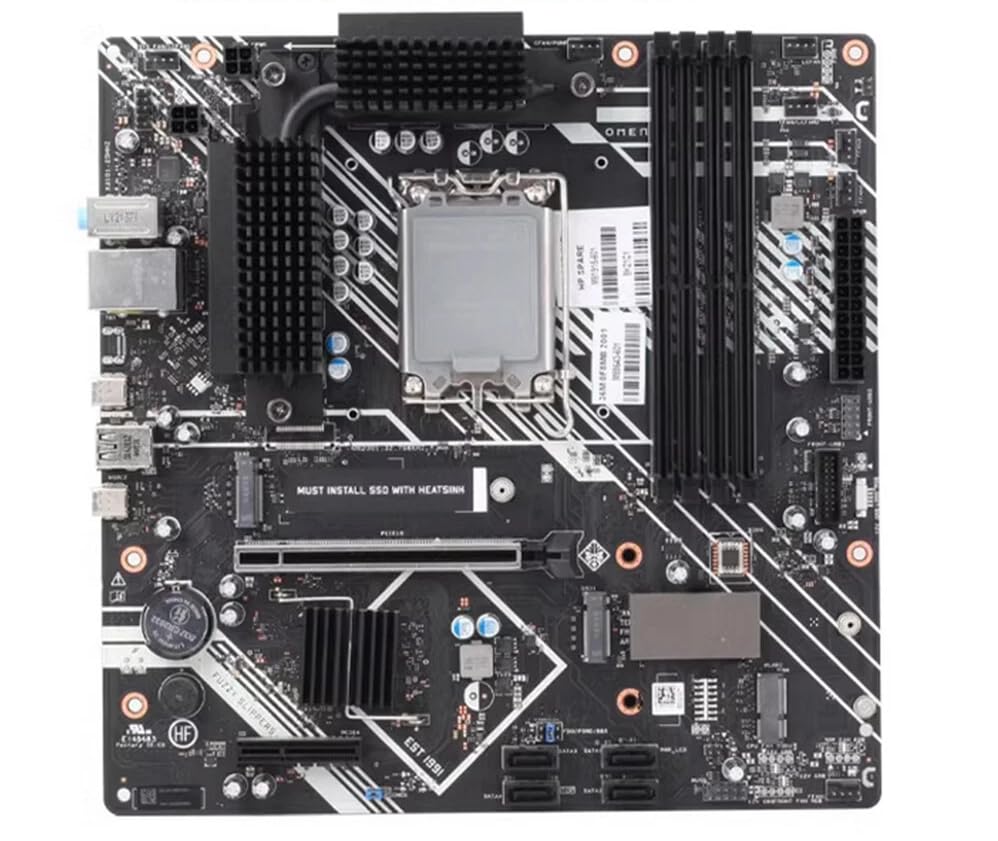
Figure 1: General view of the WXWBFAO HP OMEN GT21 GT22 Desktop Motherboard. This image shows the layout of the CPU socket, RAM slots, PCIe slots, and various connectors.
Key components include the LGA1700 CPU socket, DDR4 memory slots, PCIe expansion slots, and various I/O ports. Ensure all connections are secure during installation.

Figure 2: Close-up view of the motherboard showing part numbers M81915-601 and M88643-601, along with identifier 8K21C1. These labels are crucial for verifying compatibility.
Setup and Installation
1. Pre-Installation Checklist
- Verify motherboard model and part numbers (e.g., M81915-601, M75026-001) against your system requirements.
- Ensure you have a compatible LGA1700 CPU and DDR4 RAM modules.
- Gather necessary tools: Phillips head screwdriver, anti-static wrist strap, thermal paste (if not pre-applied to cooler).
- Prepare a clean, well-lit workspace.
2. Motherboard Installation
- Prepare the PC Case: Ensure the case is ready with standoffs correctly installed for the motherboard's form factor.
- Install the CPU:
- Carefully open the LGA1700 socket retention arm.
- Align the CPU with the socket, ensuring the triangular marker on the CPU matches the marker on the socket.
- Gently place the CPU into the socket without forcing it.
- Close the retention arm to secure the CPU.
- Install the CPU Cooler: Apply thermal paste (if necessary) and install the CPU cooler according to its manufacturer's instructions.
- Install RAM Modules:
- Open the clips on the DDR4 memory slots.
- Align the RAM module with the slot, ensuring the notch on the module matches the key in the slot.
- Press down firmly on both ends of the module until the clips snap into place.
- Mount the Motherboard: Carefully place the motherboard into the PC case, aligning the screw holes with the standoffs. Secure it with screws.
- Connect Power and Peripherals: Connect the 24-pin ATX power connector, 8-pin CPU power connector, front panel connectors (power switch, reset, USB, audio), SATA cables, and any other necessary cables.
- Install Expansion Cards: Insert graphics cards or other PCIe expansion cards into the appropriate slots and secure them.
Operating Instructions
1. First Boot
After completing the physical installation, connect your monitor, keyboard, and mouse. Power on your system. The system should perform a Power-On Self-Test (POST). If successful, you will see the BIOS/UEFI splash screen.
2. BIOS/UEFI Configuration
During POST, press the designated key (usually Del, F2, or F10) to enter the BIOS/UEFI setup utility. Here you can configure boot order, system time, and other advanced settings. Refer to your system's specific documentation for detailed BIOS/UEFI settings.
3. Operating System Installation
Once BIOS/UEFI is configured, you can proceed with installing your preferred operating system (e.g., Windows, Linux) from a bootable USB drive or DVD.
Maintenance
- Dust Removal: Regularly clean dust from the motherboard and components using compressed air. Ensure the system is powered off and unplugged before cleaning.
- BIOS/UEFI Updates: Periodically check the manufacturer's website for BIOS/UEFI updates. Updates can improve stability, compatibility, and performance. Follow the update instructions carefully to avoid system damage.
- Cable Management: Ensure all cables are neatly routed to improve airflow and prevent accidental disconnections.
Troubleshooting
Common Issues and Solutions:
- No Power/No Boot:
- Check all power connections (24-pin ATX, 8-pin CPU).
- Ensure the power supply unit (PSU) is switched on.
- Test with a different PSU if possible.
- No Display Output:
- Ensure the monitor is connected to the graphics card (if dedicated) or motherboard (if integrated graphics are used).
- Reseat the graphics card and RAM modules.
- Try booting with only one RAM stick.
- System Instability/Crashes:
- Check CPU and GPU temperatures.
- Verify RAM compatibility and stability (run memory diagnostic tools).
- Ensure all drivers are up to date.
- BIOS/UEFI Issues:
- Clear CMOS by removing the CMOS battery for a few minutes or using the clear CMOS jumper (refer to motherboard diagram).
Specifications
| Feature | Detail |
|---|---|
| Brand | WXWBFAO |
| CPU Socket | LGA1700 |
| Compatible Devices | Personal Computer |
| RAM Memory Technology | DDR4 |
| Memory Clock Speed | 1333 GHz |
| Memory Slots Available | 2 |
| Platform | Windows |
| System Bus Standard Supported | SATA 2 |
| Manufacturer | WithOUT BAND |
| UPC | 669440107238 |
| ASIN | B0FND8KVVF |
Warranty and Support
Warranty Information
This product comes with a 90-day warranty from the date of purchase. This warranty covers manufacturing defects and ensures the product functions as intended under normal use. Please retain your proof of purchase for warranty claims.
Customer Support
For technical assistance, troubleshooting, or warranty inquiries, please contact your retailer or the manufacturer, WXWBFAO. Provide your product model number (M81915-601, M75026-001) and a detailed description of the issue for efficient support.