Introduction
This manual provides essential information for the assembly, operation, and maintenance of your IRONCK 71-inch Tall Kitchen Pantry Cabinet. Please read these instructions carefully before assembly and use to ensure safe and proper functionality. Keep this manual for future reference.
Safety Information
- Always follow assembly instructions precisely.
- Ensure all hardware is securely tightened before use.
- Do not overload shelves. Distribute weight evenly.
- Install the anti-tipping devices as instructed to prevent accidental tipping, especially in homes with children or pets.
- Keep electrical components (power outlets) away from water or excessive moisture.
- Use only appliances within the specified electrical ratings for the built-in power outlets.
Package Contents
Verify that all components are present before beginning assembly. Refer to the separate assembly guide for a detailed list of parts and hardware.
- Cabinet panels and shelves
- Doors (including glass-front doors)
- Assembly hardware (screws, dowels, hinges, handles)
- Built-in power outlet unit
- Anti-tipping devices
- User Manual (this document)
- Separate Assembly Guide
Specifications
| Feature | Detail |
|---|---|
| Brand | IRONCK |
| Model Name | HK-PAN-YN04 |
| Color | White |
| Product Dimensions (D x W x H) | 15.7"D x 39.3"W x 71"H |
| Item Weight | 132.7 Pounds |
| Mounting Type | Floor Mount |
| Door Style | Glass Front (upper), Barn Door style (lower) |
| Number of Shelves | 4 (adjustable) |
| Special Features | Anti-Tipping devices, Built-In Charging Station (2 AC outlets, 1 USB, 1 Type C) |
| Assembly Required | Yes |
Setup and Assembly
Assembly of the IRONCK Pantry Cabinet requires careful attention to detail. It is recommended that two people perform the assembly due to the cabinet's size and weight.
- Unpack and Identify Parts: Carefully unpack all components and compare them against the parts list in the separate assembly guide. Ensure all pre-numbered parts and hardware are present.
- Follow Assembly Guide: Adhere strictly to the step-by-step instructions provided in the dedicated assembly guide.
- Install Anti-Tipping Devices: Once the cabinet is fully assembled and in its final position, securely attach the anti-tipping devices to the wall as instructed in the assembly guide. This step is crucial for stability and safety.

Figure 1: Cabinet dimensions and component breakdown. This diagram illustrates the overall dimensions and the sizes of individual sections, aiding in assembly and placement.

Figure 2: Detail of anti-tipping device installation. This image shows how the anti-tipping strap secures the cabinet to the wall, preventing accidental falls.
Operating Instructions
Storage Space Utilization
The IRONCK pantry cabinet offers diverse storage options for various items. Organize your belongings efficiently to maximize space and maintain stability.
- Top Glass-Door Compartments: Ideal for displaying glassware, mugs, dishes, jars, dinnerware, or decorative items. Adjustable shelves allow for flexible storage.
- Microwave Shelf / Small Appliance Hutch: Designed to accommodate kitchen appliances such as microwaves, coffee makers, espresso machines, or toaster ovens. Ensure appliances fit within the dimensions of the shelf.
- Base Cabinet with Shelves: Suitable for larger items like pots, pans, bulk groceries, or cleaning supplies. The enclosed design keeps items out of sight for a tidy appearance.

Figure 3: Functional storage areas. This diagram highlights the different sections of the cabinet and their recommended uses, from glass-door cabinets to the small appliance hutch and base storage.

Figure 4: Various storage options. This image provides visual examples of items that can be stored in the cabinet, including coffee machines, wine, bowls, books, and plants.
Built-in Charging Station
The cabinet includes a built-in power outlet unit for convenient charging and powering of small appliances.
- Power Outlets: Features 2 AC outlets (125V/12A) for standard electrical appliances.
- USB Ports: Includes 1 USB port and 1 Type C port (5V/2A) for charging mobile devices or other USB-powered electronics.
- Cable Management: Hidden cable ports are integrated to help organize wires and maintain a tidy appearance.
- Usage: Plug appliances or chargers directly into the appropriate outlets. Ensure the total power draw does not exceed the unit's maximum rating.
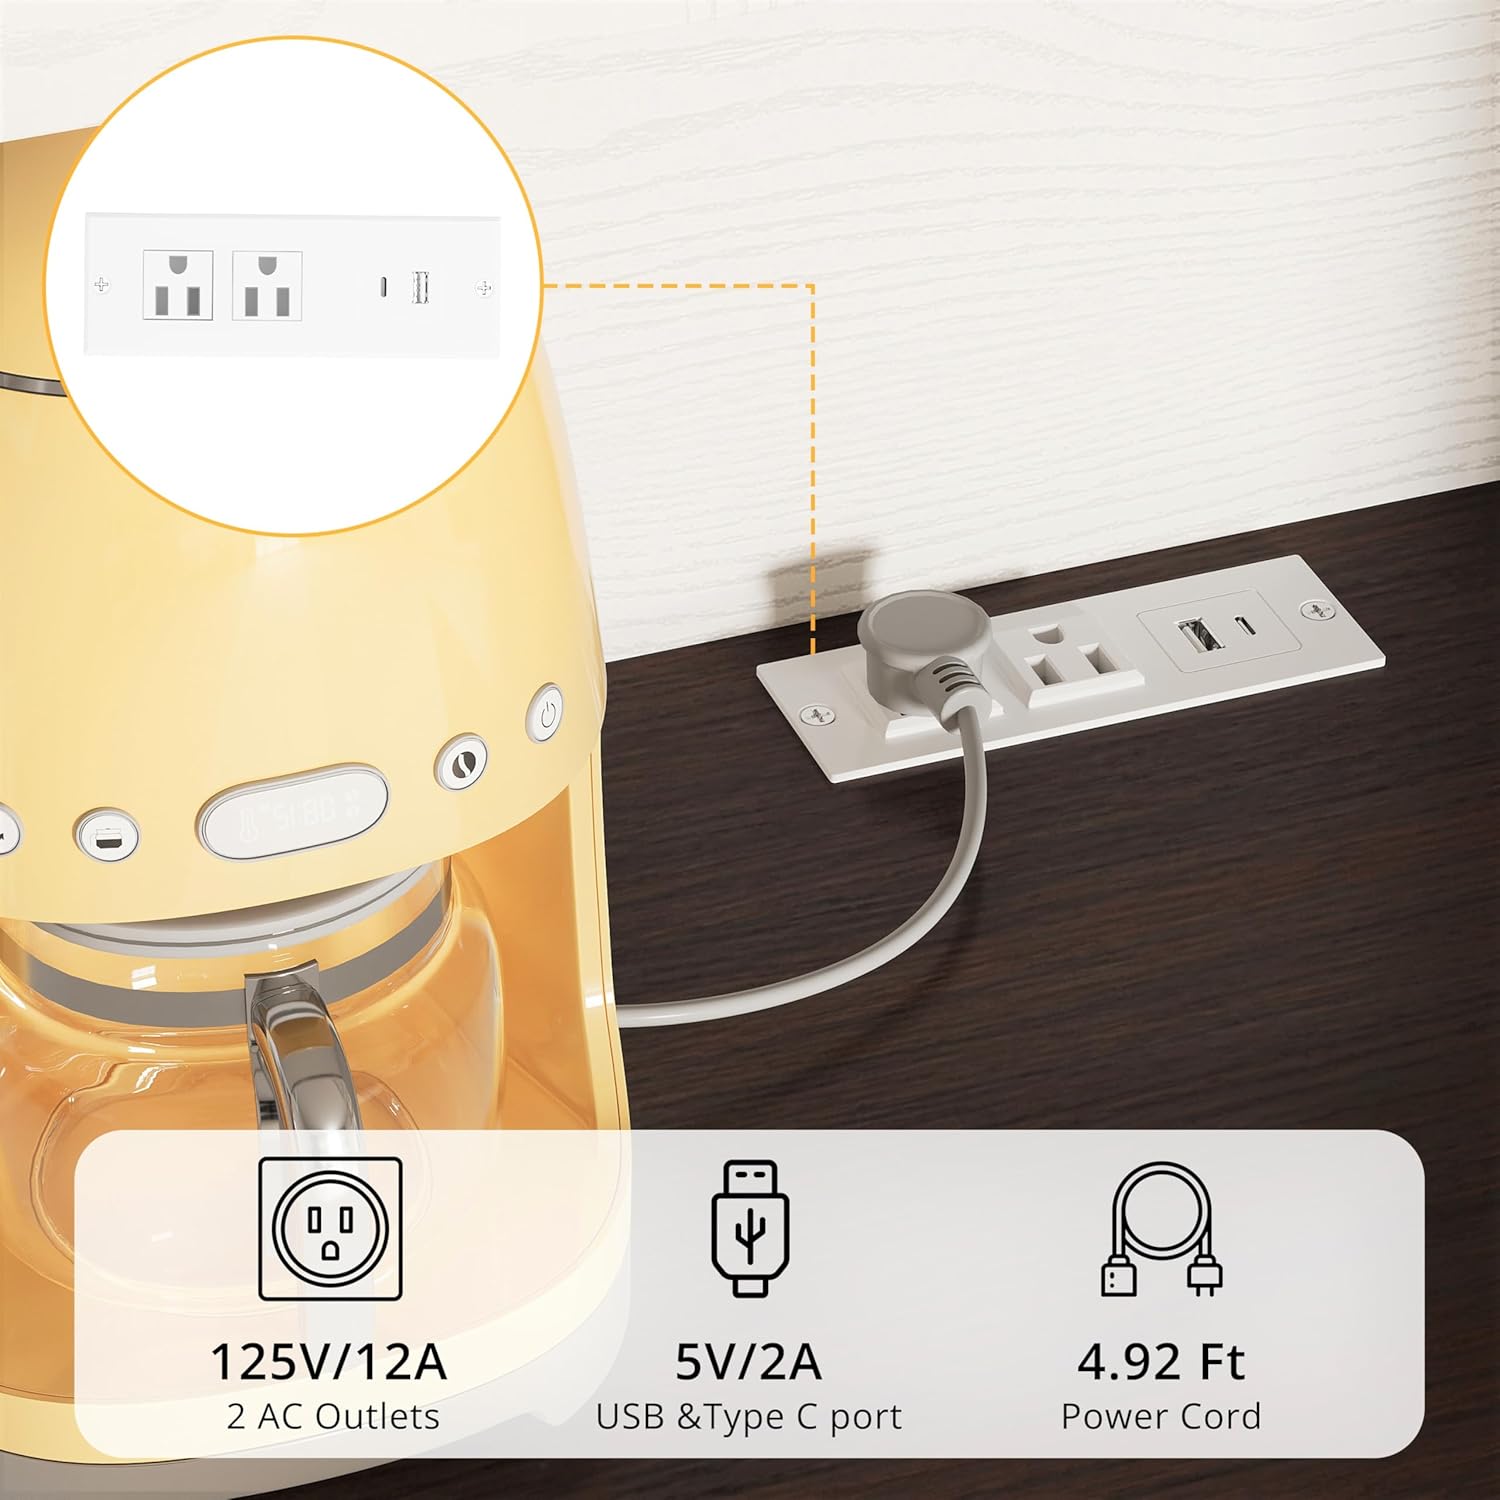
Figure 5: Built-in charging station details. This image shows the integrated power strip with two AC outlets, one USB port, and one Type C port, along with its power cord length.
Maintenance
Regular maintenance will help preserve the appearance and functionality of your cabinet.
- Cleaning: Wipe surfaces with a soft, damp cloth. Avoid abrasive cleaners or harsh chemicals that may damage the finish.
- Spills: Clean up spills immediately to prevent staining or damage to the wood.
- Hardware: Periodically check all screws and fasteners to ensure they remain tight. Retighten if necessary.
- Hinges: The hinges are designed for smooth operation. If they become stiff, a small amount of silicone-based lubricant can be applied.
Troubleshooting
| Problem | Possible Cause | Solution |
|---|---|---|
| Cabinet feels unstable or wobbly. | Loose fasteners; anti-tipping devices not installed or improperly secured. | Ensure all assembly screws are tightened. Verify anti-tipping devices are correctly installed and secured to a wall stud or appropriate anchor. |
| Power outlets are not working. | Power cord not plugged in; circuit breaker tripped; faulty appliance. | Check if the cabinet's power cord is fully plugged into a functional wall outlet. Reset any tripped circuit breakers. Test the appliance in a different outlet to rule out appliance malfunction. |
| Doors do not close smoothly or are misaligned. | Loose hinge screws; cabinet not level. | Adjust hinge screws as per the assembly guide. Ensure the cabinet is placed on a level surface. |
Warranty and Support
For warranty information, please refer to the documentation included with your purchase or contact IRONCK customer service directly. Keep your proof of purchase for warranty claims.
If you encounter any issues not covered in this manual or require further assistance, please contact IRONCK customer support. Contact details can typically be found on the manufacturer's website or your purchase receipt.
You can visit the IRONCK Store on Amazon for more product information.