VEVOR M1B-LS-3301
VEVOR Thickness Planer User Manual
Model: M1B-LS-3301
1. Introduction
Thank you for choosing the VEVOR Thickness Planer. This manual provides essential information for the safe operation, maintenance, and troubleshooting of your new tool. Please read this manual thoroughly before operating the planer to ensure proper use and to prevent injury or damage.

Image 1.1: VEVOR 13-inch Thickness Planer in operation, demonstrating its capacity for wider workpieces.
1.1 Intended Use
The VEVOR Thickness Planer (Model M1B-LS-3301) is designed for planing wood to a uniform thickness. It is suitable for both hard and soft wood materials, making it ideal for wood polishing, carpentry decoration, and various DIY creations. This machine is intended for use in a dry environment and should not be used for planing metal, plastic, or other non-wood materials.

Image 1.2: Examples of applications for the thickness planer, including wood polishing, carpentry decoration, and DIY projects.
2. Safety Instructions
WARNING: Read all safety warnings and instructions. Failure to follow the warnings and instructions may result in electric shock, fire, and/or serious injury.
2.1 General Safety
- Always wear appropriate personal protective equipment (PPE), including safety glasses, hearing protection, and a dust mask.
- Ensure the work area is clean, well-lit, and free from obstructions.
- Do not operate the planer in damp or wet conditions.
- Keep children and bystanders away from the operating area.
- Never reach into the planer's feed or discharge opening while the machine is running.
- Always disconnect the power supply before making adjustments, changing blades, or performing maintenance.
2.2 Electrical Safety
- Ensure the power supply matches the voltage specified on the planer's nameplate.
- Use only extension cords that are rated for outdoor use and have a proper ground.
- Do not abuse the power cord. Never use the cord for carrying, pulling, or unplugging the power tool.
2.3 Machine Specific Safety Features

Image 2.1: Key safety features including the safety switch to prevent accidental startup, the overload protection button, and anti-slip rubber feet for stability.
- Safety Switch: The planer is equipped with a safety switch to prevent accidental turning on. Always ensure the switch is in the OFF position when not in use or during maintenance.
- Overload Protection: The motor features overload protection. If the motor stops due to overload, press the reset button to resume operation after allowing the motor to cool.
- Rubber Feet: Four rubber feet provide anti-slip stability during operation. Ensure the planer is placed on a stable, level surface.
3. Product Overview and Components
Familiarize yourself with the components of your VEVOR Thickness Planer before operation.
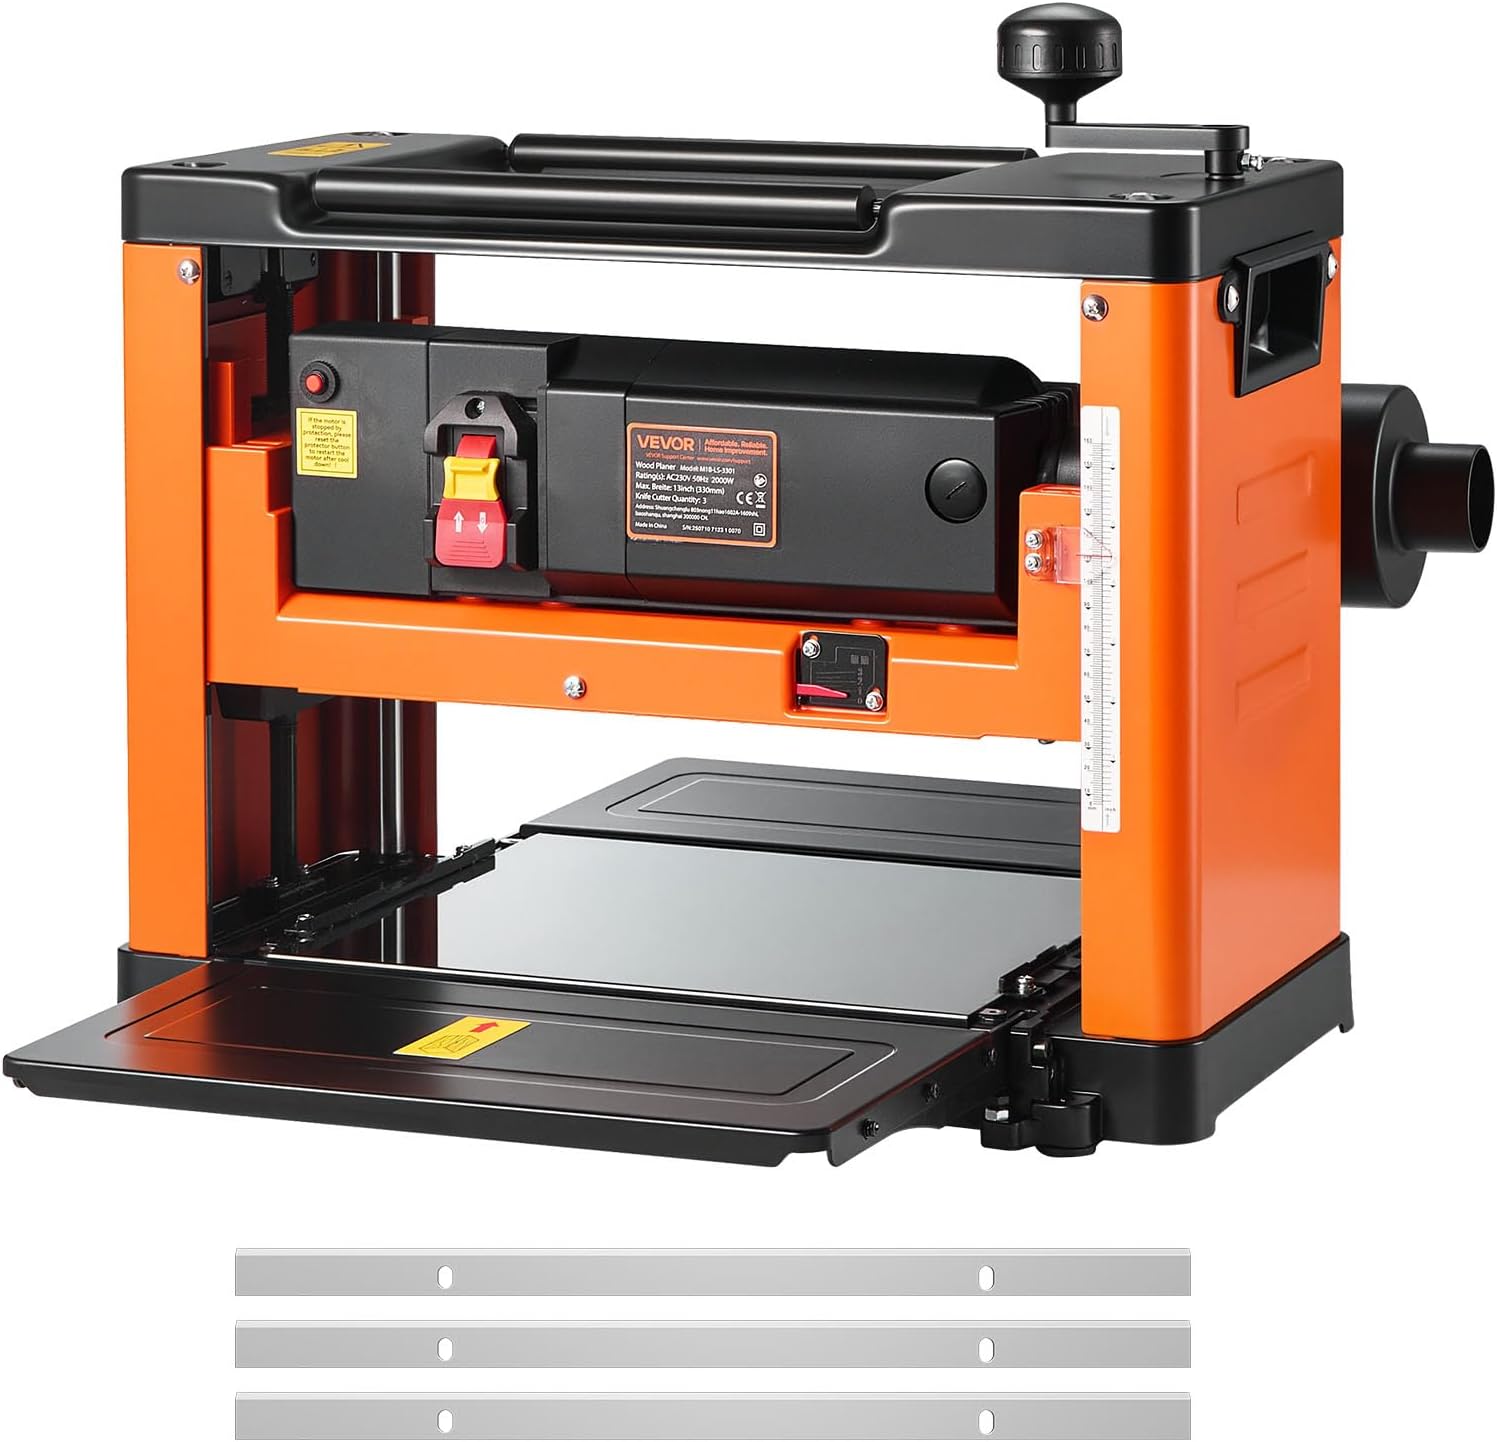
Image 3.1: Front view of the VEVOR Thickness Planer, showing the main unit and included spare blades.
3.1 Included Components
The package typically includes the following items:
- 1 x Benchtop Thickness Planer
- 1 x Accessory Set (includes blades, wrenches, etc.)

Image 3.2: The thickness planer shown with its accessory set, including three HSS blades, a blade changing tool, and a hex key.
3.2 Key Features
- Powerful Motor: Equipped with a 2000W motor, delivering up to 24,000 CPM for efficient planing of various wood types.
- Three HSS Blades: Features three sharp High-Speed Steel (HSS) blades for precise and smooth cuts.
- Dual-Roller Feeding System: Sturdy rollers ensure precise board advancement, reducing vibration and alignment issues.
- Large Worktable: A 13-inch wide, 6-inch high, and 28.2-inch long worktable accommodates long or warped boards.
- Precision Depth Control: Allows for 1/8-inch precise depth adjustments with millimeter-level accuracy.
- Dust Hose Compatibility: Compatible with both 2-inch and 4-inch dust hoses for effective chip extraction.

Image 3.3: Visual representation of the planer's key features, including its 13-inch wide worktable, three HSS blades, fast feeding rate, overload protection, powerful 2000W motor, and millimeter precision.

Image 3.4: Detailed dimensions of the planer's worktable, highlighting its 13-inch width, 6-inch depth capacity, and 28.2-inch maximum board length.
4. Setup
4.1 Unpacking
- Carefully remove the planer and all accessories from the packaging.
- Inspect the machine for any shipping damage. If damage is found, do not operate and contact customer support.
- Retain the packaging for future storage or transport.
4.2 Placement and Stability
- Place the planer on a sturdy, level workbench or stand capable of supporting its weight (approximately 62.8 lbs).
- Ensure the four rubber feet are securely positioned on the surface to prevent movement during operation.
- Allow sufficient clear space around the planer for feeding and discharging workpieces, and for safe operation.
4.3 Dust Collection Setup
Connecting a dust collection system is highly recommended to maintain a clean workspace and reduce airborne dust.
- The planer is compatible with both 2-inch and 4-inch dust hoses.
- Attach the appropriate dust hose to the dust port on the side of the planer.
- Ensure the connection is secure to prevent leaks.

Image 4.1: Illustration of the dust port's compatibility with both 2-inch and 4-inch dust hoses. Note: Vacuum hose and vacuum cleaner are not included.
5. Operating Instructions
5.1 Before Operation
- Ensure all safety guards are in place and functioning correctly.
- Verify that the blades are sharp and properly installed.
- Inspect the workpiece for any foreign objects (nails, screws, knots) that could damage the blades or cause kickback.
- Always wear safety glasses, hearing protection, and a dust mask.
5.2 Adjusting Cutting Depth
The planer allows for precise adjustment of the cutting depth.
- Turn the depth adjustment crank located on top of the machine.
- Refer to the depth scale (in both inches and millimeters) on the side of the planer to set the desired thickness.
- Adjustments can be made in precise 1/8-inch increments.
- For best results and to prevent motor strain, avoid taking excessively deep cuts, especially on hardwoods. Multiple shallow passes are preferable.
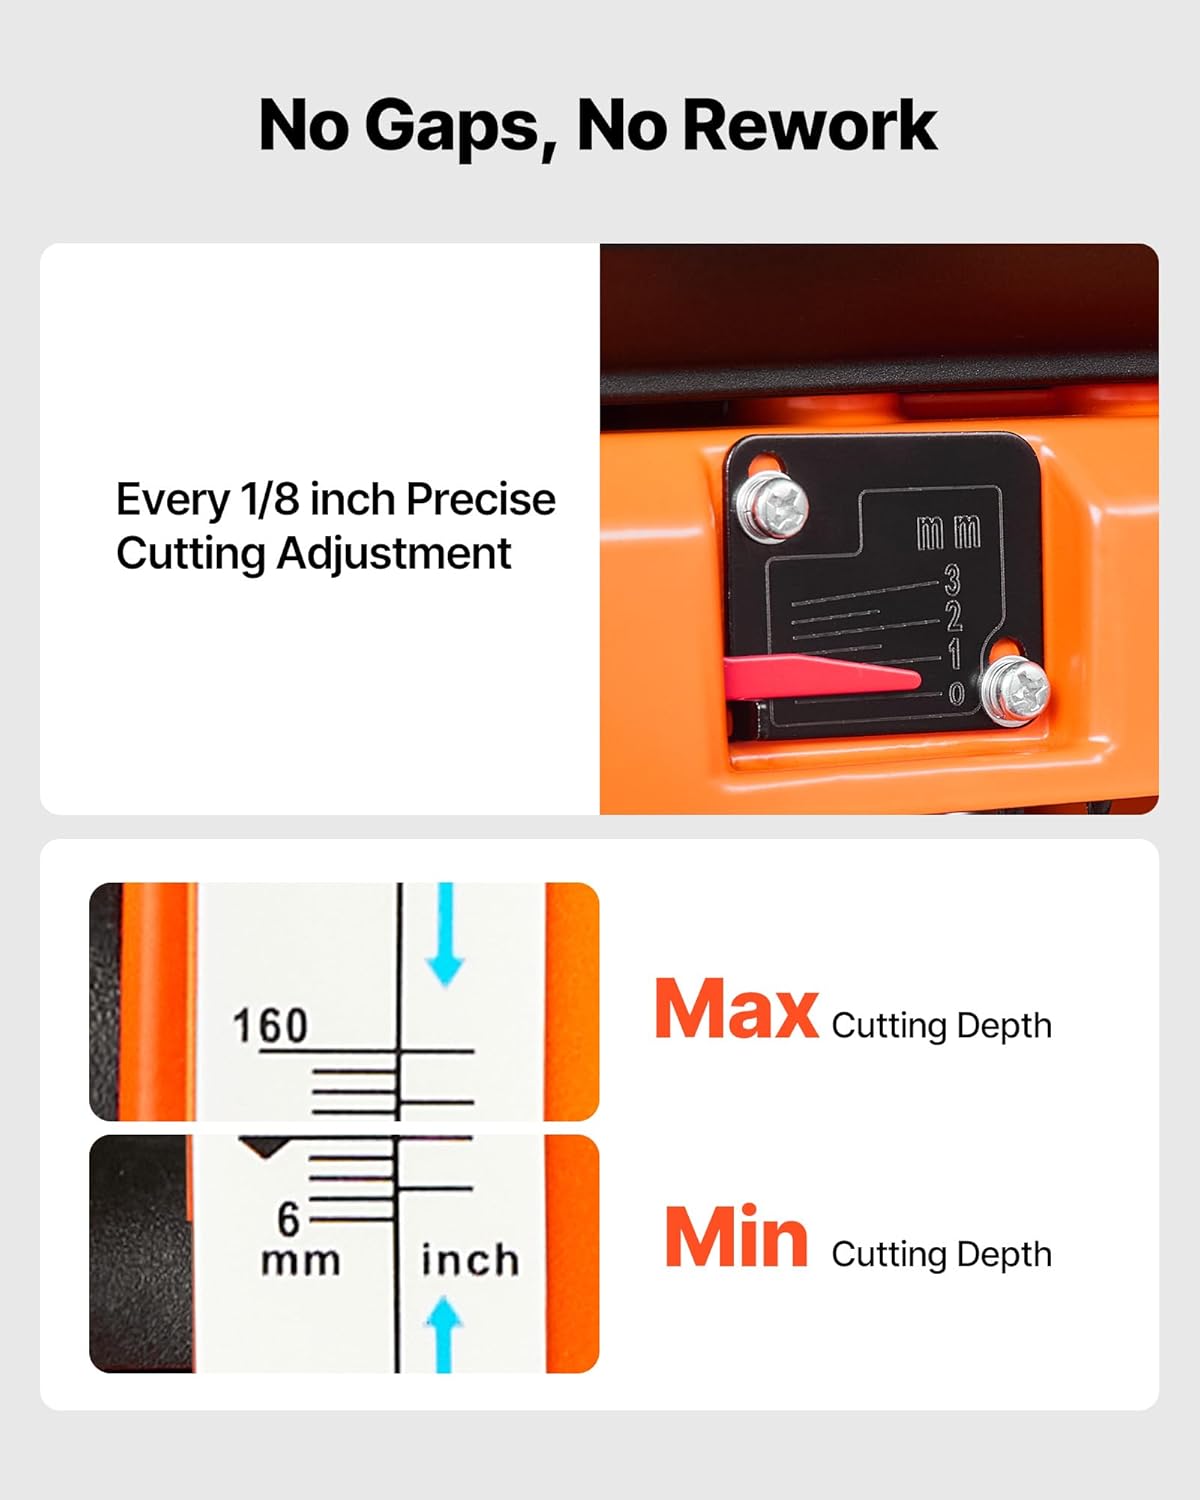
Image 5.1: Detailed view of the depth adjustment mechanism, showing the precise cutting adjustment lever and the clear measurement scale for maximum and minimum cutting depths.
5.3 Feeding Workpieces
The dual-roller feeding system ensures smooth and consistent material advancement.
- Turn on the planer using the power switch.
- Feed the workpiece into the infeed opening, keeping it flat against the worktable.
- The rollers will automatically pull the wood through the planer. Do not force the workpiece.
- Support long workpieces at both the infeed and outfeed ends to prevent snipe (uneven planing at the ends).
- Maintain a consistent feed rate. The planer has a feed rate of 6 meters per minute.

Image 5.2: A user feeding a wooden board into the thickness planer, demonstrating the machine's continuous power and effortless cutting capabilities, with indicators for feed rate, noise level, RPM, and CPM.

Image 5.3: Illustration of the infeed and outfeed rollers, which ensure a smooth and flat finish from edge to edge.
5.4 Material Compatibility
The planer is suitable for a variety of wood types, including but not limited to:
- Walnut Wood
- Cherry Wood
- Oak
- Pine

Image 5.4: Various types of wood, such as walnut, cherry, oak, and pine, demonstrating the planer's versatility across different wood materials.
5.5 Achieving a Smooth Finish
The planer is designed to produce a smooth, splinter-free finish.

Image 5.5: Comparison of wood surfaces before and after planing, illustrating the transformation from an uneven, rough surface to a smooth, precise finish achieved by the dual rollers and sharp blades.
6. Maintenance
Regular maintenance ensures the longevity and optimal performance of your planer. Always disconnect the power before performing any maintenance.
6.1 Cleaning
- After each use, clear wood chips and dust from the worktable, dust port, and around the cutterhead.
- Use a brush or compressed air to remove stubborn debris.
- Do not use solvents or harsh chemicals that could damage the machine's finish or components.
6.2 Blade Replacement
Dull blades can lead to poor cuts, motor strain, and increased snipe. Replace blades when they become dull or damaged.

Image 6.1: View of the triple sharp blades within the planer's cutterhead, along with spare blades, indicating they are easy to replace.
- Disconnect Power: Ensure the planer is unplugged from the power source.
- Access Blades: Refer to your planer's specific instructions for accessing the cutterhead. This usually involves removing a cover.
- Remove Old Blades: Carefully loosen the screws holding the blades in place using the provided wrench. Remove the dull blades. Handle blades with extreme caution as they are very sharp.
- Install New Blades: Insert new HSS blades, ensuring they are correctly seated and aligned. Tighten the screws securely.
- Replace Cover: Reinstall any covers or guards removed during the process.
6.3 Storage
- Store the planer in a clean, dry, and secure location, out of reach of children.
- Protect the machine from moisture and extreme temperatures.
7. Troubleshooting
This section addresses common issues you might encounter. For problems not listed here, contact VEVOR customer support.
| Problem | Possible Cause | Solution |
|---|---|---|
| Planer does not start. | No power supply; Safety switch not engaged; Overload protection tripped. | Check power connection; Ensure safety switch is ON; Press overload reset button. |
| Poor surface finish (e.g., tear-out, rough spots). | Dull or damaged blades; Too deep a cut; Incorrect feed rate; Wood grain issues. | Replace or sharpen blades; Take shallower passes; Adjust feed rate; Orient wood correctly. |
| Snipe (uneven ends of workpiece). | Lack of support for workpiece; Excessive depth of cut. | Provide adequate support at infeed and outfeed; Reduce cut depth. |
| Motor slows down or stops during operation. | Overload; Dull blades; Too deep a cut. | Reduce cut depth; Replace blades; Allow motor to cool and reset overload protection. |
| Excessive vibration or noise. | Loose components; Unbalanced blades; Planer not stable. | Check and tighten all fasteners; Ensure blades are correctly installed and balanced; Place planer on a stable surface. |
8. Specifications
Technical specifications for the VEVOR Thickness Planer Model M1B-LS-3301.
| Attribute | Value |
|---|---|
| Model Number | M1B-LS-3301 |
| Power | 2000W |
| No-Load Speed | 23,500 RPM |
| Cutterhead Speed | 24,000 CPM |
| Feed Rate | 6 M/Min |
| Max Planing Width | 13 inches (330 mm) |
| Max Planing Depth | 6 inches (152.4 mm) |
| Max Cutting Depth per Pass | 1/8 inch (3.175 mm) |
| Worktable Length | 28.2 inches (716 mm) |
| Net Weight | 62.8 lbs (28.5 kg) |
| Product Dimensions (L x W x H) | 20.7 x 28.2 x 18.9 inches (525 x 716 x 480 mm) |
| Material | Plastic, Die-Cast Aluminum Alloy, Stamped Sheet Metal |
| UPC | 197988158196 |

Image 8.1: Technical specifications and included accessories for the VEVOR Thickness Planer, including model number, power, weight, dimensions, and material composition.
9. Warranty and Support
9.1 Protection Plans
Extended protection plans may be available for your VEVOR Thickness Planer. Please refer to the product's purchase page or contact your retailer for details on available 3-Year or 4-Year protection plans.
9.2 Customer Support
For technical assistance, parts, or warranty claims, please contact VEVOR customer support. You can often find contact information on the official VEVOR website or through your purchase platform.
Additional resources:
- Official VEVOR Store: Visit the VEVOR Store on Amazon
- User Manual (PDF): Download PDF Manual
Related Documents - M1B-LS-3301
 |
VEVOR Thickness Planer Manual: M1B-LS-3051, M1B-LS-3301, M1B-LS-3302 - Operation and Maintenance Guide Comprehensive user manual for VEVOR thickness planers, models M1B-LS-3051, M1B-LS-3301, and M1B-LS-3302. Includes safety instructions, technical data, assembly, operation, and maintenance procedures. |
 |
VEVOR M1B-LS-3301 Thickness Planer User Manual Comprehensive user manual for the VEVOR M1B-LS-3301 Thickness Planer, detailing safety instructions, technical specifications, operation procedures, maintenance guidelines, and blade replacement. This guide ensures safe and effective use of the woodworking tool. |
 |
VEVOR Thicknesser M1B-LS-3301 User Manual This user manual provides detailed instructions for operating, maintaining, and troubleshooting the VEVOR Thicknesser M1B-LS-3301. It covers safety precautions, technical specifications, assembly, operation steps, and maintenance procedures for this woodworking tool. |
 |
VEVOR M1B-LS-3301 Wood Planer User Manual & Instructions Download the VEVOR M1B-LS-3301 Wood Planer user manual for detailed operating instructions, safety guidelines, technical specifications, and maintenance procedures. Learn how to safely and effectively use your VEVOR thickness planer. |
 |
SKYSHALO M1B-LS-3301 Wood Planer User Manual & Safety Guide Comprehensive user manual and safety guide for the SKYSHALO Wood Planer, Model M1B-LS-3301. Includes operating instructions, assembly, technical data, and essential safety precautions for woodworking. |
 |
SKYSHALO M1B-LS-3301 Wood Planer User Manual Comprehensive user manual for the SKYSHALO M1B-LS-3301 Wood Planer. This guide covers essential safety instructions, technical specifications, operation procedures, and maintenance tips for effective and safe use of your benchtop woodworking tool. Ideal for planing hard and soft woods. |
Ask a question about this manual
Ask about setup, troubleshooting, compatibility, parts, safety, or missing instructions. Manuals+ will review the question and use this page’s manual context to help answer it.