SOGTICPS 60A-48V
SOGTICPS 60A MPPT Solar Charge Controller User Manual
Model: 60A-48V
1. Introduction
This manual provides detailed instructions for the installation, operation, and maintenance of the SOGTICPS 60A MPPT Solar Charge Controller. This device is designed to efficiently manage power flow from solar panels to batteries, ensuring optimal charging and extending battery life. It is compatible with 12V, 24V, 36V, and 48V systems and supports various battery types including AGM, Gel, Flooded, and Lithium.
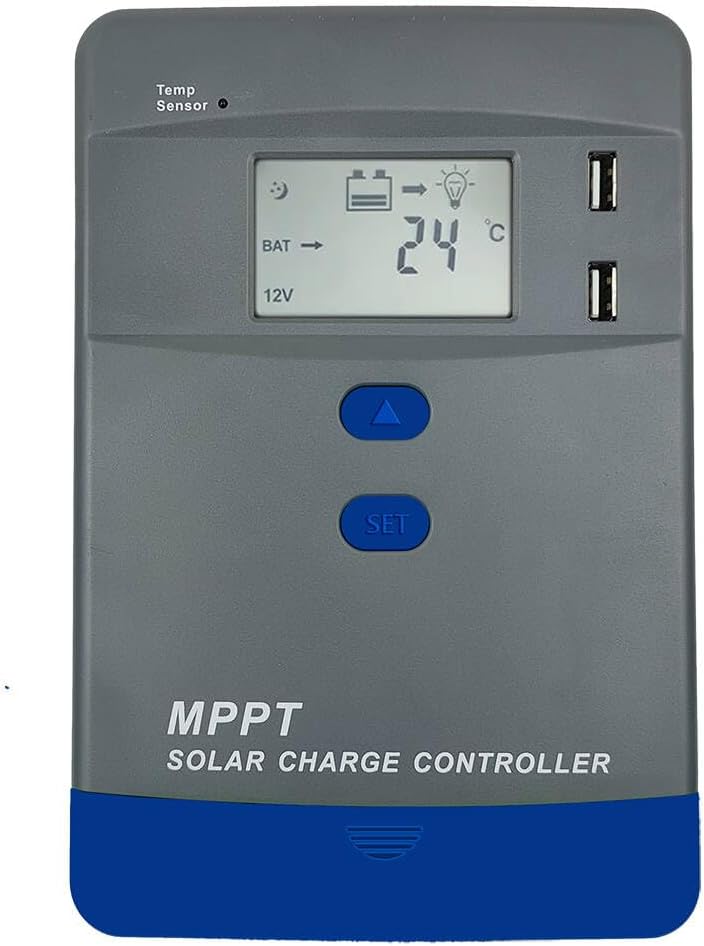
Figure 1.1: Front view of the SOGTICPS 60A MPPT Solar Charge Controller, showing the LCD screen, control buttons, and USB ports.
2. Key Features
- Advanced MPPT Technology: Achieves up to 99% tracking efficiency, converting solar energy to battery charge with high efficiency (up to 98% conversion efficiency). Supports maximum 150V solar panel voltage input (Voc) and handles 520W–5200W solar arrays (12V–48V systems).
- Multi-Battery Compatibility: Automatically recognizes 12V/24V/36V/48V systems. Compatible with Gel, Sealed, Flooded lead-acid, and Lithium batteries (LiFePO4/Li(NiCoMn)O2). Features customizable charging profiles.
- Comprehensive Protection: Built-in safeguards against over-voltage, over-discharge, overload, short-circuit, reverse polarity, and overheating.
- Intelligent LCD Display: Provides real-time system status, charging parameters, and intuitive operation for easy monitoring and configuration.
- Communication Expansion: Supports communication (customizable) for remote monitoring capabilities.
- Durable Design: Industrial-grade construction with an aluminum alloy die-cast structure for excellent heat dissipation, ensuring stable operation in harsh environments (-20°C to +55°C).
- Smart Load Management: Offers 4 modes (manual, light control, time control, reverse control) and handles up to 30A discharge current.

Figure 2.1: Illustration of the advanced MPPT technology, highlighting 98% tracking efficiency and 99% conversion efficiency, compatible with various battery types including Flooded, Sealed Lead-Acid, Gel, Lithium, and AGM.
3. Installation and Setup
Proper installation is crucial for the safe and efficient operation of your solar charge controller. Please follow these steps carefully.
3.1 Safety Precautions
- Ensure all power sources are disconnected before wiring.
- Install the controller in a well-ventilated, dry, and cool environment, away from direct sunlight and moisture.
- Use appropriate wire gauges for all connections to prevent overheating.
- Always connect the battery first, then the solar panels, and finally the load. Disconnect in reverse order.
3.2 Wiring Sequence
- Connect the Battery: Connect the battery to the controller's battery terminals. Ensure correct polarity (+ to + and - to -). The controller will automatically detect the system voltage (12V/24V/36V/48V).
- Connect the Load (Optional): If using the controller's load output, connect your DC load to the load terminals.
- Connect the Solar Panels: Connect the solar panels to the controller's PV terminals. Ensure correct polarity. The controller will begin charging the battery.

Figure 3.1: Illustrated wiring steps, emphasizing connecting the battery first, then the solar panels, and finally powering on the controller to initiate charging.
Important: Always follow the specified wiring order (Battery → Load → PV) to prevent damage to the controller or connected devices. Disconnect in the reverse order (PV → Load → Battery).
4. Operating Instructions
The controller features an intuitive LCD display and control buttons for easy operation and monitoring.
4.1 LCD Display and Navigation
The LCD screen displays real-time system parameters such as battery voltage, charging current, PV voltage, and load status. Use the UP and SET buttons to navigate through the display menus and adjust settings.

Figure 4.1: Visual guide to the LCD display navigation, showing how to cycle through different parameters like battery voltage and charging time using the SET and UP buttons.
4.2 Load Working Modes
The controller offers four distinct load working modes to suit various application needs:
- Manual Mode (24H): The load output is continuously on for 24 hours. You can manually turn it on or off using the controller's buttons.
- Solar Light Control Mode: The load automatically turns on at sunset and turns off at sunrise. Ideal for outdoor lighting applications.
- Solar Light + Time Control Mode: The load turns on at sunset and remains on for a set duration (e.g., 1-15 hours), then turns off. It will turn on again at the next sunset.
- Reverse Control Mode: The load is off during the day and on at night. (This mode description is often less common, but if it's implied by "reverse control" in the image, it's included).

Figure 4.2: Overview of the load working modes, including Manual (24H), Solar Light Control (Sunset-Sunrise), and Solar Light + Time Control (Sunset + Time, Sunrise off).
5. Specifications
Detailed technical specifications for the SOGTICPS 60A MPPT Solar Charge Controller.
| Parameter | Value |
|---|---|
| System Rated Voltage | 12V/24V/36V/48V Auto work |
| Max PV Open Circuit Voltage (Voc) | <150V |
| Max Power of PV (12V Battery) | 780W |
| Max Power of PV (24V Battery) | 1560W |
| Max Power of PV (36V Battery) | 2340W |
| Max Power of PV (48V Battery) | 3120W |
| Rated Charge Current | 60A |
| Rated Discharge Current | 30A |
| Battery Type Support | User default / Lead-Acid / Lithium (AGM, Gel, Flooded, LiFePO4, Li(NiCoMn)O2) |
| Product Dimensions | 8.5 x 5.6 x 3.1 inches (21.6 x 14.2 x 7.9 cm) |
| Item Weight | 3.3 pounds (1.5 kg) |
| Operating Temperature | -20°C to +55°C |
| Protection Rating | IP30 |

Figure 5.1: Power specifications for 12V and 24V systems, illustrating maximum PV input power and the MPPT charging curve.
6. Protection Functions
The SOGTICPS MPPT Solar Charge Controller incorporates multiple protection features to ensure the safety and longevity of your system components.
- Photovoltaic Input Overcurrent Protection: Prevents damage from excessive current from the solar panels.
- Photovoltaic Array Short Circuit Protection: Protects against short circuits in the solar panel array.
- Reversed Photovoltaic Polarity Protection: Prevents damage if solar panel polarity is accidentally reversed.
- Overvoltage Protection for Batteries: Stops charging when the battery voltage exceeds a safe limit.
- Overdischarge Protection for Batteries: Disconnects the load when the battery voltage drops below a safe level, preventing deep discharge.
- Over Temperature Protection: Shuts down or reduces power if the controller's internal temperature becomes too high.
- Load Overload Protection: Protects the load output from excessive current draw.
- Load Short Circuit Protection: Protects against short circuits on the load output.

Figure 6.1: Visual representation of the controller's multi-protection functions, including overcurrent, short circuit, reverse polarity, overvoltage, overdischarge, and over temperature protection.
7. Maintenance
Regular maintenance helps ensure the longevity and optimal performance of your solar charge controller.
- Check Connections: Periodically inspect all wiring connections for tightness and corrosion. Loose connections can cause voltage drops and overheating.
- Clean the Controller: Keep the controller clean and free from dust and debris. Use a dry cloth to wipe the surface. Do not use liquid cleaners.
- Ventilation: Ensure that the area around the controller is well-ventilated to allow for proper heat dissipation. Do not block ventilation openings.
- Battery Inspection: Regularly check your batteries for signs of damage, corrosion, or swelling. Ensure battery terminals are clean.
- System Performance: Monitor the LCD display for any unusual readings or error codes. Compare actual performance with expected values.
8. Troubleshooting
This section addresses common issues you might encounter with your solar charge controller.
| Problem | Possible Cause | Solution |
|---|---|---|
| Controller not powering on | Battery not connected or reversed polarity; Battery voltage too low. | Check battery connections and polarity. Ensure battery voltage is above minimum operating threshold. |
| No charging current from PV | Solar panels not connected or reversed polarity; Insufficient sunlight; PV voltage too low/high. | Check PV connections and polarity. Ensure panels are in direct sunlight. Verify PV voltage is within controller's operating range (<150V). |
| Load not working | Load output disabled; Overload/short circuit on load; Battery voltage too low (over-discharge protection). | Check load settings on LCD. Reduce load or check for short circuits. Allow battery to charge. |
| Controller overheating | Poor ventilation; Excessive load/PV input. | Ensure adequate airflow around the controller. Reduce load or PV input if consistently overheating. |
9. Applications
The SOGTICPS MPPT Solar Charge Controller is versatile and suitable for a wide range of applications, including:
- Residential PV Systems
- Recreational Vehicles (RVs)
- Boats and Marine Applications
- Camping and Portable Power Setups
- Small Off-Grid Power Stations
- Street Lighting Systems

Figure 9.1: Examples of multiple scenarios where the SOGTICPS MPPT Solar Charge Controller can be effectively utilized, from home solar arrays to mobile applications like RVs and boats.
10. Warranty and Support
For warranty information and technical support, please refer to the product packaging or contact SOGTICPS customer service directly. Keep your purchase receipt for warranty claims.
For further assistance, visit the official SOGTICPS store on Amazon: SOGTICPS Store
Ask a question about this manual
Ask about setup, troubleshooting, compatibility, parts, safety, or missing instructions. Manuals+ will review the question and use this page’s manual context to help answer it.