1. Introduction and Overview
The CrestWave Water Pressure Booster Pump is designed to enhance household water pressure, providing a consistent and reliable water supply. This intelligent booster pump features a permanent magnet motor for energy efficiency and automatic operation, adjusting to your water usage needs. It is suitable for residential, apartment, and light commercial applications, ensuring stable water pressure for kitchens, bathrooms, and entire house water supply systems.
Key Features:
- Powerful Boosting System: Max. head of 150FT, Max. flow rate of 1500GPH, and adjustable pressure range of 1.0-5.5bar (15-80PSI). Factory default setting is 2.5bar (36PSI).
- Energy-Efficient Permanent Magnet Motor: Built-in 550W variable frequency motor reduces energy consumption by 50% compared to traditional pumps, operating quietly at only 55 dB.
- Durable and Safe Construction: High-quality ABS housing with a stainless steel impeller, integrated pressure tank for stabilization, and a check valve to prevent backflow.
- Water Tower Mode: Allows timed water replenishment intervals (1/3/6/12h) with automatic start and stop based on water level or pressure.
- Intelligent Fault Diagnosis: Control panel features fault indicator lights and codes for easy troubleshooting of issues like power failure, leakage, blockage, or sensor faults.
- Compact Size and Easy Installation: Dimensions of 11.46"x7.72"x8.84" with 1"NPT water inlet and outlet, fitting easily into small spaces.

Figure 1: The CrestWave pump features a permanent magnet motor, offering 50% energy savings with 550W power, 110V voltage, and 8.0A current for efficient operation.

Figure 2: Visual demonstration of water pressure improvement, showing a significant boost to 80PSI in shower flow after the pump's activation.
2. Setup and Installation
Proper installation is crucial for the optimal performance and longevity of your CrestWave booster pump. Please follow these steps carefully.
2.1 Unpacking
- Carefully remove the pump and all accessories from the packaging.
- Inspect the pump for any signs of damage during transit. If damaged, do not proceed with installation and contact customer support.
- Ensure all components listed in the packing list are present.
2.2 Placement
- Install the pump in a dry, well-ventilated area, protected from direct sunlight, rain, and freezing temperatures.
- Place the pump on a stable, level surface to minimize vibration and noise.
- Ensure there is adequate space around the pump for ventilation and future maintenance.
2.3 Plumbing Connection
- The pump features 1" NPT water inlet and outlet ports. Connect your plumbing lines using appropriate fittings and thread sealant.
- Ensure all connections are watertight to prevent leaks.
- Install isolation valves on both the inlet and outlet sides of the pump to facilitate future maintenance without draining the entire system.
2.4 Electrical Connection
- The pump operates on 115V. Connect the pump to a grounded electrical outlet.
- Ensure the electrical circuit can handle the pump's 550W (0.75 HP) power requirement.
- For safety, it is recommended to have a qualified electrician perform the electrical connections.
2.5 Initial Priming
- Before first use, it is essential to prime the pump. Locate the water injection port (usually a cap on the top of the pump).
- Unscrew the cap and slowly fill the pump casing with water until it is full. This expels any air from inside the pump.
- Replace the cap securely. Failure to prime the pump can lead to dry running and damage.
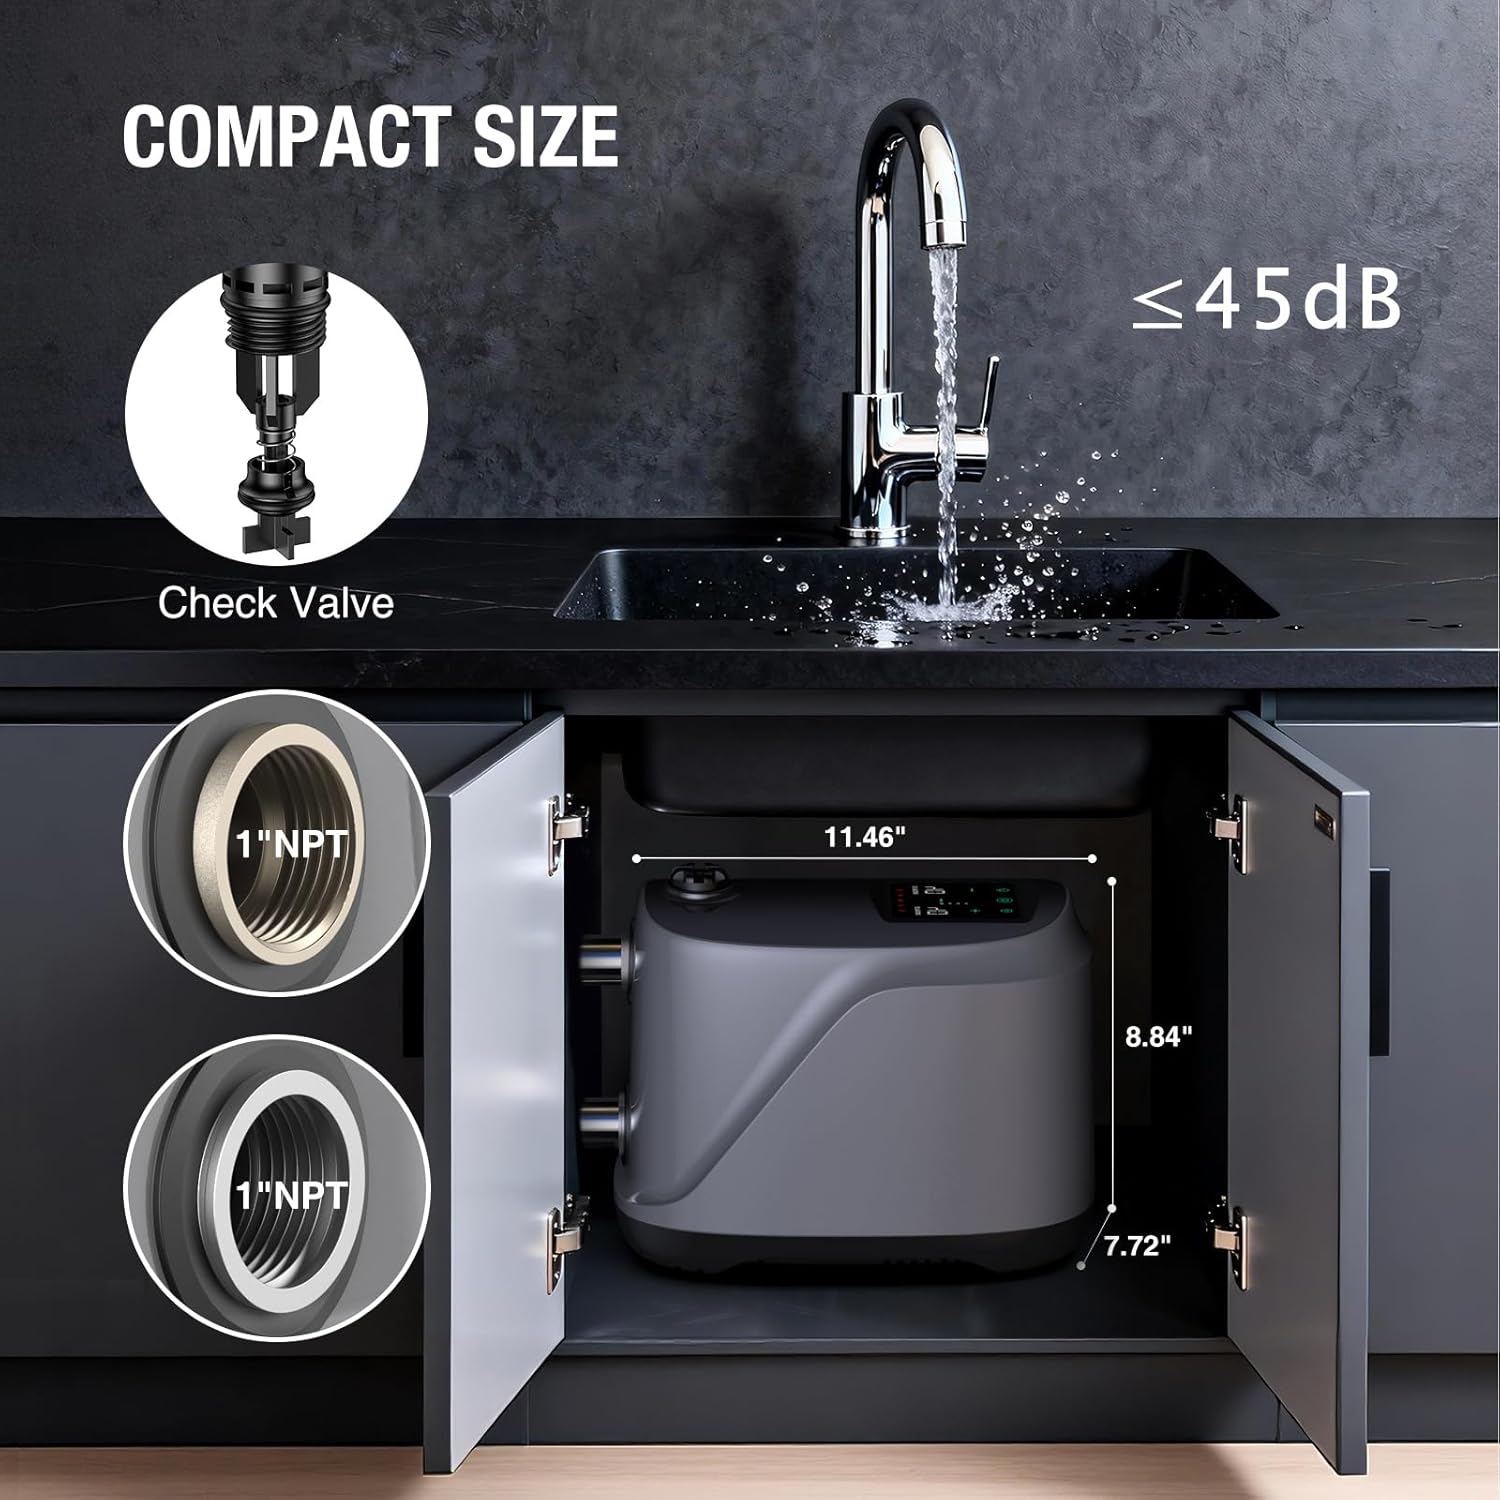
Figure 3: The compact design of the CrestWave pump allows for easy installation in small spaces, such as under a sink, utilizing its 1" NPT inlet and outlet.
3. Operation
The CrestWave booster pump is designed for user-friendly operation with intelligent features to maintain optimal water pressure.
3.1 Control Panel Overview
The pump's control panel provides essential information and allows for setting adjustments. It typically includes:
- SET PRESSURE Display: Shows the desired pressure setting.
- ACT PRESSURE Display: Shows the current actual head value in meters (not pressure value).
- Power Consumption & Timing Indicator: Displays operational status and timing settings.
- Error Indicator: Lights up to signal various fault conditions.
- Buttons: For power, pressure adjustment (+/-), and water tower mode settings.

Figure 4: The intuitive control panel allows users to monitor and adjust pump settings, including set pressure, actual head, and water tower mode.
3.2 Automatic Operation
The pump is equipped with a built-in water pressure sensor that enables automatic start and stop functionality.
- When water is drawn (e.g., opening a faucet), the pump detects a drop in pressure and automatically starts to maintain the set pressure.
- When water flow stops, the pump detects the pressure increase and automatically shuts off after a short delay.
- If the auto start-stop function is unresponsive, press the "-" button on the control panel to lower the pressure value, which may reset the sensor.

Figure 5: The pump's automatic start and stop feature ensures water pressure is maintained only when needed, conserving energy.
3.3 Pressure Adjustment
You can adjust the desired output pressure within the range of 1.0-5.5bar (15-80PSI) using the control panel buttons. The factory default is 2.5bar (36PSI).
- Use the "+" and "-" buttons to increase or decrease the SET PRESSURE value.
- The pump will then work to maintain this set pressure throughout your water system.

Figure 6: The pump ensures consistent water pressure even when multiple faucets are in use, preventing drops or surges.
3.4 Water Tower Mode
This mode is ideal for systems utilizing a water tower or storage tank, allowing for timed water replenishment.
- Activate Water Tower Mode via the control panel.
- Set a fixed replenishment interval (1, 3, 6, or 12 hours) according to your water consumption patterns.
- At the set interval, the pump will automatically start to fill the water tower.
- Once the water tower is full, the pump will automatically stop after detecting changes in water flow or reaching the required pressure.
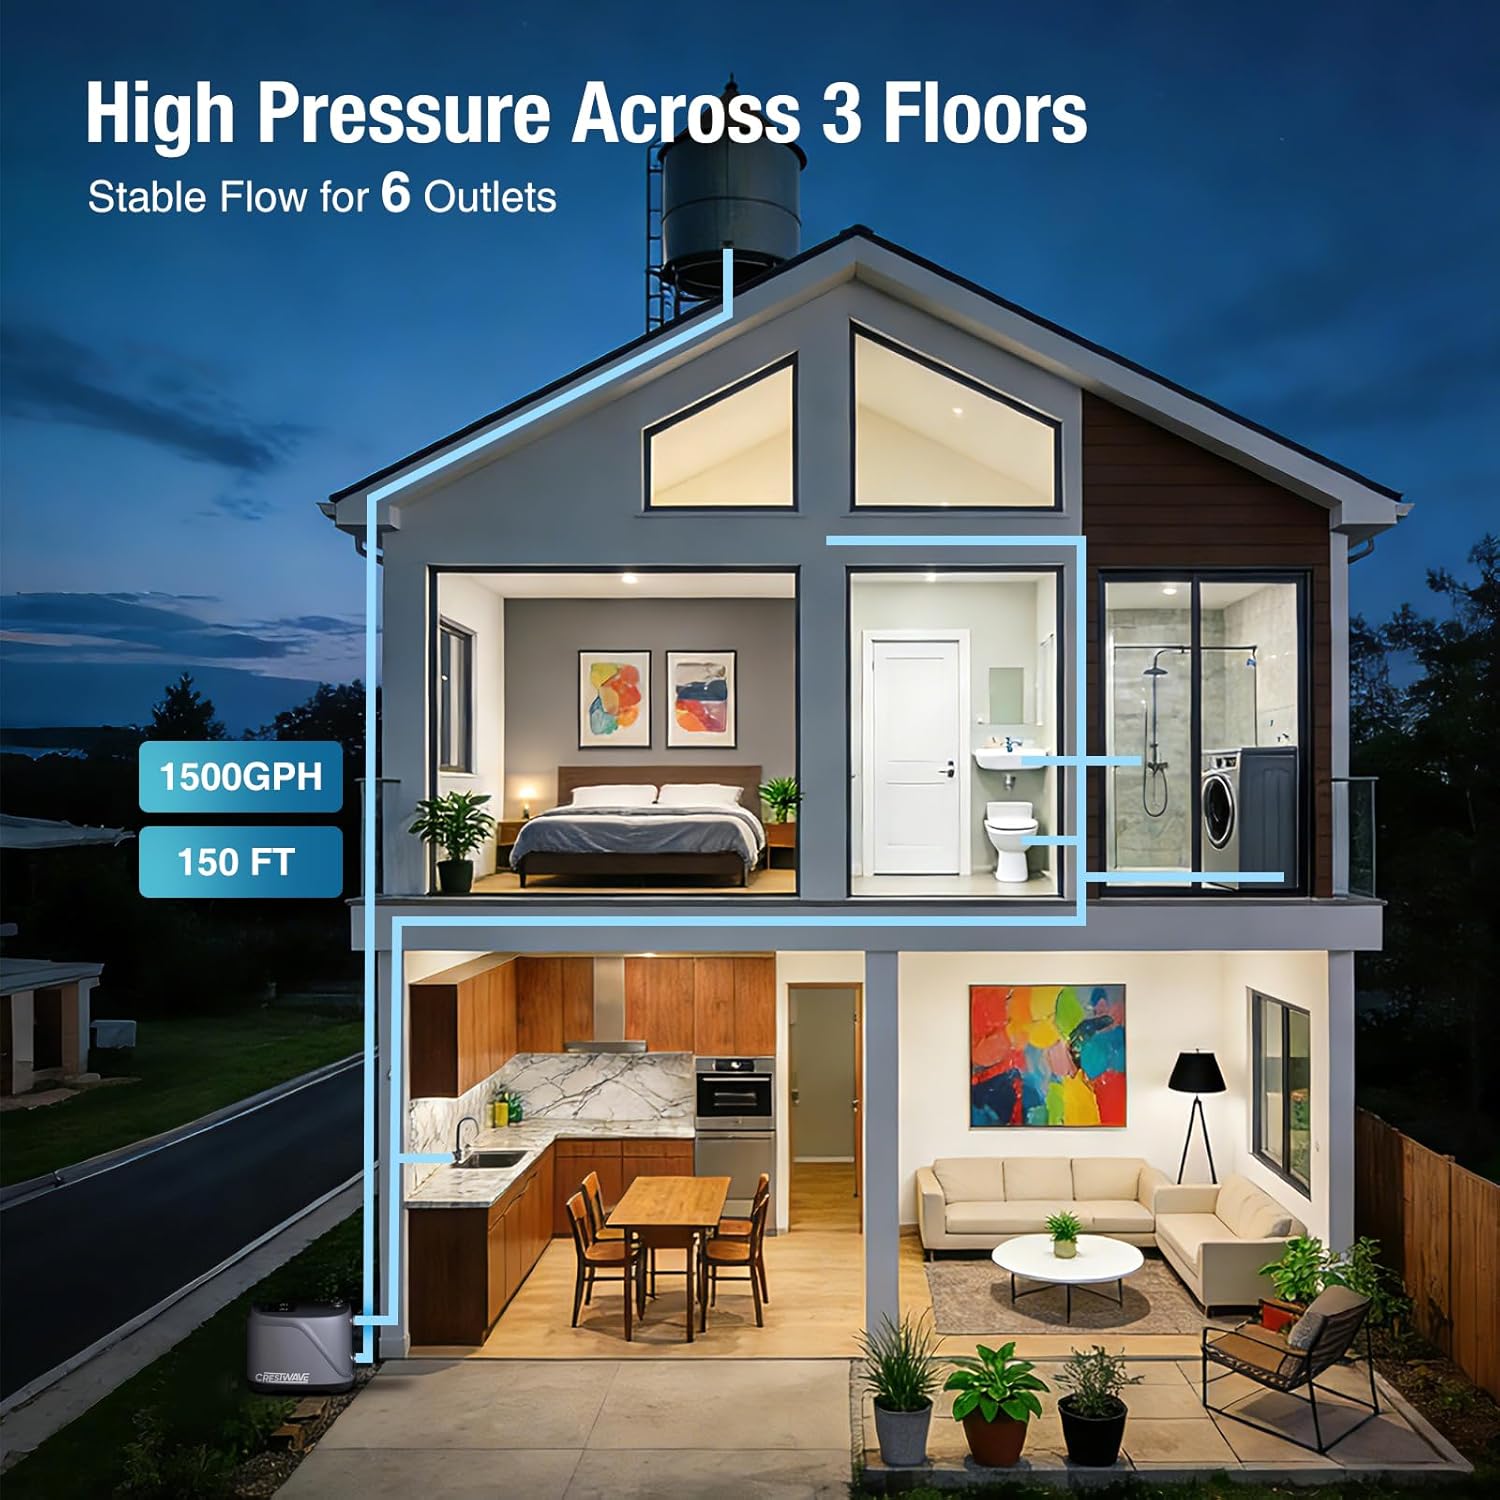
Figure 7: The pump is capable of delivering stable high pressure (1500 GPH, 150 FT head) across multiple floors and outlets in a typical home.
4. Maintenance
Regular maintenance ensures the efficient and reliable operation of your CrestWave booster pump.
4.1 Regular Checks
- Periodically inspect the pump and all connections for any signs of leaks, corrosion, or damage.
- Ensure the area around the pump remains clean and free of debris to allow for proper ventilation.
- Listen for any unusual noises during operation, which could indicate a problem.
4.2 Cleaning
- Wipe down the exterior of the pump with a damp cloth to remove dust and dirt.
- Do not use harsh chemicals or abrasive cleaners, as these can damage the pump's housing.
4.3 Winterization (for cold climates)
- If the pump is installed in an unheated area subject to freezing temperatures, it must be drained to prevent damage.
- Disconnect power to the pump.
- Open any drain valves on the pump and associated plumbing to completely empty all water.
- Store the pump in a warm, dry place if possible, or ensure it is thoroughly drained and protected from freezing.
5. Troubleshooting
The CrestWave pump features intelligent fault diagnosis to help identify and resolve common issues. Refer to the control panel's error indicators and the table below for guidance.
5.1 Fault Diagnosis
The control panel's error indicator lights will illuminate, and specific fault codes may be displayed to help pinpoint the problem. Common fault conditions include:
- Power failure protection
- Pipeline leakage protection
- Pump blockage protection
- Pressure sensor fault protection
5.2 Common Issues and Solutions
| Problem | Possible Cause | Solution |
|---|---|---|
| Pump does not start | No power; Air in pump (not primed); Blocked inlet/outlet; Faulty sensor. | Check power supply; Prime the pump (Section 2.5); Clear blockages; Check fault codes. |
| Pump runs continuously | Leak in plumbing system; Pressure sensor fault; Check valve issue. | Inspect plumbing for leaks; Check fault codes; Inspect check valve for proper function. |
| Low water pressure | Incorrect pressure setting; Partial blockage; Insufficient water supply; Worn impeller. | Adjust pressure setting (Section 3.3); Check for blockages; Ensure adequate water supply; Contact support if impeller is suspected. |
| Pump is noisy | Air in pump; Loose mounting; Foreign object in impeller; Cavitation. | Prime the pump; Secure mounting; Inspect for foreign objects (disconnect power first); Ensure adequate water supply. |
| Error indicator light on | Specific fault detected (e.g., leakage, blockage, sensor). | Refer to the specific fault code on the control panel for detailed troubleshooting steps. |
6. Technical Specifications
Detailed specifications for the CrestWave Water Pressure Booster Pump.
| Specification | Value |
|---|---|
| Brand | CRESTWAVE |
| Model Number | 80PSI Whole House Water Pressure Pump |
| Power Source | Corded Electric |
| Voltage | 115 Volts |
| Wattage | 550 watts |
| Horsepower | 0.75 Horsepower |
| Max. Head | 150 FT |
| Max. Flow Rate | 1500 GPH |
| Pressure Adjustment Range | 1.0-5.5 bar (15-80 PSI) |
| Factory Default Pressure | 2.5 bar (36 PSI) |
| Noise Level | 55 dB (during normal operation) |
| Material | Acrylonitrile Butadiene Styrene (ABS), Stainless Steel |
| Water Inlet/Outlet | 1" NPT |
| Pump Dimensions (LxWxH) | 11.46" x 7.72" x 8.84" |
| Item Weight | 6.25 kg |

Figure 8: An internal view highlighting the precision engineering of the pump, including its permanent magnet motor, multi-stage stainless steel impeller, and integrated check valve.
7. Warranty and Customer Support
For warranty information, please refer to the documentation provided with your purchase or contact the seller directly. CrestWave is committed to providing reliable products and customer satisfaction.
If you encounter any issues or have questions regarding the installation, operation, or maintenance of your CrestWave Water Pressure Booster Pump, please contact our customer support team. Have your model number and purchase details ready for faster assistance.