1. Introduction
Thank you for choosing the fishkeeper Automatic Fish Feeder. This manual provides essential information for the safe and efficient operation of your new device. Please read it thoroughly before use and retain it for future reference.
This automatic feeder is designed to provide precise and scheduled feeding for various aquatic pets in aquariums, including fish, turtles, betta, and koi. Its moisture-proof design and programmable features ensure your pets are fed consistently, offering peace of mind during vacations or busy schedules.

Image: The fishkeeper Automatic Fish Feeder mounted on an aquarium, dispensing food for fish.
Safety Information
- Ensure the feeder is securely mounted to prevent it from falling into the aquarium.
- Do not immerse the main unit in water. The moisture-proof lid is designed to protect food, not the entire device from submersion.
- Use only the specified AA batteries. Do not mix old and new batteries or different types of batteries.
- Keep the desiccant packet intact and out of reach of children and pets. Do not eat or open the desiccant packet.
- Regularly check the feeder for proper operation and ensure food is dispensing correctly.
2. What's in the Box?
Upon opening your fishkeeper Automatic Fish Feeder package, you should find the following components:
- 1x Aquarium fish feeder (Main Unit)
- 1x Adjustable tank clamp base
- 1x Double-sided sticker
- 1x User manual (this document)
- 2x AA batteries

Image: The fishkeeper Automatic Fish Feeder, adjustable tank clamp base, double-sided sticker, and user manual.
3. Key Features
- Programmable Feeding: Set up to 3 feeding times per day, with 0-3 feedings (portions) per time slot, for a maximum of 9 daily portions.
- Upgraded Moisture-Proof Design: The food outlet opens only during feeding and remains sealed at other times. Includes a dedicated slot for a desiccant to absorb moisture.
- 200mL Large Capacity: Suitable for various fish food types, including pellets, powder, sticks, and flakes.
- Adjustable Opening: Control portion size precisely with a marked, sliding scale.
- Two Installation Methods: Securely attach with a rotatable clamp for aquariums up to 0.94" thick, or use the included double-sided tape for tanks with lids.
- Long-Lasting Battery & One-Touch Feeding: Powered by 2 AA batteries for extended cordless operation. A dedicated button allows instant feeding without affecting the schedule.

Image: The fishkeeper Automatic Fish Feeder highlighting its LCD display and battery-powered operation.

Image: The automatic feeder providing convenience for various daily activities and travel.
4. Setup
4.1 Battery Installation
- Open the battery compartment cover located on the side of the main unit.
- Insert 2 AA batteries, ensuring correct polarity (+/-).
- Close the battery compartment cover securely.
4.2 Mounting Options
The feeder offers two installation methods to suit different aquarium types:
- Method 1: Clip-on Mount
Attach the adjustable tank clamp base to the feeder. Securely fasten the clamp onto the edge of your aquarium wall. This method is suitable for glass thickness up to 0.94 inches. The feeder can be rotated 360 degrees for optimal positioning. - Method 2: Adhesive Installation
For aquariums with lids, or if the clip-on mount is not suitable, use the provided double-sided tape. Attach the tape to the bottom of the feeder and then firmly press the feeder onto a clean, dry surface of your aquarium lid.

Image: Visual guide for clip-on and adhesive mounting options.
4.3 Filling the Feeder
- Slide open the loading cover on the food dispensing lid.
- Carefully pour your desired fish food (pellets, powder, sticks, or flakes) into the 200mL capacity drum.
- Close the loading cover securely to maintain the moisture-proof seal.
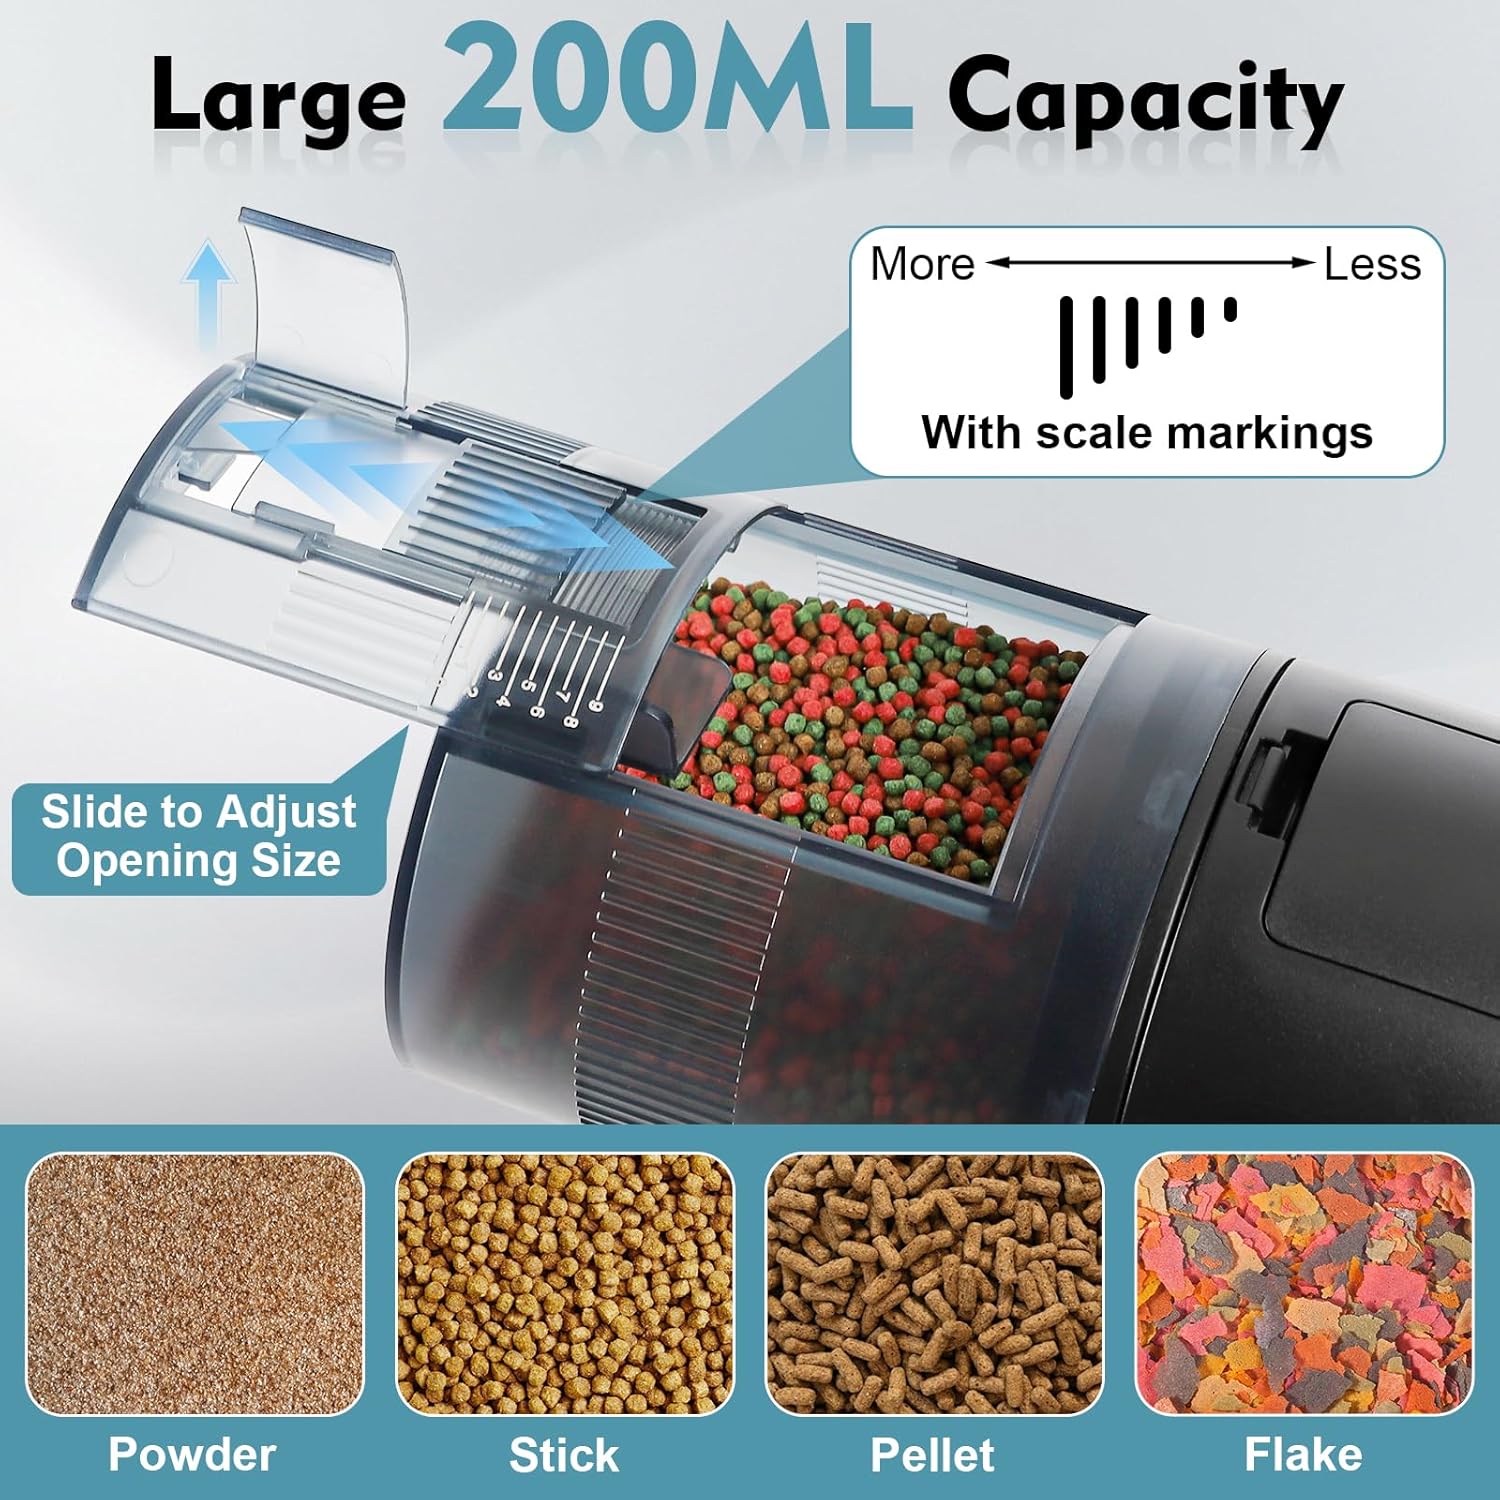
Image: The 200mL large capacity food drum and adjustable opening for various food types.
5. Operation
5.1 Control Panel Overview
Familiarize yourself with the buttons and display indicators:

Image: Detailed view of the control panel, showing battery level, current time, feeding times, feeding frequency, manual feed button, ON/OFF button, settings button, and +/- buttons.
- Power Button: Short press to turn ON, long press to turn OFF.
- Settings Button (Gear Icon): Press to enter time and feeding schedule settings.
- +/- Buttons: Adjust values (hours, minutes, feeding frequency).
- Manual Feeding Button (Hand Icon): Press for instant feeding without affecting the schedule.
- LCD Display: Shows current time, battery level, set feeding times, and feeding frequency (indicated by dots).
5.2 Setting Local Time, Feeding Times, and Frequency
Follow these steps to program your feeder:
- Turn On: Short press the Power Button.
- Enter Settings: Press the Settings Button (gear icon). The local time numbers will blink.
- Set Local Time: Use the +/- buttons to adjust hours and minutes. Press the Settings Button again to save and proceed to the first feeding time setup.
- Set 1st Feeding Time: The first feeding time will blink. Use the +/- buttons to set the desired hour and minute. Press the Settings Button again to save and proceed to set the feeding frequency for this time.
- Set 1st Feeding Frequency: The dots (*) for the first feeding portion will blink. Use the +/- buttons to adjust the number of portions (0-3 dots). Each dot represents one portion. Press the Settings Button again to save and proceed to the second feeding time setup.
- Repeat for 2nd and 3rd Feeding Times: Follow steps 4 and 5 to set the 2nd and 3rd feeding times and their respective frequencies.
- Save and Exit: After setting the 3rd feeding frequency, press the Settings Button to save all settings and exit.

Image: Visual instructions for programming feeding schedules.
5.3 Setting Feeding Interval (Days)
To set the interval days (e.g., feed every other day):
- While in the feeding frequency setting for any time slot, press the [+] and [-] buttons simultaneously.
- The display will show a number (0-4).
- 0: Feeds daily (default).
- 1: Feeds every other day.
- 2: Skips 2 days (feeds every third day).
- 3: Skips 3 days (feeds every fourth day).
- 4: Skips 4 days (feeds every fifth day).
5.4 Manual Feeding
To dispense food immediately without altering your programmed schedule:
- Press the Manual Feeding Button (hand icon) once. The feeder will dispense one portion of food.
5.5 Adjusting Portion Size
The feeder features a sliding scale on the food drum to adjust the amount of food dispensed per portion:
- Slide the scale to the left for smaller portions or to the right for larger portions.
- Observe the markings (0-9) to fine-tune the quantity.
5.6 Exiting Settings
If you need to exit the settings process immediately without completing all feeding times or frequencies:
- Press the Manual Feeding Button (hand icon). This will exit the settings and return to the normal operating mode.
5.7 Instructional Videos
Video: A detailed guide on how to set the feeding times, frequencies, and other operational aspects of the fishkeeper Automatic Fish Feeder.
Video: An overview demonstrating the precision feeding capabilities of the fishkeeper Automatic Fish Feeder for aquariums.
6. Maintenance
6.1 Moisture-Proof Design and Desiccant
The feeder is designed with a moisture-proof lid and a desiccant slot to keep food dry. To access or replace the desiccant:
- Press and pull firmly on the food dispensing lid to detach it from the main unit.
- Locate the desiccant slot inside the lid.
- Replace the desiccant packet as needed to maintain optimal moisture absorption. Ensure the new desiccant is suitable for food storage.
- Reattach the food dispensing lid by aligning it with the main unit and pressing until it clicks securely into place.

Image: Explanation of the moisture-proof lid and desiccant slot for food preservation.
6.2 Cleaning
- Regularly check the food drum and dispensing mechanism for any food residue buildup.
- To clean, detach the food dispensing lid. Wipe the interior of the drum and the dispensing area with a dry cloth.
- Do not use water or cleaning solutions on the main unit or electronic components.
- Ensure all parts are completely dry before reassembling and refilling with food.
7. Troubleshooting
If you encounter any issues with your fishkeeper Automatic Fish Feeder, refer to the table below for common problems and solutions:
| Problem | Possible Cause | Solution |
|---|---|---|
| Feeder does not turn on. | Batteries are dead or incorrectly installed. | Replace batteries with new AA batteries, ensuring correct polarity. |
| Food is not dispensing. | Food outlet blocked; food clumped; drum empty; incorrect settings. | Check for blockages, ensure food is dry and free-flowing. Refill drum. Verify feeding schedule and frequency settings. |
| Food gets wet or clumpy. | Desiccant is saturated; lid not sealed; high humidity. | Replace desiccant. Ensure food dispensing lid is securely closed. Avoid placing feeder directly over high-splash areas. |
| Incorrect time displayed. | Time not set or reset. | Re-enter settings mode and set the correct local time as per Section 5.2. |
| Feeder falls off aquarium. | Clamp not tightened; adhesive not strong enough. | Ensure clamp is fully tightened. If using adhesive, ensure surface is clean and dry, and apply firm pressure. Consider alternative mounting. |
8. Specifications
| Feature | Detail |
|---|---|
| Brand | fishkeeper |
| Model Name | Automatic fish feeder for aquarium |
| Item Model Number | SUS-FK131-200ml |
| Capacity | 200ML |
| Power Source | 2 AA batteries (required) |
| Material | Polyester |
| Color | Black |
| Item Weight | 10.2 ounces (0.29 Kilograms) |
| Product Dimensions (LxWxH) | 6.88 x 4.72 x 3.74 inches |
| Mounting Options | Adjustable tank clamp base, Double-sided sticker |
| Special Feature | Adjustable, Programmable, Moisture-Proof |
| Target Species | Fish |
| Recommended Uses | Indoor Fish Feeder |
9. Warranty and Support
The fishkeeper Automatic Fish Feeder is manufactured with high-quality materials and undergoes strict quality control. For specific warranty details, please refer to the warranty card included in your product packaging or contact fishkeeper customer support.
If you have any questions, require technical assistance, or need to report an issue, please contact our customer support team through the retailer's platform or the official fishkeeper website. Please have your model number (SUS-FK131-200ml) and purchase information ready when contacting support.