Introduction
Thank you for choosing the Olymmons T16-Yellow-1 Ultralight Camping Tent. This tent is designed for 1 to 2 persons, offering a balance of spaciousness, portability, and weather resistance for your outdoor adventures. Its lightweight and robust construction makes it suitable for backpacking, hiking, mountaineering, and motorcycle camping across three seasons. Please read this manual carefully before setting up and using your tent to ensure proper assembly, safe operation, and optimal performance.

Image: The Olymmons T16-Yellow-1 tent in yellow, with its front entrance open, revealing the inner mesh layer. This tent is designed for quick setup and provides ample space for one to two occupants.
Safety Information
- Keep all flame and heat sources away from the tent fabric. The tent is made of flammable material and will burn if left in continuous contact with any flame source.
- Do not use fuel-burning devices inside the tent. This can lead to carbon monoxide poisoning.
- Ensure proper ventilation to prevent condensation and maintain air quality.
- Always secure the tent with all stakes and guy lines provided, especially in windy conditions, to prevent damage or injury.
- Avoid pitching the tent under trees with dead branches that could fall.
- Choose a level site free of sharp objects to protect the tent floor.
Package Contents
Before setup, verify that all components are present:
- Tent Body (Inner Tent and Rainfly)
- Foldable Aluminum Poles (3 pieces)
- Aluminum Pegs (8 pieces)
- Guy Ropes (4 pieces)
- Top Storage Net
- Carry Bag

Image: A visual representation of the Olymmons 1-2 Person Camping Tent, detailing its packed size (46cm/18inch length, 16cm/6.3inch height, 2.3kg/5.07lb weight), capacity for 1-2 persons, and main dimensions (230cm/90.55inch length, 140cm/55.12inch width, 120cm/47.24inch height). The image also lists included accessories: 4 cords, 3 tent poles, 8 pegs, a top storage net, and a center height diagram.
Setup Instructions
The Olymmons T16-Yellow-1 tent features a quick and effortless assembly design, allowing for setup in approximately 3 minutes.
- Unpack and Lay Out: Remove the tent from its carry bag and spread the tent body flat on your chosen campsite. Ensure the tent floor is free of debris and sharp objects.
- Assemble Poles: Connect the sections of the foldable aluminum poles. You will have three main poles.
- Insert Poles: Locate the diagonal sleeves on the tent body. Pass the assembled aluminum poles through these sleeves. The tent uses a cross-pole construction for stability.
- Secure Poles: Once the poles are threaded through the sleeves, attach the tent body to the poles using the hooks and clips provided. Ensure all clips are securely fastened.
- Stake Down: Secure the four corners of the tent to the ground using the aluminum pegs. For added stability, use all 8 pegs provided, especially in windy conditions.
- Attach Guy Ropes: Extend the guy ropes from the designated attachment points on the rainfly and stake them firmly into the ground, away from the tent, to provide additional wind resistance. Adjust tension as needed.
- Adjust Rainfly: Ensure the rainfly is properly positioned over the inner tent, with all buckles and straps secured and tightened to prevent water ingress.

Image: A composite image illustrating the tent's cross-pole construction and the step-by-step setup process. It shows a person attaching poles to the tent fabric, laying out the tent, and the tent partially and fully erected in a natural setting.
Operating the Tent
Doors and Access
The tent features two D-shaped doors with double zippers, allowing easy access from both sides. This design facilitates entry and exit without disturbing a fellow camper. The zippers can be operated from both inside and outside the tent.
Ventilation
Optimal ventilation is crucial for comfort and to minimize condensation. The double door system promotes excellent air circulation. Additionally, the tent is equipped with ventilation windows. Ensure these are open when conditions allow to keep the interior fresh.

Image: This image emphasizes the tent's excellent ventilation, depicting air currents flowing through the tent's mesh and open sections, with a close-up of the mesh fabric and a zipper detail.
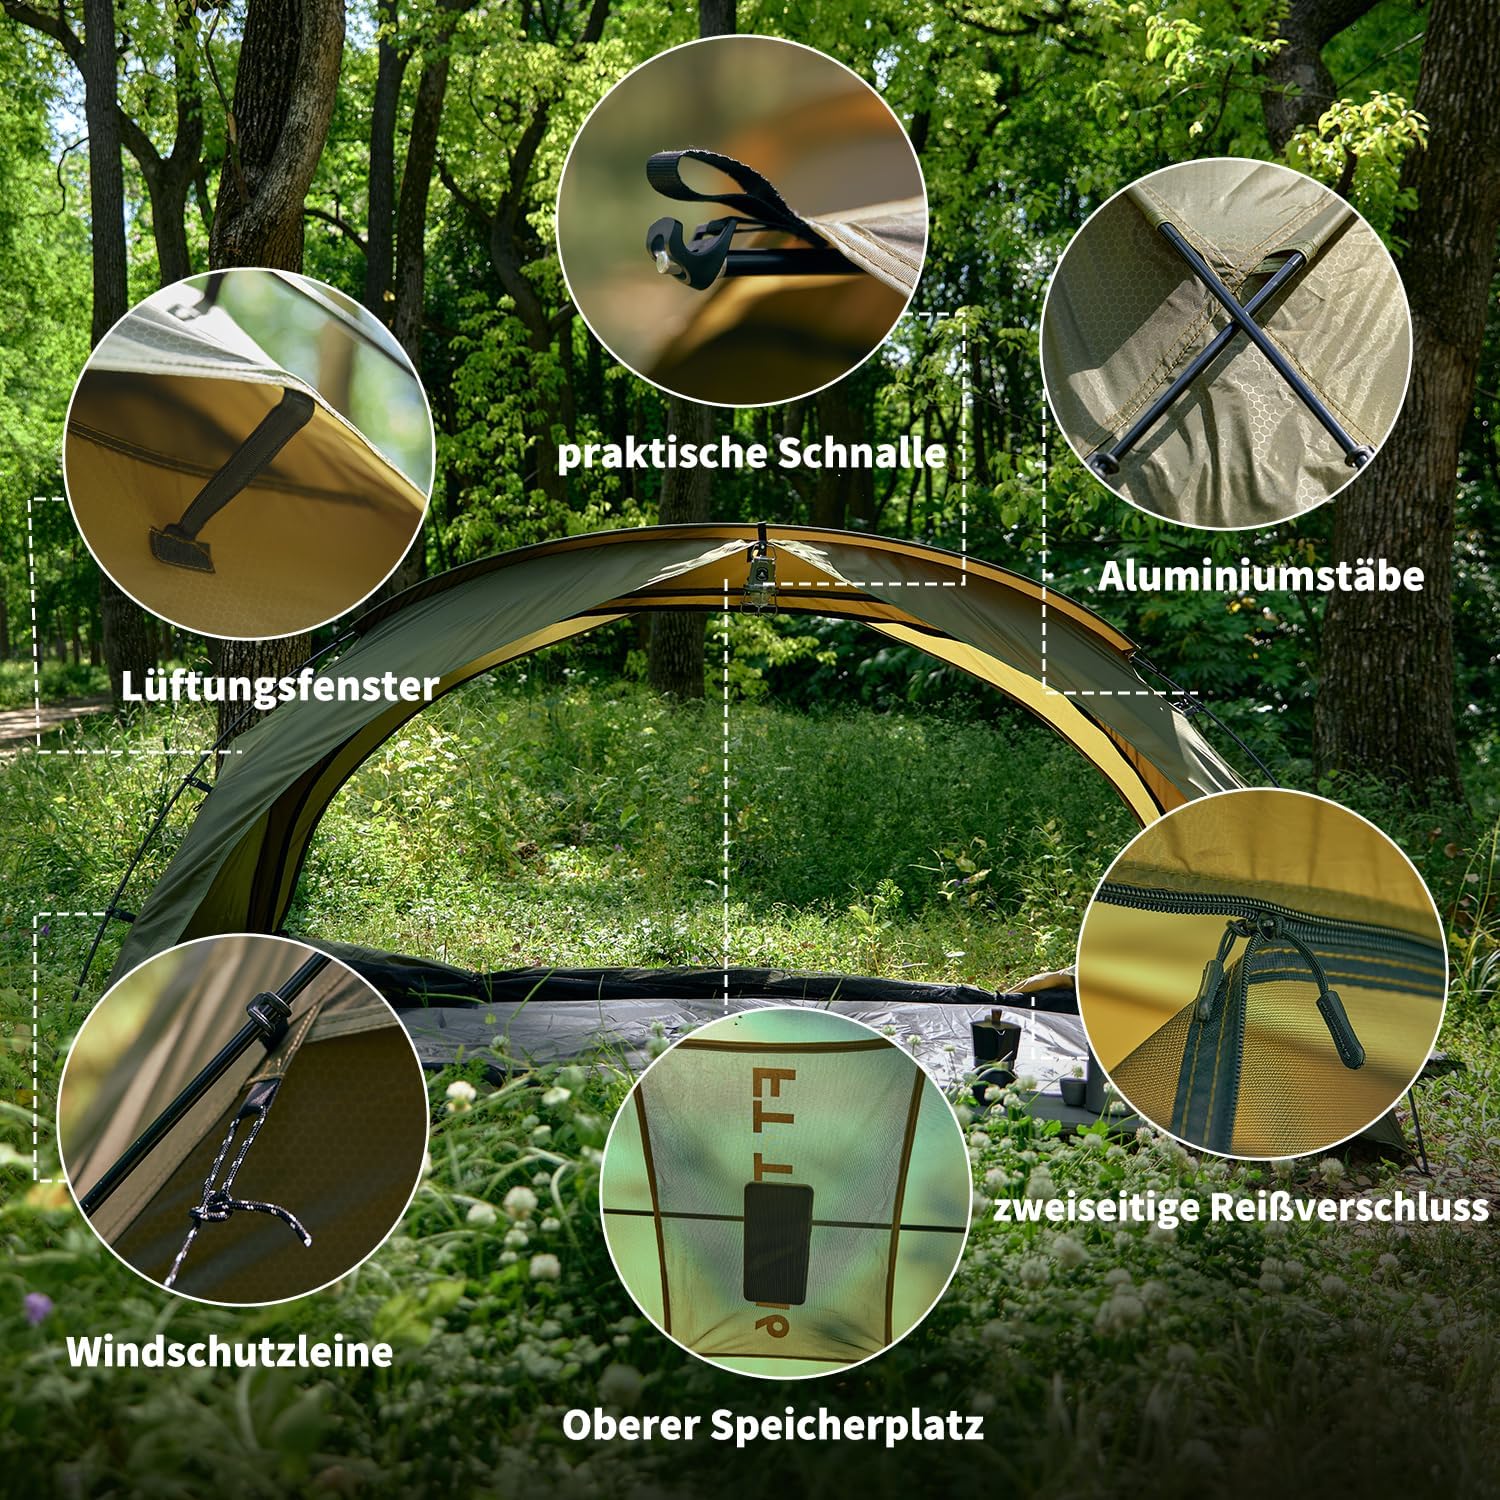
Image: A detailed view of various tent components, including practical buckles for securing poles, lightweight aluminum poles, ventilation windows for airflow, wind ropes for stability, an internal top storage net, and two-way zippers for easy access.
Internal Storage
The tent includes a top storage net for small items, helping to keep the interior organized. There is also additional space at the foot end for backpacks.

Image: A collage of close-up images showing key features: a ventilation window, a stable buckle for pole attachment, the internal top storage net, and a stable foot support point for staking.
Maintenance
Cleaning
- Clean the tent after each use. Use a soft brush or sponge with mild soap and lukewarm water. Do not use harsh detergents, bleach, or solvents.
- Rinse thoroughly to remove all soap residue.
- Do not machine wash or tumble dry.
Drying
- Always ensure the tent is completely dry before packing it away. Packing a damp tent can lead to mildew, odor, and damage to the waterproof coating.
- Hang the tent in a shaded, well-ventilated area to dry. Avoid direct sunlight for prolonged periods, as UV rays can degrade the fabric.
Storage
- Store the clean, dry tent in a cool, dry place, away from direct sunlight and extreme temperatures.
- Avoid storing heavy items on top of the packed tent.
Troubleshooting
- Condensation Inside Tent: Ensure all ventilation options (doors, windows) are open when conditions permit. Condensation is natural, especially in humid or cold weather, but good airflow helps reduce it.
- Water Leakage: Check that all zippers are fully closed and the rainfly is properly tensioned and secured. Inspect seams for any damage. The tent features fully taped seams for waterproofing. If leakage occurs around attachment points (e.g., for storage nets), consider applying a seam sealer to the exterior of these points. Ensure the tent entrance is positioned to minimize rain entry, as the design may allow water in if opened during heavy rain.
- Tent Not Stable in Wind: Ensure all pegs are firmly in the ground and all guy ropes are extended and properly tensioned. Adjust the tension of the guy ropes to distribute stress evenly.
- Difficulty Assembling Poles: Ensure pole sections are fully seated. If poles are bent or damaged, they may need replacement.
Specifications
| Feature | Detail |
|---|---|
| Model | T16-Yellow-1 |
| Occupancy | 1-2 Person |
| Product Dimensions (L x W x H) | 230 cm x 140 cm x 120 cm (90.55 in x 55.12 in x 47.24 in) |
| Packed Size | 46 cm x 16 cm x 16 cm (18 in x 6.3 in x 6.3 in) |
| Item Weight | 2.3 kg (5.07 lb) |
| Material Type | 210T Polyester with PU coating |
| Water Resistance Technology | PU 3000mm Hydrostatic Head |
| Pole Material | Foldable Aluminum |
| Special Features | Quick Setup, Rainproof, UV Protection, Windproof, Double Doors, Ventilation Windows, Top Storage Net |
| Included Components | Tent Body, Aluminum Poles, Aluminum Pegs, Guy Ropes, Top Storage Net, Carry Bag |

Image: A close-up view of the tent fabric, demonstrating its water resistance with visible water droplets on the surface. The text overlay indicates a 'Wasserfestigkeitsklasse PU3000MM' (Water resistance class PU3000MM).
Warranty and Support
Warranty Information
Please refer to the product packaging or the retailer's website for specific warranty details. Generally, Olymmons products are covered by a limited warranty against manufacturing defects.
Customer Support
For any questions, concerns, or assistance with your Olymmons T16-Yellow-1 tent, please contact your retailer or the Olymmons customer service department. Contact information can typically be found on the product packaging or the official Olymmons website.


