1. Introduction
This manual provides comprehensive instructions for the safe and effective use of your KKnoon E24848 Electric Wood Trimmer Router. This versatile power tool is designed for various woodworking tasks, including trimming, grooving, carving, and drilling in wood and other materials. Please read this manual thoroughly before operation and retain it for future reference.
2. Safety Instructions
Always follow basic safety precautions to reduce the risk of fire, electric shock, and personal injury.
- Work Area Safety: Keep your work area clean and well-lit. Cluttered or dark areas invite accidents. Do not operate power tools in explosive atmospheres, such as in the presence of flammable liquids, gases, or dust.
- Electrical Safety: Power tool plugs must match the outlet. Never modify the plug in any way. Avoid body contact with earthed or grounded surfaces. Do not expose power tools to rain or wet conditions.
- Personal Safety: Always wear eye protection, dust mask, non-skid safety shoes, hard hat, or hearing protection as appropriate. Do not overreach. Keep proper footing and balance at all times. Dress properly; avoid loose clothing or jewelry.
- Tool Use and Care: Do not force the power tool. Use the correct power tool for your application. Disconnect the plug from the power source before making any adjustments, changing accessories, or storing power tools.
- Maintenance: Maintain power tools. Check for misalignment or binding of moving parts, breakage of parts, and any other condition that may affect the power tool’s operation.
3. Package Contents
Verify that all items are present upon unpacking:
- Electric Trimmer (with transparent base) x 1
- Router Bit Set (15 pieces) x 1
- Trim Guide Base x 1
- Straight Trim Guide Ruler x 1
- Screw x 1
- Carbon Brush x 2
- Wrench x 2
- Guide Line x 1
4. Product Features and Components
Familiarize yourself with the main parts of your electric trimmer:
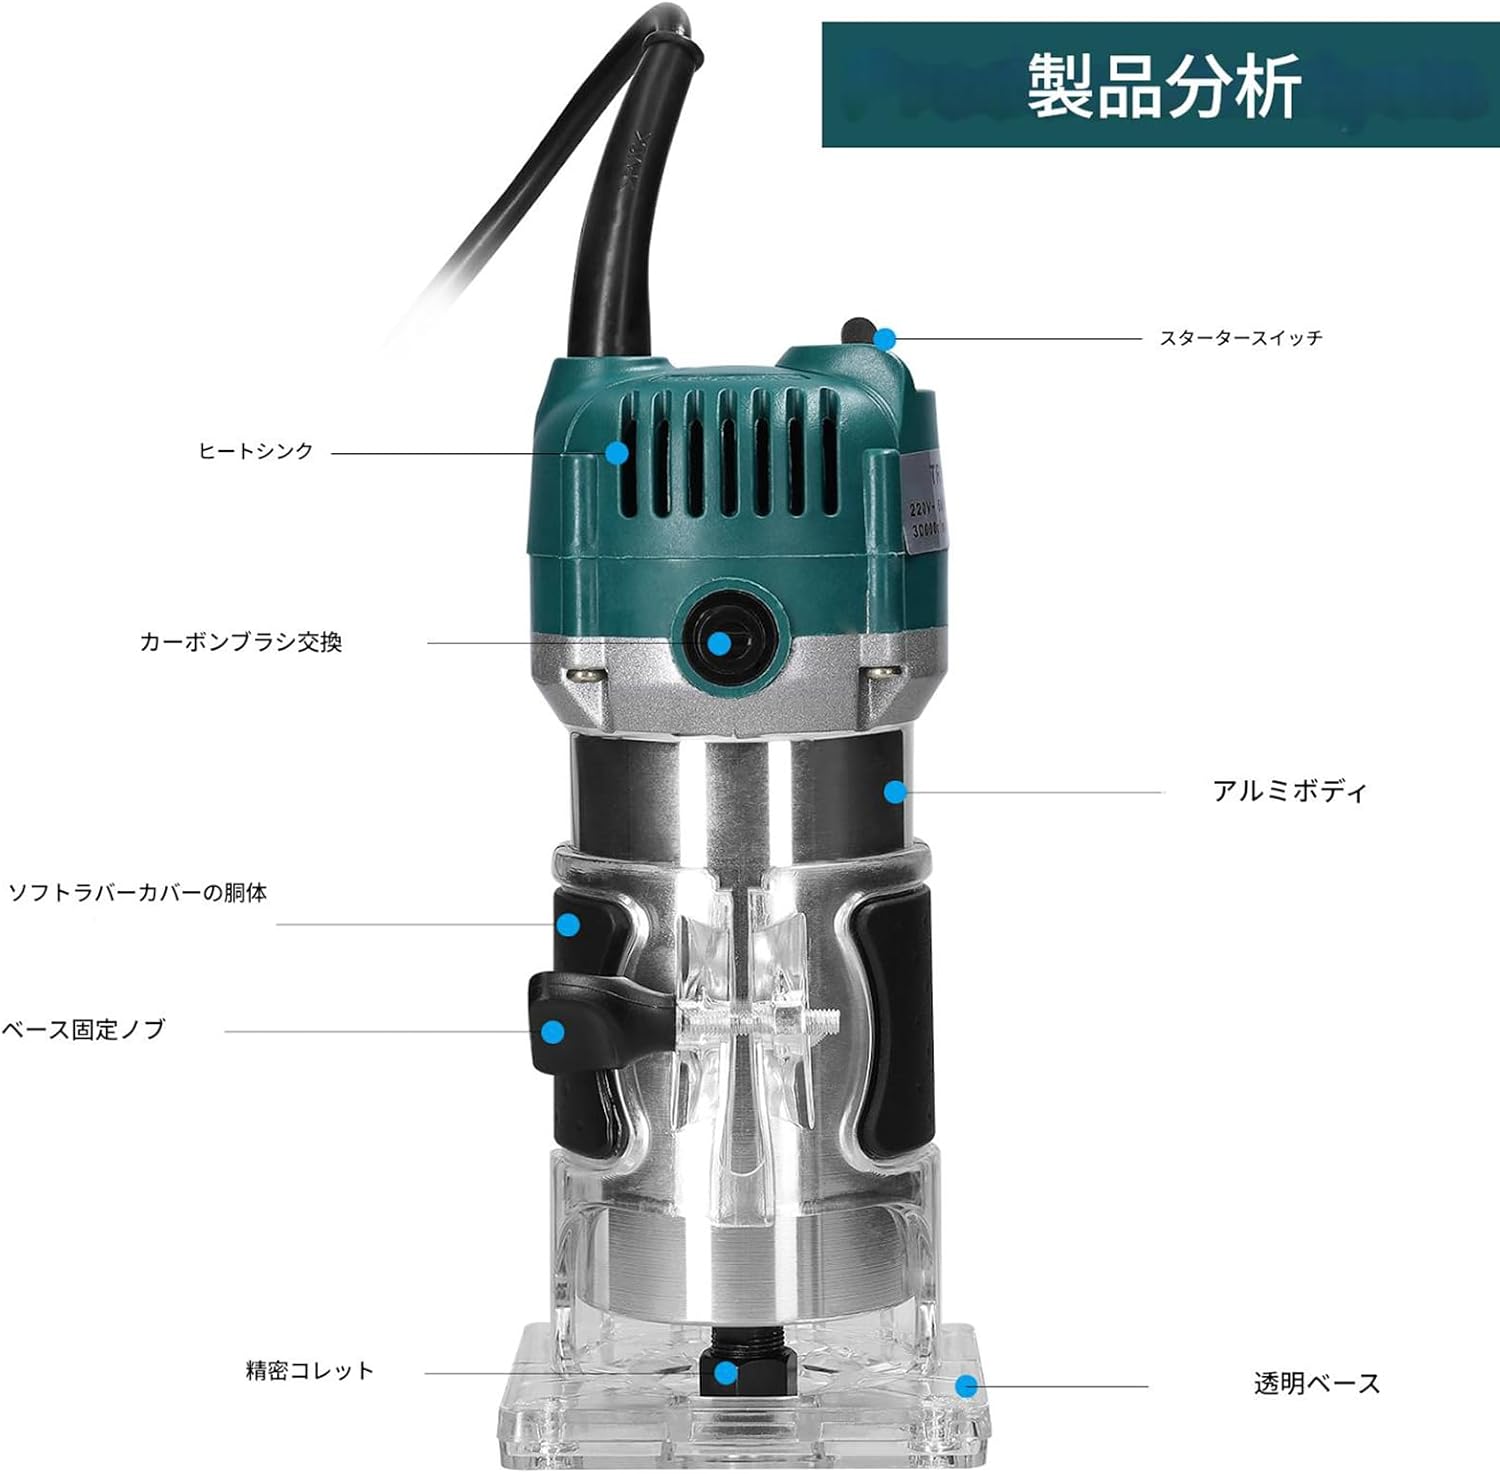
Image: Product analysis diagram highlighting key components such as the starter switch, heat sink, carbon brush access, aluminum body, soft rubber cover, base fixing knob, precision collet, and transparent base.
- Durable Construction: The main body is constructed from aluminum and plastic, with an internal aluminum heat dissipation fan for efficient cooling and extended tool life. The exterior is waterproof, dustproof, and durable.
- Transparent Base: Allows for clear observation of the cutting process, ensuring precision and control.
- Tightening Adjustment Knob: Enables precise adjustment of the transparent cover's tightness.
- External Carbon Brush Design: Facilitates easy replacement of carbon brushes, enhancing safety and convenience.
- Extended Power Cord: Provides a wider working range.
- Non-slip Handle: High-quality rubber handle with non-slip pads ensures a comfortable grip and precise control, reducing fatigue during prolonged use.
5. Setup
Follow these steps to prepare your trimmer for operation:

Image: Detailed view of the guide bracket, transparent base, tightening adjustment knob, and the included 15-piece router bit set.
- Installing a Router Bit:
- Ensure the tool is unplugged.
- Loosen the collet nut using the provided wrench.
- Insert the desired router bit into the collet, ensuring it is fully seated.
- Tighten the collet nut firmly with the wrench.
- Adjusting Cutting Depth:
- Place the trimmer on the workpiece.
- Loosen the base fixing knob.
- Adjust the trimmer body up or down until the router bit reaches the desired cutting depth.
- Tighten the base fixing knob securely.
- Attaching Guide Bases:
- For straight cuts, attach the straight trim guide ruler to the transparent base using the provided screw.
- For curved or edge trimming, attach the trim guide base.
6. Operating Instructions
Always ensure the workpiece is securely clamped before starting. Wear appropriate personal protective equipment.

Image: The electric trimmer being used in a workshop setting for woodworking tasks.
- Power On/Off: Plug the tool into a suitable power outlet. Use the starter switch to turn the trimmer ON and OFF.
- Starting the Cut: Hold the trimmer firmly with both hands. Allow the motor to reach full speed before contacting the workpiece.
- Making the Cut: Guide the trimmer smoothly and steadily along the desired cutting line. Apply consistent pressure. Avoid forcing the tool, as this can lead to poor cut quality and motor strain.
- Types of Operations:
- Trimming: Use appropriate bits for edge profiling or flush trimming.
- Grooving: Use straight bits and the straight guide ruler for creating grooves.
- Carving/Engraving: Select specialized bits for detailed work.
- Hole Drilling: For specific applications, use appropriate bits and ensure stable positioning.
- Finishing: Once the cut is complete, lift the trimmer from the workpiece before turning it off.
7. Maintenance
Regular maintenance ensures optimal performance and extends the life of your tool.
- Cleaning: After each use, unplug the tool and clean dust and debris from the motor vents and transparent base using a soft brush or compressed air. Do not use solvents or abrasive cleaners.
- Carbon Brush Replacement: The carbon brushes are external for easy access. When the motor performance decreases or sparks become excessive, the carbon brushes may need replacement. Unscrew the brush caps, remove the old brushes, and insert new ones. Ensure the new brushes are seated correctly before replacing the caps.
- Collet Maintenance: Keep the collet and collet nut clean and free of debris to ensure proper bit gripping.
- Storage: Store the trimmer in a dry, secure location, out of reach of children.
8. Troubleshooting
Refer to this section for common issues and their solutions.
| Problem | Possible Cause | Solution |
|---|---|---|
| Motor does not start | No power supply; Faulty switch; Worn carbon brushes | Check power connection; Test switch; Replace carbon brushes |
| Excessive sparking from motor | Worn carbon brushes; Dirty commutator | Replace carbon brushes; Clean commutator (professional service recommended) |
| Poor cut quality or vibration | Dull or damaged router bit; Loose bit in collet; Incorrect feed rate | Replace bit; Tighten collet nut; Adjust feed rate |
| Overheating | Blocked ventilation; Overloading the tool | Clean vents; Reduce load or cutting depth |
If problems persist, contact customer support.
9. Specifications

Image: Diagram illustrating the dimensions of the electric trimmer: 206mm (8.11in) height, 90mm (3.54in) width, and 87mm (3.43in) depth.
| Feature | Specification |
|---|---|
| Product Name | Electric Trimmer Router |
| Model Number | E24848 |
| Material | Plastic + Metal (Aluminum Housing) |
| Power Consumption | 800W |
| No-load Speed | 30,000 r/min |
| Collet Chuck Diameter | 6.35mm (1/4 inch) |
| Body Size | 206 x 87 x 90mm / 8.11 x 3.43 x 3.54 inches |
| Body Weight | 1891g / 4.17 lbs (approx. 2 kg) |
| Power Source | Corded Electric (Single phase 110V, 50/60Hz) |
| Power Cord Length | Approx. 1.3m |
10. Warranty and Support
For warranty information or technical support, please refer to the retailer or manufacturer's official website. Keep your purchase receipt as proof of purchase.