1. Introduction
Thank you for choosing the Mujocooker 4-Wheel Folding Mobility Scooter. This lightweight electric scooter is designed to provide enhanced mobility and independence for adults. Featuring a unique dual front wheel design for increased stability, a powerful motor, and a foldable frame, it is suitable for various terrains and travel. Please read this manual thoroughly before operating the scooter to ensure safe and correct usage.
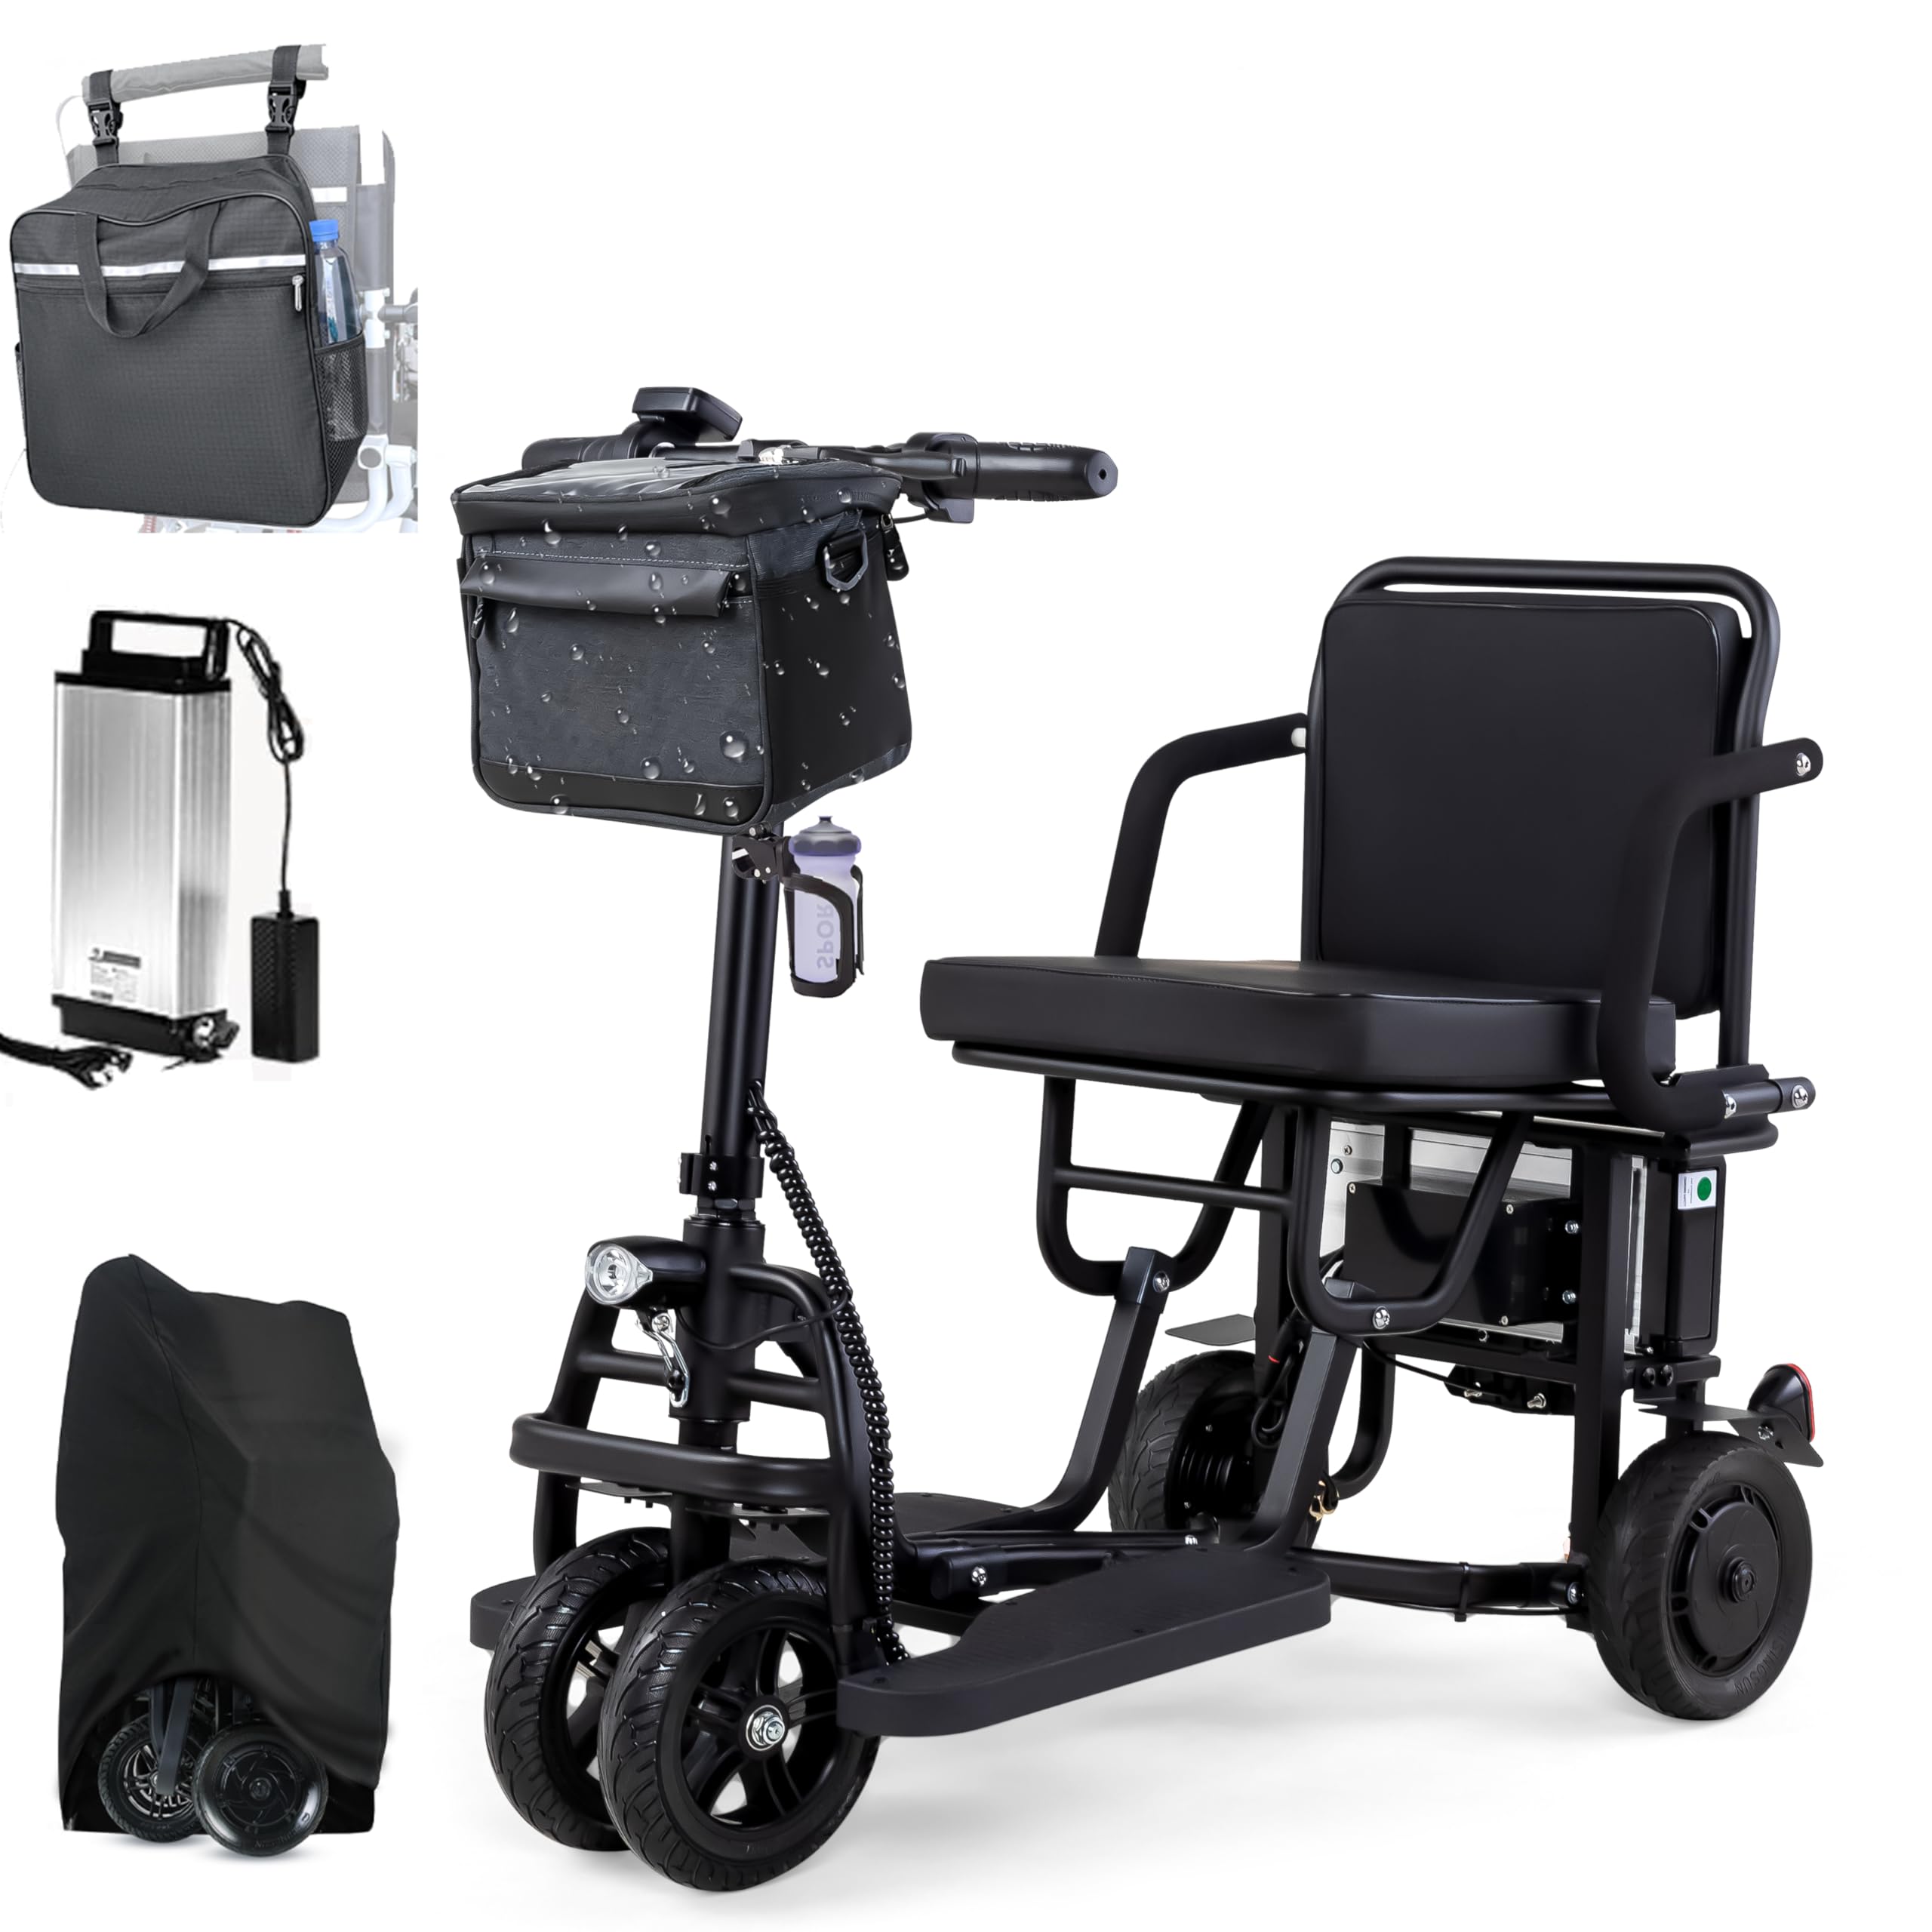
Image 1.1: Mujocooker 4-Wheel Folding Mobility Scooter in its operational state.
2. Safety Information
Your safety is paramount. Adhere to all safety guidelines to prevent injury or damage.
- Always wear appropriate safety gear, such as a helmet, when operating the scooter.
- Ensure the scooter is fully charged before each use to avoid unexpected power loss.
- Familiarize yourself with all controls, including speed adjustment, brakes, and turn signals, before riding.
- Do not exceed the maximum weight capacity of 300 lbs.
- Avoid operating the scooter on steep inclines (greater than 9 degrees) or uneven surfaces that may compromise stability.
- Use headlights and turn signals in low-light conditions or when making turns to enhance visibility.
- Exercise caution when operating in crowded areas and be mindful of pedestrians.
- Do not operate the scooter under the influence of alcohol or medication that may impair judgment.
- Regularly inspect tires, brakes, and battery for proper function.
3. Package Contents
Upon unpacking, verify that all items are present:
- Mujocooker 4-Wheel Folding Mobility Scooter
- 10AH Lithium-Ion Battery (pre-installed or separate)
- Battery Charger (42.0V 2.0A)
- Backpack
- Dust Bag
- Metal Basket
- Water Cup Holder
- User Manual
- Allen Wrenches (for minor attachments like headlamp)
4. Setup
4.1 Unfolding the Scooter
- Place the folded scooter on a flat, stable surface.
- Carefully release the locking mechanism that secures the scooter in its folded position.
- Unfold the main frame, handlebar, and seat until they click securely into place.
- Ensure all locking mechanisms are engaged before use.

Image 4.1: The scooter can be folded and unfolded quickly for transport and storage.
4.2 Battery Installation and Charging
The scooter comes with a removable 10AH Lithium-Ion battery. It is recommended to fully charge the battery before first use.
- Installation: If the battery is not pre-installed, slide it into the designated compartment until it locks securely. Ensure the battery is locked with the provided key to prevent theft.
- Charging: Connect the charger to the scooter's charging port or remove the battery and charge it directly. The charging time is approximately 6 hours for a full charge.
- Indicator: The charger will typically show a red light during charging and turn green when fully charged.
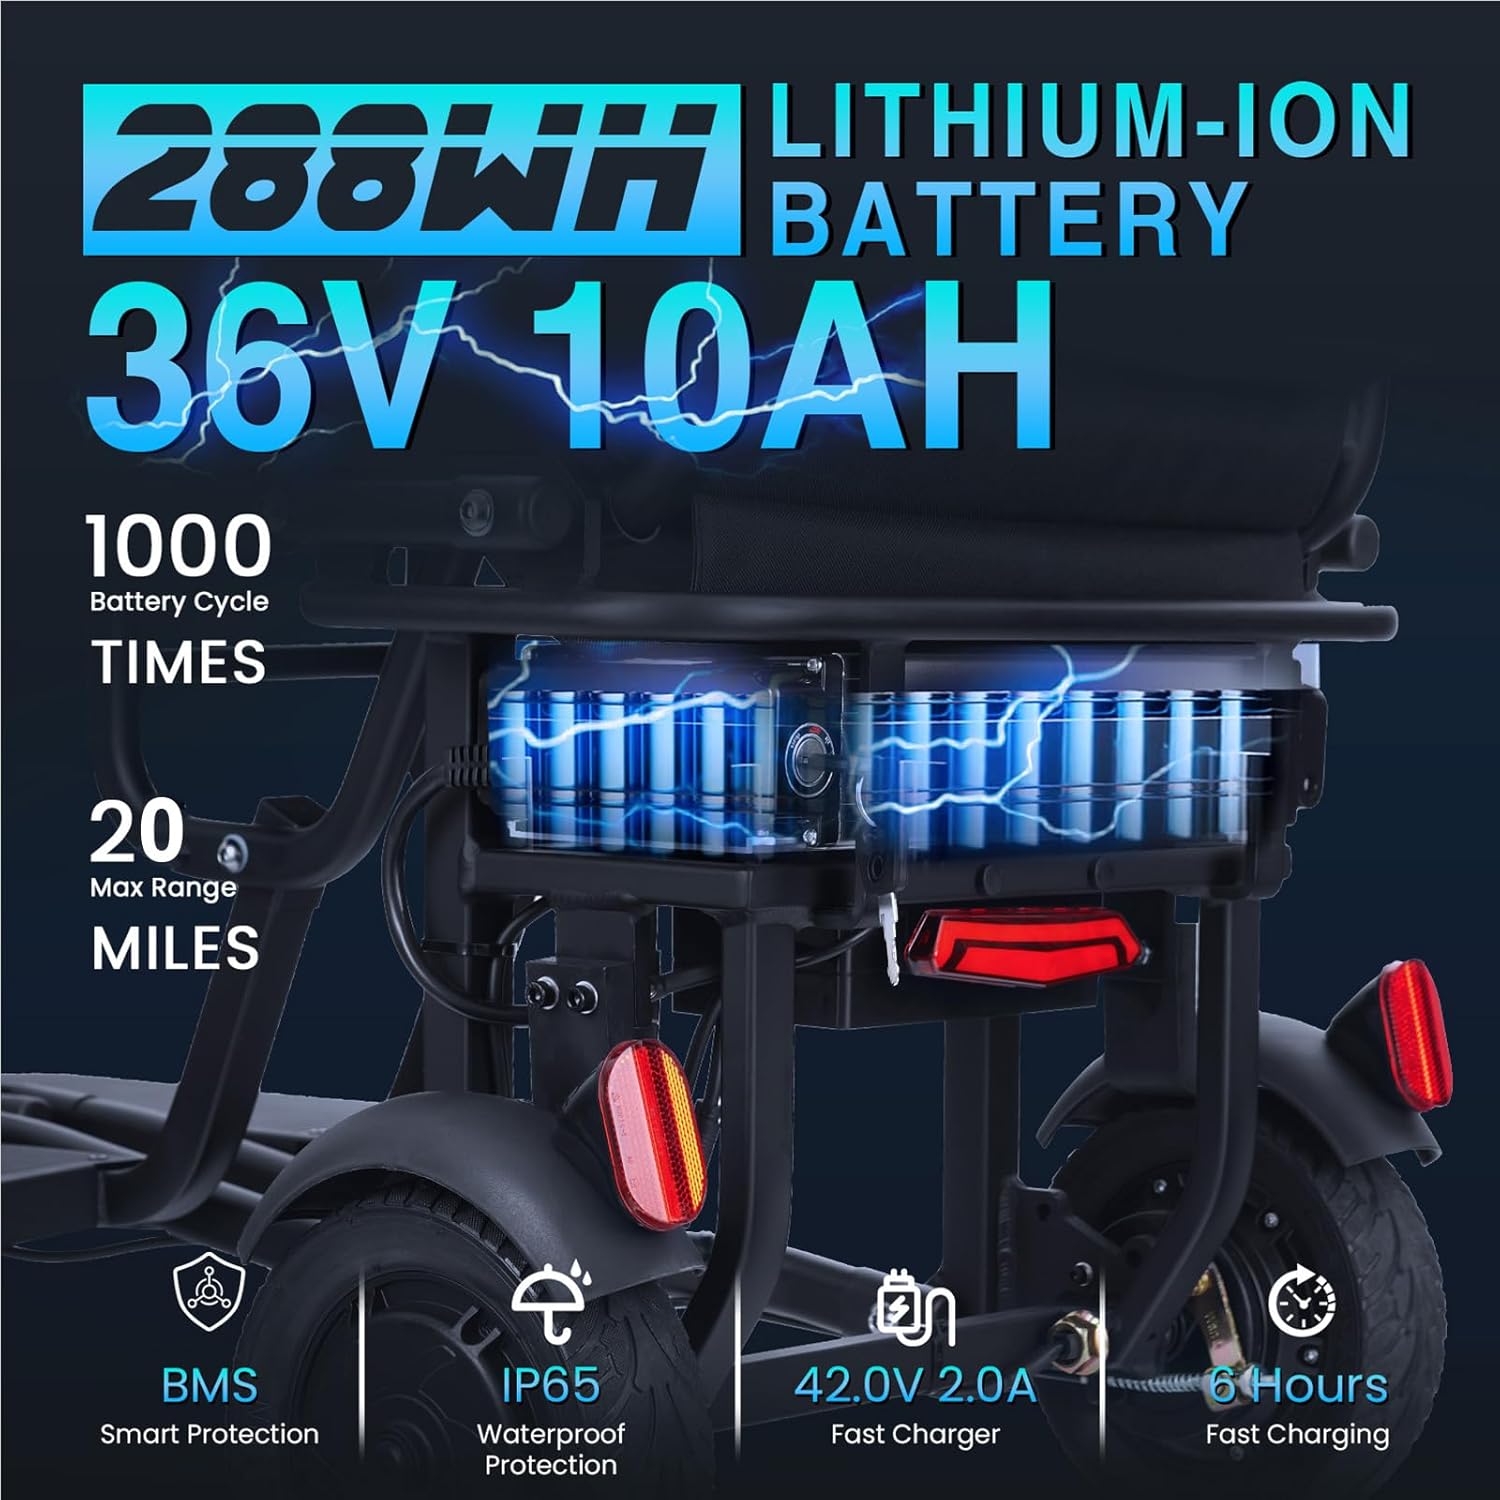
Image 4.2: Detailed view of the 36V 10AH Lithium-Ion battery and charging specifications.

Image 4.3: The scooter battery can be charged while installed or removed.
4.3 Attaching Accessories
Attach the backpack, metal basket, and cup holder to their designated points on the scooter as needed. The headlamp may require minor assembly using the provided Allen wrenches.
5. Operating Instructions
5.1 Control Panel Overview
The intuitive control panel on the handlebar provides access to all essential functions.

Image 5.1: The backlit LED display shows speed, battery level, and fault warnings. Controls include throttle, D/R switch, turn signals, and horn.
- Power On/Off: Insert the key and turn to the ON position.
- Throttle Rotary Handle: Rotate to accelerate. Release to stop immediately.
- D/R Switch (Forward/Reverse): Toggle to select driving direction.
- Trumpet Switch (Horn): Press to sound the horn.
- Turn Signals: Activate left or right turn signals using the switch.
- Speed Mode Button (M): Cycle through 3 forward speed modes (3.73 mph, 6.21 mph, 9.32 mph).
- Cruise Control: The scooter can maintain a constant speed of 3.73 mph without continuous throttle input. Squeeze the handbrake to disengage cruise control.
- Lighting: Turn the key to the right again to activate lights.

Image 5.2: Close-up of the D/R (Forward/Reverse) button and horn button on the handlebar, alongside the solid tires.
5.2 Driving the Scooter
Start slowly and gradually increase speed as you become comfortable with the controls.
- Acceleration: Gently rotate the throttle handle.
- Braking: Release the throttle handle to slow down. Use the mechanical handbrake for sensitive and controlled stopping.
- Turning: The scooter has a turning radius of 34 inches, allowing for navigation in tight spaces. Use turn signals when changing direction.
- Terrain: The scooter is equipped with 8-inch flat, explosion-proof solid rubber tires and 4.9 inches of ground clearance, suitable for various surfaces including sidewalks, grass, and uneven terrain.

Image 5.3: The scooter's 34-inch turning radius allows for easy maneuverability.
6. Maintenance
6.1 Battery Care
- Charge the battery regularly, even if the scooter is not in frequent use, to maintain battery health.
- Avoid completely draining the battery before recharging.
- Store the battery in a cool, dry place away from direct sunlight and extreme temperatures.
- If the battery gets hot during charging, ensure it is in a well-ventilated area.
6.2 Tire Maintenance
The scooter uses solid, explosion-proof tires, which require minimal maintenance. Periodically inspect them for any signs of wear or damage.
6.3 Cleaning and Storage
- Clean the scooter with a damp cloth. Avoid using harsh chemicals or direct water spray.
- Store the scooter in a dry, protected area when not in use.
- Use the provided dust bag for protection against dust and moisture during storage.

Image 6.1: Using the dust bag helps protect the scooter during storage.
7. Troubleshooting
| Problem | Possible Cause | Solution |
|---|---|---|
| Scooter does not power on | Battery not charged; Battery not properly installed; Key not fully turned. | Charge battery; Ensure battery is securely in place and locked; Turn key fully to ON position. |
| Loss of power during operation | Low battery charge. | Recharge the battery. |
| Brakes feel ineffective | Brake cable adjustment needed; Worn brake pads. | Inspect and adjust brake cable tension; Contact customer support for brake pad replacement. |
| Scooter struggles on inclines | Operating on too steep an incline; Low battery; Exceeding weight capacity. | Avoid inclines greater than 9 degrees; Ensure battery is fully charged; Verify weight is within limits. |
| Uncomfortable seat | Personal preference. | Consider adding additional padding or a cushion for comfort. |
If you encounter issues not listed here or require further assistance, please contact Mujocooker customer support.
8. Specifications
| Feature | Specification |
|---|---|
| Model | B0FN3KZFJK |
| Brand | Mujocooker |
| Wheel Type | Solid, Explosion-proof Rubber Tires |
| Maximum Speed | 9.32 Miles per Hour (15 km/h) |
| Range per Charge | Up to 20 Miles |
| Battery | 36V 10AH Lithium-Ion (288Wh) |
| Charging Time | Approximately 6 hours |
| Motor Power | 300W Mid-Drive Motor |
| Maximum Climbing Ability | Up to 9 degrees |
| Turning Radius | 34 Inches |
| Ground Clearance | 4.9 Inches |
| Frame Material | Aluminum |
| Brake Style | Mechanical Handbrake |
| Additional Features | 3+1 Speed Mode, Dual Front Wheel Combination, Airline Approved, LED Headlights, Turn Signals, Horn, Backpack, Dust Bag, Cup Holder, Basket |
9. Warranty and Support
Mujocooker is committed to providing quality products and customer satisfaction.
- Return Policy: Your purchase is protected by a 30-day return policy.
- Product Warranty: A 1-year warranty covers quality-related issues for the scooter.
- Parts Warranty: 1-year warranty for parts.
- Battery Warranty: 3-month warranty for the battery.
- Customer Support: Dedicated customer support is available 24/7 to assist you.
- Email Support: For assistance, please email mujocooker@163.com.

Image 9.1: Mujocooker offers email support within 24 hours and provides return labels.

Image 9.2: Overview of Mujocooker's service commitment, including warranty periods and contact email.