1. Introduction
Thank you for choosing the ECO-WORTHY 5000W 48V Hybrid Inverter. This device is designed to provide reliable power conversion for various applications, including off-grid solar systems, backup power, and RV power supply. It integrates a solar charge controller, inverter, and battery charger into one unit, offering a comprehensive solution for energy management. This manual provides essential information for the safe installation, operation, and maintenance of your inverter.
2. Safety Instructions
Please read and understand all safety instructions before installation and operation. Failure to follow these instructions may result in electric shock, fire, serious injury, or death.
- Installation must be performed by qualified personnel in accordance with all local electrical codes.
- Do not attempt to repair the unit yourself. Refer all servicing to authorized service personnel.
- Ensure all power sources (AC, DC, Solar) are disconnected before performing any wiring or maintenance.
- Wear appropriate personal protective equipment (PPE), including insulated gloves and eye protection.
- Do not install the inverter in areas with flammable materials, explosive gases, or excessive dust.
- Ensure proper ventilation around the inverter to prevent overheating.
- Connect the inverter to a proper earth ground.
3. Product Overview
The ECO-WORTHY 5000W 48V Hybrid Inverter is a versatile power solution. It features a robust design for reliable performance and includes an intuitive interface for monitoring and control.
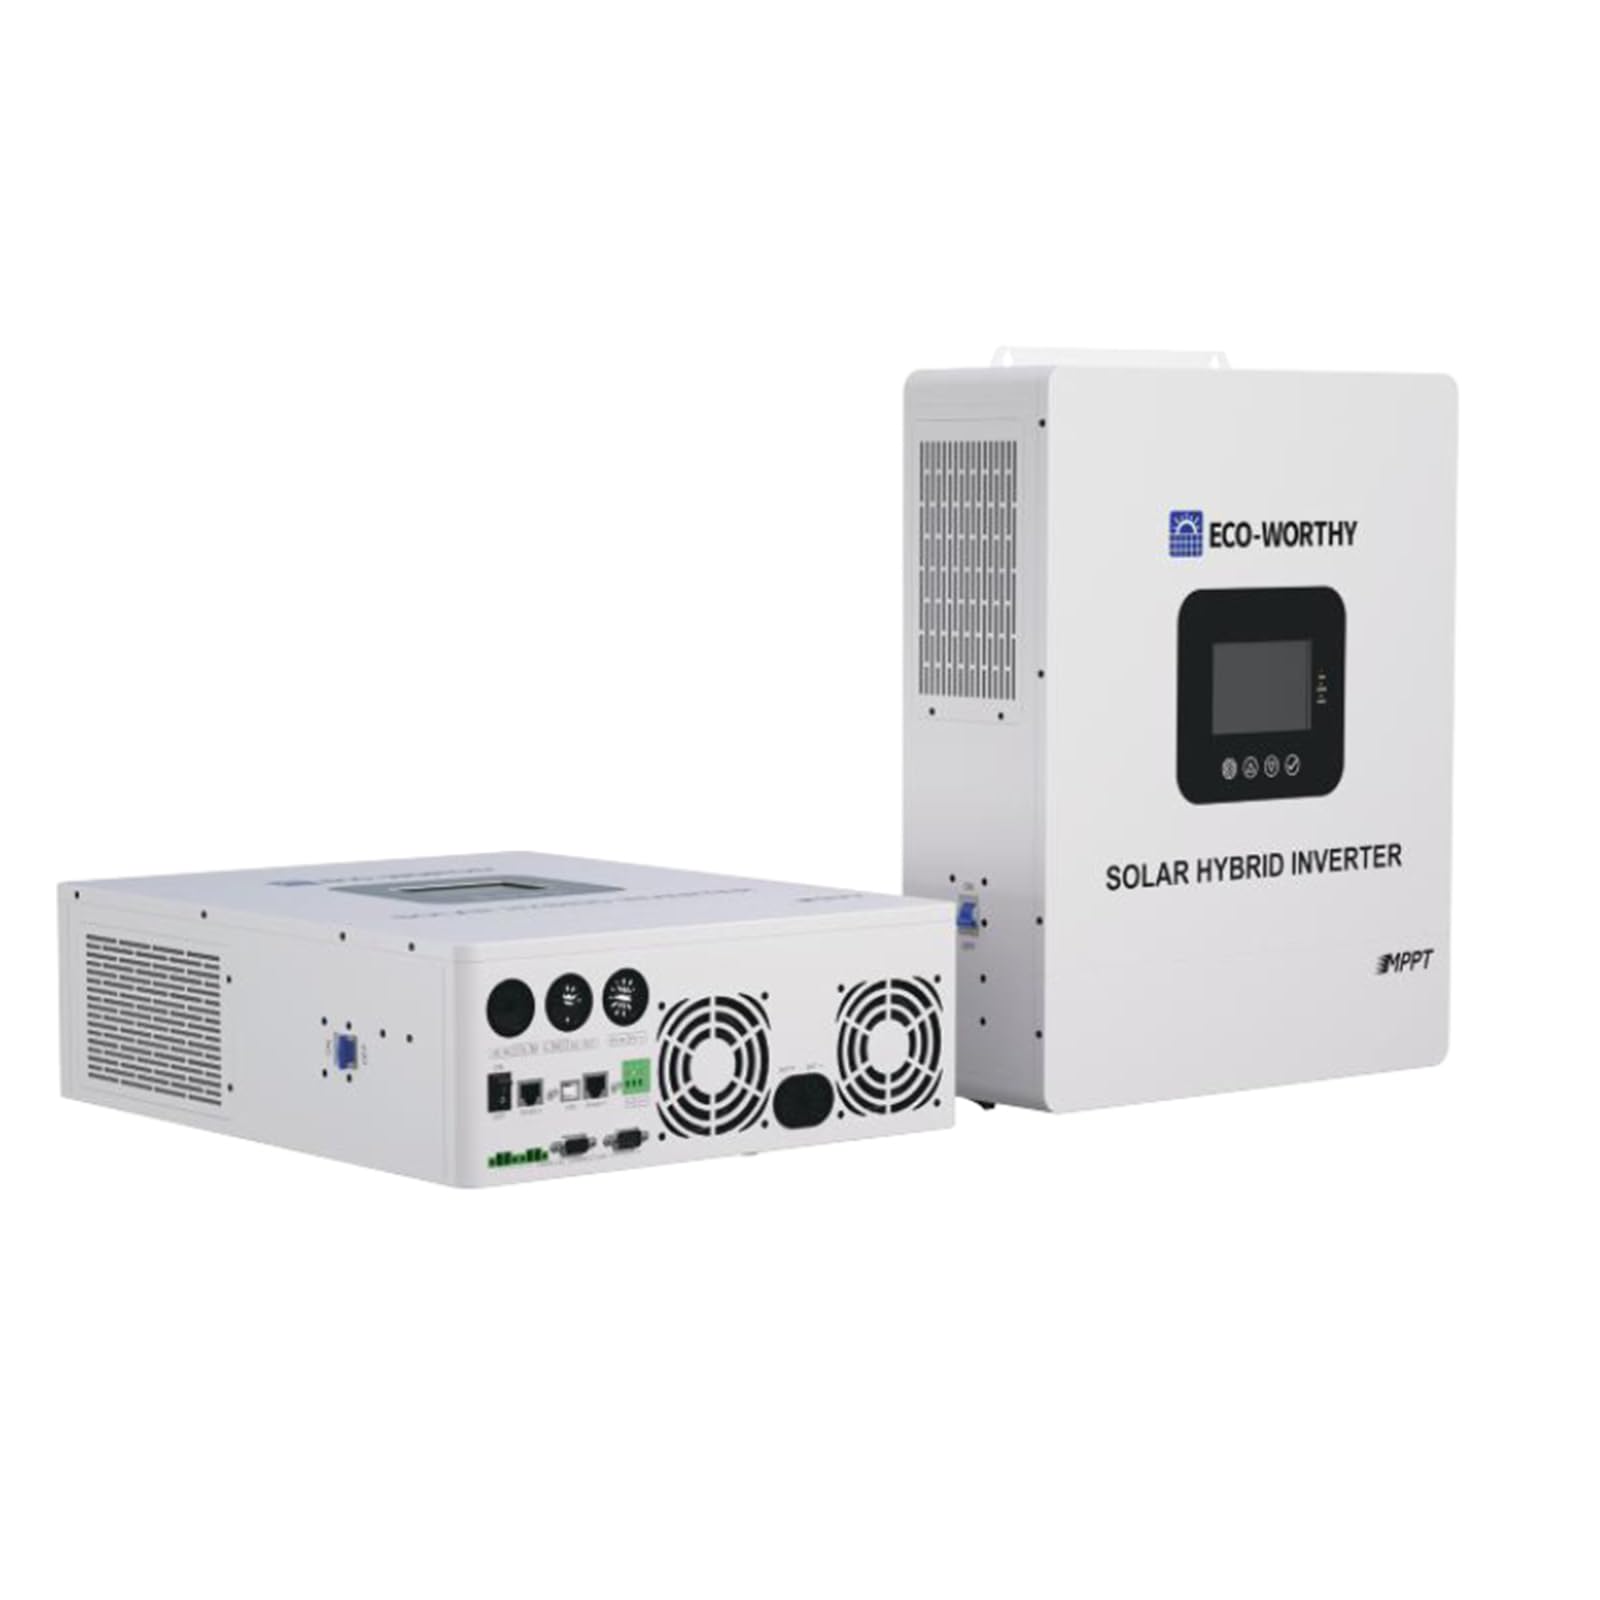
Figure 3.1: Front view of the ECO-WORTHY 5000W 48V Hybrid Inverter. This image displays the main unit, highlighting its compact design and the user interface panel, which typically includes an LCD screen and control buttons for system monitoring and configuration.
Key components include the LCD display for status monitoring, control buttons for settings adjustment, and various connection terminals for DC input (battery), solar PV input, AC input (grid/generator), and AC output (loads).
4. Setup
4.1 Unpacking and Inspection
Upon receiving your inverter, carefully unpack it and inspect for any shipping damage. Ensure all accessories listed in the packing list are present. If any damage or missing parts are found, contact your dealer immediately.
4.2 Mounting
Select a suitable mounting location that is dry, well-ventilated, and protected from direct sunlight, rain, and dust. The inverter should be mounted vertically on a solid surface capable of supporting its weight. Maintain adequate clearance (at least 20 cm) around the unit for proper airflow and heat dissipation.
4.3 Wiring
All wiring must comply with local and national electrical codes. Use appropriate wire gauges for all connections to prevent overheating and ensure efficient power transfer.
- Battery Connection: Connect the 48V battery bank to the DC input terminals. Ensure correct polarity (+ to + and - to -). Install a DC circuit breaker or fuse between the battery bank and the inverter for protection.
- Solar PV Input: Connect the solar panel array to the PV input terminals. Observe the correct polarity and ensure the open-circuit voltage (Voc) and short-circuit current (Isc) of the array do not exceed the inverter's maximum input specifications.
- AC Output: Connect your AC loads to the AC output terminals. Install an AC circuit breaker for protection.
- AC Input (Grid/Generator): If using a grid or generator as an AC input source, connect it to the designated AC input terminals. An AC circuit breaker must be installed on this line.
- Grounding: Connect the inverter's ground terminal to a reliable earth ground point.
4.4 Initial Power-up
Follow this sequence for initial power-up:
- Ensure all wiring connections are secure and correct.
- Turn on the DC circuit breaker for the battery bank.
- If applicable, turn on the solar PV array circuit breaker.
- If applicable, turn on the AC input (grid/generator) circuit breaker.
- Turn on the inverter's power switch.
- Observe the LCD display for status and any error messages.
5. Operating
5.1 Display and Indicators
The LCD display provides real-time information about the system's status, including input/output voltage, current, power, battery status, and operating mode. LED indicators typically show the inverter's operational status (e.g., green for normal operation, yellow for warning, red for fault).
5.2 Operating Modes
The hybrid inverter typically supports multiple operating modes, which can be configured via the control buttons and LCD menu. Common modes include:
- Solar Priority: Solar power is used first to power loads and charge batteries. Grid/generator power is used only when solar power is insufficient.
- Utility Priority: Grid/generator power is the primary source. Solar power is used when the grid is unavailable or to supplement charging.
- Battery Priority: Loads are primarily powered by batteries. Solar charges batteries, and the grid/generator acts as a backup.
5.3 Settings Configuration
The inverter allows for various settings to be configured, such as battery type, charging current, AC output voltage/frequency, and transfer time. Refer to the detailed menu structure in the full manual for specific instructions on navigating and adjusting these settings.
6. Maintenance
Regular maintenance ensures the longevity and optimal performance of your inverter.
- Cleaning: Periodically clean the inverter's exterior with a dry, soft cloth. Ensure ventilation openings are free from dust and debris. Do not use liquid cleaners.
- Connection Check: Annually inspect all electrical connections for tightness and signs of corrosion. Re-tighten if necessary.
- Environmental Check: Ensure the installation environment remains within the specified temperature and humidity ranges.
- Battery Maintenance: If using lead-acid batteries, check electrolyte levels and specific gravity regularly as per battery manufacturer guidelines. Keep battery terminals clean and free of corrosion.
7. Troubleshooting
This section provides solutions for common issues. For problems not listed here, contact technical support.
| Problem | Possible Cause | Solution |
|---|---|---|
| Inverter not turning on | No DC input from battery; Battery voltage too low; DC breaker tripped. | Check battery connections and voltage; Charge battery; Reset DC breaker. |
| No AC output | AC output breaker tripped; Overload; Inverter in fault mode. | Reset AC breaker; Reduce load; Check display for error codes and troubleshoot accordingly. |
| Battery not charging | Solar PV input issue; AC input issue; Battery settings incorrect. | Check solar panel connections and voltage; Verify AC input source; Adjust battery charging settings. |
| Overload warning | Connected loads exceed inverter capacity. | Reduce the total power consumption of connected appliances. |
8. Specifications
Technical specifications for the ECO-WORTHY 5000W 48V Hybrid Inverter:
| Feature | Specification |
|---|---|
| Brand | ECO-WORTHY |
| Model Number | 810198850987 |
| Input Voltage | 48 Volts (DC) |
| Output Power | 5000 Watts |
| Output Voltage | 230 Volts (AC) |
| Peak Output Power | 5000 Watts |
| Output Waveform | Modified Sine Wave |
| Power Source | Hybrid Operation |
| Certifications | CE |
| Recommended Uses | Powering RV appliances, backup power in case of outage, operating tools and equipment on a job site. |
9. Warranty and Support
ECO-WORTHY products are designed for reliability and performance. For warranty information, technical support, or service inquiries, please refer to the warranty card included with your product or visit the official ECO-WORTHY website. Please have your model number (810198850987) and purchase date available when contacting support.