Introduction
This manual provides detailed instructions for the setup, operation, and maintenance of your EasySMX X05Pro Wireless PC Controller. Designed for multi-platform compatibility, this controller features advanced Hall Effect joysticks, dual-stage impulse triggers, and programmable buttons to enhance your gaming experience. Please read this manual thoroughly before use to ensure optimal performance and longevity of your device.
Video: An overview of the EasySMX X05Pro Gaming Controller's key features and performance.
Key Features
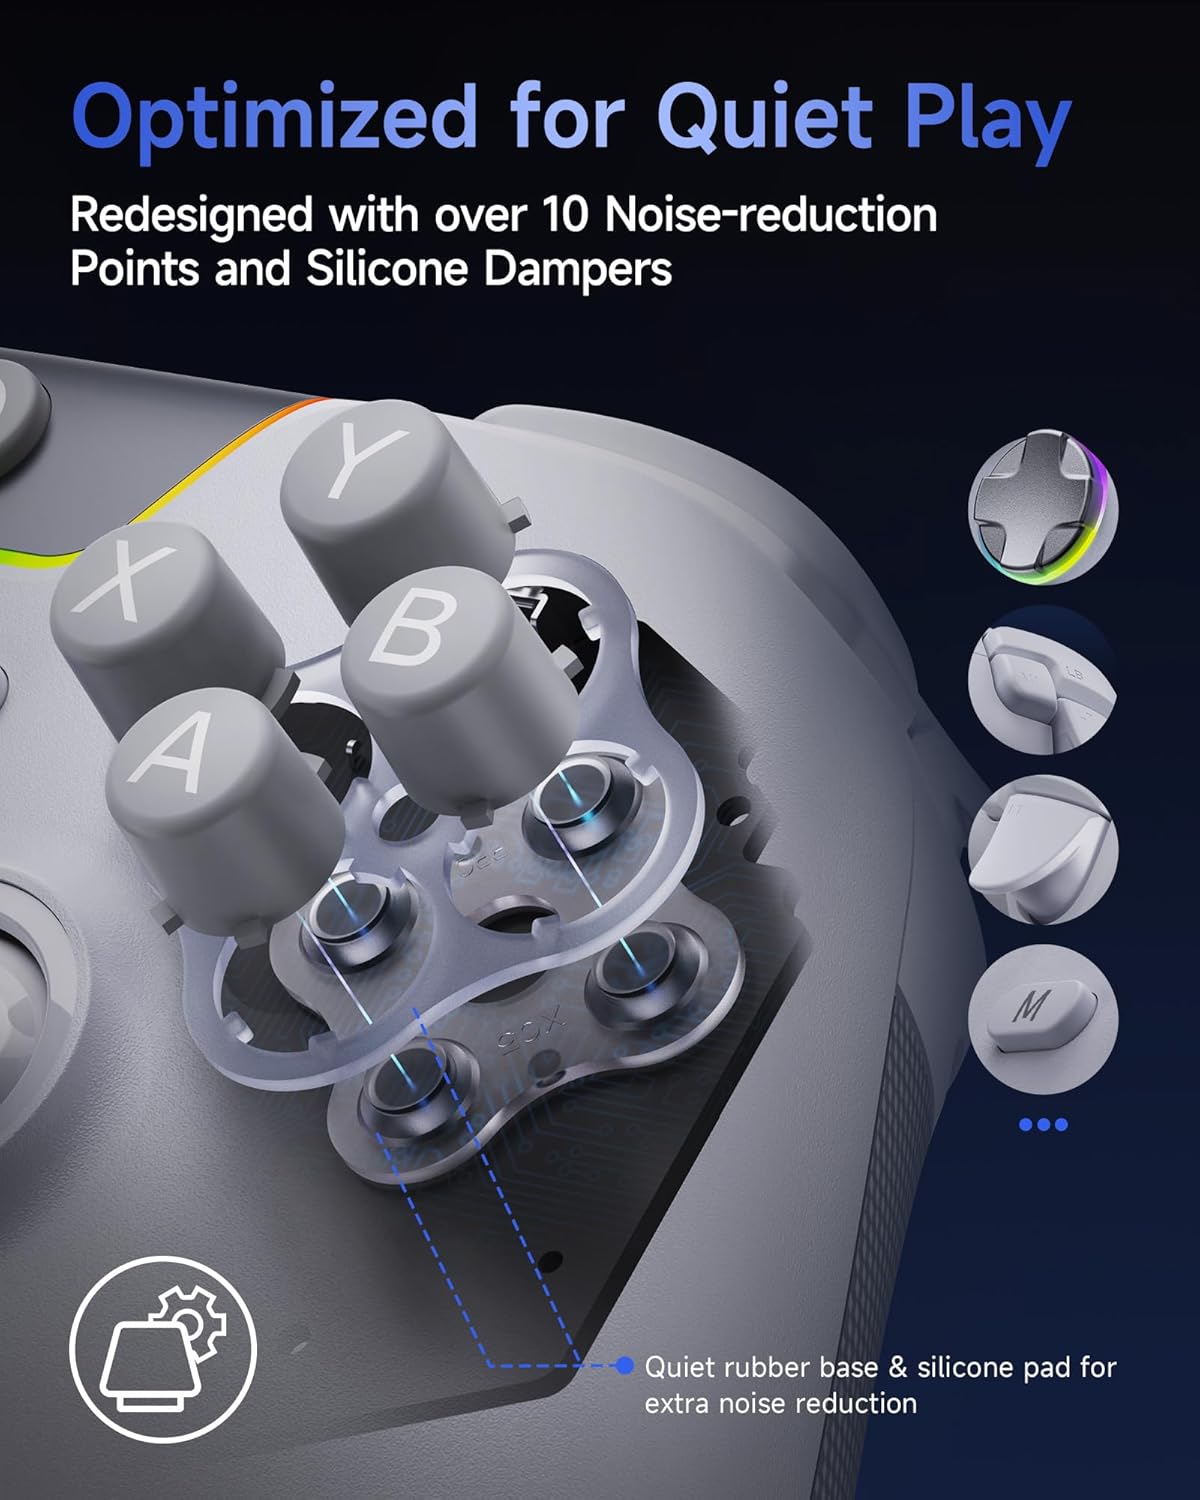
Image: A general view of the EasySMX X05Pro Wireless PC Controller.
- Soft-Click Low-Noise Buttons: Full-button structure with silicone dampers for ultra-quiet operation, ideal for undisturbed gaming.
- Dual-Stage Impulse Triggers: Adjustable trigger lock for short or long travel, with 2+2 built-in rumble motors for realistic feedback in racing and FPS games.
- Programmable Buttons: Two customizable buttons located on the top of the controller to prevent accidental activation.
- Hall Effect Joysticks + 1000Hz Polling Rate: High-precision 11-bit sensors ensure drift-free accuracy and durability. Supports 1000Hz response in wired and 2.4G wireless modes, and 125Hz in Bluetooth mode for mobile gaming.
- Ergonomic Skin-Like Grip + Long Battery Life: Soft-touch silicone coating provides a sweat-resistant, non-slip hold. Built-in 1000mAh rechargeable battery for extended play sessions.
- Upgraded 8-Way D-Pad: Reengineered with dome switches and a recessed pivot for smooth diagonal input and precise 8-directional control.
- Multi-Platform Compatibility: Seamlessly works with Windows PC, Nintendo Switch / Switch 2, Android, and iOS. Not compatible with Xbox or PlayStation consoles.
- 4-Zone Vibration Feedback: Features a 2+2 motor structure to enhance tactile immersion during gameplay.

Image: Detail of the controller's soft-click, low-noise buttons with silicone dampers.

Image: A close-up view of the controller's dual-stage Hall triggers, showing short and long travel options.

Image: The two programmable M1 and M2 buttons located on the top of the controller.

Image: An illustration of the Hall Effect joysticks and their associated polling rates for different connection modes.

Image: A close-up of the controller's ergonomic, skin-like grip texture.

Image: A diagram illustrating the upgraded 8-way D-Pad with its recessed pivot structure.

Image: The controller highlighting its multi-platform compatibility with various devices.

Image: An illustration depicting the 4-zone vibration feedback system within the controller.
Setup and Connection
The EasySMX X05Pro controller offers multiple connection methods for various platforms. Follow the instructions below for your specific device.
1. Connecting to PC (2.4GHz Wireless)
To connect your controller to a PC using the 2.4GHz wireless mode:
- Insert the provided USB receiver into an available USB port on your PC.
- Slide the 'Mode Toggle' switch on the controller to the 2.4 GHz (wireless) mode.
- Press and hold the Home button on the controller to power it on. The controller will automatically connect to the receiver.
Video: Demonstrates inserting the 2.4GHz USB receiver into a PC and activating the controller's 2.4GHz mode for connection.
2. Connecting to Nintendo Switch
To connect your controller to a Nintendo Switch:
- On your Nintendo Switch, navigate to the 'Controllers' menu and select 'Change Grip/Order' to enter pairing mode.
- Slide the 'Mode Toggle' switch on the controller to the Switch mode.
- Press and hold the Home button on the controller for 5 seconds to power it on and initiate pairing. The controller will connect to the Switch.
Video: Shows how to put the Nintendo Switch into pairing mode and connect the controller in Switch mode.
3. Connecting to Mobile Devices (Android/iOS via Bluetooth)
To connect your controller to an Android or iOS mobile device via Bluetooth:
- Ensure Bluetooth is enabled on your mobile device.
- Slide the 'Mode Toggle' switch on the controller to the Bluetooth mode.
- Press and hold the Home button on the controller for 5 seconds to power it on.
- On your mobile device, search for "Xbox Wireless Controller" in the Bluetooth settings and select it to pair.
Video: Illustrates enabling Bluetooth on a mobile device and pairing the controller.
Operating Instructions
1. Turbo Setting
The controller supports a manual turbo function for continuous firing.
- Activate Manual Turbo: Press the 'M' button and the 'A' button simultaneously to activate continuous firing while holding down the 'A' button.
- Cancel Manual Turbo: Press the 'M' button and the 'A' button a third time to cancel the turbo function.
Video: Demonstrates how to activate and deactivate the manual turbo function.
2. Setting M1/M2 Programmable Buttons
The M1 and M2 buttons can be programmed to replicate other button functions.
- While the controller is connected, press and hold the 'M' button and either 'M1' or 'M2' button.
- Press the button(s) you wish to assign to M1/M2.
- Press M1/M2 again to save the setting and exit programming mode.
- To cancel a programmed function, press and hold 'M' and M1/M2, then press M1/M2 again to clear the button's function.
Video: Explains how to program and clear functions for the M1 and M2 buttons.
3. Adjusting RGB Light Mode and Brightness
Customize the controller's RGB lighting effects.
- Change Light Mode: Press the 'M' button twice to cycle through different light modes (e.g., breathing effect, solid color).
- Change Colors (Breathing Effect): When in breathing effect mode, turn the Left Stick left or right to cycle through available colors.
- Change Colors (Solid Color): When in solid color mode, turn the Left Stick left or right to cycle through available colors.
- Adjust Brightness: Press the Left Stick down to adjust the brightness through 4 levels (Level 1 to 4).
Video: Demonstrates how to change RGB light modes, cycle colors, and adjust brightness.
4. Adjusting Joystick Dead Zone
You can switch between "zero dead zone" and "with dead zone" modes for the joysticks.
- While connected, press and hold the Right Stick and the 'O' button for 2 seconds to switch between "zero dead zone" and "with dead zone" modes. The default setting is "with dead zone".
Video: Shows how to switch between joystick dead zone settings.
5. Adjusting Vibration Intensity
Modify the overall vibration feedback intensity of the controller.
- Increase Intensity: Press the 'M' button and turn the Left Stick up.
- Decrease Intensity: Press the 'M' button and turn the Left Stick down.
Video: Demonstrates how to increase and decrease the controller's vibration intensity.
6. Adjusting Trigger Vibration
The triggers offer two distinct vibration modes: Press Vibration and Linked Vibration.
- Press Vibration Mode: Hold the Left Trigger and the 'O' button for 2 seconds (while connected). In this mode, the left/right trigger vibrates instantly when pressed. Hold the Left Trigger and 'O' for 2 seconds again to turn it off.
- Linked Vibration Mode: Hold the Right Trigger and the 'O' button for 2 seconds (while connected). In this mode, trigger vibration syncs with the grip motor for enhanced immersion. Hold the Right Trigger and 'O' for 2 seconds again to turn it off.
Video: Illustrates how to activate and deactivate Press Vibration Mode and Linked Vibration Mode for the triggers.
7. Calibrating Triggers and Joysticks
To ensure optimal accuracy, you can calibrate the triggers and joysticks.
- Keep the controller connected. Press the 'BACK' button, 'B' button, and 'Home' button simultaneously to enter calibration mode.
- Rotate both the left and right sticks clockwise for 3 full rotations.
- Fully press both the left and right triggers three times at a consistent speed.
- Place the controller on a flat surface for at least 3 seconds.
- Press the 'B' button to complete the calibration.
Video: Guides through the process of calibrating the controller's triggers and joysticks.
Product Specifications
| Feature | Description |
|---|---|
| Brand | EasySMX |
| Model Number | X05Pro |
| Controller Type | Gamepad |
| Connectivity Technology | Bluetooth, USB C (Wired & 2.4G Wireless) |
| Compatible Devices | PC (Windows), Nintendo Switch / Switch 2, Android, iOS |
| Hardware Platform | Desktop, Laptop, Smartphone, Steam Deck, Television |
| Additional Features | Ergonomic, Multiuse, Rumble, Wireless, Soft-Click Low-Noise Buttons, Dual-Stage Impulse Triggers, Programmable Buttons, Hall Effect Joysticks, 1000Hz Polling Rate, Skin-Like Grip, 1000mAh Battery, 8-Way D-Pad |
| Battery Capacity | 1000mAh (Rechargeable) |
Maintenance and Care
- Keep the controller away from extreme temperatures, direct sunlight, and humid environments.
- Avoid dropping or subjecting the controller to strong impacts.
- Clean the controller with a soft, dry cloth. Do not use harsh chemicals or abrasive cleaners.
- Store the controller in a safe place when not in use to prevent damage.
- Charge the battery regularly, even if not in frequent use, to maintain battery health.
Troubleshooting
Controller Not Connecting:
- Ensure the 'Mode Toggle' switch is set to the correct platform (2.4GHz for PC, Switch for Nintendo Switch, Bluetooth for mobile).
- Verify the controller is powered on by pressing and holding the Home button.
- For 2.4GHz connection, ensure the USB receiver is securely plugged into your PC.
- For Bluetooth connection, ensure Bluetooth is enabled on your mobile device and the controller is discoverable.
- Try restarting the controller and the device you are trying to connect to.
Input Lag or Disconnections:
- Ensure the controller is fully charged.
- Reduce the distance between the controller and the receiver/device.
- Minimize interference from other wireless devices (e.g., Wi-Fi routers, other Bluetooth devices).
- For PC, try connecting the receiver to a different USB port.
Joysticks Drifting or Inaccurate:
- Perform the joystick calibration procedure as described in the "Operating Instructions" section.
- Check the dead zone setting and adjust if necessary.
Buttons Not Responding:
- Ensure the controller is properly connected and powered on.
- Check if any programmable buttons (M1/M2) have been assigned incorrectly. Reset them if needed.
- Test the controller with another game or application to rule out software issues.
Warranty and Support
EasySMX products come with a standard manufacturer's warranty. For specific warranty details, technical support, or service inquiries, please refer to the official EasySMX website or contact their customer support directly. Keep your purchase receipt for warranty claims.
Online Support: Visit the EasySMX official website for FAQs, driver downloads, and further assistance.