Introduction
Thank you for choosing the Sweetcrispy Ergonomic Office Chair. This manual provides essential information for the safe assembly, proper operation, and effective maintenance of your new chair. Please read these instructions carefully before use and retain them for future reference.
This high-back mesh rolling work swivel chair is designed for comfort and support, featuring a footrest, adjustable headrest, and lumbar support. It is suitable for home, bedroom, study, and student use.
Safety Information
- Maximum Weight Capacity: Do not exceed the maximum weight capacity of 275 pounds (125 kg).
- Ensure all bolts and screws are securely tightened before use. Periodically check and re-tighten as necessary.
- Avoid standing on the chair or using it as a step stool.
- Keep hands and fingers clear of moving parts during adjustment.
- Use the chair on a flat, stable surface to prevent tipping.
Setup and Assembly
Assembly is required for this product. Please follow the steps below carefully. An assembly video is also provided for visual guidance.
Video: Official Sweetcrispy assembly guide for the office chair. This video demonstrates the step-by-step process of putting together the chair components, including the base, casters, seat, backrest, armrests, and headrest.
- Assemble the Base:
Turn the base (E) upside down. Insert the five base legs (F) one by one into the base (E). Tighten them with 10 screws (M) using the provided Allen wrench (R).
Image: A person assembling the chair base by screwing the legs into the central hub.
- Install Casters and Gas Lift:
Insert the casters (G) into the base legs (F). Then, insert the gas lift (D) into the hole in the center of the base (E).
Image: A person inserting the casters into the chair base and then placing the gas lift cylinder into the central opening.
- Attach Chair Seat:
Position the chair seat (B) upright with the mechanism facing down. Insert the gas lift (D) into the center hole of the seat mechanism and press down until fully engaged.
Image: A person carefully lowering the chair seat onto the gas lift, ensuring it is properly aligned and engaged.
- Attach Back Bar to Chair Back:
Take the lumbar pillow (I) from the back frame of the chair back (A). Attach the back bar (J) to the chair back (A) with 4 bolts (O) using the Allen wrench (R).
Image: Close-up of hands screwing bolts to attach the back bar to the chair's backrest frame.
- Attach Chair Back to Seat:
Insert the back bar (J) into the hole at the back of the chair seat (B). Tighten them with 2 bolts (N) using the Allen wrench (R).
Image: A person inserting the back bar into the seat's receiving slot and securing it with bolts.
- Attach Back Bar Cover:
Attach the back bar cover (K) to the chair back (A) by pushing the buckle into the slot.
Image: A person snapping the plastic back bar cover into place on the chair's backrest.
- Attach Armrests:
Attach the armrests (C) to the chair back (A) with 2 screws (P) and to the chair seat (B) with 2 screws (Q) using the Allen wrench (R).
Image: A person screwing the armrests into position, connecting them to both the seat and backrest.
- Attach Headrest:
Attach the headrest (H) to the chair back (A) with 2 bolts (N) by Allen wrench (R). Then, attach the plastic cover (L) to the hole of the headrest (H).
Image: A person attaching the headrest to the top of the chair back and then covering the attachment points with plastic caps.
- Place Lumbar Pillow:
Put the lumbar pillow (I) on the assembled chair.
Image: A person placing the lumbar support pillow onto the chair's backrest.
Operating Instructions
Your Sweetcrispy office chair offers multiple adjustments to customize your seating experience.
- Height Adjustment:
To adjust the seat height, pull the lever located under the seat upwards while applying or releasing body weight. The pneumatic gas cylinder allows for smooth and silent height changes.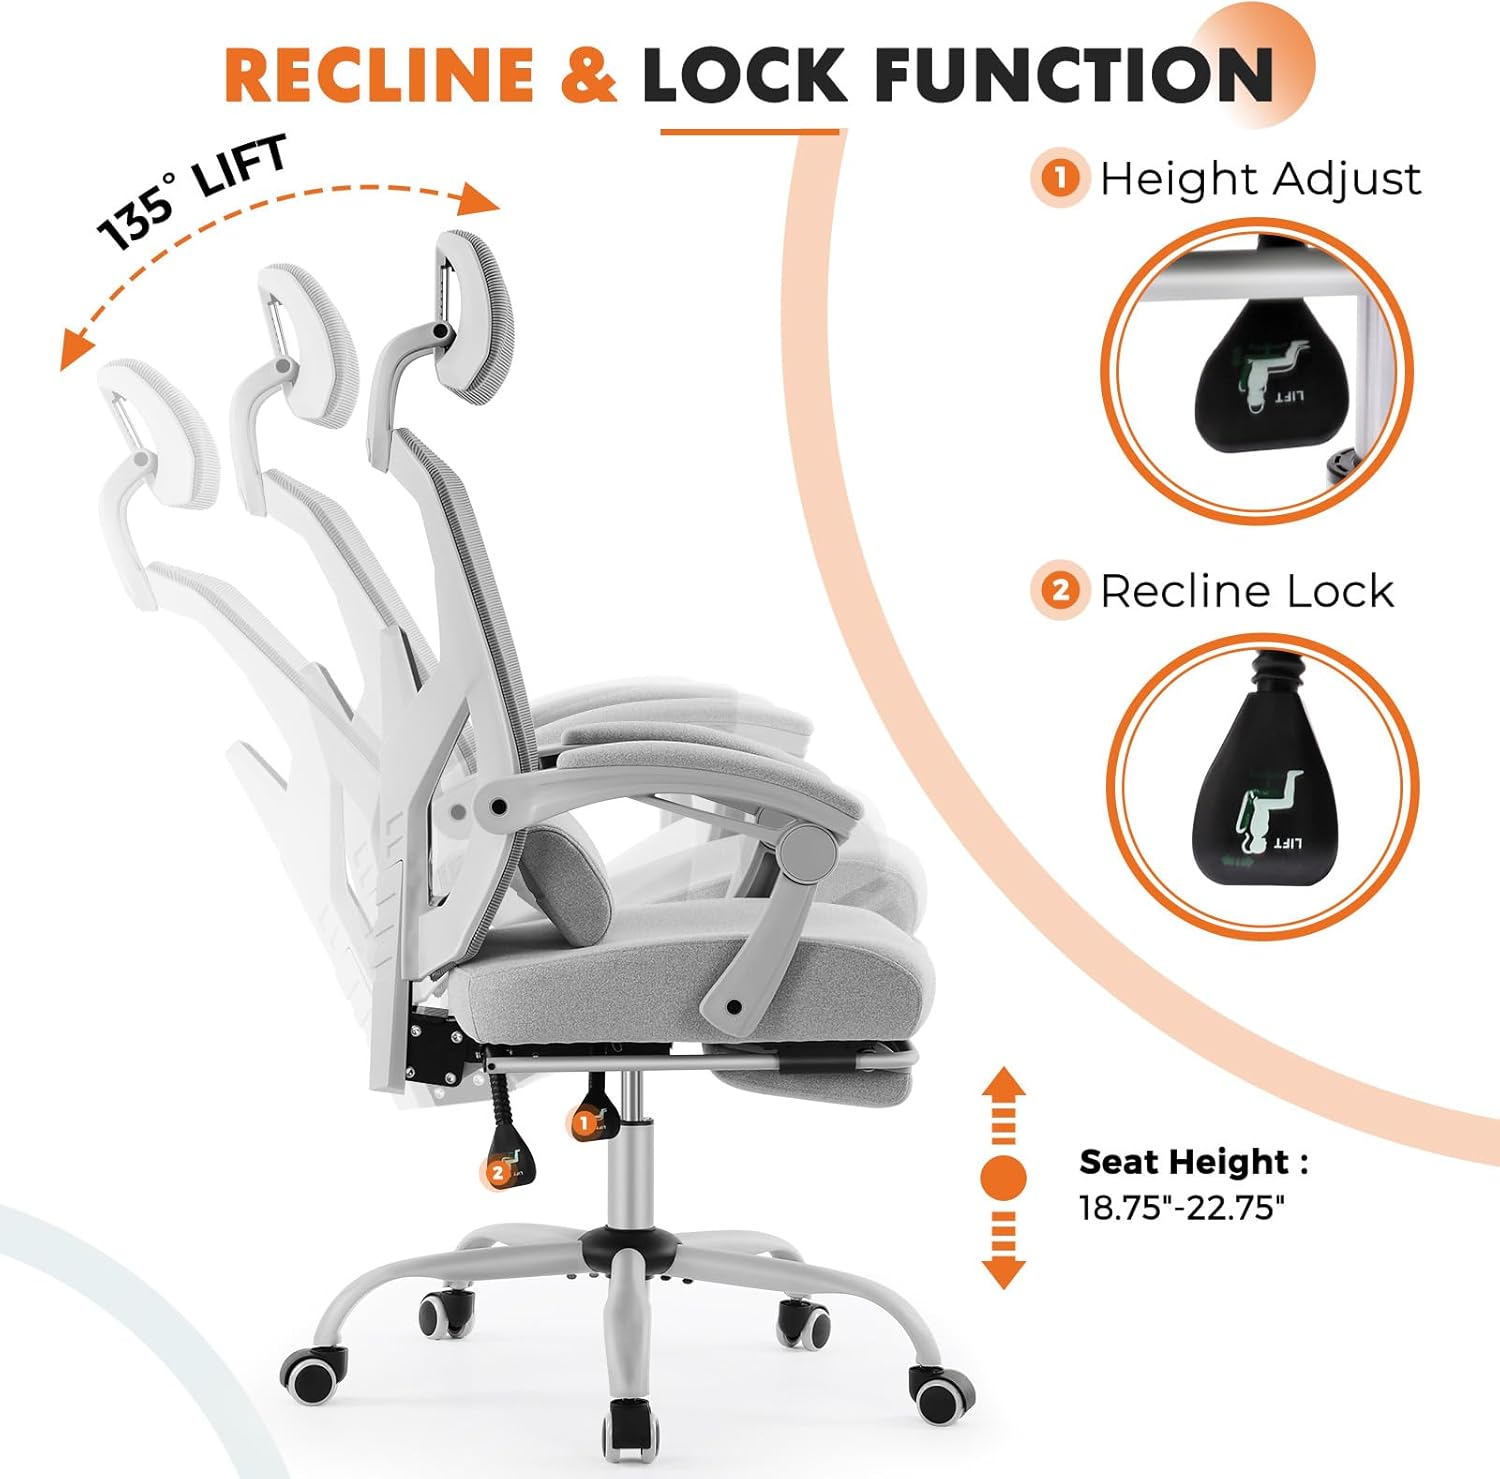
Image: Diagram illustrating the seat height adjustment mechanism and the range of adjustment.
- Reclining Function:
Push the lever up to unlock the backrest for reclining (90-135 degrees). Push the lever down to lock the backrest in your desired position. This feature is ideal for short breaks or relaxation.Image: Diagram illustrating the recline and lock function lever and the chair's reclining angles.
- Adjustable Headrest:
The flexible headrest can be adjusted up and down, and back and forth, to provide optimal support for your neck and reduce cervical pressure.
Image: Diagram showing the vertical and angular adjustment capabilities of the headrest.
- Lumbar Support:
The soft lumbar support pillow is designed to support the natural curve of your spine, providing comfort and relieving lower back pressure during prolonged sitting.
Image: Close-up of the lumbar support pillow, emphasizing its ergonomic design.
- Retractable Footrest:
Pull out the footrest from under the seat to extend it. Flip it up for use and push it back in when not needed. This feature allows you to relax your legs and reduce fatigue.Image: Diagram showing the retractable footrest extended from under the seat.
- Padded Armrests:
The padded armrests provide comfortable support for your elbows and forearms, helping to reduce tension in the upper body.Image: Close-up of the padded armrests, highlighting their soft texture.
- Swivel and Casters:
The chair features 360-degree swivel capability and smooth-rolling casters, allowing for easy movement across various floor surfaces without scratching.
Image: Diagram illustrating the chair's 5-point base and smooth-rolling casters.
Maintenance
- Cleaning: Wipe clean with a damp cloth. Avoid harsh chemicals or abrasive cleaners that may damage the mesh or fabric.
- Regular Inspection: Periodically check all bolts and screws to ensure they are tight. Re-tighten if any looseness is detected.
- Caster Care: Keep casters free of hair and debris to ensure smooth rolling.
Troubleshooting
- Chair Squeaks: Check all connections and tighten any loose bolts. A small amount of silicone lubricant can be applied to moving parts if necessary.
- Difficulty Adjusting Height: Ensure the gas lift lever is fully engaged or disengaged. If the issue persists, the gas lift cylinder may need replacement.
- Casters Not Rolling Smoothly: Clean any debris (hair, lint, etc.) from the caster wheels. Ensure the casters are fully inserted into the base legs.
- Chair Feels Unstable: Verify that all base legs are securely attached and all screws are tightened. Ensure the chair is on a level surface.
Specifications
| Feature | Detail |
|---|---|
| Brand | Sweetcrispy |
| Model Number | C-3509-W-GY |
| Color | Light Grey |
| Material | Mesh, Metal, Sponge |
| Product Dimensions (D x W x H) | 18.8" x 20" x 50.75" |
| Item Weight | 34.4 Pounds |
| Maximum Weight Recommendation | 275 Pounds |
| Back Style | High Back, Mesh Back |
| Additional Features | Adjustable Headrest, Adjustable Height, Arm Rest, Foot Rest, Rolling |

Image: Detailed diagram outlining the dimensions and maximum weight capacity of the chair.
Warranty and Support
For warranty information or technical support, please refer to the product packaging or contact Sweetcrispy customer service directly. You can also visit the official Sweetcrispy store on Amazon for more details and contact options.


