Introduction
The HEXGAMING ULTIMATE PRO Gaming Controller is designed for competitive gaming across PlayStation 5, PC, and mobile platforms. It features advanced customization options including remappable back buttons, adjustable triggers, and swappable thumbsticks, along with Drifix technology to mitigate stick drift. This manual provides detailed instructions for setup, operation, maintenance, and troubleshooting to ensure optimal performance and longevity of your controller.
Video: Quick Look at the ULTIMATE PRO Controller. This video provides a brief overview of the controller's design and key features.
Package Contents
- ULTIMATE PRO eSports Controller
- 8 Interchangeable Thumbsticks
- Adjustment Tool
- User Manual (this document)
Note: The wireless controller does not include a charging cable or other accessories unless specified.

Image: Package Contents. This image displays the HEXGAMING ULTIMATE PRO Controller along with its included interchangeable thumbsticks and adjustment tool.
Setup
1. Connecting the Controller
The ULTIMATE PRO controller is compatible with PlayStation 5, PC, and mobile devices. Ensure the controller is charged before first use. Connect the controller to your device via Bluetooth or a compatible USB-C cable (not included).
2. Swapping Thumbsticks
The controller comes with 8 interchangeable textured thumbsticks to suit various playstyles. To swap, gently pull the existing thumbstick upwards to remove it, then align and push down the desired thumbstick until it clicks into place.

Image: Front View of Controller. This image shows the front of the HEXGAMING ULTIMATE PRO Controller, highlighting the interchangeable thumbsticks.
3. Adjusting Triggers
The controller features upgraded trigger-control switches allowing quick toggling between digital trigger and adaptive modes. Use the physical switches located near the triggers to select your preferred mode. Digital triggers offer a short 1.5 to 2mm travel for rapid input, ideal for FPS games. Adaptive triggers provide precise control for nuanced actions like throttle management in racing games.

Image: Micro Switch Triggers. This image details the micro switch triggers on the controller, illustrating their short travel distance for quick responses.
Operating the Controller
1. Back Button Remapping
The ULTIMATE PRO controller includes 4 remappable back buttons (K1, K2, K3, K4) and 6 custom profiles. Each profile is indicated by a different color (Blue, Green, Cyan, Yellow, Purple, White).
Entering Mapping Mode:
- First, sync the controller with your console or PC. The indicator light will remain lit after syncing.
- Press and hold the Setting Button (located on the back of the controller) for 3 seconds. The indicator light will flash, signaling entry into mapping mode.
Mapping a Button:
- While in mapping mode, press the back button (K1, K2, K3, or K4) you wish to map.
- Then, press the standard controller button (e.g., X, O, Square, Triangle, L1, R1, etc.) you want to assign to the back button.
- The indicator light will flash once to confirm the mapping.
Exiting Mapping Mode:
After mapping, hold down the Setting Button for about 3 seconds. The indicator light will stay solid, indicating you have exited mapping mode.
Video: Button Remap Tutorial. This video demonstrates the process of remapping the back buttons on the HEXGAMING ULTIMATE PRO Controller.

Image: Back View of Controller. This image shows the rear of the HEXGAMING ULTIMATE PRO Controller, highlighting the four remappable back buttons.
2. Switching Profiles
Double-click the Setting Button to switch to the next memory profile. There are a total of six memory profiles, each represented by a different color: Blue, Green, Cyan, Yellow, Purple, White.

Image: 6 Custom Remapping Profiles. This image illustrates the six distinct remapping profiles available on the controller, each identified by a unique color.
3. Clearing All K Button Mappings in Current Profile
To clear all K button mappings that have been set in the current profile:
- When the indicator light remains solid (not in mapping mode).
- Press and hold the combination of L1 + Up + Left + R1 + Triangle + Circle for about 5 seconds.
- The indicator light will turn red and flash three times, signaling that all K button mappings in the current profile have been cleared successfully.
Drifix Technology for Stick Drift Adjustment
The exclusive Drifix technology allows you to adjust axis deviations within a 0.12 range to maintain pinpoint accuracy for your thumbsticks. This helps offset stick drift and ensures consistent controller performance.
Adjustment Procedure:
- Access the Drifix module located on the back of the controller.
- Use the provided adjustment tool to carefully turn the screws on the module.
- Monitor the calibration values on a gamepad tester (e.g., gamepad-tester.com) to ensure the stick values are centered within the optimal 0.12 range.
- Adjust until the values are centered, then replace the cover.
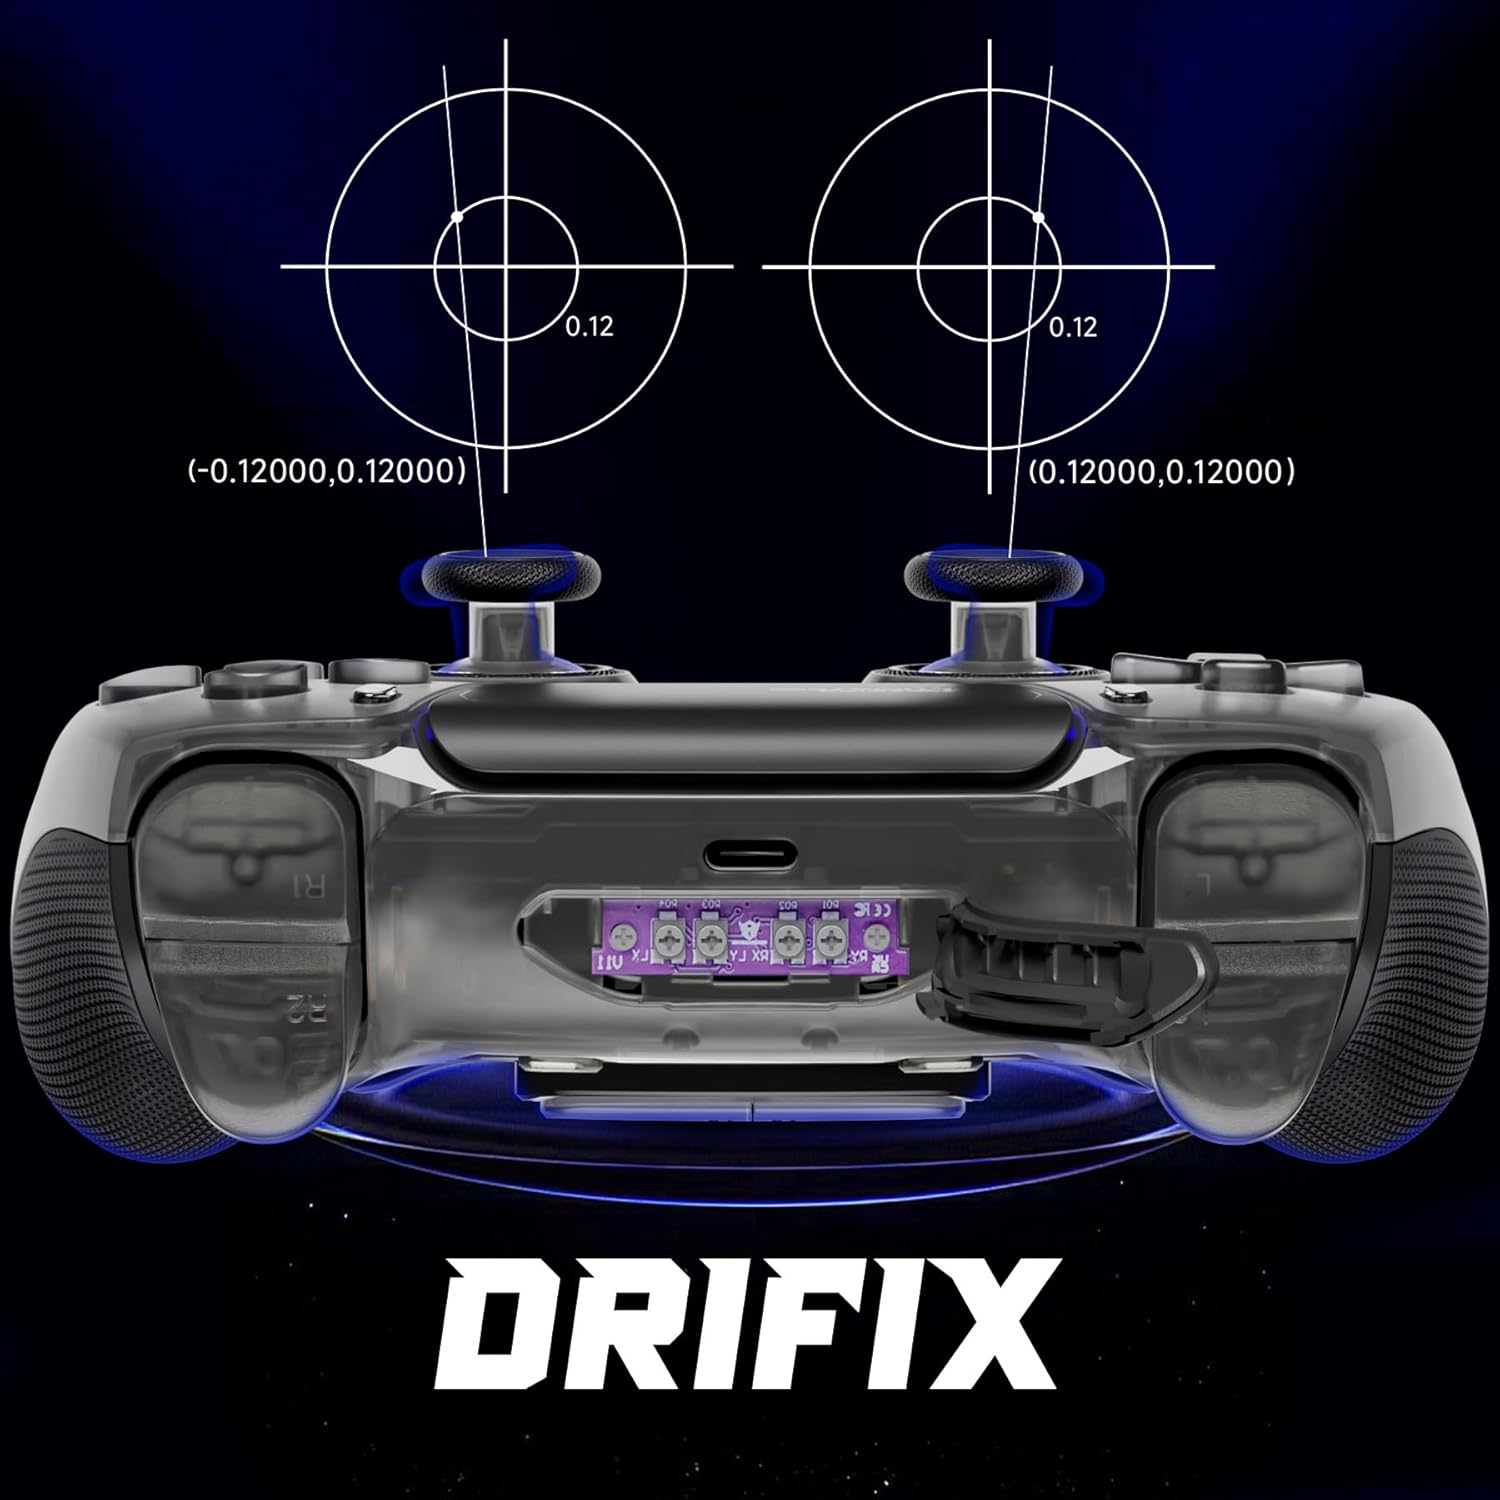
Image: Drifix Module. This image highlights the Drifix module on the controller, used for fine-tuning thumbstick calibration.
Video: How the HEX DRIFIX module works. This video demonstrates the functionality and adjustment process of the HEX DRIFIX module to correct stick drift.
Specifications
| Compatible Devices | PlayStation 5, PC, Mobile |
| Controller Type | Gamepad |
| Connectivity Technology | Wireless |
| Button Quantity | 22 |
| Item Weight | 330 Grams |
| Item Dimensions | 6.3 x 3.94 x 2.36 inches |
Maintenance
Cleaning Instructions
It is recommended to clean the plastic surfaces of your controller with a wipe dampened with less than 70% alcohol. After cleaning, place it in a ventilated area to dry completely. Do not spray water or alcohol directly onto the product surface. Avoid using any other organic solvents for cleaning.

Image: Cleaning Guidelines. This image provides visual instructions for cleaning the controller's plastic components.
Troubleshooting
Mapping Issues:
- Ensure the controller is properly synced with your device before entering mapping mode.
- Verify that you are holding the Setting Button for the correct duration (3 seconds to enter/exit mapping mode).
- If a mapping is not working, try clearing all K button mappings for the current profile as described in the 'Operating the Controller' section, then remap the desired buttons.
Stick Drift:
- If you experience unintended movement or 'stick drift', utilize the Drifix technology to recalibrate your thumbsticks. Refer to the 'Drifix Technology for Stick Drift Adjustment' section for detailed instructions.
- Ensure you use the provided adjustment tool for precise calibration.
Warranty and Support
For further assistance, warranty information, or frequently asked questions, please visit the official HEXGAMING support resources:
- Knowledge Base and FAQs: hexgaming.com/guide
- Support and Feedback: hexgaming.com/faq