1. Introduction
Thank you for choosing the Luminus LED Panel Light. This manual provides essential information for the safe and efficient installation, operation, and maintenance of your new LED panel lights. Please read these instructions thoroughly before installation and retain them for future reference.
This product features a 10 cm (4 inch) LED panel with a detached junction box, offering selectable colour temperatures (2700K-5000K) and dimmable functionality. It is designed for easy installation in both insulated and non-insulated ceilings.
2. Safety Information
- WARNING: Risk of electric shock. Disconnect power at the circuit breaker or fuse box before installation or servicing.
- Installation must be performed by a qualified electrician in accordance with all local electrical codes.
- Do not modify the fixture or its components.
- Ensure the supply voltage is 120V AC, 60Hz.
- This product is suitable for damp and dry locations. Do not expose to direct water spray.
- Do not install near heat sources.
- Wear safety glasses and gloves during installation.
- The fixture is IC rated, suitable for direct contact with insulation.
3. Package Contents
Each package contains the following items:
- 8 x Luminus LED Panel Lights (10 cm)
- 8 x Detached Junction Boxes
- 1 x Instruction Manual (this document)

Image 3.1: Contents of the 8-pack Luminus LED Panel Light kit.
4. Specifications
| Feature | Specification |
|---|---|
| Brand | Luminus |
| Model Number | PPS144J8A |
| Power Consumption | 10 Watts |
| Light Output | 820 Lumens |
| Efficacy | 82 lumens per watt |
| Colour Temperature | Selectable (2700K, 3000K, 3500K, 4000K, 5000K) |
| Dimmable | Yes |
| Voltage | 120V AC, 60Hz |
| Beam Angle | 110° |
| Colour Rendering Index (CRI) | >90 |
| Lifespan | Up to 50,000 hours |
| Panel Diameter | 135 mm (5.31 inches) |
| Panel Height | 20 mm (0.79 inches) |
| Junction Box Dimensions | Approx. 135mm L x 135mm W x 20mm H (based on product image) |
| Cut-out Hole Size | 11 cm (4.33 inches) recommended |
| Operating Environment | Damp and Dry Locations |
| Certifications | IC Rated, Energy Star Certified, RoHS Compliant, cETLus Listed |
| Material | Plastic, Metal |
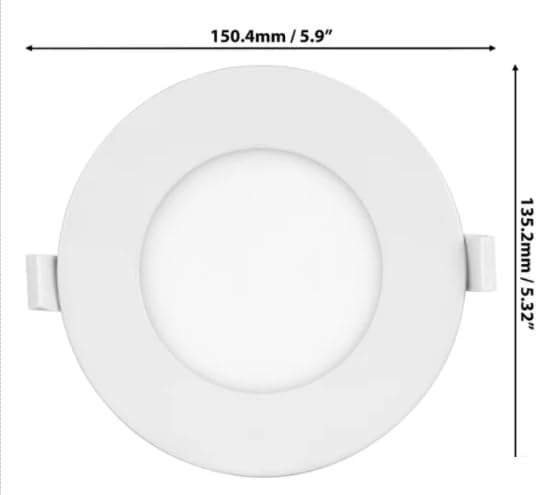
Image 4.1: Dimensional drawing of the LED panel light.
5. Installation Instructions (Setup)
Before beginning installation, ensure the power supply is turned off at the circuit breaker.
- Prepare the Ceiling: Cut a circular hole in the ceiling at the desired location. The recommended cut-out diameter is approximately 11 cm (4.33 inches). Ensure there are no obstructions within the ceiling space.
- Connect Wiring: Open the junction box. Connect the household electrical wires to the push-in connectors inside the junction box.
- Connect the black (live) wire from the ceiling to the black wire in the junction box.
- Connect the white (neutral) wire from the ceiling to the white wire in the junction box.
- This fixture is designed to work with 2-wire systems and does not require a ground wire.
- Secure Junction Box: Place the junction box into the ceiling opening. The low-profile design allows for installation without traditional recessed housing.
- Connect Panel to Junction Box: Connect the cable from the LED panel to the corresponding connector on the junction box. Ensure a secure connection.
- Install LED Panel: Gently push the spring clips on the sides of the LED panel upwards and insert the panel into the ceiling opening. Release the clips to secure the panel flush against the ceiling.
- Restore Power: Turn the power back on at the circuit breaker.
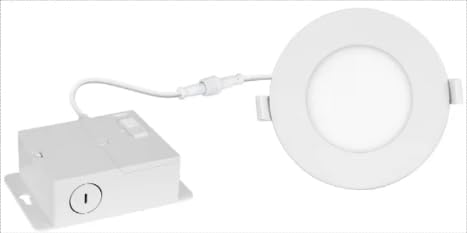
Image 5.1: Luminus LED Panel Light with detached junction box.
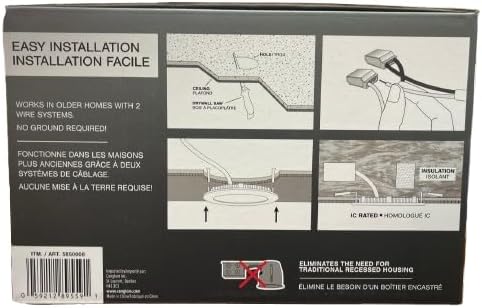
Image 5.2: Visual guide for LED panel light installation.
6. Operating Instructions
Once installed and power is restored, the Luminus LED Panel Light operates like a standard light fixture.
- Turning On/Off: Use your standard wall switch to turn the light fixture on or off.
- Colour Temperature Selection: Each junction box includes a switch for selecting the desired colour temperature (CCT). Before final installation, open the junction box and select from 2700K (Warm White), 3000K, 3500K, 4000K, or 5000K (Daylight). This setting is typically done once during installation.
- Dimmability: This fixture is dimmable. To utilize the dimming feature, ensure you have a compatible LED dimmer switch installed. Adjust the dimmer switch to achieve your desired brightness level.
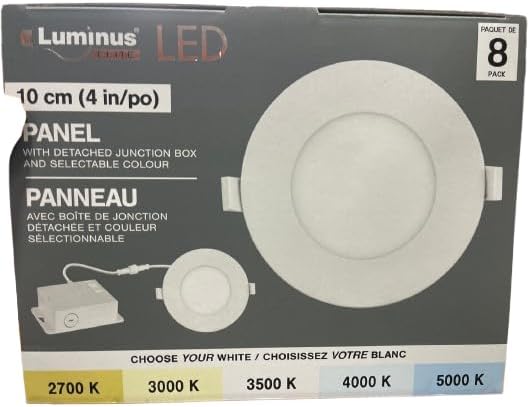
Image 6.1: Colour temperature selection options.
7. Maintenance
The Luminus LED Panel Light requires minimal maintenance.
- Cleaning: Ensure the power is off before cleaning. Wipe the surface of the LED panel with a soft, dry, or slightly damp cloth. Do not use abrasive cleaners or solvents.
- No User-Serviceable Parts: There are no user-serviceable parts inside the LED panel or junction box. Do not attempt to open or repair the unit.
- LED Lifespan: The integrated LED light source is designed for a long operational life of up to 50,000 hours and does not require replacement.
8. Troubleshooting
If you experience issues with your Luminus LED Panel Light, refer to the following troubleshooting guide:
| Problem | Possible Cause | Solution |
|---|---|---|
| Light does not turn on. | No power supply. Loose wiring connection. Faulty switch. | Check circuit breaker and wall switch. Ensure all wire connections in the junction box are secure (power off first). Test the switch with another device. |
| Light flickers or dims inconsistently. | Incompatible dimmer switch. Loose wiring. | Ensure a compatible LED dimmer switch is used. Check all wiring connections (power off first). |
| Incorrect colour temperature. | CCT switch set incorrectly. | Turn off power. Access the junction box and adjust the CCT selection switch to the desired setting. |
If the problem persists after attempting these solutions, please contact customer support. Do not attempt to repair the fixture yourself.
9. Warranty and Support
The Luminus LED Panel Light is backed by a 5-year warranty from the date of purchase. This warranty covers defects in materials and workmanship under normal use. It does not cover damage resulting from improper installation, accident, misuse, abuse, or unauthorized modification.
For warranty claims or technical support, please contact the manufacturer directly.
10. Manufacturer Contact Information
Canarm Ltd.2157 Parkedale Avenue
Brockville, Ontario
K6v 5v6
Website: www.canarm.com