1. Introduction
Thank you for choosing the Lordear 30-inch Waterfall Kitchen Sink. This manual provides detailed instructions for the safe and efficient installation, operation, and maintenance of your new kitchen sink. Please read this manual thoroughly before installation and retain it for future reference.
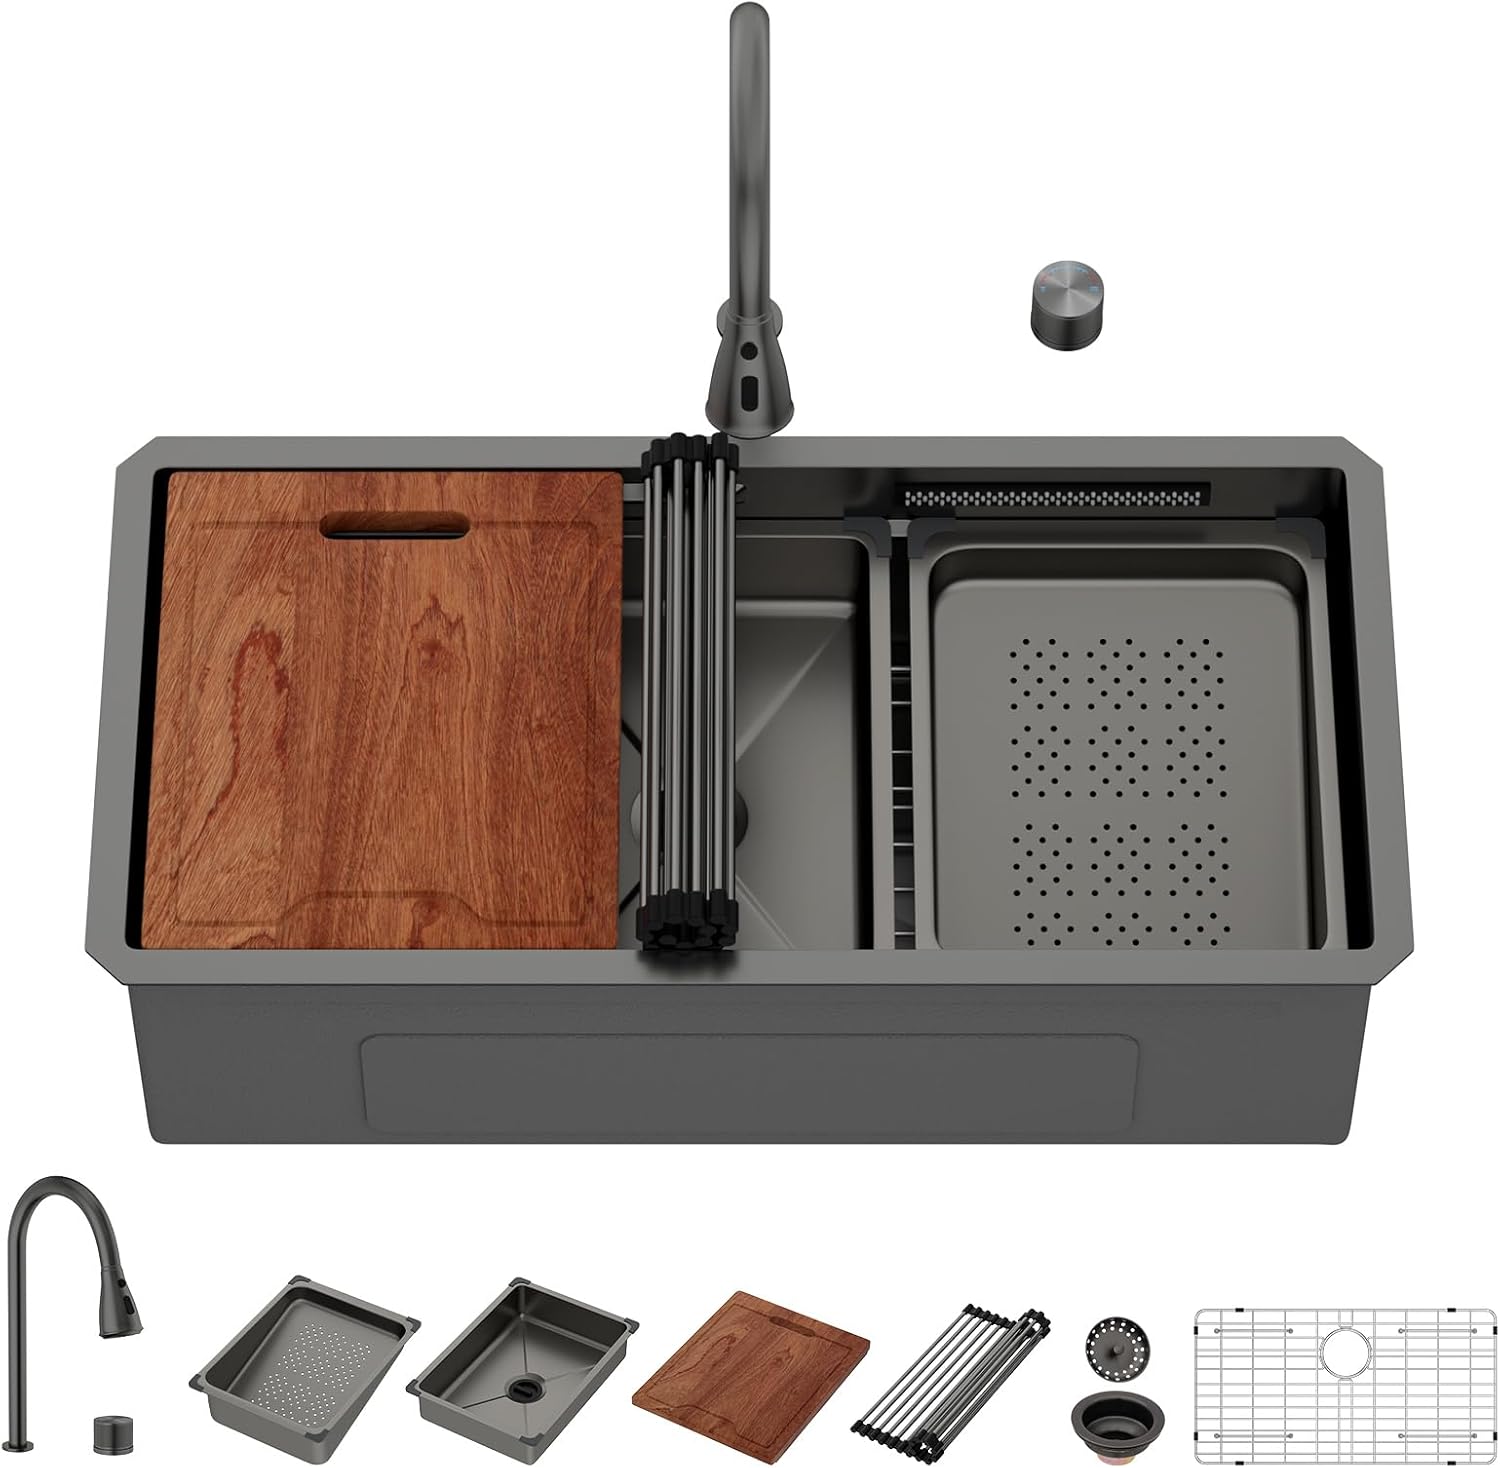
Image: The Lordear 30-inch Waterfall Kitchen Sink shown with its various integrated accessories, including the cutting board, roll-up rack, and colander.
2. Safety Information
Always follow basic safety precautions when installing or using this product to reduce the risk of fire, electric shock, or injury to persons.
- Ensure all local plumbing and building codes are met during installation.
- Turn off the main water supply before beginning any installation or maintenance.
- Wear appropriate personal protective equipment, such as safety glasses and gloves, during installation.
- If you are unsure about any installation steps, consult a qualified plumber.
- Do not use harsh chemicals or abrasive cleaners on the sink surface, as this may damage the finish.
3. Package Contents
Verify that all components are present before beginning installation:
- 30-inch Undermount Kitchen Sink
- Faucet Set (with pull-out faucet)
- Mounting Clips
- Cutout Template
- Instructions Manual (this document)
- Cutting Board
- Colander
- Basin (small, for in-sink use)
- Roll-up Rack
- Bottom Rinse Grids
- Switch Knob (for water outlet control)
- Drain Assembly

Image: A visual representation of the included accessories: pull-down faucet, switch knob, roll-up rack, natural solid wood cutting board, stainless steel colander, basin in basin, bottom grid, and drain assembly.
4. Specifications
| Brand | Lordear |
| Model Number | LUBS3019A1-FYFT |
| Color | Gunmatel Black (Waterfall) |
| Material | 16-Gauge T304 Stainless Steel with Nano-PVD Finish |
| Exterior Dimensions (D x W x H) | 16.72" x 30" x 10" |
| Interior Dimensions (Bowl Size) | 14.72" x 28" x 9.75" |
| Installation Type | Undermount |
| Minimum Cabinet Base Size | 33 inches |
| Drain Opening | 3.5 inches (compatible with most garbage disposals) |
| Hole Count | 1 (for faucet) |

Image: Details on the sink's construction, highlighting the 2mm thick panel, SUS 304 stainless steel for durability, and the 10-inch deep bowl for ample space.

Image: Explanation of the sink's quiet operation and anti-condensation features, showing how undercoating prevents dripping and reduces noise.
5. Setup and Installation
This section outlines the general steps for installing your undermount kitchen sink. Professional installation is recommended.
- Prepare the Cabinet: Ensure your cabinet base is at least 33 inches wide. Clear the area and ensure the countertop opening is correctly sized for the sink.
- Position the Sink: Carefully place the sink into the countertop opening from below. Ensure it is centered and aligned.
- Secure with Clips: Use the provided mounting clips to secure the sink to the underside of the countertop. Tighten evenly to create a watertight seal.
- Install Faucet and Drain: Install the faucet and drain assembly according to their respective instructions. Connect water supply lines and the drain pipe.
- Test for Leaks: Turn on the water supply and check all connections for leaks.

Image: Detailed installation dimensions, including exterior size, bowl size, minimum cabinet base requirement, and drain opening size.

Image: Visual guide for undermount installation, indicating the cutout size and the necessary minimum cabinet base size.
Installation Video Guide
Video: An official Lordear installation guideline video demonstrating the steps for installing an undermount kitchen sink.
6. Operating Instructions
6.1 Faucet Operation
Your sink includes a pull-out faucet with multiple spray modes:
- Stream Mode: For filling pots and general washing.
- Rinse Mode: A powerful spray for rinsing dishes and removing stubborn food particles.
- Spray Mode: A wider spray pattern for cleaning the sink basin.
Switch between modes using the button on the faucet head. The 20-inch extra-long hose allows the faucet to reach all corners of the sink.

Image: The pull-out faucet demonstrating its extended reach and three distinct water flow patterns: rinse, stream, and spray.
6.2 Waterfall Feature and Water Outlet Control
The sink features a unique waterfall spout and a dedicated switch knob to control the water outlet.
- Rotate the switch knob to the left to activate the main faucet.
- Rotate the switch knob to the right to activate the waterfall outlet.

Image: The switch knob, indicating how to rotate it left for faucet water and right for the waterfall feature.
6.3 Workstation Accessories
Utilize the dual overhanging ledges to slide and position the included accessories for enhanced functionality:
- Cutting Board: Provides a convenient surface for food preparation directly over the sink.
- Colander: Ideal for rinsing fruits, vegetables, or draining pasta.
- Basin: A smaller basin that fits within the main sink for specific tasks.
- Roll-up Rack: Use for drying dishes, cooling baked goods, or as an additional workspace.
- Bottom Rinse Grids: Protect the sink bottom from scratches and allow water to drain freely.
Image: The workstation sink demonstrating the use of the cutting board, roll-up rack, and colander for various kitchen tasks.
7. Maintenance and Care
Proper care will ensure the longevity and appearance of your Lordear kitchen sink.
- Daily Cleaning: Wipe the sink surface with a soft cloth and mild soap or a non-abrasive cleaner after each use. Rinse thoroughly with water and dry to prevent water spots.
- Avoid Abrasives: Do not use steel wool, abrasive pads, or harsh chemical cleaners (e.g., bleach, ammonia-based products) as they can damage the Nano-PVD finish.
- Prevent Scratches: Use the included bottom rinse grids to protect the sink base from scratches caused by pots and pans.
- Drainage: The sloped basin bottom and X-shaped drainage grooves are designed for efficient water runoff. Ensure the drain assembly is kept clear of debris to maintain optimal drainage.
- Accessory Care: Clean the cutting board, colander, and roll-up rack regularly. The wooden cutting board should be hand-washed and air-dried.

Image: Features designed for easy maintenance, including X-grooves for efficient drainage and R10 round corners to simplify cleaning and prevent residue buildup.
8. Troubleshooting
Refer to this section for common issues and their solutions.
| Problem | Possible Cause | Solution |
|---|---|---|
| Water spots on sink surface | Hard water deposits; not drying after use. | Wipe the sink dry after each use. For existing spots, use a vinegar-water solution (1:1 ratio) and a soft cloth, then rinse and dry. |
| Slow drainage | Drain assembly clogged with food particles or debris. | Remove the drain stopper and clear any visible obstructions. Use a drain cleaner safe for stainless steel if necessary. |
| Faucet leaks or drips | Loose connections; worn O-rings or cartridge. | Check all faucet connections and tighten if loose. If the issue persists, contact customer support for replacement parts or professional assistance. |
| Water not switching between faucet and waterfall | Switch knob mechanism obstructed or faulty. | Ensure the switch knob is free of debris. If the mechanism is faulty, contact customer support. |
9. Warranty and Support
Lordear offers a comprehensive warranty and customer support for your product.
- Return Policy: Enjoy 3 months for returns from the date of purchase.
- After-Sales Service: A 5-year after-sales service is provided for this product.
- Contact Support: For any questions, concerns, or warranty claims, please contact Lordear customer service. Refer to the product packaging or the Lordear website for contact details.
Your satisfaction is our priority. Please retain your proof of purchase for warranty purposes.