TANYO FG11S
TANYO Stair Tread Template Tool Instruction Manual
Model: FG11S
Introduction
The TANYO Stair Tread Template Tool is designed for precise measurement and replication of angles and lengths in various woodworking projects, particularly for stair treads, risers, shelves, cabinets, and flooring. Constructed from high-strength aviation aluminum alloy, this tool offers durability and accuracy for both professionals and DIY enthusiasts.
Product Features
- Premium Material: Made from high-strength aviation aluminum alloy (0.16 inches / 4 mm thick) for resistance to damage, bends, wear, rust, and deformation.
- Clear Markings: Features CNC anodized surface and electroplating markings for clearer and more accurate readings. Laser etching ensures better accuracy.
- Flexible Adjustment: Includes two sets of extension components (16-inch, 12-inch, and 8-inch sliders) allowing for length adjustments from 10.4 inches to 60 inches.
- Multi-Angle Measurement: The stair gauge angle can be adjusted from 0° to 360° to match various stair corner shapes and other complex angles.
- Adjustable Damping: Elastic rubber gaskets between the template and ruler help secure the tool, preventing slip and protecting the ruler from scratching.
Package Contents
Before assembly, please verify that all components are present:
- 1 x Storage Bag
- 10 x Washers
- 2 x 16-inch Sliders (A)
- 2 x 12-inch Sliders (B)
- 2 x 8-inch Sliders (C)
- 10 x Stainless Steel Bolts
- 2 x 10-inch Tread Templates
- 10 x Knobs
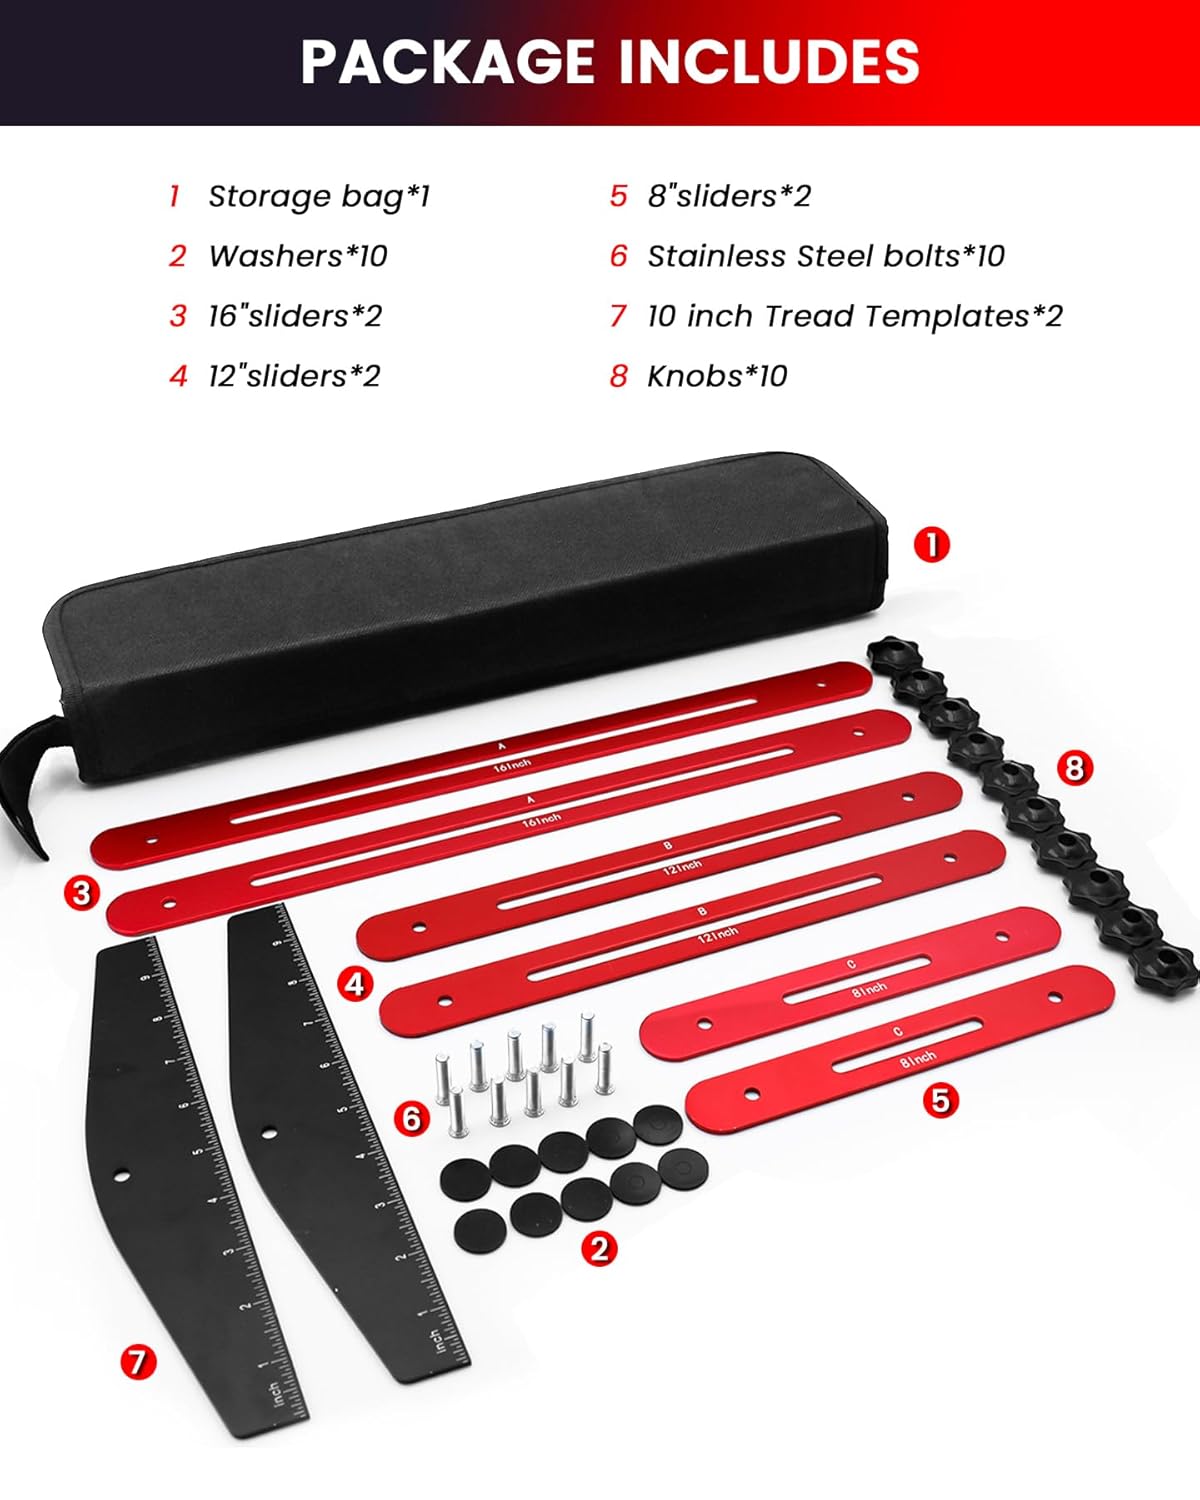
Figure 1: All components included in the TANYO Stair Tread Template Tool package.
Assembly Instructions
Follow these steps to assemble your TANYO Stair Tread Template Tool:
- Attach Tread Templates to Sliders:
Insert a stainless steel bolt through the hole on one of the black 10-inch tread templates. Place a washer onto the bolt, then align the bolt with the slot on one of the red sliders (e.g., a 16-inch slider). Secure with a knob. Repeat for the other end of the slider and the second tread template.

Figure 2: Attaching a slider to a tread template using a bolt, washer, and knob.
- Connect Multiple Sliders (Optional):
For longer measurements, connect additional red sliders. Insert a bolt through the end hole of one slider, place a washer, then align with the end hole of another slider. Secure with a knob. Ensure the elastic rubber gaskets are placed between the template and ruler for secure locking and scratch protection.

Figure 3: Connecting two slider bars to extend the tool's length.
- Adjusting Damping:
The elastic rubber gaskets are crucial for maintaining the tool's shape and preventing accidental movement. Ensure they are correctly positioned between the template and the ruler when tightening the knobs. This provides optimal damping and stability.
Video 1: Demonstrates the assembly and flexible combination of the TANYO Stair Tread Template Tool components.
Operating Instructions
The TANYO Stair Tread Template Tool allows for flexible adjustment of length and angle to match various project requirements.
1. Adjusting Length
- The tool can be adjusted from a minimum measuring distance of 10.4 inches to a maximum of 60 inches by combining the 8-inch, 12-inch, and 16-inch sliders.
- To adjust, loosen the knobs, slide the components to the desired length, and then firmly tighten the knobs to secure the measurement.

Figure 4: Flexible length adjustment by combining different slider sizes.
2. Adjusting Angle
- The angle of the tread templates can be adjusted from 0° to 360° to conform to the shape of stair corners or other surfaces.
- Loosen the knobs on the tread templates, rotate them to the required angle, and then tighten the knobs to lock the angle in place.

Figure 5: Multi-angle measurement capability of the tool.
3. Measuring and Marking
- Once the tool is adjusted to the desired length and angle, place it firmly against the surface to be measured (e.g., a stair tread).
- Ensure all knobs are securely tightened to prevent movement.
- Use a pencil or marking tool to trace the outline of the template onto your material.

Figure 6: Marking the outline using the adjusted template.
Maintenance
- Cleaning: Wipe the tool clean with a dry or slightly damp cloth after each use to remove dust and debris. Avoid abrasive cleaners that could damage the anodized surface or etched markings.
- Storage: Store the tool in its provided Oxford cloth bag to protect it from scratches and prevent loss of small parts. Keep it in a dry environment to prevent corrosion.
- Inspection: Periodically check all bolts, washers, and knobs for wear or damage. Replace any worn components to maintain accuracy and functionality.
Troubleshooting
- Tool does not hold shape securely:
Ensure the elastic rubber gaskets are correctly placed between the template and the ruler. These gaskets provide necessary friction. Tighten all knobs firmly. If the issue persists, inspect gaskets for wear and replace if necessary.
- Difficulty adjusting components:
Loosen the knobs sufficiently before attempting to slide or rotate components. If components are stiff, clean any debris from the slots and threads. Do not force adjustments.
- Markings are unclear:
The electroplating markings are designed for durability. If they appear unclear, ensure the tool is clean and free of dust or residue. Use adequate lighting when reading measurements.
Specifications
| Feature | Specification |
|---|---|
| Model Number | FG11S |
| Material | High-strength Aviation Aluminum Alloy |
| Color | Red and Black |
| Item Thickness | 0.16 Inches (4 mm) |
| Adjustable Angle | 0° - 360° |
| Measuring Length Range | 10.4 Inches (minimum) to 60 Inches (maximum) |
| Scale Markings | Laser-etched, Electroplating |
Warranty and Support
For warranty information or technical support, please refer to the contact details provided with your purchase or visit the official TANYO website. Keep your proof of purchase for warranty claims.
Manufacturer: TANYO
Ask a question about this manual
Ask about setup, troubleshooting, compatibility, parts, safety, or missing instructions. Manuals+ will review the question and use this page’s manual context to help answer it.