1. Introduction
This manual provides essential information for the safe and efficient operation, maintenance, and troubleshooting of your A-iPower 10700-Watt Electric Start Portable Generator, model AP10700E. Please read this manual thoroughly before operating the generator to ensure proper use and to prevent injury or damage.
The A-iPower AP10700E is a heavy-duty, gas-powered portable generator designed for home use, job sites, emergencies, and power outages. It features a 459cc OHV engine and offers both electric push-button start and recoil start options.
2. Product Features
- Electric Start: Convenient electric push-button start system with included battery.
- Recoil Start: Manual recoil start option for backup.
- Powerful Engine: Equipped with a 459cc OHV high-performance engine featuring a cast iron sleeve for durability, fuel efficiency, and excellent heat dissipation.
- High Output: Delivers 10,700 starting watts and 8,500 running watts on gasoline.
- Multi-Featured Control Panel: Includes a CO sensor indicator light, digital data center (displaying voltage, frequency, and hours), electric push-button start, 2x 5-20R GFCI (20A, 120V) outlets, 1x L5-30R (30A, 120V) outlet, 1x L14-30R (30A, 120/240V) outlet, and 1x 14-50R (50A, 120/240V) outlet.
- Robust Construction: Heavy-duty frame with a durable powder-coated finish.

3. Setup
Before first use, several components must be assembled and fluids added. Ensure the generator is on a flat, stable surface in a well-ventilated area, away from any ignition sources.
3.1 Unboxing and Inventory
Carefully remove all contents from the packaging. Verify that all parts listed in the 'Included in Box' section are present.
3.2 Wheel and Handle Assembly
- Attach the wheels to the generator frame using the provided hardware.
- Install the handles onto the frame. Ensure they are securely fastened.
3.3 Adding Engine Oil
The generator is shipped without engine oil. It is crucial to add the correct type and amount of oil before starting.
- Place the generator on a level surface.
- Remove the oil fill cap/dipstick.
- Using the provided funnel, slowly add the recommended engine oil (e.g., 10W-30) until it reaches the upper mark on the dipstick. Do not overfill.
- Securely replace the oil fill cap/dipstick.
3.4 Adding Fuel
Use only fresh, unleaded gasoline with an octane rating of 87 or higher. Do not use E85 fuel.
- Ensure the generator is turned off and cool.
- Open the fuel tank cap.
- Carefully pour gasoline into the fuel tank, leaving a small air gap at the top to allow for expansion.
- Securely close the fuel tank cap. Wipe up any spilled fuel immediately.
3.5 Battery Connection (for Electric Start)
Connect the battery terminals as instructed in the quick-start guide. Ensure positive (+) and negative (-) terminals are connected correctly to avoid damage.
4. Operating Instructions
Always operate the generator outdoors in a well-ventilated area, far from windows, doors, and vents to prevent carbon monoxide poisoning.
4.1 Control Panel Overview
Familiarize yourself with the control panel components before starting the generator.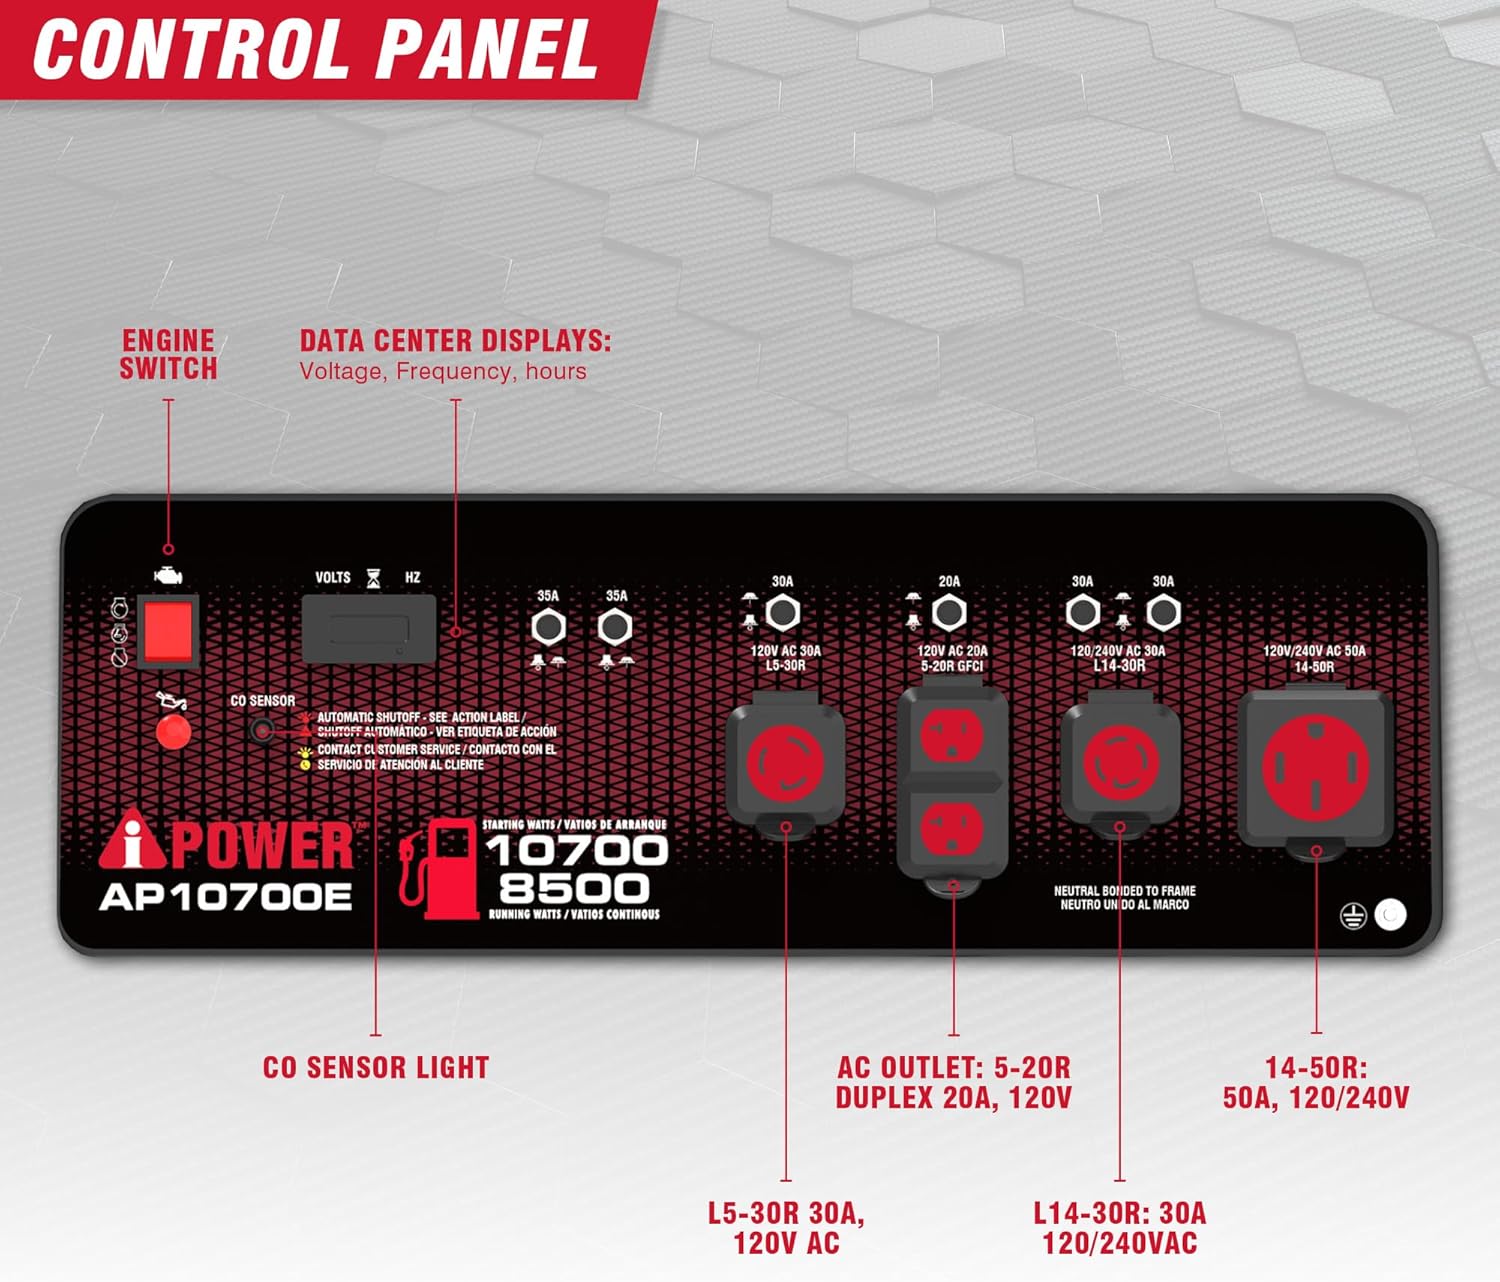

4.2 Starting the Generator (Electric Start)
- Ensure all electrical loads are disconnected from the generator.
- Turn the fuel valve to the 'ON' position.
- Set the engine switch to 'ON'.
- If the engine is cold, move the choke lever to the 'CHOKE' position.
- Press and hold the electric start button until the engine starts.
- Once the engine starts, slowly move the choke lever to the 'RUN' position.
4.3 Starting the Generator (Recoil Start)
- Follow steps 1-4 from the Electric Start procedure.
- Grasp the recoil starter handle firmly and pull it slowly until resistance is felt, then pull quickly and smoothly.
- Repeat until the engine starts.
- Once the engine starts, slowly move the choke lever to the 'RUN' position.
4.4 Connecting Electrical Loads
After the generator has been running for a few minutes and is stable, you can connect your electrical devices.
- Ensure the total wattage of connected devices does not exceed the generator's running wattage.
- Plug in your devices one at a time.
- Monitor the digital data center for voltage and frequency readings.
4.5 Shutting Down the Generator
- Disconnect all electrical loads from the generator.
- Allow the generator to run for a few minutes without load to cool down.
- Turn the engine switch to 'OFF'.
- Turn the fuel valve to the 'OFF' position.
4.6 Official Product Video
5. Maintenance
Regular maintenance is crucial for the longevity and reliable performance of your generator. Always ensure the generator is off and cooled down before performing any maintenance.
5.1 Maintenance Schedule
| Item | Every Use | Every 50 Hrs / Monthly | Every 100 Hrs / 6 Months | Every 300 Hrs / Annually |
|---|---|---|---|---|
| Check Engine Oil Level | ✓ | |||
| Change Engine Oil | ✓ (First 20 Hrs) | ✓ | ||
| Clean Air Filter | ✓ | |||
| Check Spark Plug | ✓ | |||
| Replace Spark Plug | ✓ | |||
| Check Fuel Filter | ✓ |
5.2 Storage
For long-term storage (more than 30 days), proper preparation is essential to prevent fuel degradation and engine damage.
- Drain the fuel tank and carburetor.
- Add a fuel stabilizer if draining is not possible.
- Change the engine oil.
- Remove the spark plug and pour a small amount of engine oil into the cylinder, then slowly pull the recoil starter a few times to distribute the oil. Reinstall the spark plug.
- Clean the generator thoroughly.
- Store in a clean, dry, well-ventilated area.
6. Troubleshooting
This section provides solutions for common issues you might encounter with your generator.
| Problem | Possible Cause | Solution |
|---|---|---|
| Engine will not start | No fuel Low oil level Engine switch OFF Choke not set correctly Spark plug issue Battery low (electric start) | Add fuel Add oil Turn engine switch ON Adjust choke Inspect/clean/replace spark plug Charge/replace battery |
| No power output | Circuit breaker tripped Overload Faulty outlet | Reset circuit breaker Reduce load Contact service for outlet repair |
| Engine runs rough | Stale fuel Dirty air filter Spark plug fouled | Drain and refill with fresh fuel Clean/replace air filter Clean/replace spark plug |
| CO Sensor light active | High carbon monoxide levels detected | Move generator to a well-ventilated outdoor area immediately. Allow to clear before restarting. |
7. Specifications
| Specification | Detail |
|---|---|
| Brand | A-iPower |
| Model Name | AP10700E |
| Starting Wattage | 10700 Watts |
| Running Wattage | 8500 Watts |
| Engine Type | 459cc OHV 4-Stroke |
| Fuel Type | Gasoline |
| Power Source | Fuel Powered |
| Voltage | 120 Volts / 240 Volts |
| Product Dimensions | 28.7"L x 21.9"W x 27.8"H |
| Item Weight | 255 pounds |
| Material | Aluminum (frame) |
| Special Feature | Automatic Idle Control, CO Sensor |
| Included Components | Generator, Owners Manual, Quick Start Guide, Toolkit |
8. Warranty
A-iPower stands behind its products and offers a 2-year limited manufacturer's warranty for the AP10700E portable generator. This warranty covers defects in material and workmanship under normal use and service. Please refer to the warranty card included with your product or visit the official A-iPower website for full terms and conditions.
9. Support
For technical assistance, parts, or warranty claims, please contact A-iPower customer support. Have your model number (AP10700E) and serial number ready when contacting support.
- Website: Visit the official A-iPower website for FAQs, support documents, and contact information.
- Phone: Refer to your quick start guide or the A-iPower website for the most current customer service phone number.


