HTLNUZD TX15 Max Radio Controller
RadioMaster TX15 Max V5.0 RC Transmitter Instruction Manual
Model: TX15 Max Radio Controller | Brand: HTLNUZD
Introduction
The RadioMaster TX15 Max V5.0 is a high-performance 16-channel 2.4G RC transmitter designed for FPV and other remote-controlled applications. It features an ELRS internal RF module, a 3.5-inch IPS touchscreen, AG02 CNC Hall gimbals, and supports OpenTX/EdgeTX firmware. This manual provides essential information for the setup, operation, and maintenance of your TX15 Max transmitter.
Safety Information
Always operate the transmitter in a safe environment, away from obstacles, people, and animals. Ensure all connections are secure before operation. Do not expose the device to extreme temperatures, moisture, or direct sunlight for prolonged periods. Always follow local regulations regarding radio-controlled devices. Disconnect the battery when the transmitter is not in use.
Package Contents
Upon unpacking, verify that all items listed below are present and in good condition:
- 1 x TX15 Max Radio Controller
- 1 x Signature Carry Case
- 1 x Short 2-position Latching Shoulder Toggle Switch Assembly
- 1 x Short 2-position Momentary Shoulder Toggle Switch Assembly
- 1 x 18650 Battery Tray
- 1 x USB-C Cable
- 1 x Screen Protector
- 1 x 1.5mm Hex Wrench
- 4 x High Tension Gimbals Springs
- 2 x Gimbal Stick Set Screw
- 1 x Stickers Set
- 1 x User Manual (this document)
- 1 x Inventory Card

Image: The TX15 Max Radio Controller shown with its signature carry case, battery tray, USB-C cable, screen protector, hex wrench, gimbal springs, stick set screws, stickers, and user manual.
Product Overview
The TX15 Max features a robust design with advanced components for precise control and enhanced user experience.

Image: A visual representation of three TX15 Max transmitters (black, red, gold), emphasizing the AG02 CNC Hall Gimbals with quad precision bearings and adjustable travel, along with customizable RGB gimbal lighting and CNC metal keys.
Key Features:
- STM32 H7 Chip: Provides fast EdgeTX control, instant model switching, and quick script execution.
- ELRS Internal RF Module: LR1121 transceiver supports 2.4GHz/900MHz for long-range communication.
- AG02 CNC Hall Gimbals: Precision gimbals with adjustable vertical and horizontal travel for superior control.
- 3.5-inch IPS Touchscreen: High-visibility display (480 x 320 resolution, 600 nits) for clear viewing even in direct sunlight.
- Built-in Gyro: Features ICM-42607-C gyro with TiltX/TiltY for advanced control.
- Customizable Switches: Includes momentary and two-position shoulder toggle switches for versatile operation.
- 4GB Built-in Flash Memory: For firmware and model storage, expandable with MicroSD card (not included).
- USB-C Connectivity: Supports charging, data transmission, and use as a USB joystick (HID) for simulators.
- Powerful Cooling System: Low-noise, high-output fans with an aluminum heat sink to maintain optimal operating temperature.

Image: Front view of the TX15 Max transmitter, highlighting the gimbals, switches, and screen, alongside side views showing the ergonomic grip and overall profile.

Image: Detailed view of the 3.5-inch high-visibility color touchscreen, demonstrating its clarity. Below, the single USB-C port is shown with its multiple functions: data transmission, charging, and simulator connectivity (USB Joystick HID, USB Storage SD, USB Serial VCP).

Image: Illustration of the powerful cooling system with low-noise, high-output fans and an aluminum heat sink. Also shown is the smart active balance charging system, designed to prevent overcharging and extend battery life for 18650 cells.
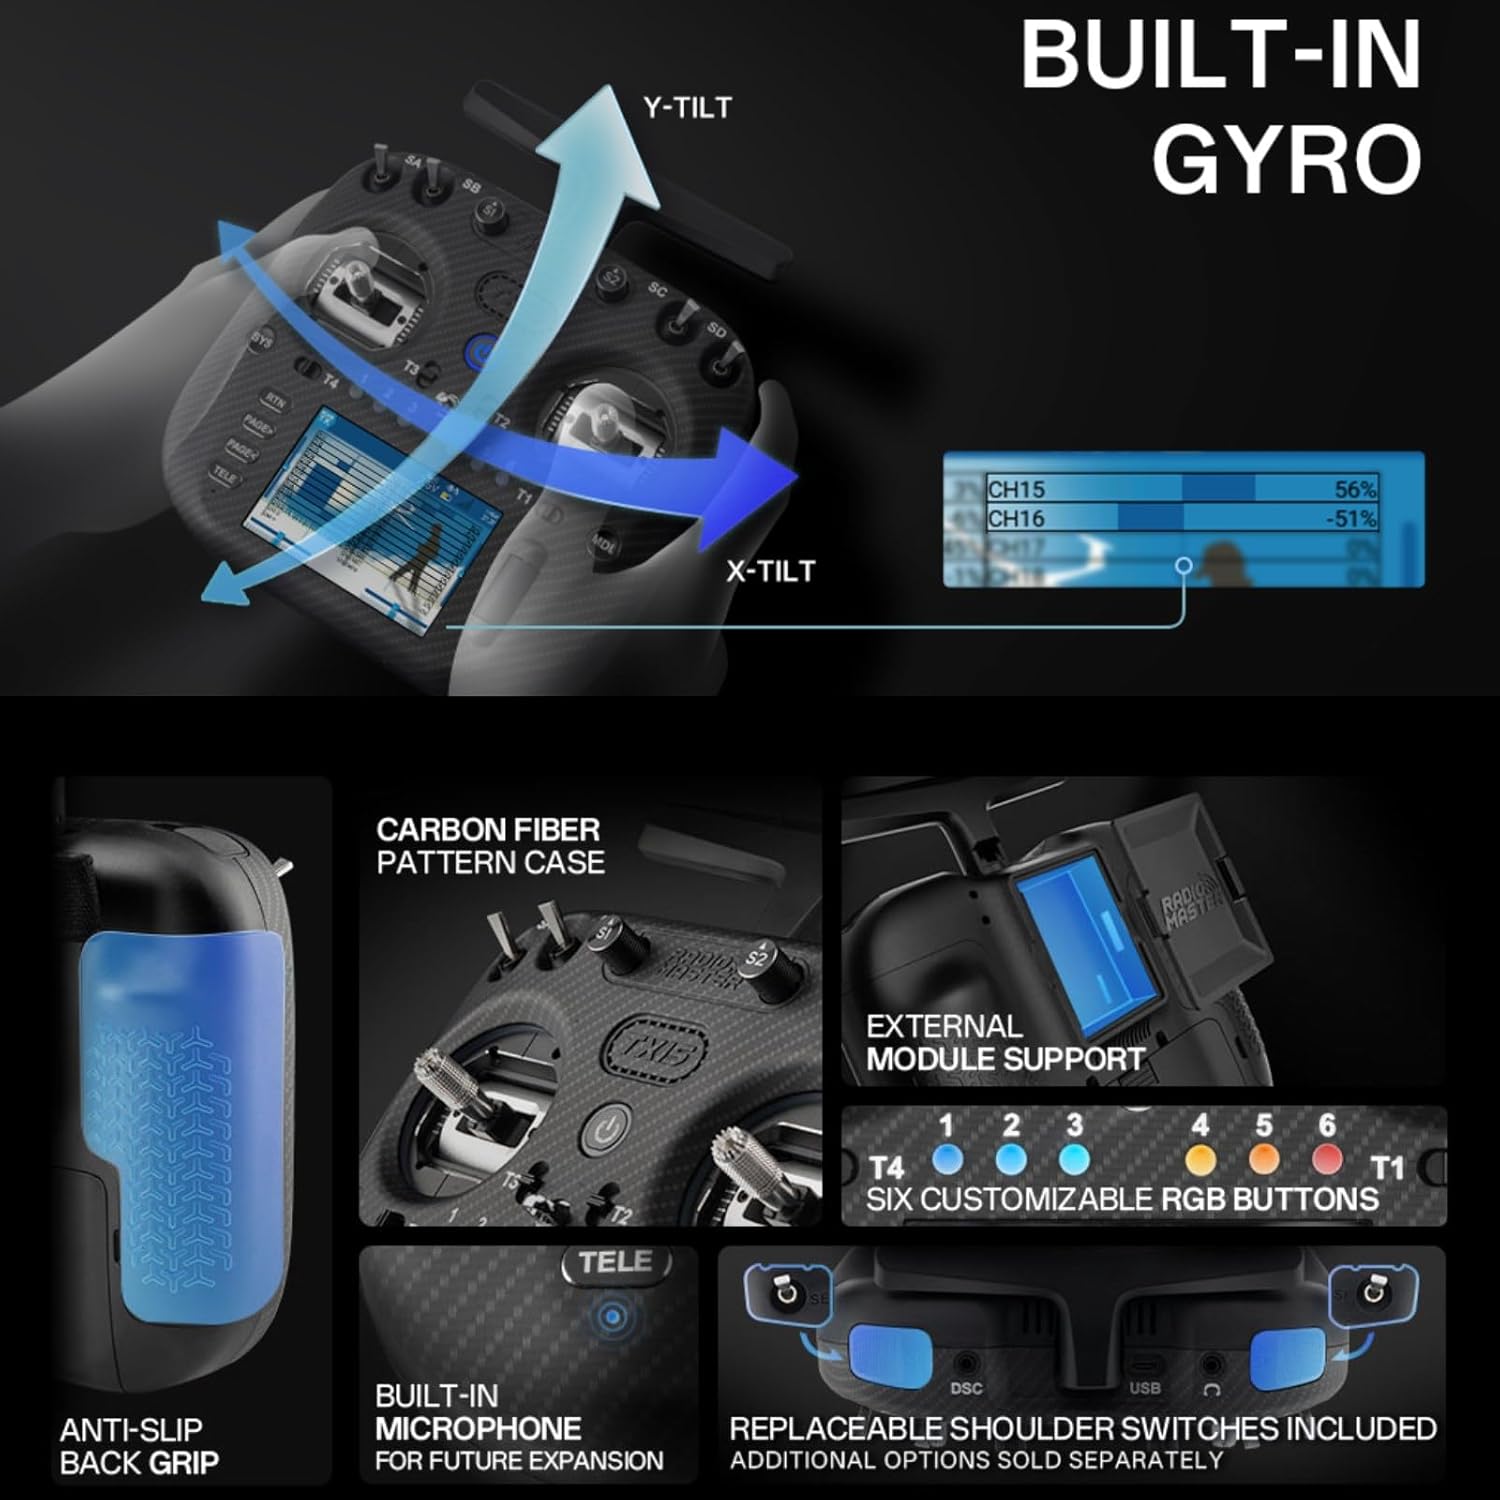
Image: A composite image detailing several features: the built-in gyro with X-tilt and Y-tilt indicators, the carbon fiber pattern case, support for external modules, six customizable RGB buttons, an anti-slip back grip, a built-in microphone (for future expansion), and replaceable shoulder switches (included).
Setup
1. Battery Installation
The TX15 Max requires a 7.4V 2-cell Lithium-Polymer battery, two 3.7V 18650 Lithium-Ion cells, or a 21700 5000mAh battery (batteries not included). If using 18650 cells, insert them into the provided 18650 battery tray, ensuring correct polarity. Then, connect the battery tray or LiPo battery to the internal battery connector within the battery compartment of the transmitter. Secure the battery compartment cover.
2. Initial Power On
Press and hold the power button located on the front of the transmitter until the screen illuminates. The transmitter will boot into the EdgeTX firmware. Follow any on-screen prompts for initial setup, such as language selection and calibration.
3. Firmware and Module Configuration
The TX15 Max comes pre-installed with EdgeTX firmware (version 3.0.0 or later required) and ExpressLRS module firmware. For optimal performance, ensure both are up to date. Firmware updates can be performed via the USB-C port using the UF2 method. Refer to the official EdgeTX and ExpressLRS documentation for detailed update procedures.
Operating Instructions
1. Basic Controls
- Gimbals (AG02 CNC Hall Gimbals): Control the primary movements of your RC model. The gimbals offer precise control and can be adjusted for tension and travel.
- Switches (SA, SB, SC, SD, T1-T6): Utilize the various toggle and momentary switches for auxiliary functions, flight modes, or arming/disarming your model. The included short 2-position latching and momentary shoulder toggle switches can be installed as desired.
- Buttons (SYS, RTN, PAGE+, PAGE-, TELE, MDL): Navigate the EdgeTX menu system, access telemetry data, and manage models.
2. Touchscreen Navigation
The 3.5-inch IPS touchscreen allows for intuitive navigation of the EdgeTX interface. Tap icons and menus to select options, and swipe to move between screens. The screen's high brightness ensures visibility in various lighting conditions.
3. Connectivity
- USB-C Port: Connect the transmitter to a computer using the supplied USB-C cable for:
- Charging: Recharge the internal battery.
- Data Transmission: Access the internal 4GB flash memory or an inserted MicroSD card.
- Simulator Use (USB Joystick HID): Use the transmitter as a controller for flight simulators.
- Module Bay: The JR-compatible module bay allows for the installation of additional external RF modules, expanding compatibility with other protocols if needed.
Maintenance
1. Cleaning
Wipe the transmitter's exterior with a soft, dry cloth. For stubborn dirt, a slightly damp cloth can be used, ensuring no moisture enters openings. Avoid using harsh chemicals or abrasive cleaners.
2. Battery Care
The TX15 Max features smart active balance charging to prevent overcharging and extend battery life. Always use the recommended charging methods. Store the transmitter with the battery at a storage voltage (typically around 3.8V per cell for LiPo/Li-Ion) if it will not be used for an extended period.
3. Firmware Updates
Regularly check for firmware updates for both EdgeTX and ExpressLRS. Updates often include new features, bug fixes, and performance improvements. Connect the transmitter to your computer via USB-C and follow the official update guides provided by EdgeTX and ExpressLRS communities.
Troubleshooting
- Transmitter does not power on: Ensure the battery is correctly installed and fully charged. Check the battery voltage.
- No signal to receiver: Verify that the internal RF module (ELRS) is active and correctly bound to your receiver. Check antenna connection. Ensure both transmitter and receiver are on the same frequency and protocol.
- Gimbals not responding correctly: Perform a gimbal calibration through the EdgeTX menu. Check for any physical obstructions or damage to the gimbals.
- Touchscreen unresponsive: Try restarting the transmitter. If the issue persists, a firmware re-flash might be necessary.
- USB-C connectivity issues: Ensure you are using a data-capable USB-C cable. Try a different USB port on your computer.
For more detailed troubleshooting, consult the extensive documentation and community forums for EdgeTX and ExpressLRS, which are widely supported.
Specifications

Image: A table detailing the specifications of the TX15 Max Radio Controller, including size, weight, frequency, internal RF, display, battery, gimbals, and more. Below the table, a diagram illustrates the physical dimensions of the transmitter (178.0mm height, 168.0mm width, 81.0mm depth).
| Feature | Detail |
|---|---|
| Item | TX15 Max Radio Controller |
| Size | 178 x 168 x 81 mm (6.61 x 3.19 x 7.01 inches) |
| Weight | 672g (without battery) |
| Color Options | Red, Black, Gold |
| Frequency | 2.400GHz OR Sub-G 900MHz |
| Internal RF Module | ExpressLRS LR1121 (2.4GHz / 900MHz) |
| Supported Protocols | Express-LRS |
| Cooling Fan | Yes |
| Built-in Flash Size | 4GB |
| Built-in Microphone | Yes (Future expansion) |
| Built-in Gyro | Yes (ICM-42607-C) |
| MicroSD Card | Not included; 32GB/FAT32 recommended (disables onboard flash) |
| Antenna Gain | 2dB (transmit power adjustable) |
| Current | 875mA at max power output |
| Voltage Range | 6.6 - 8.4V DC |
| Radio Firmware | EdgeTX (requires version 3.0.0 or later) |
| Module Firmware | ExpressLRS |
| Channels | Max 16 channels (Receiver dependent) |
| Display | 3.5-inch IPS touchscreen (480 x 320 resolution) |
| Battery Type | 7.4V 2-cell Lithium-Polymer / Two 3.7V 18650 Lithium-Ion cells / 21700 5000mAh Battery (batteries not included) |
| Connectivity | USB-C |
| Gimbals | AG02 CNC Hall sensor gimbals |
| Gimbal Sticks | M4 |
| Upgrade Method | USB-C (UF2) |
| Module Bay | JR-compatible module bay |
Warranty and Support
For warranty information, please refer to the terms and conditions provided by the retailer or manufacturer at the time of purchase. For technical support, firmware updates, and community resources, visit the official websites for EdgeTX and ExpressLRS, as well as the manufacturer's support channels. These communities offer extensive documentation, tutorials, and forums to assist users.
Manufacturer: HTLNUZD