1. Introduction
The Awgem SH1 Handheld Spot Welder is designed for precise and efficient spot welding tasks, particularly for battery pack assembly and repair. Its integrated ergonomic design allows for one-handed operation, enhancing efficiency for various DIY and professional applications.
Product Application Range
- Replacement of batteries in devices where non-replaceable rechargeable batteries are exhausted.
- Spot welding of nickel plate sheets to battery cells.
- Suitable for various cylindrical lithium batteries (e.g., 18650, 26650, 32650), mobile phone batteries, NiMH batteries, and NiCd batteries.
- Supports welding of nickel-plated plates with a thickness of 0.1-0.2 mm.

Image: The Awgem SH1 Handheld Spot Welder is ideal for cylindrical batteries (18650, 26650, 32650) and mobile phone battery repair. It offers approximately 200+ spot welds on a 2.5-hour full charge.
2. Safety Precautions
- Temperature Warning: Ensure the welding temperature is normal before charging the device. Charging the device when its temperature is too high can cause irreversible damage to the battery.
- Low Voltage Alarm: The device features an automatic red light alarm when the internal battery cell voltage drops below 3.2V. Recharge the device promptly.
- Overheating Protection: If the device temperature reaches or exceeds 65℃, the welding point will be forcibly cut off, and a blue light warning will activate. Allow the device to cool down before resuming operation.
- Eye Protection: Always wear appropriate eye protection during spot welding to prevent injury from sparks.
- Material Compatibility: This spot welder is designed for thin metal tabs, primarily nickel-plated sheets. Do not attempt to weld thicker metals or use it as a substitute for soldering irons or arc welders.
3. Package Contents
Verify that all items are present in the package:
- 1 x Awgem SH1 Battery Spot Welder
- 2 pairs of Spot Welding Needles (including those pre-installed on the device)
- 1 x 2m Nickel-plated Sheet
- 1 x Sandpaper
- 1 x Charging Cable (Type-C)
- 1 x Instruction Manual (This document)
4. Product Overview
Familiarize yourself with the components and controls of your Awgem SH1 Handheld Spot Welder.

Image: Detailed diagram of the Awgem SH1 Handheld Spot Welder, highlighting its various indicators, buttons, and the integrated spot welding pen with adjustable tip spacing.
- Gear Indicator Lights: Display the selected welding power level (11 gears).
- Manual Mode Indicator Light: Illuminates when manual welding mode is active.
- Auto Mode Indicator Light: Illuminates when automatic welding mode is active.
- Battery Indicator: Shows the remaining battery charge.
- Gear Adjustment Button: Used to cycle through the 11 power levels.
- Type-C Input Interface: For charging the device.
- ON/OFF Key / Manual Mode Button: Long press to power on/off. Short press to trigger a weld in manual mode. Long press to switch between manual/automatic modes.
- Spot Welding Pen: Integrated welding electrodes.
- Pen Tip Spacing: Adjustable from 0.5mm to 3mm.
5. Setup
5.1 Charging the Device
- Connect the provided Type-C charging cable to the device's input interface.
- Connect the other end of the cable to a suitable USB power adapter (not included).
- The battery indicator lights will show charging progress. Ensure the device is at a normal temperature before charging to prevent battery damage.
5.2 Installing and Adjusting Welding Needles
The Awgem SH1 features an integrated welding pen design. The welding needles are replaceable and their spacing can be adjusted.

Image: The welding spacing is adjustable. A wider spacing decreases welding strength, while a narrower spacing improves it. Adjust the distance between the solder pins by moving them up and down.
- To adjust the spacing, gently push or pull the individual welding pins up or down.
- A wider spacing may decrease welding strength, while a narrower spacing can improve it. Adjust according to your specific welding needs and material thickness.
- To replace needles, carefully unscrew the old needles and screw in the new ones, ensuring they are securely fastened.
6. Operation
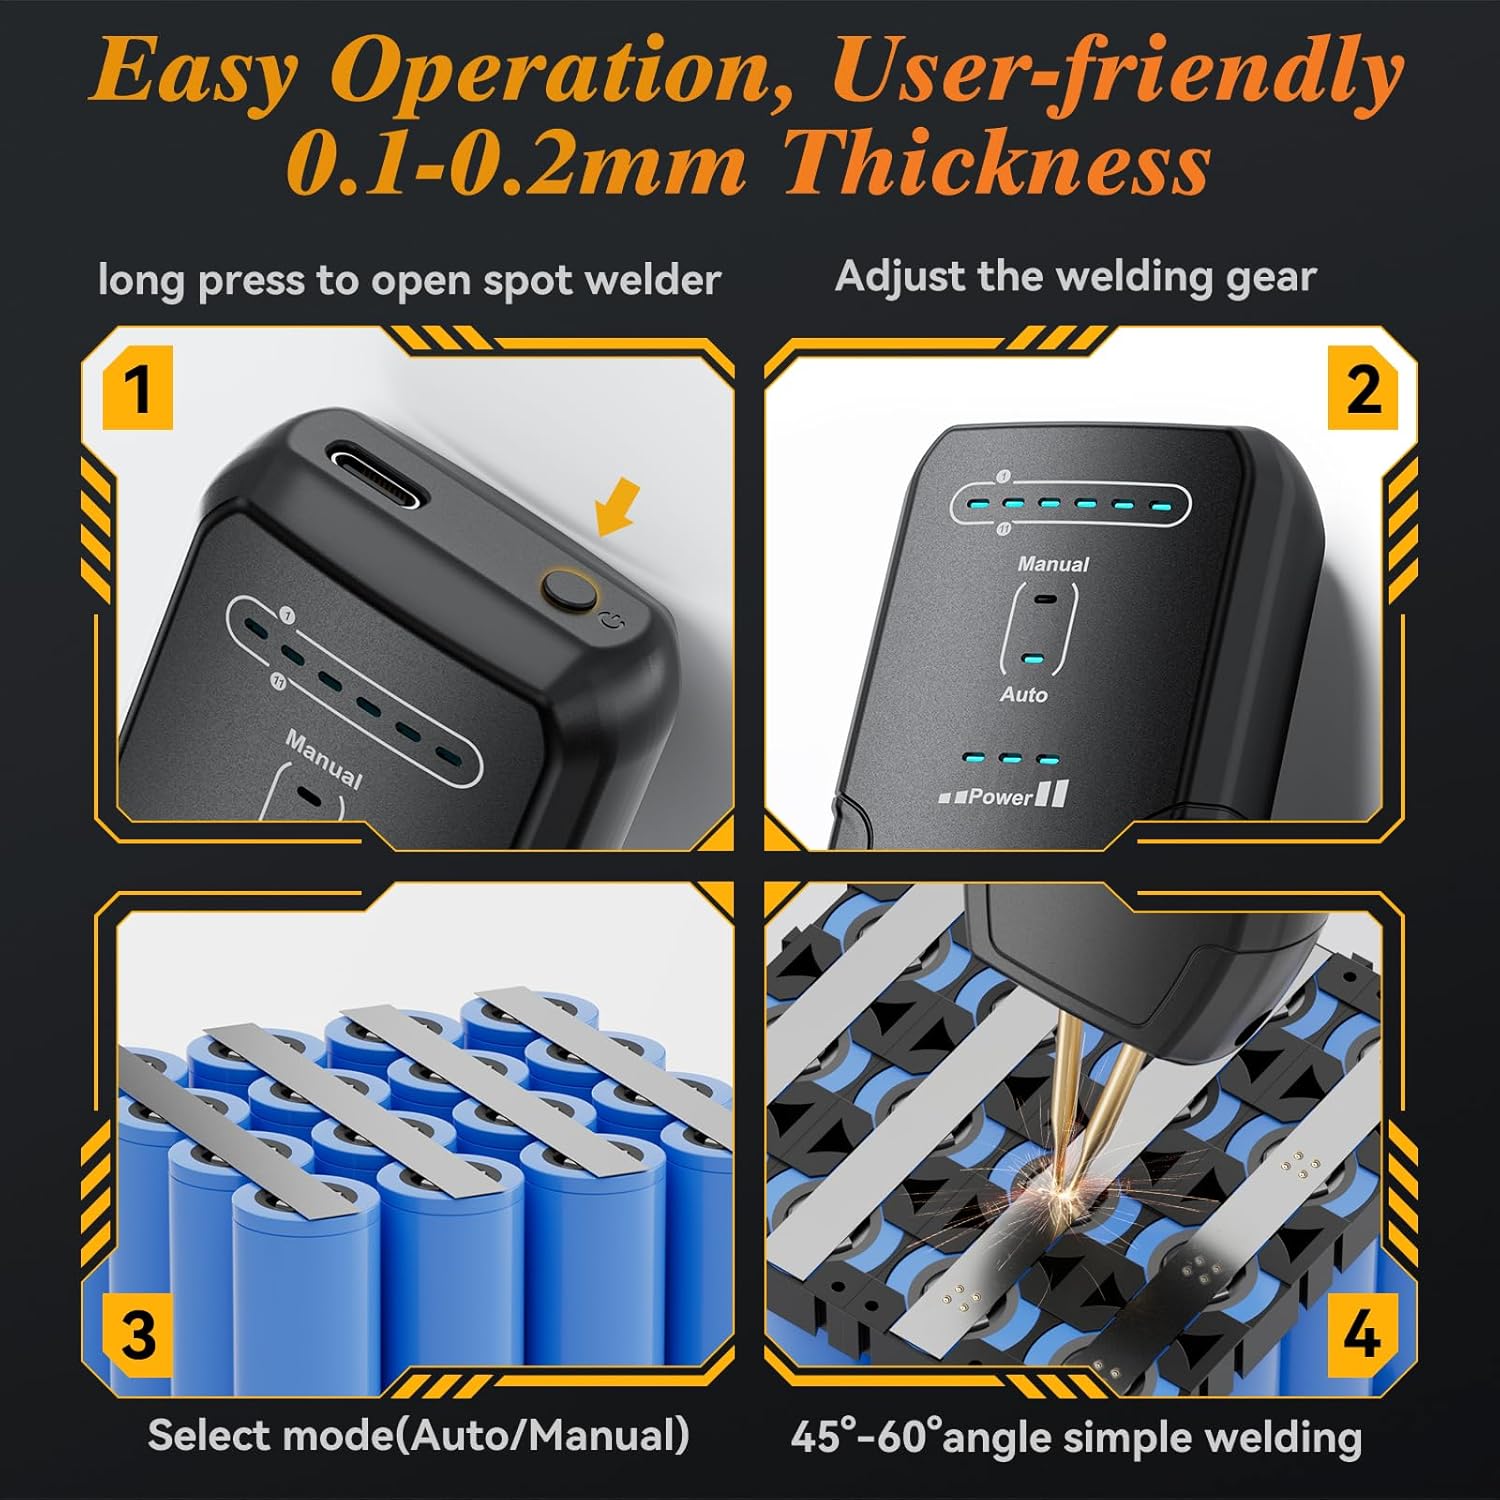
Image: Easy operation steps for the Awgem SH1 spot welder, demonstrating power on, gear adjustment, mode selection, and proper welding angle.
6.1 Powering On/Off
- To Power On: Long press the ON/OFF Key / Manual Mode Button until the indicator lights illuminate.
- To Power Off: Long press the ON/OFF Key / Manual Mode Button until the indicator lights turn off.
6.2 Adjusting Welding Gear (Power Levels)
- The Awgem SH1 features 11 adjustable power levels (gears).
- Press the Gear Adjustment Button to cycle through the power levels. The Gear Indicator Lights will show the currently selected level.
- Start with a lower gear for thinner materials and gradually increase for thicker materials or stronger welds.
6.3 Selecting Operating Mode (Automatic/Manual)
- Long press the ON/OFF Key / Manual Mode Button to switch between Automatic (Auto) and Manual modes.
- Automatic Mode: The welder will automatically detect contact with the welding material and initiate a weld pulse. This mode is suitable for general use and intelligently matches common battery sheets.
- Manual Mode: A weld pulse is initiated only when the ON/OFF Key / Manual Mode Button is pressed. This mode offers precise control for detailed welding work.
6.4 Welding Procedure
- Ensure the battery surfaces and nickel strips are clean and free of oxidation. Use sandpaper if necessary.
- Select the appropriate welding gear based on the thickness of the nickel strip (refer to section 6.5).
- Choose either Automatic or Manual welding mode.
- Position the two welding pins firmly and evenly on the nickel strip, ensuring good contact with the battery terminal underneath. Maintain a 45°-60° angle for optimal results.
- In Automatic mode, the weld will trigger automatically after a short delay upon contact. In Manual mode, press the ON/OFF Key / Manual Mode Button to initiate the weld.
- After the weld, lift the welder straight up. Inspect the weld spot for strength and consistency.
6.5 Welding Thickness Guidelines
The 11-gear adjustment allows for precise welding of various nickel sheet thicknesses. The following are general guidelines:

Image: The Awgem SH1 offers 11 gear power settings for precise welding. It can easily weld 0.1-0.2mm thick nickel sheets for battery packs. Maximum weldable thicknesses for various materials are also shown.
- Nickel-plated sheets: Up to 0.25mm (MAX)
- Iron sheets: Up to 0.2mm (MAX)
- Steel sheets: Up to 0.2mm (MAX)
- Pure nickel sheets: Up to 0.15mm (MAX)
Note: Always perform test welds on scrap material to determine the optimal gear setting for your specific application and material.
7. Maintenance
7.1 Cleaning
- After use, ensure the device is powered off and cool.
- Wipe the exterior of the welder with a clean, dry cloth.
- Gently clean the tips of the welding needles to remove any residue. Use the provided sandpaper if necessary to maintain clean contact surfaces.
7.2 Replacing Welding Needles
The welding needles are consumables and will wear down over time. Replace them when they become excessively worn or damaged to ensure consistent weld quality.
- Ensure the device is powered off.
- Carefully unscrew the worn welding needles from the integrated pen.
- Screw in new replacement needles, ensuring they are tightened securely but not over-tightened.
- Adjust the tip spacing as needed (refer to section 5.2).
8. Troubleshooting
- Device not powering on: Ensure the battery is charged. Connect to a charger and allow sufficient time for charging.
- Weak or inconsistent welds:
- Increase the welding gear (power level).
- Ensure welding needles are clean and sharp. Use sandpaper to clean tips.
- Verify good contact between needles, nickel strip, and battery terminal. Apply firm, even pressure.
- Check battery charge level; low battery can affect weld strength.
- Adjust needle spacing for improved welding strength (narrower spacing).
- Red light alarm (low voltage): The internal battery voltage is below 3.2V. Recharge the device immediately.
- Blue light warning (overheating): The device temperature is ≥65℃. Stop operation and allow the welder to cool down completely before resuming.
- No weld in Automatic mode: Ensure the device is making proper contact with the material. Check if the mode is correctly set to Automatic.
- No weld in Manual mode: Ensure the ON/OFF Key / Manual Mode Button is being pressed firmly to trigger the weld.
9. Specifications
| Feature | Specification |
|---|---|
| Model Number | SH1 |
| Shell Material | Plastic |
| Weight | 140 grams (device only), 717 g (item weight including packaging) |
| Dimensions | 165mm x 45mm x 35mm (approx. 7.62 x 2.54 x 15.24 cm) |
| Battery Capacity | 1800mAh (Lithium Polymer) |
| Wattage | 2200 milliamp_hours (likely refers to output capacity or equivalent) |
| Power Source | Battery Powered |
| Gear Adjustment | 11 Gears |
| Welding Modes | Automatic / Manual |
| Supported Nickel Sheet Thickness | 0.1 - 0.2 mm (general), up to 0.25mm for nickel plating |
| Pen Tip Spacing | Adjustable 0.5 - 3 mm |
| Upper Temperature Rating | 65 Degrees Celsius (Overheat protection activates) |
10. Warranty and Support Information
Specific warranty details for the Awgem SH1 Handheld Spot Welder are not provided in this manual. For warranty claims, technical support, or service inquiries, please refer to the retailer or manufacturer's official website where the product was purchased. Keep your proof of purchase for any warranty-related matters.


