
1. Introduction
The Waveshare ESP32-P4-ETH is a high-performance development board based on the ESP32-P4 chip. It is designed for various applications requiring advanced processing power, rich human-machine interfaces, and versatile connectivity. This manual provides essential information for setting up, operating, and maintaining your development board.
Key features include:
- High-performance MCU with RISC-V 32-bit dual-core and single-core processors.
- Memory and Storage: 128 KB HP ROM, 16 KB LP ROM, 768 KB HP L2MEM, 32 KB LP SRAM, and 8 KB TCM.
- Image and Voice Processing: Supports JPEG codecs, Pixel Processing Accelerator (PPA), Image Signal Processor (ISP), and H.264 video encoder.
- Integrated Peripherals: MIPI-CSI, MIPI-DSI, USB 2.0 OTG, Ethernet, SDIO 3.0 TF card slot, microphone, and speaker header.
- Security Features: Secure Boot, Flash Encryption, cryptographic accelerators, TRNG, and hardware access protection.
2. Package Contents
Verify that all items listed below are included in your package. The specific components may vary slightly depending on the kit version (e.g., KIT-A or KIT-B).

Figure 2.1: Included components for the ESP32-P4-POE-ETH-KIT-A.
- ESP32-P4-ETH-M Development Board (with pre-soldered headers)
- PoE module
- Screws pack
- 8Ω 2W speaker
- Pi5-Camera-Cable-200mm
- FFC 15PIN cable
- MX1.25 4PIN to USB cable
- RPi Camera (B)
3. Specifications
The following table details the technical specifications of the Waveshare ESP32-P4-ETH Development Board and its bundled components.
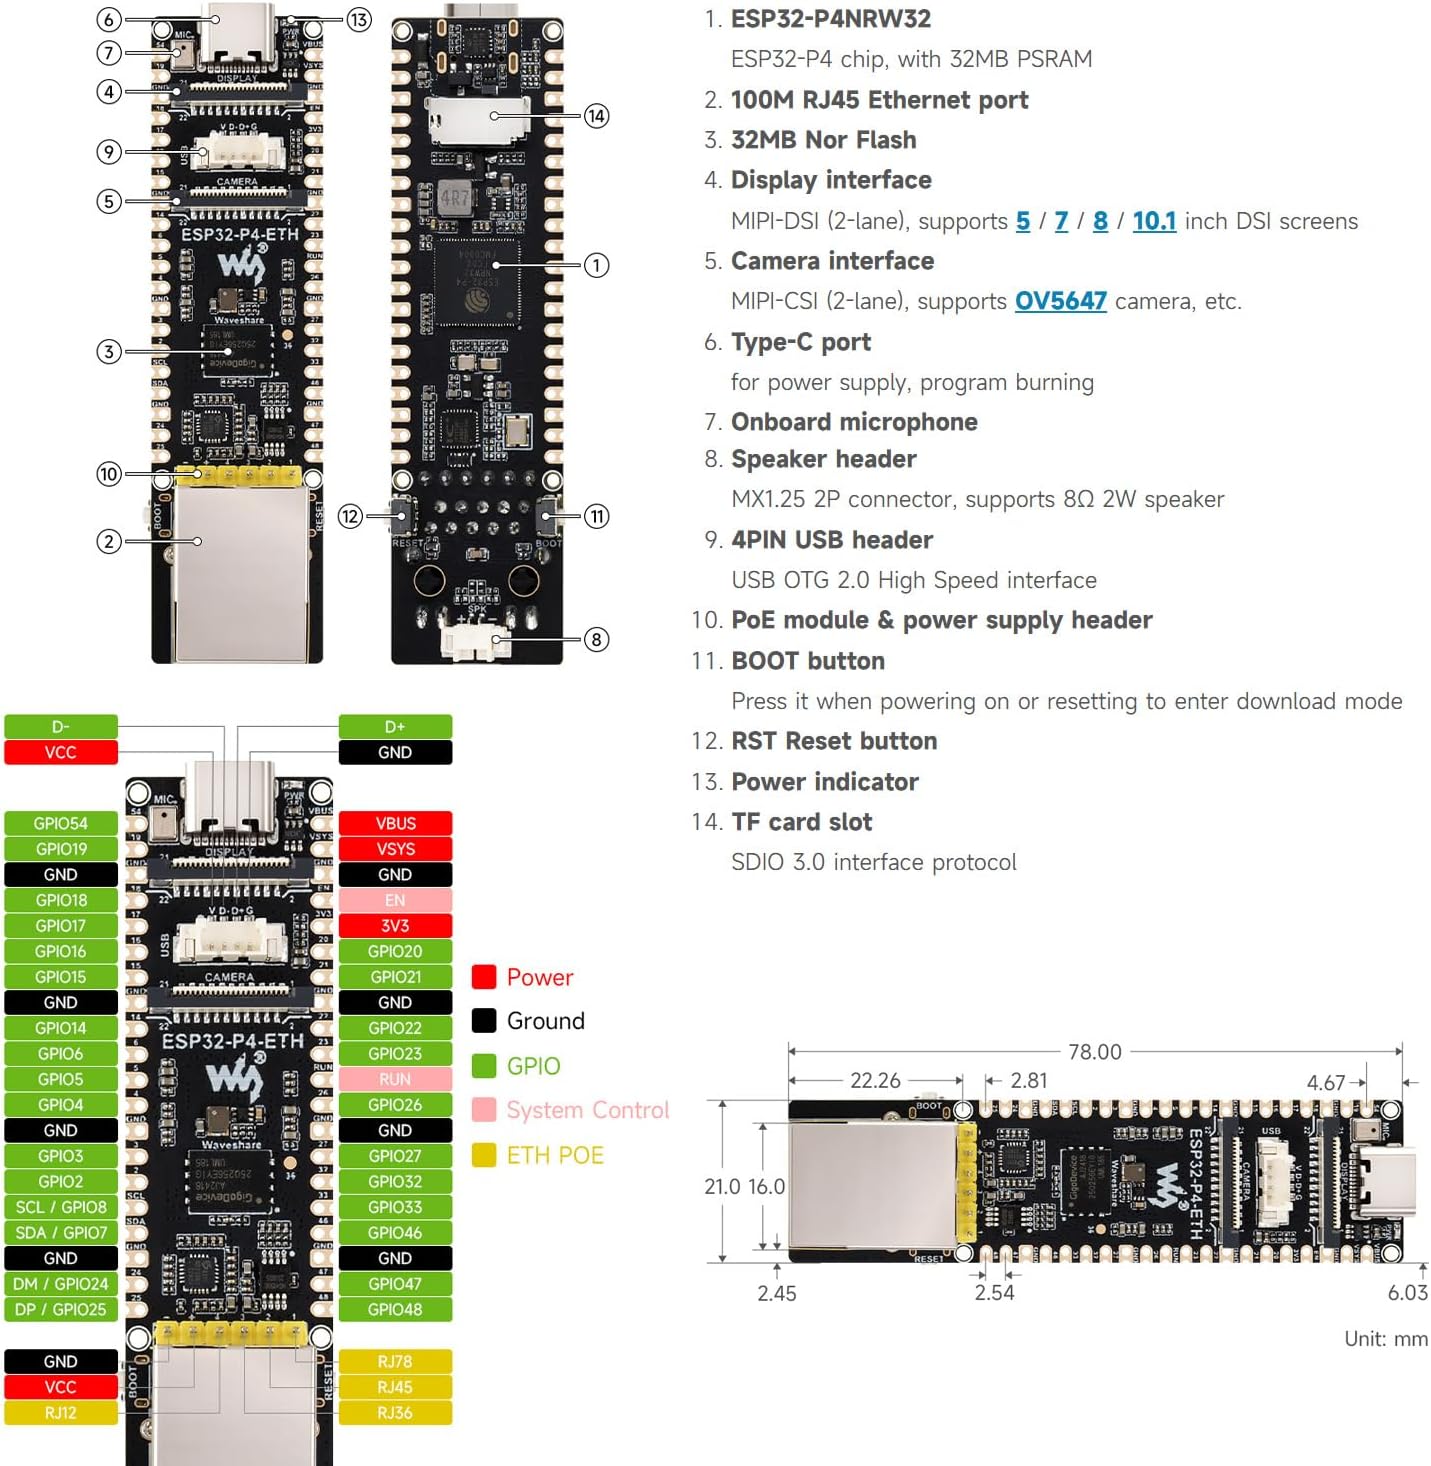
Figure 3.1: ESP32-P4-ETH Board Layout and Dimensions.
| Feature | Description |
|---|---|
| Brand | Waveshare |
| Model Name | ESP32-P4-POE-ETH-KIT-A |
| MCU | RISC-V 32-bit dual-core and single-core processors |
| Memory | 128 KB HP ROM, 16 KB LP ROM, 768 KB HP L2MEM, 32 KB LP SRAM, 8 KB TCM, 32MB PSRAM |
| Flash | 32MB Nor Flash |
| Ethernet Port | 100 Mbps RJ45 |
| Display Interface | MIPI-DSI (2-lane) for 5/7/8/10.1 inch DSI screens |
| Camera Interface | MIPI-CSI (2-lane) supports OV5647 camera |
| USB Port | USB 2.0 OTG Type-C |
| Audio | Onboard microphone, Speaker header (MX1.25 2P connector, supports 8Ω 2W speaker) |
| Storage | TF card slot (SDIO 3.0 interface) |
| Power Supply | USB Type-C, PoE (with optional PoE module) |
| GPIOs | Adapting 2*20 GPIO headers with 27 remaining programmable GPIOs |
| Dimensions | 78.00 mm x 21.0 mm (approximate, refer to diagram for details) |
Raspberry Pi Camera (B) Specifications

Figure 3.2: Raspberry Pi Camera (B) details.
| Feature | Description |
|---|---|
| Sensor | OV5647 |
| Pixels | 5MP |
| CMOS Size | 1/4 inch |
| Aperture | F2.0 |
| Focal Length | 6mm |
| Field of View | 60.6° |
| Night Vision | Not Supported |
| Focusing | Manual Focus |
4. Setup
This section guides you through the initial setup of your ESP32-P4-ETH Development Board and its peripherals.
4.1 Power Supply
The board supports two power supply methods:
- USB Type-C: Connect a 5V USB power adapter to the USB Type-C port on the board.
- PoE (Power over Ethernet): If using the optional PoE module, connect it to the board and then connect an 802.3af-compliant PoE router or switch to the RJ45 Ethernet port. This provides both network connection and power through a single Ethernet cable.

Figure 4.1: Power Supply Options.

Figure 4.2: PoE Module Connection.
4.2 Peripheral Connections
Connect the camera, speaker, and other peripherals as required for your application. Refer to the connection examples below for guidance.
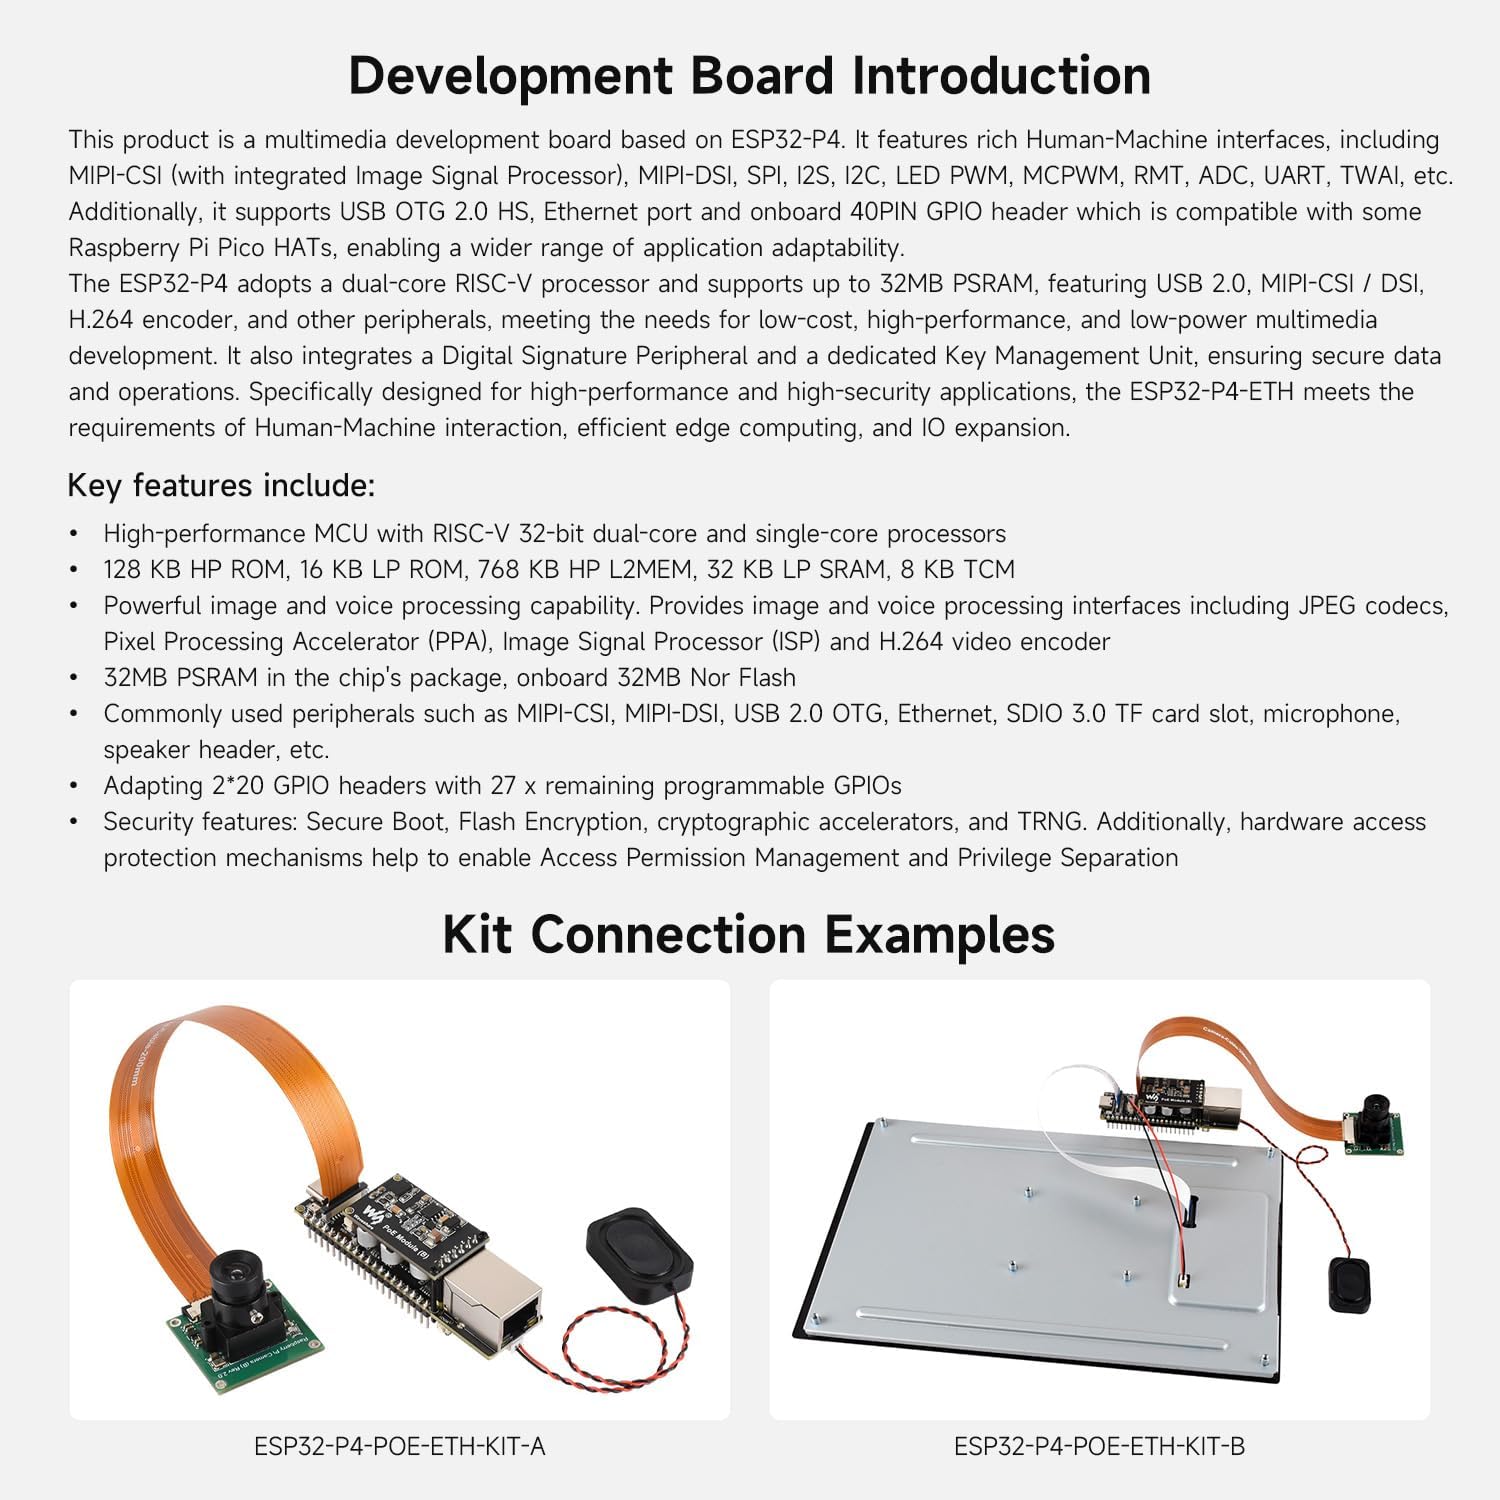
Figure 4.3: Kit Connection Examples (KIT-A).
- Camera: Connect the RPi Camera (B) to the MIPI-CSI interface using the provided camera cable.
- Speaker: Connect the 8Ω 2W speaker to the speaker header on the board.
- Display (Optional): If using a DSI display (e.g., 10.1-DSI-TOUCH-A, typically included in KIT-B), connect it to the MIPI-DSI interface.
5. Operating Instructions
Once the board is powered and peripherals are connected, you can begin developing and operating your applications.
5.1 Initial Boot and Programming
- Connect the board to your computer via the USB Type-C port for power and data communication.
- To enter download mode for programming, press the BOOT button while powering on or resetting the board.
- Refer to the official Waveshare Wiki resources for detailed programming guides and SDK information. A link to the Wiki can be found on the Waveshare store page.
5.2 AI Speech Interaction
The ESP32-P4-ETH board supports AI speech interaction, allowing access to online large model platforms such as DeepSeek and Doubao. This functionality utilizes the onboard microphone and can output responses via a connected DSI display or speaker.
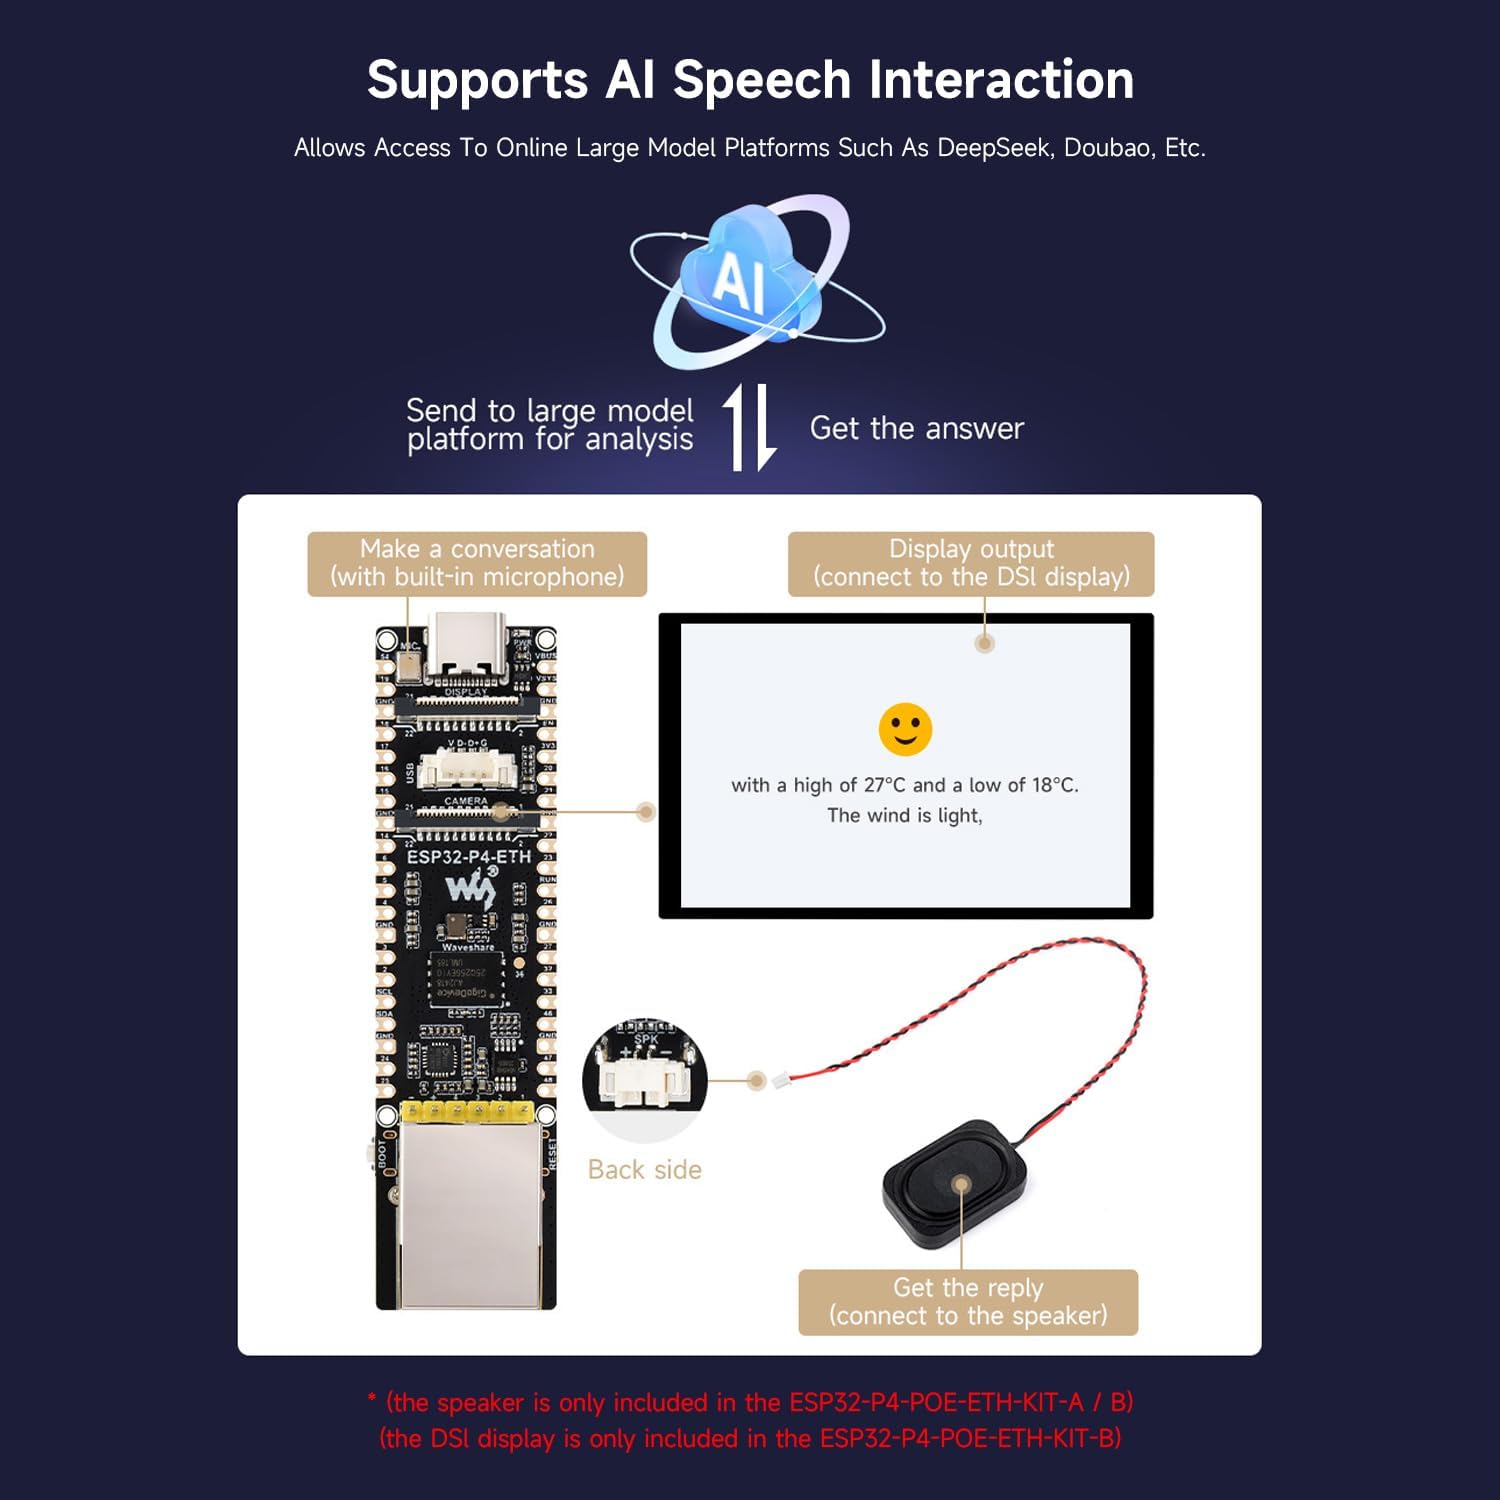
Figure 5.1: AI Speech Interaction Flow.
5.3 Ethernet Connectivity
The 100 Mbps RJ45 Ethernet port provides stable network connectivity for your applications. If using PoE, ensure your network infrastructure supports 802.3af standard.
6. Maintenance
Proper maintenance ensures the longevity and reliable operation of your development board.
- Cleaning: Keep the board clean and free from dust and debris. Use a soft, dry brush or compressed air for cleaning. Avoid using liquids or solvents.
- Storage: Store the board in a dry, anti-static environment when not in use.
- Handling: Handle the board by its edges to avoid touching sensitive components. Use anti-static precautions (e.g., anti-static wrist strap) to prevent electrostatic discharge (ESD) damage.
- Firmware Updates: Regularly check the Waveshare Wiki for firmware updates and apply them as recommended to ensure optimal performance and security.
7. Troubleshooting
This section addresses common issues you might encounter with the ESP32-P4-ETH Development Board.
7.1 Power Issues
- Board not powering on: Ensure the USB Type-C cable is securely connected and the power source is active. If using PoE, verify the PoE module is correctly installed and the Ethernet switch provides PoE power. Check the power indicator LED on the board.
- Intermittent power: Check for loose connections or faulty cables. Try a different power adapter or USB cable.
7.2 Connectivity Issues
- Ethernet not connecting: Verify the Ethernet cable is properly connected to both the board and the network device. Ensure the network device is active and configured correctly. Check network settings in your software.
- USB not recognized: Ensure the USB cable is functional and connected to a working USB port on your computer. Install necessary drivers if prompted by your operating system.
7.3 Programming Issues
- Failed to upload firmware: Ensure the board is in download mode (press BOOT button during power-up/reset). Verify your development environment (e.g., ESP-IDF) is correctly set up and configured for the ESP32-P4. Check serial port selection.
8. Warranty and Support
The Waveshare ESP32-P4-ETH Development Board comes with a 1-year warranty from the manufacturer.
For technical support, additional resources, and detailed documentation, please visit the official Waveshare Wiki page. You can find a link to the Wiki by visiting the Waveshare Store on Amazon and clicking the Wiki link.
Video 8.1: Overview of the ESP32 P4 Series, providing general information about the development board's capabilities and features.