1. Introduction
Thank you for choosing the COLAMY XK01 Ergonomic Office Chair. This manual provides essential information for the safe assembly, operation, maintenance, and troubleshooting of your new chair. Please read these instructions carefully before use and retain them for future reference.
2. Important Safety Information
WARNING:
- Ensure proper assembly according to instructions.
- Do not exceed the maximum weight capacity of 300 pounds.
- Use the chair on a stable, flat surface to prevent tipping.
- Keep children and pets away from the chair during assembly.
- Periodically check all bolts and connections to ensure they remain tight.
3. Package Contents
Before assembly, please verify that all components are present and undamaged. If any parts are missing or damaged, please contact customer support.
- Backrest (A)
- Seat Cushion (B)
- Arms (C) - Left and Right labeled
- Gas Lift (D)
- Star Base (E)
- Casters (F) x 5
- Allen Key (G)
- Bolts (H, L, N)
- Rectangular Metal Plates (M)
- Headrest (I)
- Headrest Plastic Cover (P)
4. Setup and Assembly
Follow these steps to assemble your COLAMY XK01 Ergonomic Office Chair. An assembly video is provided for visual guidance.
Video: COLAMY XK01 Ergonomic Office Chair Assembly Guide. This video demonstrates the step-by-step process of assembling the chair components, including attaching the casters, arms, backrest, and headrest.
Assemble the Base
Turn the Star Base (E) upside down. Press the five Casters (F) firmly into the holes at the end of each base leg until they click into place. Insert the Gas Lift (D) into the center hole of the Star Base (E).

Image: Assembly of the chair's star base, showing casters being pressed into the legs and the gas lift inserted into the center.
Attach the Arms to the Seat Cushion
Attach the two Arms (C) to the Seat Cushion (B). Place each Rectangular Metal (M) plate over two Bolts (L). Use the Allen Key (G) to tighten the bolts. Ensure arms are placed on the correct sides (labeled 'L' for left, 'R' for right).

Image: Detail of the 4D adjustable armrests, illustrating their multi-directional movement.
Connect Backrest to Seat Cushion
Attach the Backrest (A) to the Seat Cushion (B) using three Bolts (H). Align the three screw holes and tighten all the bolts with the Allen Key (G).
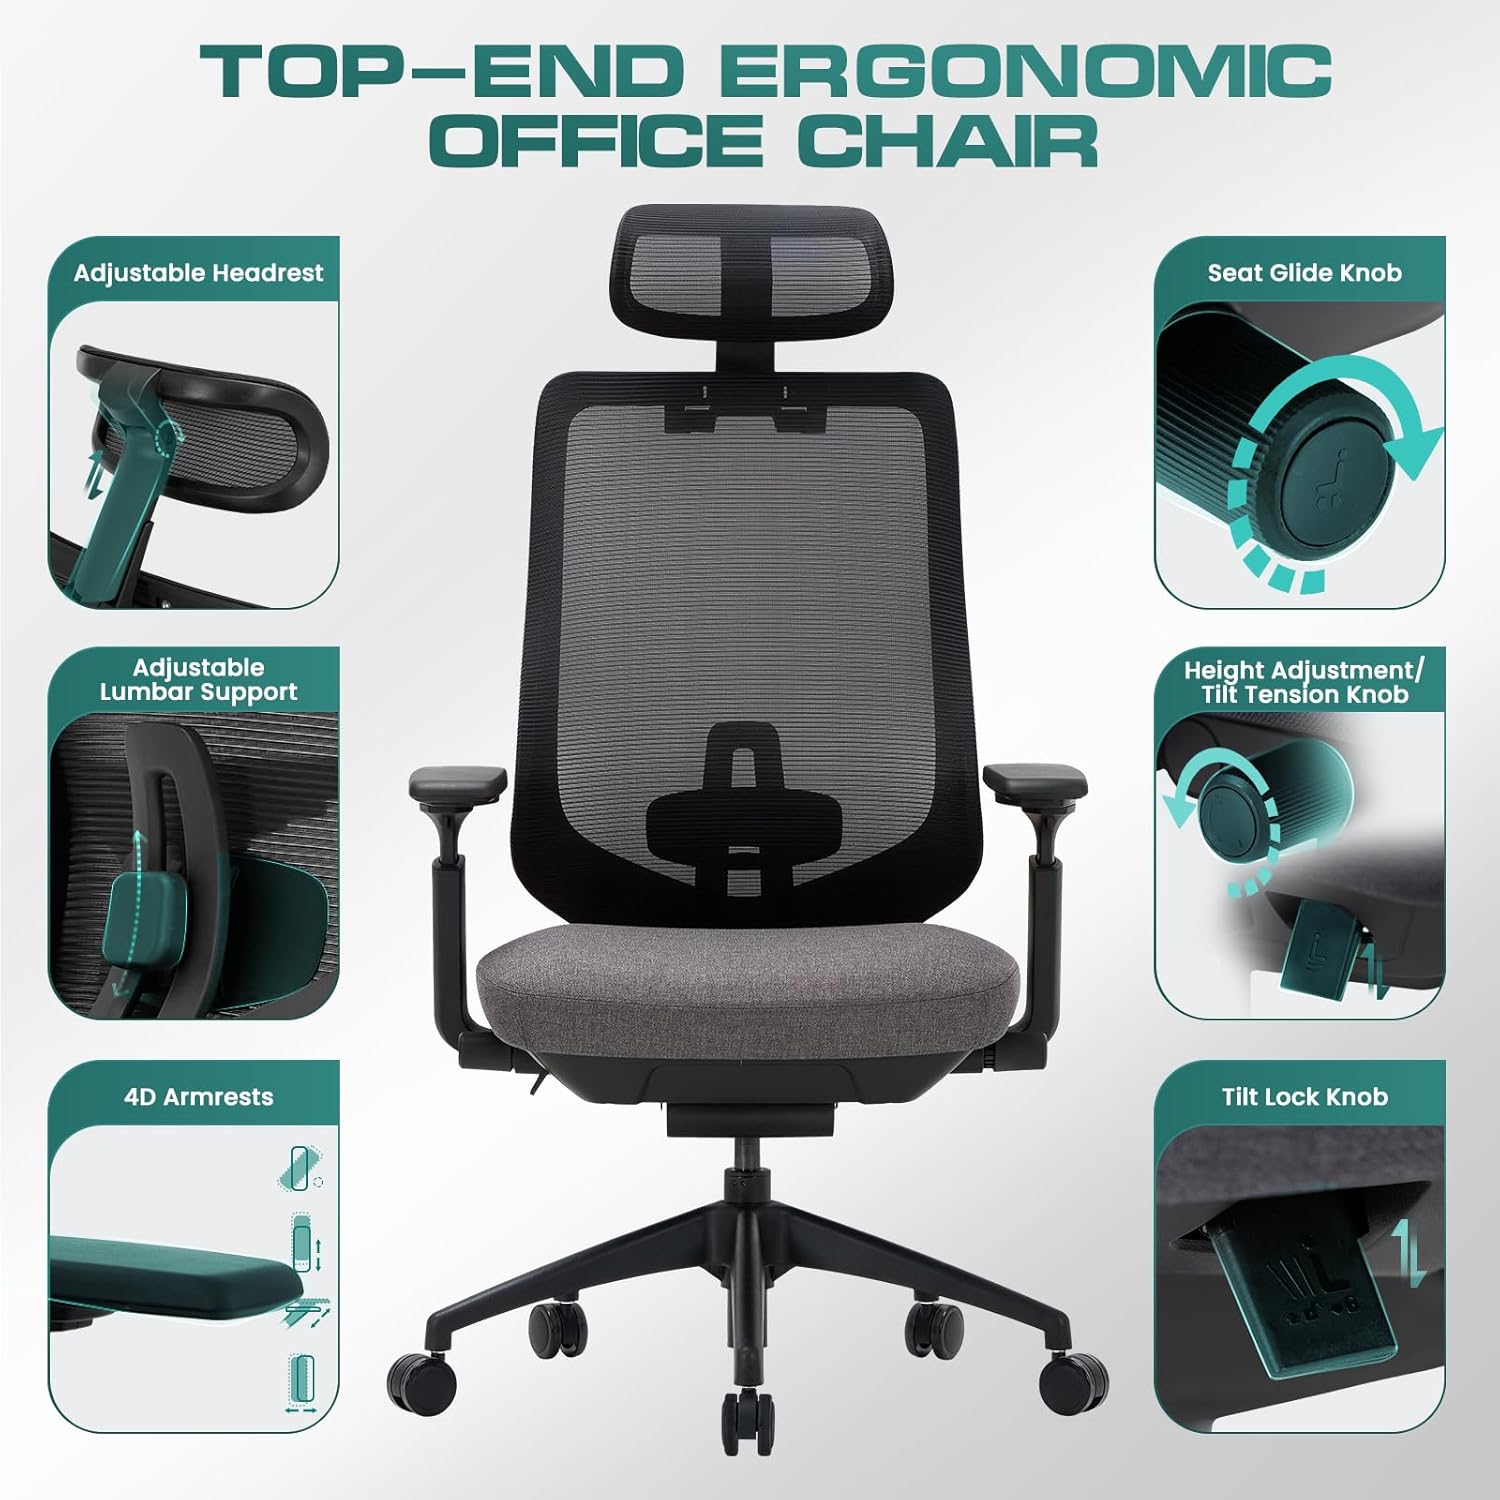
Image: Rear view of the chair, showing the mesh backrest and lumbar support mechanism.
Install the Headrest
Install the Headrest (I) onto the backrest. Align the screw holes, use two Bolts (N), and tighten with the Allen Key (G). Press the Headrest Plastic Cover (P) to conceal the screw holes.

Image: Detailed view of the adjustable headrest, highlighting its movement and ergonomic design.
Final Assembly
Push the assembled Seat Cushion (B) down onto the Gas Lift (D) firmly until the connection is secure. The chair is now successfully installed.
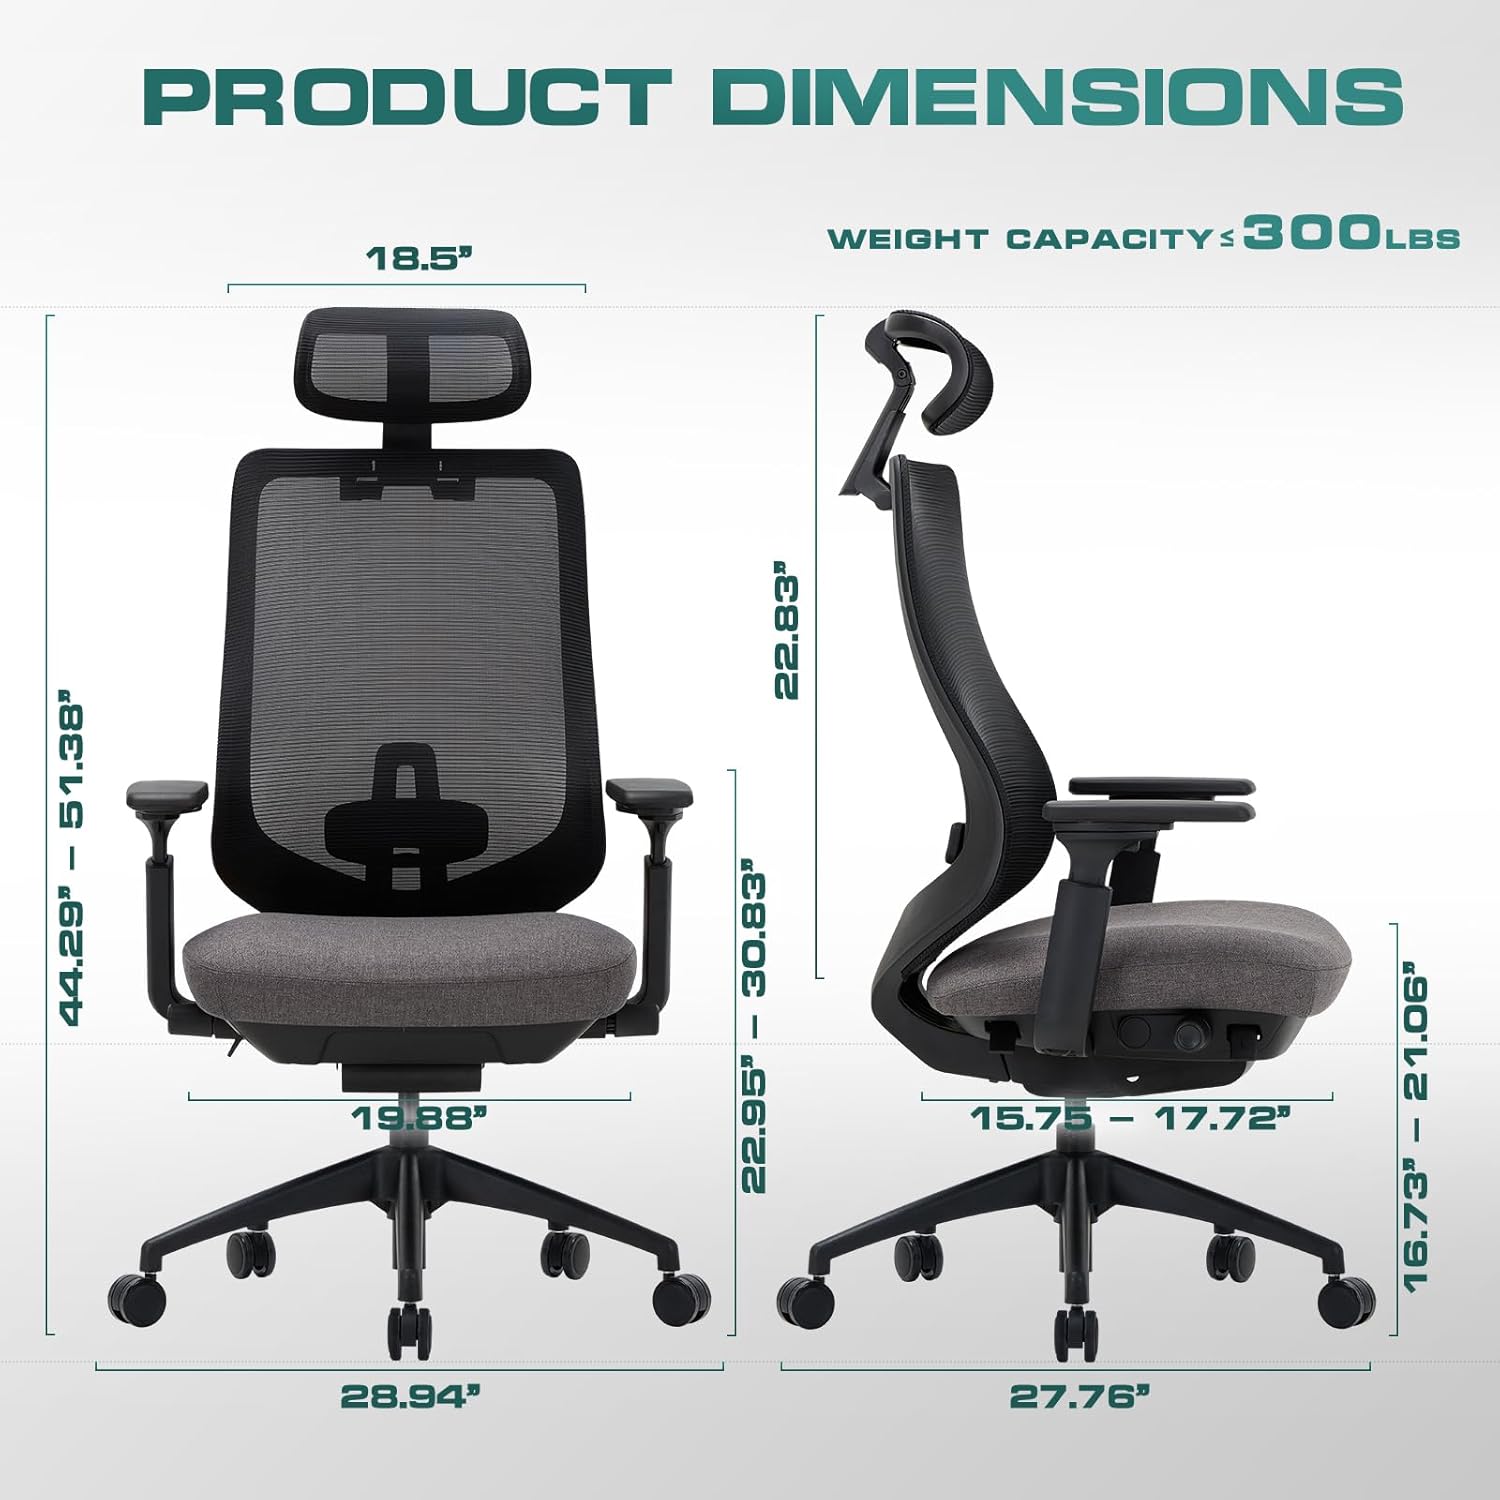
Image: Front view of the fully assembled COLAMY XK01 Ergonomic Office Chair.
5. Operating Instructions and Adjustments
Your COLAMY XK01 chair offers multiple adjustment features to customize your seating experience. Refer to the video below for demonstrations.
Video: COLAMY Ergonomic Office Chair Features and Adjustments. This video demonstrates how to utilize the various adjustable features of the chair for optimal comfort and support.

Image: An overview highlighting the various adjustable components of the COLAMY XK01 chair.
Seat Height Adjustment
Locate the lever on the right side beneath the seat. Pull the lever up to raise the seat. While seated, pull the lever up to lower the seat. Release the lever to lock the height.

Image: Detail of the height adjustment lever and tilt tension knob located under the seat.
Seat Depth Adjustment (Slide Seat)
The seat sliding feature allows you to adjust the seat depth. Locate the knob on the left side beneath the seat. Rotate the knob to slide the seat forward or backward, providing better back support and relieving pressure from the back of the knees.

Image: Close-up of the seat glide knob, used for adjusting the seat depth.
Backrest Tilt and Lock
The chair features a 4-position tilt lock. Use the lever on the left side beneath the seat to recline the backrest. Push the lever in to lock the backrest at your desired angle (107°, 115°, 123°, or 132°). Pull the lever out to unlock and allow free tilting.

Image: Detail of the tilt lock button, indicating its function for securing the backrest angle.
Tilt Tension Adjustment
Adjust the resistance of the backrest tilt by rotating the round knob located under the front of the seat. Turn clockwise to increase tension (firmer tilt) and counter-clockwise to decrease tension (looser tilt).
Adjustable Headrest
The headrest can be adjusted for height and angle. Gently push or pull the headrest to find your preferred position for neck and head support.
Image: Detailed view of the adjustable headrest, illustrating its movement and ergonomic design.
Adjustable Lumbar Support
The lumbar support can be adjusted vertically to align with the natural curve of your spine. Move the lumbar support up or down to achieve optimal lower back comfort.

Image: Close-up of the adjustable lumbar support mechanism on the chair's backrest.
4D Adjustable Armrests
The armrests can be adjusted in four dimensions: height, forward/backward, left/right pivot, and inward/outward angle. Press the buttons or levers on the armrests to unlock and adjust, then release to lock in place.
Image: Detail of the 4D adjustable armrests, illustrating their multi-directional movement.
6. Maintenance
Regular maintenance helps prolong the life and appearance of your chair.
- Cleaning: Wipe clean with a damp cloth. Avoid harsh chemicals or abrasive cleaners. For mesh areas, a soft brush can be used to remove dust.
- Inspection: Periodically check all bolts and screws to ensure they are tight. Re-tighten if necessary to maintain stability and safety.
- Casters: Keep casters free of hair and debris to ensure smooth rolling.
7. Troubleshooting
Here are solutions to common issues you might encounter:
- Chair is wobbly: Check all assembly bolts and ensure they are securely tightened. Ensure the chair is on a flat, even surface.
- Gas lift not adjusting height: Ensure the height adjustment lever is fully engaged or disengaged. If the issue persists, the gas lift may need replacement.
- Squeaking noises: Apply a small amount of silicone lubricant to moving parts, especially where metal components meet. Check for loose bolts and tighten them.
- Casters not rolling smoothly: Remove any hair or debris wrapped around the caster wheels. Clean the wheels with a damp cloth.
8. Specifications
| Feature | Detail |
|---|---|
| Brand | COLAMY |
| Model Name | XK01 |
| Color | Xk01-darkgrey |
| Product Dimensions | 17.72"D x 28.94"W x 51.38"H |
| Back Style | Mesh Back |
| Special Features | Adjustable Headrest, Adjustable Lumbar, 4D Arm Rests, Back Support, Slide Seat, 4-position Tilt Lock |
| Product Care Instructions | Wipe Clean |
| Maximum Weight Recommendation | 300 Pounds |
| Room Type | Game Recreation Room, Library, Office, Study Room |
| Included Components | Caster |
| Fill Material | Foam |
| Item Weight | 46 pounds |
| Assembly Required | Yes |
9. Warranty and Support
For warranty information or customer support, please refer to the product packaging or contact COLAMY customer service directly. Keep your purchase receipt as proof of purchase.