1. Introduction
This manual provides comprehensive instructions for the safe and effective operation and maintenance of your AKEYDIY 15x15 Heat Press Machine. This versatile heat press is designed for creating custom designs on a wide range of materials, including T-shirts, canvas bags, pillowcases, caps, mugs, tumblers, and ceramic plates. It features a 15" x 15" platen press and includes attachments for tumblers, hats, and plates, making it suitable for various heat transfer projects.
2. Safety Instructions
Please read and understand all safety warnings and operating instructions before using the heat press machine. Failure to follow these instructions may result in electric shock, fire, or serious injury.
- Always operate the heat press on a stable, heat-resistant surface.
- Ensure the machine is properly grounded to prevent electrical shock.
- Keep hands and fingers clear of the heating platen during operation to avoid burns. The platen reaches high temperatures.
- Do not leave the machine unattended while it is powered on or heating.
- Unplug the machine from the power outlet when not in use or before cleaning and maintenance.
- Do not operate the machine with a damaged cord or plug.
- Keep children and pets away from the heat press during operation.
- The built-in fuse provides safety by automatically cutting power if the circuit is abnormal. If this occurs, unplug the machine, allow it to cool, and contact customer support if the issue persists after re-plugging.
- The handle is designed with a non-slip grip, and the machine base has non-slip foot pads for enhanced stability and safety during use.
- Ensure adequate ventilation in the work area, especially when working with materials that may emit fumes.
3. Product Overview
3.1 Components Included
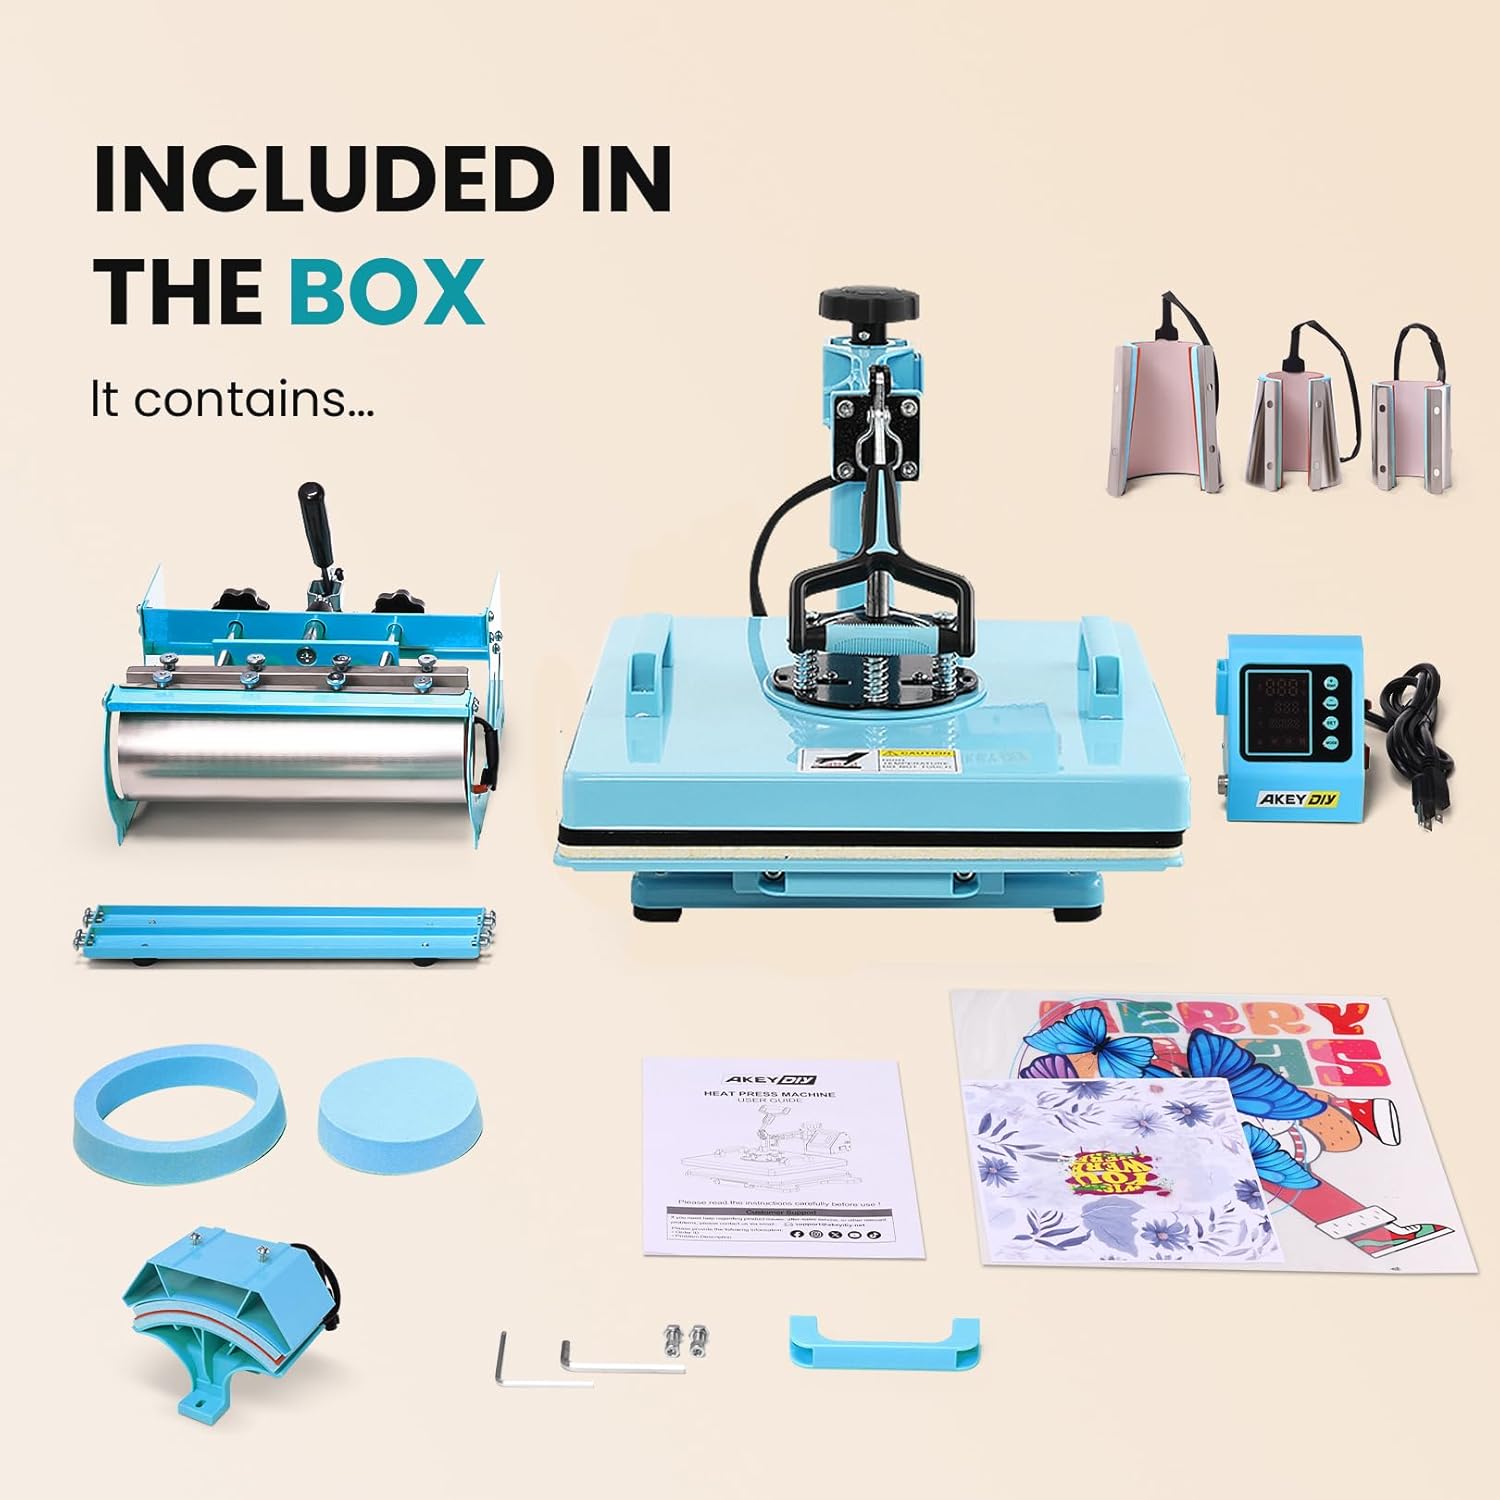
Image: All components included in the AKEYDIY 15x15 Heat Press Machine package, showing the main press, various attachments, and accessories.
The package typically includes the following components:
- 1 x 15x15 Heat Press Machine (main unit with platen press)
- 1 x Sublimation Tumbler Heat Press Attachment (for 11-30oz tumblers)
- 1 x Hat Press Attachment (for caps)
- 1 x 5-inch Plate Press Attachment
- 1 x 6-inch Plate Press Attachment
- 1 x Control Box with Digital Display
- Power Cable
- Bonus Teflon Sheets
- Basic Tools for assembly (e.g., Allen wrench)
3.2 Key Features

Image: Visual representation of the heat press's key features: 360-degree swivel design, 15x15 inch large heat plate, accurate digital temperature display, and auto shut-off function.
- Versatile Application: Capable of pressing designs onto T-shirts, canvas bags, pillowcases, caps, mugs, tumblers, and ceramic plates.
- 360° Swing-Away Design: Allows the heating platen to be rotated away from the lower platen, providing a safer and more convenient workspace for arranging materials and preventing accidental contact with the hot surface.
- Slide-Out Drawer Design: The lower platen slides out, making it easier to position garments and materials accurately and safely.
- Dual-Tube Heating Engine: Features a high-density uniform heating system with double heating tubes, ensuring consistent temperature across the entire platen for clear and even transfers.

Image: A diagram comparing the uniform heating provided by the dual-tube heating engine to the uneven heating of a single-tube system.
- Digital Temperature & Timer Control: An LCD control panel allows precise setting and monitoring of temperature (32-482°F / 0-250°C) and time (0-999 seconds). It supports one-key mode selection for thermal sublimation and allows saving custom settings.
- Teflon-Coated Platen: The aluminum heating platen is Teflon-coated to prevent sticking and ensure smooth transfers.
- Adjustable Pressure Knob: Ensures a seamless fit between the heating plate and the material, allowing for efficient sublimation and heat transfer.
- Enhanced Durability & Safety: Features upgraded sliding rails for smooth movement, an upgraded ergonomic handle for comfort, and an improved cable connection for enhanced safety and durability.

Image: Detailed views highlighting the upgraded sliding rails for smooth operation, the ergonomic handle for comfortable use, and the improved cable connection for enhanced safety.
4. Setup and Assembly
Before first use, ensure all components are present and inspect for any shipping damage.
- Unpack Components: Carefully remove all parts from the packaging.
- Assemble Main Unit: Follow the included assembly guide for attaching the main heat press unit to its base, if required. Ensure all screws are tightened securely.
- Connect Control Box: Attach the digital control box to the main unit using the provided cable. Ensure the connection is firm.
- Choose Attachment: Select the appropriate attachment (e.g., platen, tumbler, hat, plate press) for your project and secure it to the main unit according to the specific attachment instructions.
- Placement: Place the assembled heat press on a sturdy, level, and heat-resistant surface with adequate clearance around it for ventilation and safe operation.
- Power Connection: Plug the power cord into a grounded 110V AC outlet.
5. Operating Instructions
This section outlines the general steps for operating the AKEYDIY Heat Press Machine. Specific temperature and time settings will vary depending on the material and transfer type. Always refer to the transfer material manufacturer's recommendations.
5.1 Basic Operation (Platen Press)
- Power On: Turn on the main power switch, usually located on the side of the control box.
- Set Temperature: Use the digital control panel to set the desired temperature. Press the "SET" button, then use the "+" and "-" buttons to adjust the temperature. Press "SET" again to confirm. The display will show the current temperature rising to the set temperature.
- Set Time: After setting the temperature, press "SET" again to enter time setting mode. Use the "+" and "-" buttons to adjust the desired pressing time in seconds. Press "SET" to confirm.
- Pre-heat: Allow the machine to reach the set temperature. The indicator light or display will confirm when it's ready.
- Prepare Material: Place your garment or flat item on the lower platen. Use the slide-out drawer feature for easier placement. Ensure the material is flat and free of wrinkles. Place a Teflon sheet or parchment paper over the material to protect the platen and the transfer.

Image: A user demonstrating the preparation of a flat item, such as a ceramic plate, on the heat press platen before applying pressure.
- Apply Pressure: Swing the heating platen over the material. Lower the handle firmly to apply pressure. The timer will automatically start counting down once the platen is fully closed. Adjust the pressure knob as needed to achieve the desired pressure.
- Release: Once the timer reaches zero, lift the handle to release the pressure and swing the heating platen away. Carefully remove the transferred item.
- Auto Shut-off: The machine features an auto shut-off function after 30 minutes of inactivity for safety and energy saving.
5.2 Using Attachments (Tumbler, Hat, Plate Press)
To use different attachments, first ensure the main unit is cool and unplugged. Remove the current platen attachment and install the desired one (tumbler, hat, or plate press) following the specific instructions provided with each attachment.
- Tumbler Press:
Attach the tumbler heating element. Place your tumbler into the attachment, ensuring a snug fit. Adjust pressure if necessary. Follow the same temperature and time setting procedures as the main press.
Image: A user demonstrating the process of using the tumbler heat press attachment to apply a design to a cylindrical object.
- Hat Press:
Install the curved hat platen. Position the hat securely on the platen. Lower the heating element onto the hat. Adjust pressure and set temperature/time as required.
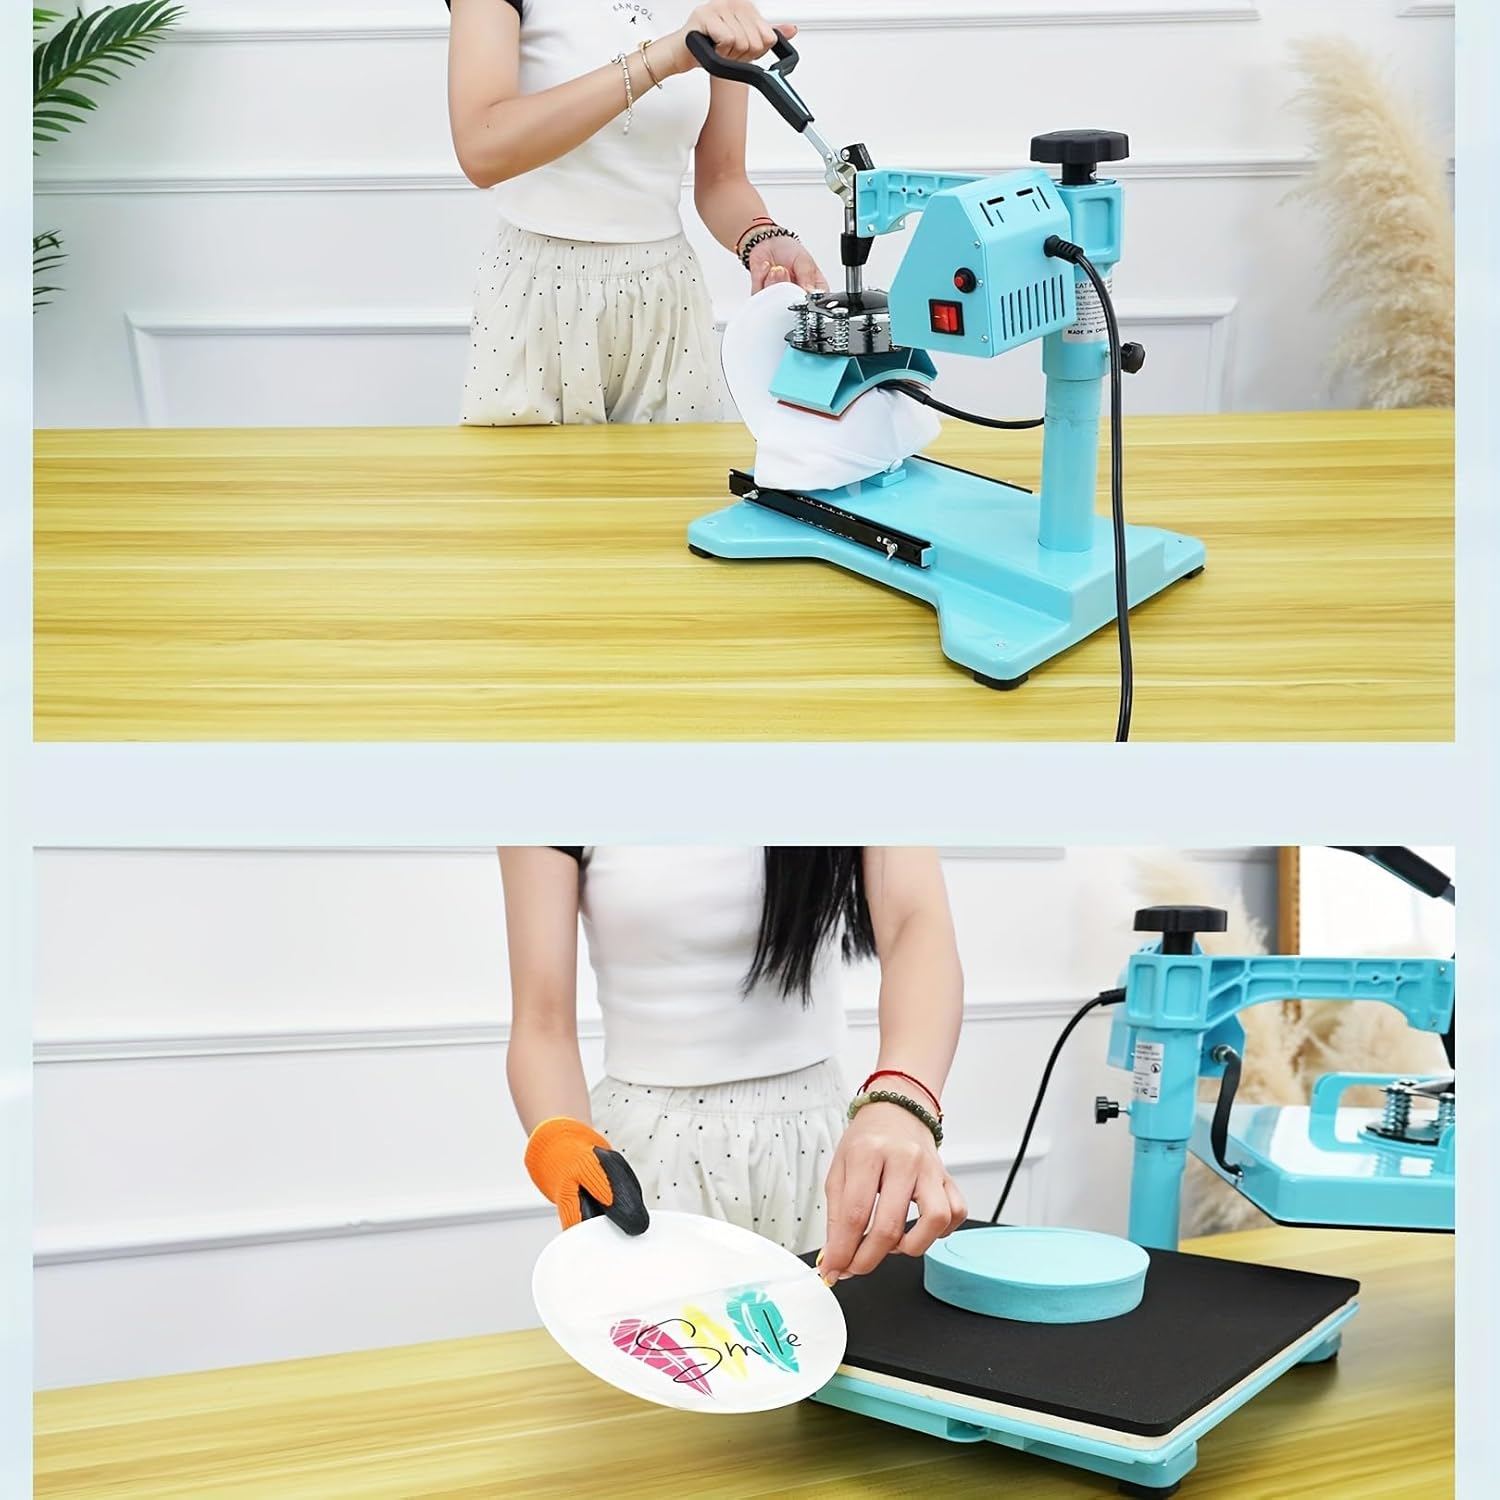
Image: A user demonstrating the application of a design onto a hat using the dedicated hat press attachment.
- Plate Press:
Attach the appropriate size plate heating element (5-inch or 6-inch). Place the ceramic plate onto the lower platen. Lower the heating element and apply pressure. Set temperature and time according to plate and transfer material specifications.
Image: A user demonstrating the use of the plate heat press attachment to transfer a design onto a ceramic plate.
6. Maintenance
Proper maintenance ensures the longevity and optimal performance of your heat press machine.
- Cleaning the Platen: Allow the heating platen to cool completely. Use a soft, damp cloth to wipe down the Teflon-coated surface. For stubborn residue, a specialized platen cleaner can be used, but avoid abrasive cleaners or tools that could damage the coating.
- Cleaning the Base: Wipe down the machine's exterior with a soft, dry cloth.
- Lubrication: Periodically check the moving parts, such as the swing arm pivot and sliding rails. Apply a small amount of high-temperature lubricant if movement becomes stiff.
- Cord Inspection: Regularly inspect the power cord for any signs of damage, fraying, or cuts. If damaged, discontinue use and contact customer support.
- Storage: Store the heat press in a dry, dust-free environment when not in use.
7. Troubleshooting
This section addresses common issues you might encounter and provides solutions.
| Problem | Possible Cause | Solution |
|---|---|---|
| Machine does not power on. | Power cord unplugged, power switch off, tripped circuit breaker, blown fuse. | Ensure power cord is securely plugged in. Turn on power switch. Check household circuit breaker. If the internal fuse has popped out, unplug the machine, allow it to cool, and contact customer support if the issue persists after re-plugging. |
| Uneven heating or poor transfer quality. | Incorrect temperature/time settings, uneven pressure, damaged heating element, material not flat. | Verify temperature and time settings match transfer material requirements. Adjust pressure knob for even contact. Ensure material is flat on the platen. If heating element is suspected, contact customer support. |
| Temperature display is inaccurate. | Sensor issue. | Allow the machine to cool down and restart. If the problem persists, contact customer support. |
| Attachments are difficult to change. | Improper alignment, debris. | Ensure the machine is cool and unplugged. Check for any obstructions or debris. Refer to the attachment-specific instructions for proper installation. |
8. Specifications
| Parameter | Value |
|---|---|
| Model Number | CX5586 |
| Power | 1400W |
| Voltage | 110V |
| Temperature Range | 32-482 ℉ (0-250 ℃) |
| Time Control | 0-999 seconds |
| Platen Size | 15 x 15 inches |
| Product Dimensions | 15"L x 15"W x 15"H |
| Material | Metal (main body), Polyamide (handle/some components) |
9. Warranty and Support
AKEYDIY provides a 1-year after-sale service on the heat press machine. Additionally, lifetime friendly customer service is available to assist with any inquiries or issues you may encounter.
For support, please refer to the contact information provided with your purchase or visit the official AKEYDIY website.