
1. Introduction
Thank you for choosing the MUPATER 12x14 FT Wooden Cedar Pergola Kit. This manual provides essential information for the safe assembly, operation, and maintenance of your new outdoor structure. Please read all instructions carefully before beginning assembly and retain this manual for future reference.
2. Safety Information
Important Safety Precautions:
- Always assemble the pergola on a stable, level surface.
- Securely anchor the pergola to the ground or a suitable foundation (e.g., cement, concrete, wood decks).
- Use caution when handling and assembling the components, as they may be heavy. It is recommended that at least two people assist with assembly.
- Do not exceed the recommended weight limit for hanging items on the structure.
- Inspect the pergola regularly for signs of wear or damage. Repair or replace any damaged parts as needed to ensure structural integrity.
- Keep children and pets away from the assembly area during installation.
3. Components Overview
Before starting assembly, ensure all parts are present and undamaged. Refer to the included parts list in your packaging for a complete inventory. Key components include cedar wood posts, beams, rafters, and hardware for assembly and anchoring.

Figure 3.1: Fully assembled MUPATER 12x14 FT Wooden Cedar Pergola.
4. Assembly Instructions
This pergola is designed for straightforward assembly with pre-drilled components. Follow the step-by-step instructions provided in your package. Two people are recommended for efficient and safe assembly.
4.1 Site Preparation
- Choose a level and stable location for your pergola.
- Clear the area of any debris, rocks, or vegetation.
- Ensure adequate clearance around the pergola for future use and maintenance.
4.2 Post Installation and Anchoring
The pergola features ground stakes for securing posts on dirt ground. For installation on cement, concrete, or wood decks, appropriate anchoring hardware (not always included) should be used to ensure stability.

Figure 4.1: Illustration of post installation options, including stakes for dirt and suitability for cement, wood deck, and concrete.
Note: It is not recommended to install posts directly on loose stone or paver surfaces as they may shift and compromise stability.
4.3 Frame Assembly
Connect the main beams to the posts using the provided hardware. Ensure all connections are tight and secure. Proceed to install the roof rafters and slatted trellis components according to the detailed diagrams in your manual.

Figure 4.2: Detail of the slatted roof trellis and beam connections.
The slatted roof design allows for ample sunlight while providing a base for additional shading covers or decorative elements.
5. Operation and Usage
Your MUPATER pergola is designed to enhance your outdoor living space. It can be used for various purposes:
- Shade and Shelter: The slatted roof provides partial shade. For increased shade or rain protection, you may add an extra cover (not included) to the top.
- Decoration: The structure is suitable for growing climbing plants like grapevines or flowers. Lightweight hammocks, swings, or ceiling fans can also be hung, provided they do not exceed the structure's weight capacity.
- Outdoor Gatherings: Ideal for patios, backyards, decks, and poolside areas for hosting events or relaxing.

Figure 5.1: Pergola providing a shaded area for poolside relaxation.
6. Care and Maintenance
Proper maintenance will extend the lifespan and preserve the appearance of your cedar pergola.
- Cleaning: Clean the cedar wood periodically with a mild soap and water solution. Avoid harsh chemicals or abrasive cleaners that can damage the wood finish.
- Stain Protection: The pergola is constructed from 100% cedar wood, which is naturally resistant to rot. For enhanced protection and durability, especially in humid climates, it is highly recommended to apply an additional water-based stain. This can also be done to customize the appearance.
- Seasonal Inspection: Regularly check all bolts, screws, and connections to ensure they remain tight. Inspect the wood for any signs of cracking, warping, or insect damage. Address any issues promptly.
- Weather Resistance: The solid wood construction is designed to withstand up to 80 MPH winds and endure all four seasons. However, during extreme weather conditions, consider removing any hanging items or additional covers to prevent damage.

Figure 6.1: Solid cedar wood construction with weather-resistant stain.

Figure 6.2: Pergola durability across different seasons.
7. Troubleshooting
This section addresses common issues you might encounter with your pergola.
| Problem | Possible Cause | Solution |
|---|---|---|
| Pergola feels unstable or wobbly. | Loose connections or inadequate anchoring. | Check all bolts and screws and tighten them. Ensure posts are securely anchored to the ground or foundation. Re-evaluate the stability of the installation surface. |
| Wood appears faded or weathered. | Exposure to sun and elements without sufficient protection. | Apply a fresh coat of water-based stain or sealant to protect the wood and restore its appearance. |
| Difficulty aligning parts during assembly. | Parts are not oriented correctly or minor manufacturing variations. | Double-check the instruction manual for correct part orientation. Loosen adjacent connections slightly to allow for adjustment, then re-tighten. Do not force parts. |
8. Product Specifications
Detailed specifications for the MUPATER 12x14 FT Wooden Cedar Pergola Kit:
- Brand: MUPATER
- Model Number: PG0202-07-2
- Material: 100% Cedar Wood
- Style: Classic
- Overall Dimensions (L x W x H): 169.3" x 137.8" x 92.15" (12x14 FT nominal)
- Interior Dimensions (L x W x H): 135.1" x 107.6" x 85.83"
- Maximum Entrance Height: 97.01 inches
- Item Weight: Approximately 339 Pounds
- Frame Material: Cedar Wood
- Water Resistance Level: Water Resistant (enhanced with additional stain)
- Shape: Rectangular
- Ultraviolet Light Protection: Yes
- Assembly Required: Yes
- Wind Resistance: Withstands up to 80 MPH
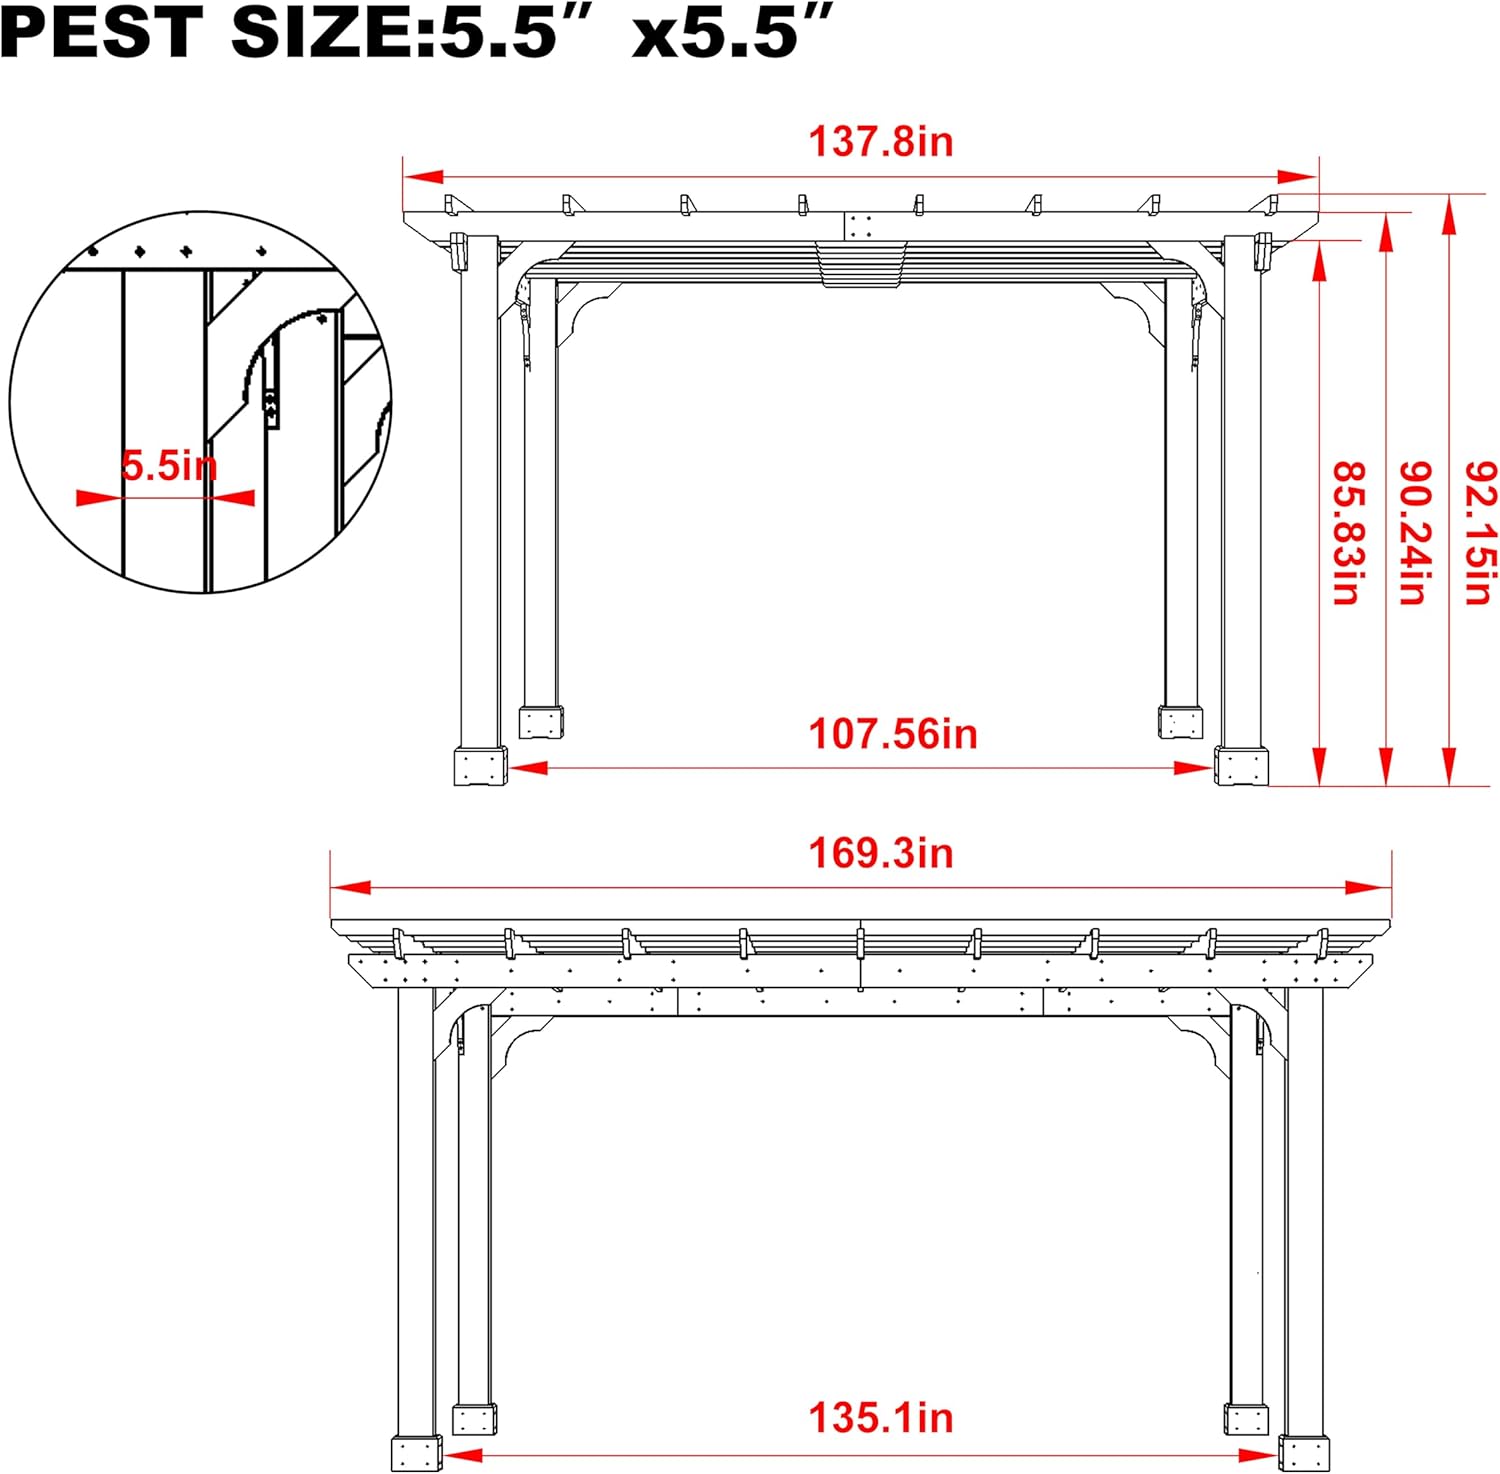
Figure 8.1: Detailed dimensions of the pergola structure.
9. Warranty and Support
For specific warranty details and customer support, please refer to the warranty card included with your product packaging or visit the official MUPATER website. Keep your purchase receipt as proof of purchase for any warranty claims.
Manufacturer: MUPATER
Contact: Refer to the contact information provided in your product documentation or the MUPATER brand store for assistance.