1. Introduction
This manual provides detailed instructions for the assembly, operation, and maintenance of your Yanosaku Vanity Desk with Mirror and Lights, Model VD024-WH. Please read this manual thoroughly before assembly and use to ensure safe and correct operation of the product. Keep this manual for future reference.

Image 1.1: Front view of the Yanosaku Vanity Desk, showcasing the mirror with lights, multiple drawers, and open shelves.
2. Safety Information
Please observe the following safety precautions to prevent injury or damage to the product:
- Ensure all parts are securely fastened during assembly.
- Do not overload drawers or shelves.
- Keep electrical components (lights, power outlets) away from water.
- Unplug the vanity from the power source before cleaning or if not in use for extended periods.
- Do not attempt to modify the electrical wiring or components.
- Place the vanity on a stable, level surface to prevent tipping.
3. Package Contents
Before beginning assembly, verify that all components listed below are present and undamaged. If any parts are missing or damaged, please contact customer support.
- Vanity Desk Panels (various sizes)
- Mirror with Integrated LED Lights
- 7 Drawer Components
- 6 Open Shelf Panels
- Power Outlet Unit (2 AC, 2 USB)
- Hair Dryer Holder
- Assembly Hardware (screws, dowels, cam locks, etc.)
- Instruction Manual
4. Setup and Assembly Instructions
Assembly of the Yanosaku Vanity Desk requires following the included step-by-step instructions. All parts are labeled for easy identification.
- Prepare the Area: Clear a spacious, clean, and level area for assembly.
- Unpack Components: Carefully unpack all parts and hardware. Refer to the parts list to ensure everything is present.
- Follow Step-by-Step Guide: Use the detailed assembly guide provided in the package. Each step will illustrate how to connect specific labeled parts.
- Secure All Fasteners: Ensure all screws, dowels, and cam locks are tightened securely to provide stability. Do not overtighten.
- Install Drawers and Shelves: Once the main frame is assembled, install the drawer slides, assemble the drawers, and place the open shelves.
- Mount Mirror and Electrical Components: Attach the mirror unit and integrate the power outlet unit and hair dryer holder as instructed.
- Final Check: Before use, verify that the vanity is stable and all components are correctly installed.

Image 4.1: An example of the fully assembled vanity desk in a room, demonstrating its functional layout.
5. Operating Instructions
5.1. LED Mirror Lights
The vanity mirror is equipped with 10 LED lights offering three adjustable lighting modes and brightness control.
- Power On/Off: Locate the touch switch on the mirror. A short press will turn the lights on or off.
- Change Lighting Mode: With the lights on, short press the touch switch to cycle through the three color modes:
- Cool White (11000K): Ideal for party or professional makeup.
- Natural Light (4500K): Suitable for office or daily makeup.
- Warm Yellow (3000K): Best for evening skincare and daily makeup.
- Adjust Brightness: To adjust the brightness within any selected lighting mode, long press the touch switch until the desired brightness level is achieved. Release the switch to set the brightness.

Image 5.1: Visual representation of the three distinct lighting modes (Cold, Natural, Warm) and their corresponding color temperatures.
5.2. Built-in Charging Station
The vanity desk includes a convenient charging station to power your electronic devices and beauty tools.
- AC Outlets: Two 125V/12A AC outlets are provided for appliances such as hair dryers, curling irons, or other small electronics.
- USB Ports: Two 5V/2A USB ports are available for charging smartphones, tablets, or other USB-powered devices.
- Power Cord: The integrated power cord is 5.0 feet long. Ensure it is plugged into a grounded electrical outlet.
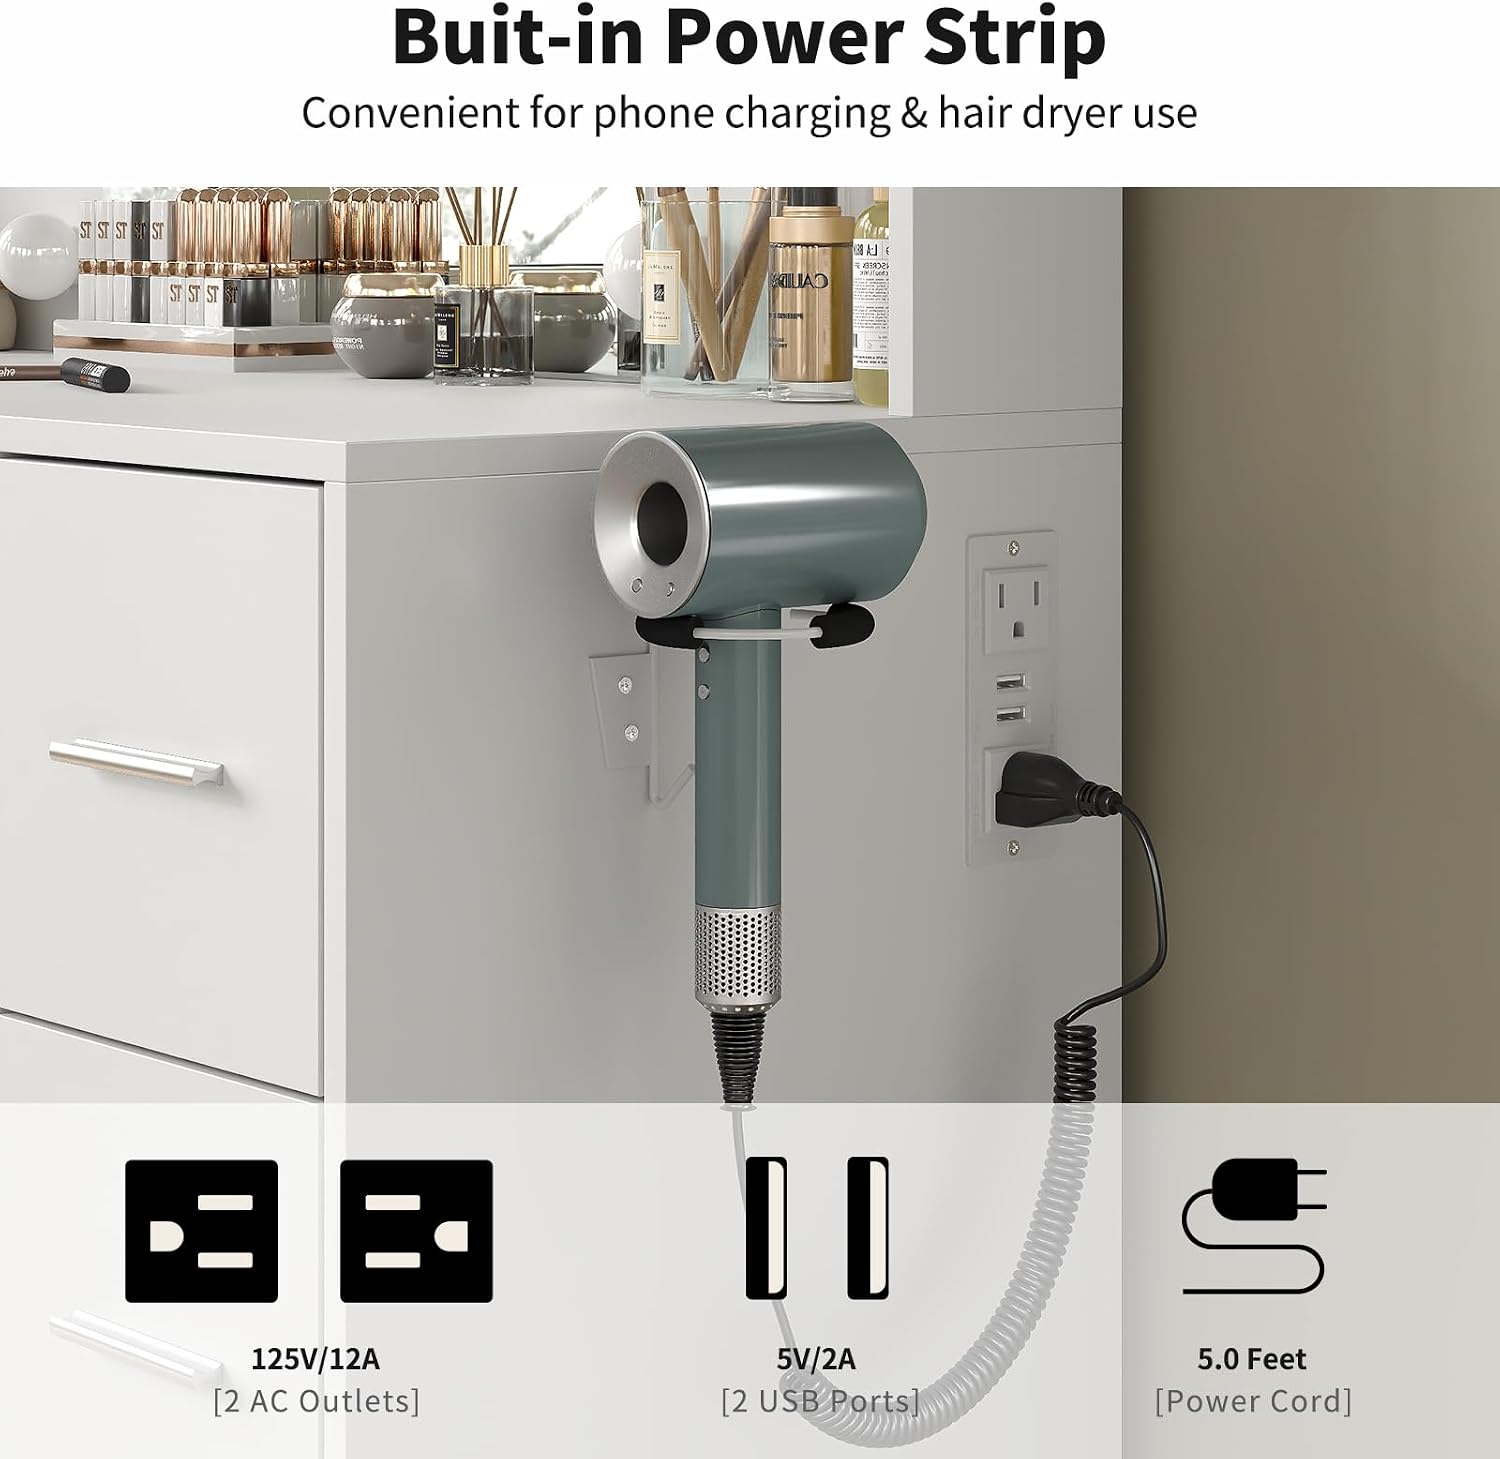
Image 5.2: Close-up view of the integrated charging station, showing the AC outlets, USB ports, and the hair dryer holder.
5.3. Storage Features
The vanity desk is designed with ample storage to keep your beauty essentials organized.
- 7 Spacious Drawers: Utilize the seven drawers for storing cosmetics, skincare products, jewelry, and other personal items.
- 6 Open Shelves: The six open shelves provide easy access and display space for frequently used items or decorative pieces.
- Hair Dryer Holder: A dedicated holder is integrated on the side for convenient storage of your hair dryer.
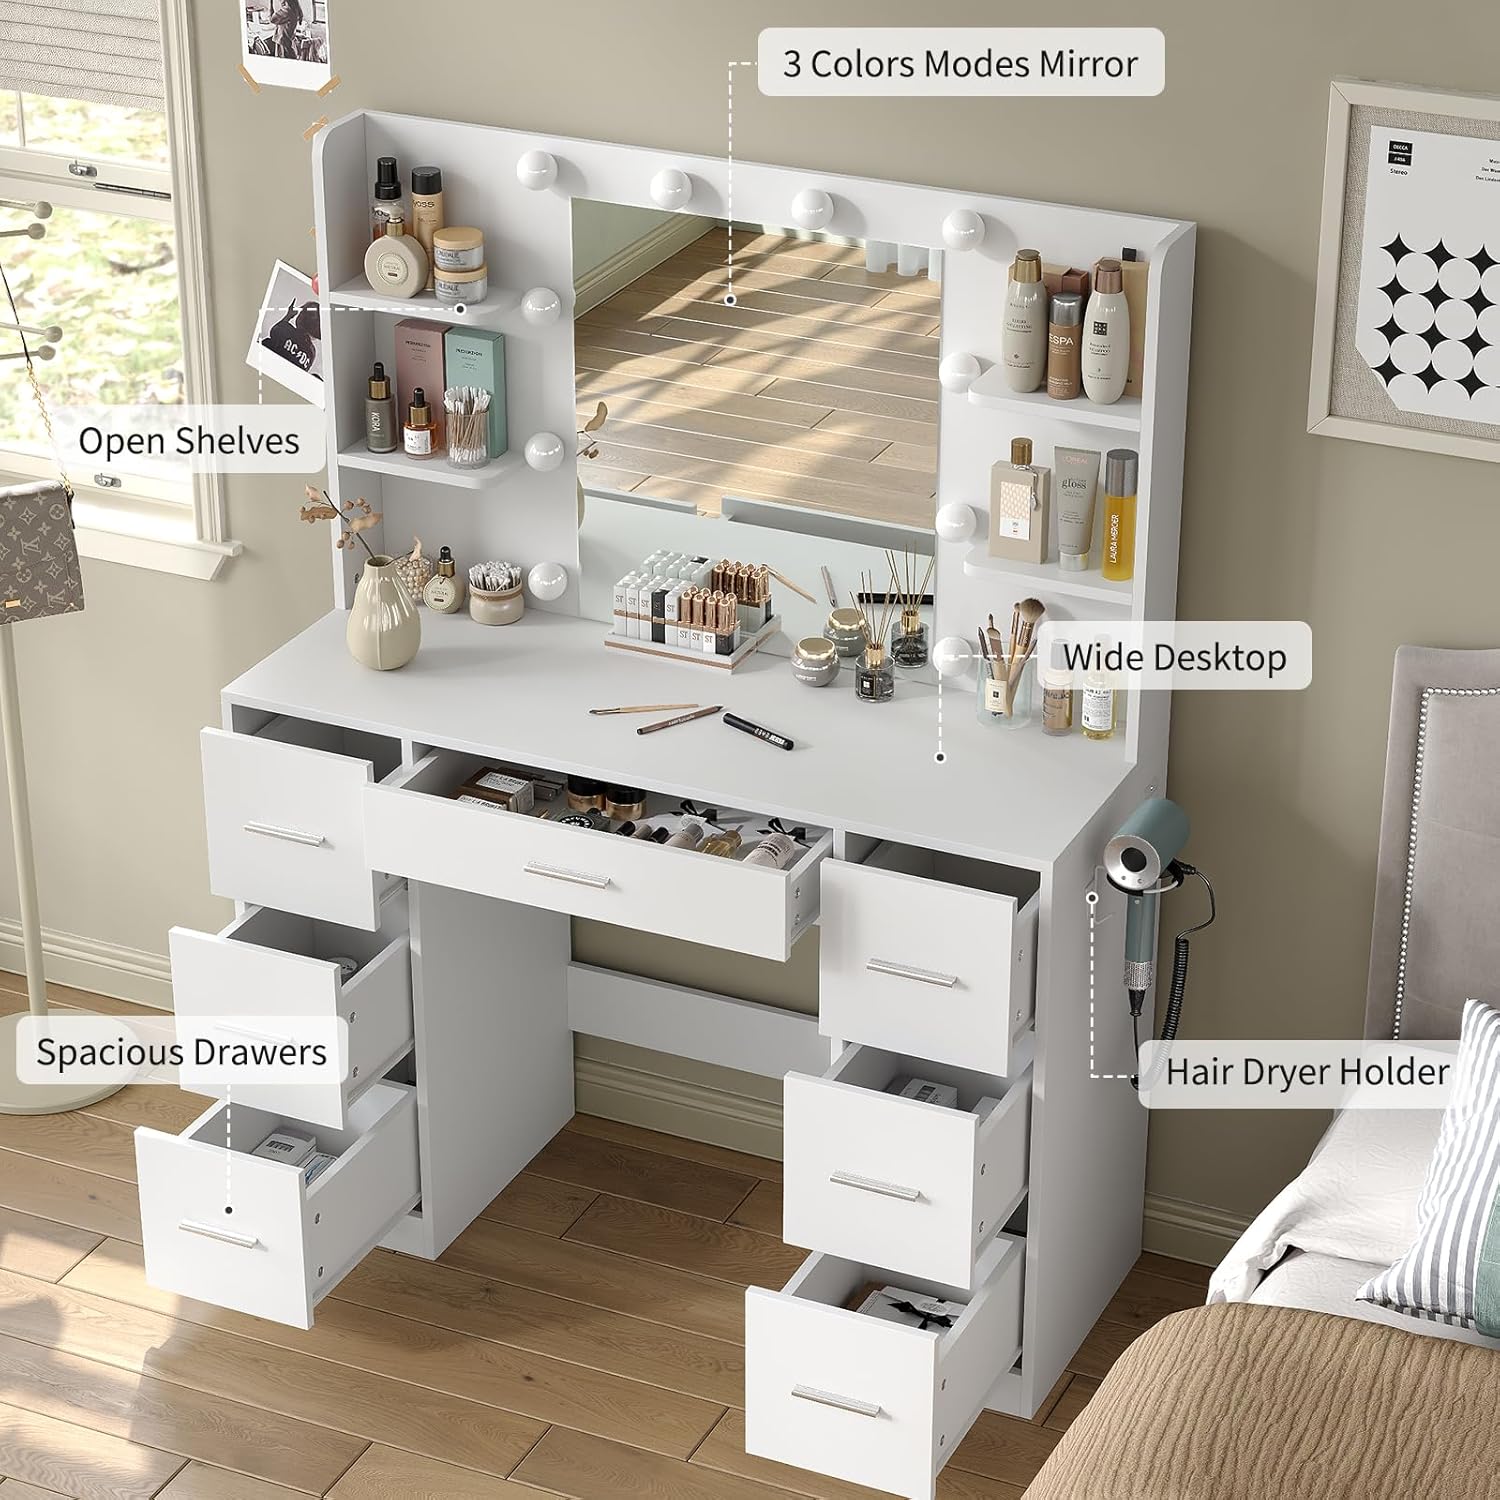
Image 5.3: The vanity desk with several drawers pulled out and items on the open shelves, illustrating its storage capabilities.
6. Maintenance
Proper maintenance will extend the life and appearance of your vanity desk.
- Cleaning Surfaces: Wipe the smooth, waterproof surfaces with a soft, damp cloth. Avoid abrasive cleaners or harsh chemicals that may damage the finish.
- Mirror Cleaning: Use a glass cleaner and a lint-free cloth for the mirror. Spray cleaner onto the cloth, not directly onto the mirror, to prevent liquid from seeping into the light components.
- Dusting: Regularly dust all surfaces, including shelves and drawers, to prevent buildup.
- Electrical Components: Ensure the power outlets and USB ports are free from dust and debris. Do not attempt to clean inside the ports with liquids.
- Check Fasteners: Periodically check all assembly fasteners and tighten if necessary to maintain stability.
7. Troubleshooting
If you encounter issues with your vanity desk, refer to the following common problems and solutions:
| Problem | Possible Cause | Solution |
|---|---|---|
| Lights do not turn on. | Not plugged in; power outage; faulty connection; touch switch issue. | Ensure the vanity is plugged into a working outlet. Check household circuit breaker. Verify all electrical connections are secure. Try pressing the touch switch firmly. |
| Lights are dim or flickering. | Brightness setting too low; loose connection. | Long press the touch switch to increase brightness. Check electrical connections. |
| Power outlets/USB ports not working. | Not plugged in; power outage; device not compatible; faulty outlet. | Confirm the vanity is plugged in. Test with a different device. Check if the device requires more power than supplied. |
| Vanity feels wobbly. | Loose fasteners; uneven floor. | Tighten all assembly screws and fasteners. Place shims under the base if the floor is uneven. |
If the problem persists after attempting these solutions, please contact Yanosaku customer support for further assistance.
8. Specifications
| Feature | Detail |
|---|---|
| Model Number | VD024-WH |
| Brand | Yanosaku |
| Product Dimensions (L x W x H) | 43.3" x 15.75" x 55.1" (110 cm x 40 cm x 140 cm) |
| Item Weight | 116 pounds (52.6 kg) |
| Material | Engineered Wood |
| Color | White |
| Lighting Modes | 3 (Cool White, Natural Light, Warm Yellow) |
| Brightness Adjustment | Adjustable via long press touch switch |
| Power Outlets | 2 x 125V/12A AC outlets |
| USB Ports | 2 x 5V/2A USB ports |
| Power Cord Length | 5.0 feet |
| Storage | 7 Drawers, 6 Open Shelves, 1 Hair Dryer Holder |

Image 8.1: Dimensional diagram of the vanity desk, indicating width, height, and depth.
9. Warranty and Support
Yanosaku is committed to providing high-quality products. For any questions, missing parts, or issues not covered in this manual, please contact our customer support team. Details for contacting support are typically found on the product packaging or the retailer's website where the product was purchased.
Please retain your proof of purchase for warranty claims.