1. Introduction
This manual provides detailed instructions for the installation, operation, and maintenance of your Hawkray Solar Security Camera. Please read this manual thoroughly before using the product to ensure proper functionality and safety.
2. Product Components
Verify that all components listed below are present in your package. If any items are missing or damaged, please contact customer support.

Image 2.1: Included components for the Hawkray Solar Security Camera system.
- Solar Panel (x2)
- Security Camera (x2)
- Mounting Brackets (x2)
- USB Charging Cable (x2)
- Mounting Screws and Wall Plugs (x4 sets)
- Positioning Stickers (x4)
- User Manual (this document)

Image 2.2: Detailed view of the Hawkray Solar Security Camera's external components and ports.
Key Camera Components:
- Lens: Captures video footage.
- Night Lights: Provide illumination for color night vision.
- Indicator Light: Shows camera status.
- PIR Sensor: Passive Infrared sensor for motion detection.
- MIC: Microphone for audio input.
- TF Card/Reset: Slot for Micro SD card and reset button.
- Wi-Fi Antenna: For wireless network connection.
- Speaker: For two-way audio output and siren.
- SD Card Slot: For local video storage (supports up to 128GB, card not included).
- Charge Port: USB port for charging.
- OFF-ON Switch: Power switch for the camera.
3. Setup and Installation
Follow these steps to properly install your Hawkray Solar Security Camera.
3.1 Charging the Camera
Before initial use, fully charge the camera using the provided USB cable. Connect the USB cable to the camera's charge port and a standard 5V/2A USB power adapter (not included). The indicator light will show charging status.
3.2 App Download and Account Registration
- Scan the QR code on the packaging or in the quick start guide to download the recommended mobile application (e.g., "V-CAM" or similar).
- Install the app and create a new user account.
3.3 Camera Pairing with Wi-Fi
- Ensure your smartphone is connected to a 2.4GHz or 5GHz Wi-Fi network.
- Power on the camera using the OFF-ON switch.
- Open the app, tap "Add Device" or the "+" icon.
- Follow the on-screen instructions to connect the camera to your Wi-Fi network. This typically involves scanning a QR code displayed on your phone with the camera lens.
- Once connected, the camera's indicator light will change, and you will receive a confirmation in the app.
3.4 Mounting the Camera and Solar Panel
Choose a location with good Wi-Fi signal and direct sunlight exposure for the solar panel. The camera should be mounted at a height that provides optimal viewing angle and motion detection coverage.

Image 3.1: Hawkray Solar Security Cameras with solar panels.
- Mark Drilling Positions: Use the positioning sticker to mark the drill holes on the wall or mounting surface.
- Drill Holes: Drill holes at the marked positions. Insert wall plugs if mounting on masonry.
- Attach Bracket: Secure the mounting bracket to the wall using the provided screws.
- Mount Camera: Attach the camera to the mounting bracket. Adjust the angle as needed.
- Mount Solar Panel: Position the solar panel in an area that receives maximum direct sunlight throughout the day. Connect the solar panel cable to the camera's charge port.
4. Operating Instructions
4.1 Live View and Pan-Tilt Control
Open the mobile app and select your camera to access the live video feed. Use the on-screen controls to pan (horizontal) and tilt (vertical) the camera for a 360° view of the monitored area.

Image 4.1: Illustrates the 360° pan and tilt functionality of the camera.
4.2 Two-Way Audio
The camera supports two-way audio communication. In the live view, tap the microphone icon to speak through the camera's speaker. Tap the speaker icon to listen to audio from the camera's microphone.

Image 4.2: Demonstrates the two-way audio feature for communication.
4.3 Motion Detection and Alerts
The camera features PIR motion detection and smart AI alerts to identify human, pet, package, and vehicle movement. Configure detection zones and sensitivity settings within the app.

Image 4.3: Smart alerts and motion tracking for various objects.
When motion is detected, the camera can:
- Send push notifications to your phone.
- Activate a siren alarm (manual or automatic).
- Trigger a white light flashing alarm (manual or automatic).
- Record video footage to the Micro SD card or cloud storage.

Image 4.4: Smart PIR motion detection with siren and white light alarm capabilities.
4.4 Night Vision
The camera supports both infrared and color night vision. Color night vision is activated by the built-in white lights when motion is detected or can be manually enabled in the app, providing clearer, full-color images in low-light conditions.
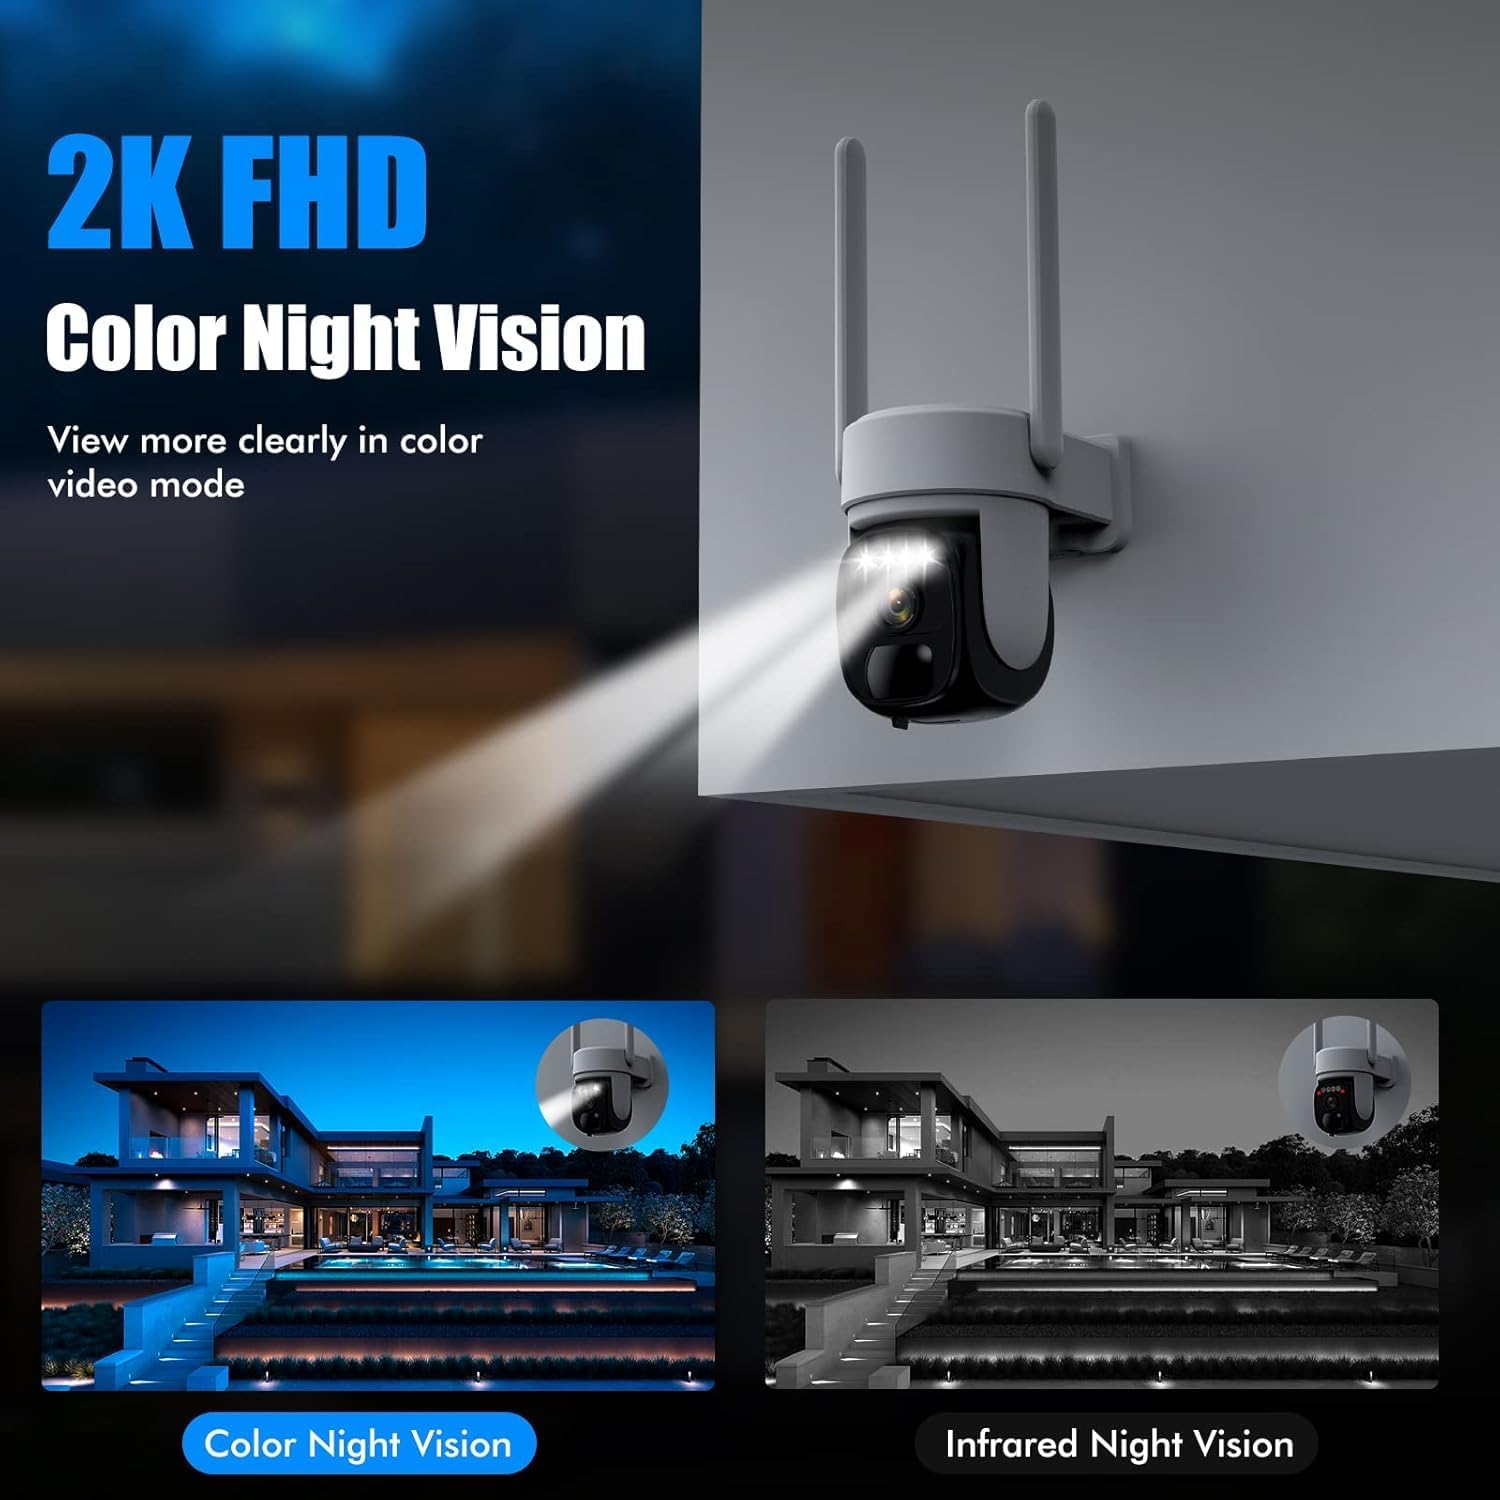
Image 4.5: Comparison of color night vision and infrared night vision.
4.5 Video Storage
Video footage can be stored locally on a Micro SD card (up to 128GB, not included) or via optional cloud storage services (a trial may be available).

Image 4.6: Flexible storage options including Micro SD card and cloud service.
5. Maintenance
5.1 Cleaning
- Regularly clean the camera lens and solar panel with a soft, damp cloth to ensure optimal performance.
- Avoid using harsh chemicals or abrasive materials that could damage the surfaces.
5.2 Battery Care
- Ensure the solar panel receives adequate direct sunlight to keep the camera battery charged.
- In prolonged periods of low sunlight, you may need to manually charge the camera using the USB cable.
- The camera is designed for outdoor use with IP65 waterproofing, making it durable in various weather conditions.

Image 5.1: IP65 waterproof rating ensures durability in various weather conditions.
6. Troubleshooting
| Problem | Possible Cause | Solution |
|---|---|---|
| Camera not powering on | Low battery; Power switch off | Charge the camera fully; Ensure the power switch is in the ON position. |
| Unable to connect to Wi-Fi | Incorrect Wi-Fi password; Camera too far from router; Router settings issue (e.g., 5GHz only, but camera supports both 2.4G & 5G); Incorrect pairing process. | Verify Wi-Fi password; Move camera closer to router; Ensure router supports 2.4GHz or 5GHz and try pairing again; Reset camera and re-attempt pairing. |
| No motion detection alerts | PIR sensitivity too low; Detection zone not set; App notifications disabled; Obstructions in detection area. | Increase PIR sensitivity in app; Define detection zones; Enable app notifications; Clear any obstructions. |
| Poor video quality at night | Lens dirty; Insufficient ambient light for color night vision; Infrared LEDs obstructed. | Clean the camera lens; Ensure white lights are enabled for color night vision; Check for obstructions blocking infrared LEDs. |
| Solar panel not charging | Insufficient sunlight; Panel dirty; Cable disconnected. | Relocate panel to receive more direct sunlight; Clean the solar panel surface; Ensure cable is securely connected. |
7. Specifications
- Model: B0FM7VX4FK
- Resolution: 2K (2560x1440)
- Connectivity: 2.4GHz & 5GHz Wi-Fi
- Pan/Tilt Range: 360° Horizontal, 90° Vertical
- Zoom: 3X Digital Zoom
- Night Vision: Color Night Vision, Infrared Night Vision
- Audio: Two-Way Audio
- Detection: PIR Motion Detection, AI Human/Pet/Package/Vehicle Detection
- Alarm: Siren, White Light Flashing Alarm
- Storage: Micro SD Card (up to 128GB, not included), Cloud Storage (optional)
- Weather Resistance: IP65 Waterproof
- Power: Solar Powered with Built-in Battery
8. Warranty and Support
For warranty information, technical support, or any inquiries regarding your Hawkray Solar Security Camera, please refer to the contact information provided with your purchase or visit the official Hawkray website. Keep your purchase receipt as proof of purchase for warranty claims.