Introduction
Thank you for choosing the LINSY HOME 9-Drawer Dresser, Model HC318E. This manual provides comprehensive instructions for the safe assembly, proper use, and effective maintenance of your new furniture. Please read all instructions carefully before beginning assembly and retain this manual for future reference.

Image: The LINSY HOME 9-Drawer Dresser, Model HC318E, featuring a black wood grain finish and metal handles, positioned in a bedroom with green walls and decorative items.
Safety Information
WARNING: Furniture tip-over can cause serious or fatal crushing injuries. To prevent this product from overturning, it must be permanently attached to the wall using the wall attachment device provided. Always use tip-over restraints. Never allow children to climb or hang on drawers, doors, or shelves.

Image: A diagram illustrating the three steps for installing the wall attachment device to secure the dresser and prevent tip-over.
- Ensure all parts are present and undamaged before assembly.
- Assemble on a soft, clean surface to prevent scratches.
- Do not overtighten screws.
- Keep small parts away from children.
- Two people are recommended for assembly.
What's in the Box
Your LINSY HOME 9-Drawer Dresser package includes all necessary panels, hardware, and drawer slides for assembly. Please verify all components against the parts list provided in your packaging before starting assembly.
Video: An overview of all components included in the LINSY HOME dresser package, laid out on a white surface, followed by a step-by-step demonstration of the assembly process.
Setup and Assembly Instructions
Follow these steps carefully for proper assembly. A screwdriver and hammer are required (not included).
- Prepare Drawer Slides: Attach the drawer slides to the designated side panels using the provided screws. Ensure they are securely fastened.
- Assemble Base Frame: Connect the bottom and side panels of the dresser frame. Use screws to secure the connections.
- Install Support Beams: Attach the horizontal support beams between the side panels to create the internal structure for the drawers.
- Attach Top Panel: Carefully place and secure the top panel onto the assembled frame.
- Install Back Panel: Position the back panel and secure it to the frame using small nails or screws.
- Assemble Drawers: For each drawer, attach the drawer slides to the drawer sides, then assemble the drawer box using screws. Attach the handles to the drawer fronts.
- Insert Drawers: Carefully slide each assembled drawer into its designated slot in the dresser frame.
- Secure to Wall: Using the provided anti-tip kit, secure the dresser to a wall stud to prevent accidental tipping.
For a visual guide, please refer to the "How to install" video in the "What's in the Box" section, which demonstrates the complete assembly process.
Operating Instructions
- Drawer Usage: The dresser features nine smooth-gliding deep drawers for classified storage. Open and close drawers gently to ensure longevity of the slides.
- Weight Capacity: The dresser has a weight capacity of 150 lbs for the top surface. Distribute weight evenly within drawers to prevent strain on the structure.
- Versatile Placement: This unit can function as a bedroom dresser, an accent cabinet in a living room, or a TV stand. Ensure the TV's base fits within the top surface dimensions (53.1"W x 15.7"D) and does not exceed the weight capacity.

Image: An internal view of the dresser's compartments, demonstrating the ample storage space for various items like folded clothing, accessories, and small boxes.
Maintenance
- Cleaning: Wipe surfaces with a soft, damp cloth. Avoid harsh chemicals or abrasive cleaners, which can damage the finish.
- Dusting: Regularly dust with a dry, soft cloth.
- Spills: Blot spills immediately with a clean, dry cloth.
- Hardware: Periodically check and tighten all screws and fasteners to ensure stability.
- Drawer Slides: If drawers become stiff, a small amount of silicone lubricant can be applied to the slides.
Troubleshooting
- Drawers not sliding smoothly:
- Check if drawer slides are correctly aligned and securely fastened to both the drawer and the dresser frame.
- Ensure no obstructions are in the drawer tracks.
- Apply a small amount of silicone lubricant to the drawer slides if needed.
- Dresser feels unstable:
- Verify all assembly screws are tightened.
- Ensure the dresser is placed on a level surface.
- Confirm the anti-tip wall attachment device is properly installed and secured to a wall stud.
- Missing parts or damaged components:
- Refer to the parts list in your packaging. Contact LINSY HOME customer support for assistance.
Specifications
| Feature | Detail |
|---|---|
| Brand | LINSY HOME |
| Model Name | Dresser |
| Item Model Number | HC318E |
| Product Dimensions | 15.7"D x 53.1"W x 33.5"H |
| Color | Black |
| Material Type | Manufactured wood |
| Item Weight | 120 Pounds |
| Assembly Required | Yes |
| Number of Drawers | 9 |
| UPC | 810199832999 |
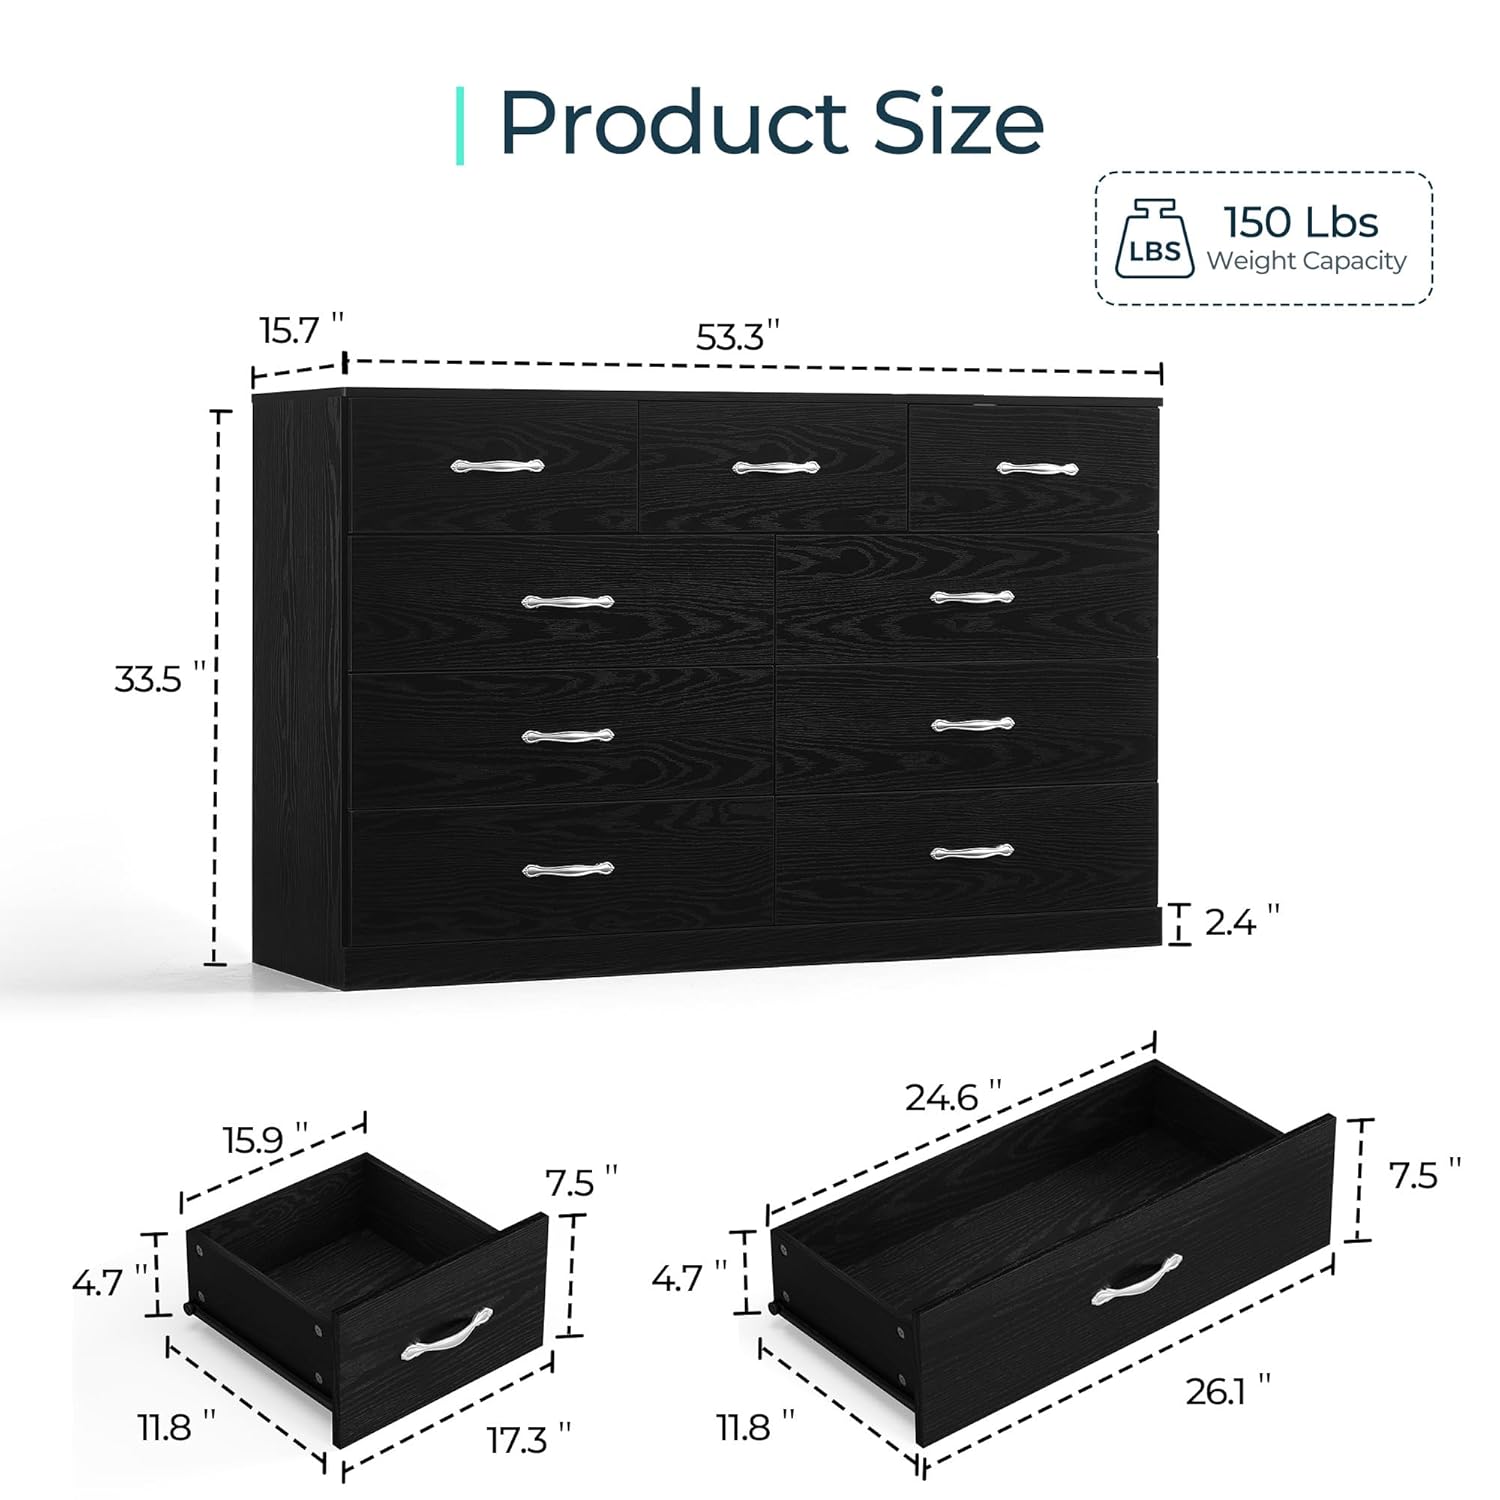
Image: A technical drawing showing the precise dimensions of the LINSY HOME 9-Drawer Dresser, including overall height, width, depth, and individual drawer dimensions.
Warranty and Support
For any questions, concerns, or to report missing/damaged parts, please contact LINSY HOME customer support. While specific warranty details are not provided in this manual, additional protection plans may be available for purchase through your retailer.
For customer support, please visit the LINSY HOME Store on Amazon or contact your point of purchase.