Important Safety Instructions
When using electrical appliances, basic safety precautions should be followed, including the following:
- Read all instructions before using the appliance.
- Do not operate any appliance with a damaged cord or plug, or after the appliance malfunctions or has been damaged in any manner.
- Do not use outdoors.
- Do not immerse cord, plugs, or appliance in water or other liquid.
- Close supervision is necessary when any appliance is used by or near children.
- Always unplug from outlet when not in use and before cleaning.
- Do not let cord hang over edge of table or counter, or touch hot surfaces.
- Do not place on or near a hot gas or electric burner, or in a heated oven.
- Do not use appliance for other than intended use.
- Always attach plug to appliance first, then plug cord into the wall outlet. To disconnect, turn any control to "off", then remove plug from wall outlet.
- Extreme caution must be used when moving an appliance containing hot oil or other hot liquids.
- This appliance is intended for household use only.
Product Overview
The Total Chef Retro Microwave Oven combines a classic aesthetic with modern functionality, offering convenient and efficient cooking for various food items.

Front view of the Total Chef Retro Microwave Oven, showcasing its black finish and chrome accents.
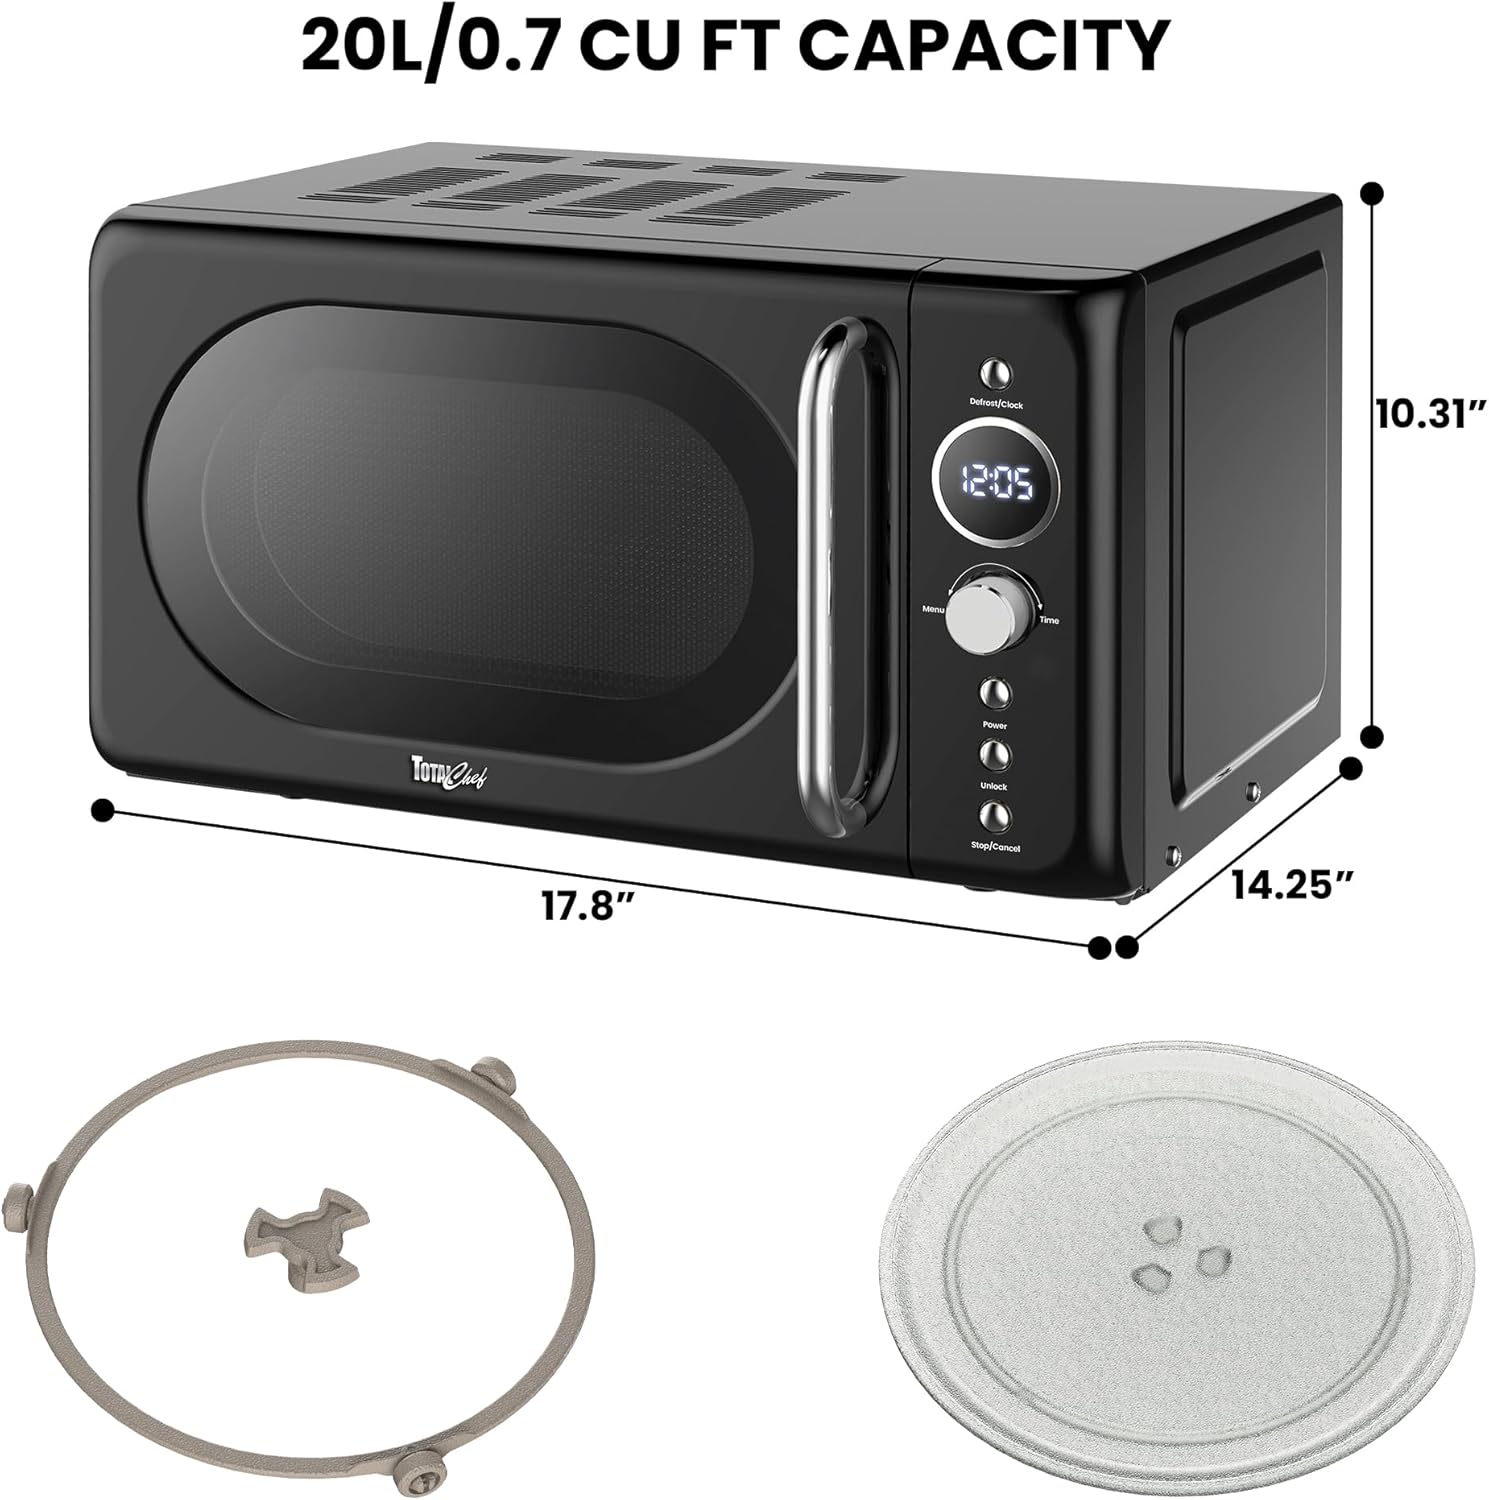
Diagram illustrating the dimensions of the microwave oven (17.8"D x 14.25"W x 10.31"H) and its included components: the glass turntable and roller ring.
Setup and Installation
- Unpacking: Carefully remove the microwave oven and all packing materials from the carton. Check for any damage.
- Placement: Place the microwave on a flat, stable surface that is strong enough to hold the oven and the food you place in it. Ensure there is adequate ventilation space around the unit (at least 4 inches on sides and back, 12 inches above).
- Power Connection: Plug the power cord into a grounded electrical outlet. Ensure the voltage matches the appliance's requirements (700W).
- Turntable Assembly: Place the roller ring in the center of the microwave cavity. Then, place the glass turntable securely on top of the roller ring.
Operating Instructions
Control Panel Overview

Close-up of the microwave's control panel, featuring the LED display, Defrost/Clock button, Menu button, Time dial, Power button, Unlock button, and Stop/Cancel button.
- LED Display: Shows time, cooking settings, and program indicators.
- Defrost/Clock Button: Used to set the clock or initiate defrost by time/weight.
- Menu Button: Accesses pre-set cooking modes.
- Time Dial: Adjusts cooking time or weight for defrosting.
- Power Button: Selects power levels (6 available).
- Unlock Button: Disables the child lock feature.
- Stop/Cancel Button: Stops cooking, clears settings, or cancels a program.
Basic Cooking

Illustration of food being cooked inside the microwave, demonstrating its powerful performance.
- Place food in a microwave-safe container on the glass turntable.
- Close the microwave door securely.
- Turn the Time Dial to set the desired cooking time.
- Press the Power Button repeatedly to select a power level (default is 100% power).
- Press the Time Dial (push to start) to begin cooking.
Pre-set Cooking Modes
This microwave features 8 pre-programmed functions for common food items:

Visual representation of the 8 auto cook programs available on the microwave: Beverages, Rice, Pasta, Potato, Reheat, Fish, Pizza, and Popcorn.
- Coffee
- Rice
- Pasta
- Potato
- Reheat
- Fish
- Pizza
- Popcorn
To use a pre-set mode:
- Press the Menu Button repeatedly until the desired food type appears on the display.
- Turn the Time Dial to select the quantity or weight if prompted.
- Press the Time Dial (push to start) to begin cooking.
Defrosting (Weight/Time)
- Place frozen food in the microwave.
- Press the Defrost/Clock Button once for defrost by weight, or twice for defrost by time.
- Turn the Time Dial to set the weight or time.
- Press the Time Dial (push to start) to begin defrosting.
Child Lock Feature
The microwave includes a two-step safety child lock to prevent accidental operation.

Illustration of the 2-step safety lock mechanism, which secures the microwave door.
To activate the child lock:
- Press and hold the Stop/Cancel Button for 3 seconds until "LOCK" appears on the display.
To deactivate the child lock:
- Press and hold the Unlock Button for 3 seconds until "LOCK" disappears from the display.
Maintenance and Cleaning
- Exterior Cleaning: Wipe the exterior of the microwave with a soft, damp cloth. Do not use abrasive cleaners or harsh chemicals.
- Interior Cleaning: For spills and splatters, wipe the interior with a damp cloth and mild detergent. For stubborn stains, place a bowl of water with lemon slices inside and microwave for a few minutes to create steam, then wipe clean.
- Glass Turntable and Roller Ring: The glass turntable and roller ring are removable and dishwasher-safe for easy cleaning. Ensure they are completely dry before placing them back in the microwave.
- Door Seal: Regularly clean the door seal and surrounding areas to ensure proper closure and efficient operation.
Troubleshooting
| Problem | Possible Cause | Solution |
|---|---|---|
| Microwave does not start. | Power cord not plugged in; Door not closed properly; Child lock activated. | Ensure plug is securely in outlet; Close door firmly; Deactivate child lock by holding Unlock button. |
| Food not cooking evenly. | Food not stirred or rotated; Incorrect power level or cooking time. | Stir or rotate food halfway through cooking; Adjust power level and cooking time as needed. |
| Light bulb not working. | Light bulb needs replacement. | Contact customer support for bulb replacement instructions or service. |
| Unusual noise during operation. | Turntable not seated correctly; Foreign object in cavity. | Ensure turntable and roller ring are properly placed; Check for and remove any foreign objects. |
Specifications
- Model: TCMOR-Black
- Capacity: 0.7 Cubic Feet (20L)
- Wattage: 700 watts
- Product Dimensions (D x W x H): 17.8" x 14.25" x 10.31"
- Item Weight: 2.31 pounds
- Material: Steel
- Color: Black
- Installation Type: Countertop
- Included Components: Microwave, glass turntable, roller ring
Warranty and Support
For warranty information or technical support, please contact TOTAL Chef customer service. Keep your purchase receipt as proof of purchase.
Manufacturer: Koolatron China
Date First Available: August 13, 2025
For further assistance, please visit the official TOTAL Chef website or refer to the contact information provided with your product packaging.


