Important Safeguards
When using electrical appliances, basic safety precautions should always be followed to reduce the risk of fire, electric shock, and injury to persons. Read all instructions carefully before using the AIRMSEN Cold Press Slow Juicer.
- Always ensure the juicer is properly assembled before operation.
- Do not immerse the motor base in water or other liquids.
- Unplug the appliance from the outlet when not in use, before assembling or disassembling parts, and before cleaning.
- Keep hands and utensils away from moving parts during operation to prevent injury.
- Do not operate any appliance with a damaged cord or plug, or after the appliance malfunctions or has been damaged in any manner.
- This appliance is for household use only. Do not use outdoors.
- Ensure the lid is securely locked before starting the juicer.
- Do not force food into the feeding chute. Use the food pusher provided.
Product Overview
The AIRMSEN Cold Press Slow Juicer is designed for efficient juice extraction from fruits and vegetables, preserving nutrients through its slow masticating process. It features a wide feed chute and a filter-free design for ease of use and cleaning.

Figure 1: Fully assembled AIRMSEN Cold Press Slow Juicer.
Key Components
- Motor Base: Contains the powerful 300W pure-copper motor.
- Feeding Chute: Extra-large 141mm (6.0-inch) opening for whole fruits and vegetables.
- Auger: 7-stage upgraded spiral auger for efficient pressing.
- Juice Bowl: Collects the extracted juice.
- Pulp Outlet: Discharges dry pulp.
- Juice Outlet: Dispenses fresh juice.
- Lid with Safety Lock: Secures components and activates operation.
- Food Pusher: For safely guiding ingredients into the chute.
- Cleaning Brush: For easy maintenance.

Figure 2: The 7-stage spiral auger, designed for maximum juice extraction.
Setup and Assembly
Follow these steps to correctly assemble your AIRMSEN Cold Press Slow Juicer before first use.

Figure 3: Easy 4-step assembly guide for the juicer.
- Step 1: Align Outlets. Place the juice bowl onto the motor base, aligning the two outlets (juice and pulp) with their corresponding slots on the base.
- Step 2: Place Filter. Insert the filter component into the juice bowl. It can be placed in any direction due to its filter-free design.
- Step 3: Insert Auger. Place the spiral auger into the center of the filter and juice bowl assembly, ensuring the spiral side is facing upwards.
- Step 4: Secure Lid. Open the lid, twist the feeding chute hopper into its slot on top of the auger and juice bowl, and align the dot on the lid with the lock symbol. Close the lid securely until it clicks into place. The juicer will not operate unless the lid is properly locked.
Operating Instructions
1. Ingredient Preparation
The AIRMSEN juicer features a 141mm (6.0-inch) extra-large feeding chute, allowing most fruits and vegetables to be juiced whole, reducing preparation time.
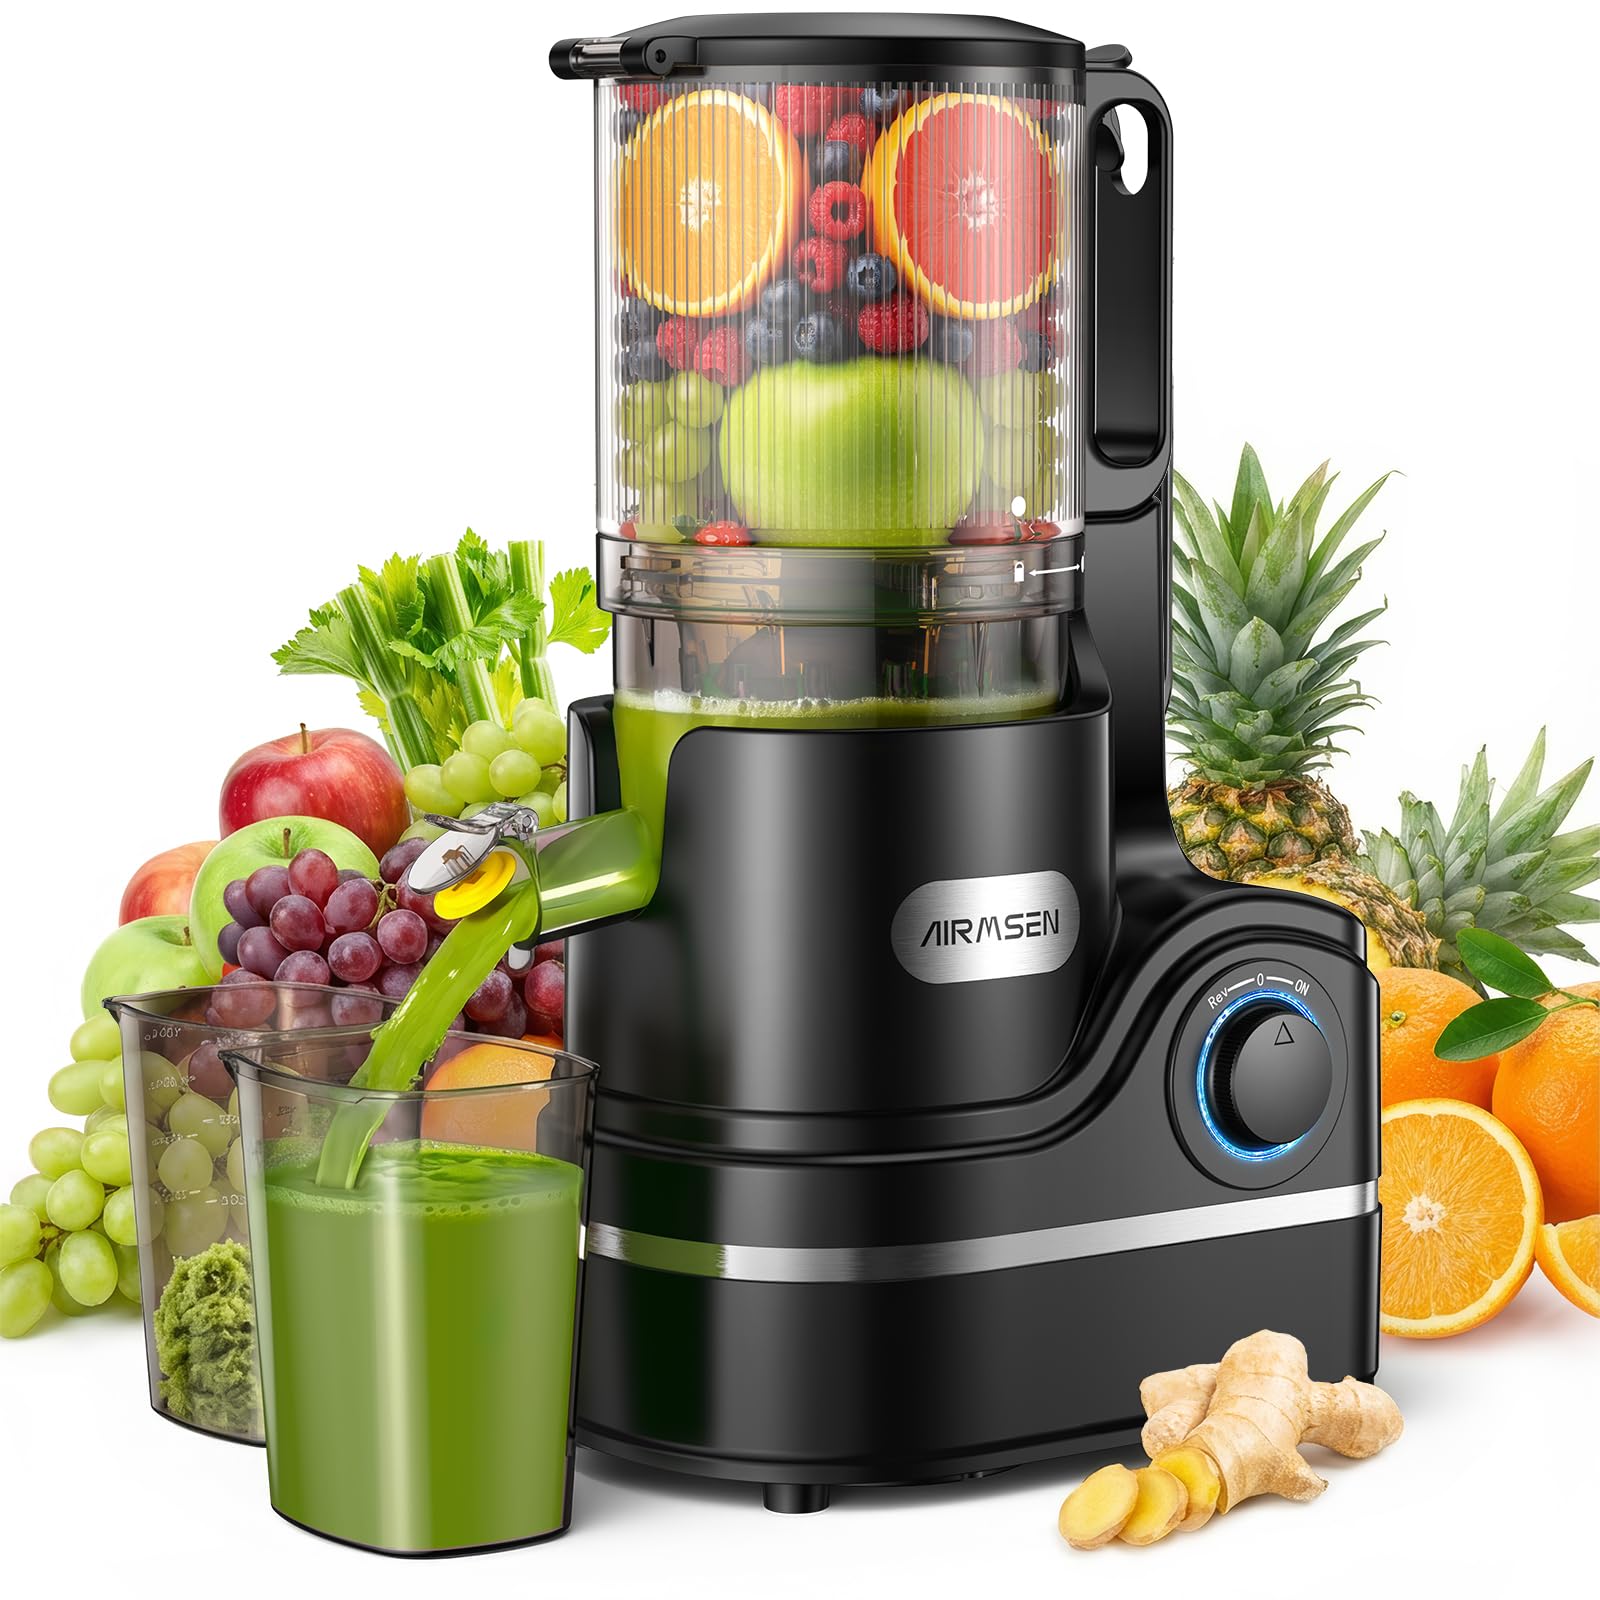
Figure 4: The 141mm wide feed chute accommodates large produce.
- Wash all fruits and vegetables thoroughly.
- For very large items, or items with hard pits/seeds (e.g., peaches, avocados), remove pits and cut into smaller pieces if necessary to fit comfortably into the chute.
- Remove hard skins from fruits like pineapple, mango, and citrus.
- Fibrous vegetables like celery or kale can be juiced whole, but cutting them into shorter lengths (approx. 2-3 inches) can help prevent tangling and optimize juice yield.
2. Juicing Process
- Ensure the juicer is fully assembled and the lid is securely locked.
- Place a juice collection cup under the juice outlet and a pulp collection container under the pulp outlet.
- Plug the power cord into a grounded electrical outlet.
- Turn the power switch to the 'ON' position. The juicer will begin operating at 55 RPM.
- Slowly feed prepared ingredients into the feeding chute. Use the food pusher only if necessary to gently guide ingredients. Do not force ingredients.
- The juicer will extract juice, which will flow into the juice cup, and separate the pulp into the pulp container.
- If the juicer becomes clogged, turn the switch to the 'REV' (Reverse) position for a few seconds to clear the blockage, then switch back to 'ON'.
- Once juicing is complete, turn the power switch to 'OFF' and unplug the appliance.
3. Safety Features
The AIRMSEN juicer is equipped with safety mechanisms to ensure safe operation.

Figure 5: Lid-activated safety and safety lock mechanisms.
- Lid-Activated: The machine will only start when the lid is properly closed and locked. It will stop if the lid is opened during operation.
- Safety Lock: The lid can only be closed and secured when all internal components are correctly aligned, ensuring stable and safe operation.
- Overheating Protection: The juicer's 300W pure-copper motor includes an overheating protection system that automatically shuts down the unit if it becomes too hot, preventing damage. Allow the unit to cool down before resuming operation.
Maintenance and Cleaning
Regular cleaning ensures optimal performance and longevity of your juicer. The filter-free design makes cleaning significantly easier.

Figure 6: Cleaning the juicer components under running water.
- Unplug: Always unplug the juicer from the power outlet before cleaning.
- Disassemble: Disassemble the juicer by reversing the assembly steps.
- Rinse: Rinse all detachable parts (lid, feeding chute, auger, juice bowl, filter) under running water immediately after use. This prevents pulp from drying and sticking.
- Brush: Use the provided cleaning brush to remove any remaining pulp from crevices or the auger. The filter-free design means no fine mesh to scrub.
- Wash: Hand wash all detachable parts with warm, soapy water. While some parts may be dishwasher safe, hand washing is recommended for longevity. Do not wash the motor base.
- Wipe Motor Base: Wipe the motor base with a damp cloth. Never immerse it in water.
- Dry: Ensure all parts are completely dry before reassembling or storing the juicer.

Figure 7: The filter-free design simplifies cleaning by eliminating traditional mesh filters.
Troubleshooting
If you encounter issues with your juicer, refer to the following common problems and solutions.
| Problem | Possible Cause | Solution |
|---|---|---|
| Juicer does not start. | Not plugged in; Lid not securely locked; Overheat protection activated. | Ensure power cord is plugged in. Check if the lid is properly closed and locked. If motor is hot, unplug and let cool for 30 minutes. |
| Juicer stops during operation. | Overload/Overheat protection activated; Lid opened. | Unplug and let cool. Check if the lid was accidentally opened. Reduce the amount of ingredients being fed. |
| Excessive vibration or noise. | Improper assembly; Hard ingredients. | Disassemble and reassemble the juicer, ensuring all parts are correctly aligned and locked. Cut hard ingredients into smaller pieces. |
| Pulp is wet. | Overfeeding; Certain types of produce. | Feed ingredients slowly. Some very soft or watery produce may naturally yield wetter pulp. |
| Juice leaks from the base. | Improper assembly; Damaged seal. | Ensure the juice bowl and auger are correctly seated and the lid is locked. Check for any visible damage to seals or components. |
If the problem persists after attempting these solutions, please contact customer support.
Specifications
Technical specifications for the AIRMSEN Cold Press Slow Juicer.

Figure 8: High-performance 300W pure-copper motor.
| Feature | Detail |
|---|---|
| Brand | AIRMSEN |
| Model | Cold Press Slow Juicer with 141mm Wide Feed Chute |
| Color | Black |
| Motor Power | 300W Pure-Copper Motor |
| Speed | 55 RPM (Slow Speed Pressing) |
| Feeding Chute Size | 141mm (6.0 inches) |
| Product Dimensions (D x W x H) | 11.42" x 7.87" x 19.29" |
| Item Weight | 9.7 Pounds |
| Special Features | Auto-Reversing, Easy to Clean, Overheat Protection, Powerful Motor, Whole Fruit Processing, Filter-Free Design, Low Noise (≤60dB) |
| Product Care Instructions | Hand Wash Only (detachable parts) |
| Material | BPA-Free materials |

Figure 9: Juicer dimensions and BPA-free material confirmation.
Warranty and Support
For warranty information or technical support, please refer to the warranty card included with your product or contact AIRMSEN customer service directly. Keep your purchase receipt as proof of purchase.
Customer Service Contact: Please visit the official AIRMSEN website or refer to the contact details provided in your product packaging for the most up-to-date support information.