1. Introduction
The HTVRONT A300 Auto Hat Heat Press Machine is designed for efficient and precise heat transfers onto various hat types. This automatic press simplifies the heat transfer process, making it suitable for both beginners and experienced crafters. This manual provides detailed instructions for safe and effective operation, maintenance, and troubleshooting.
2. Safety Information
- Caution: Hot Surface. Avoid Contact. The heat plate reaches high temperatures during operation. Always use the provided heat-resistant gloves when handling the machine or materials during and immediately after use.
- Ensure the machine is placed on a stable, heat-resistant surface.
- Keep away from children and pets.
- Do not operate the machine with wet hands or near water.
- Unplug the machine when not in use or before cleaning and maintenance.
- Do not attempt to disassemble or repair the machine yourself. Contact customer support for assistance.
3. Package Contents
Verify that all items are present in the package:
- HTVRONT A300 Auto Hat Heat Press Machine (x1)
- Large Hat Platen (Pre-Installed) (x1)
- Small Hat Platen (x1)
- Power Cord (x1)
- Heat-Resistant Gloves (x1 pair)
- User Guide Envelope (x1)

4. Product Features
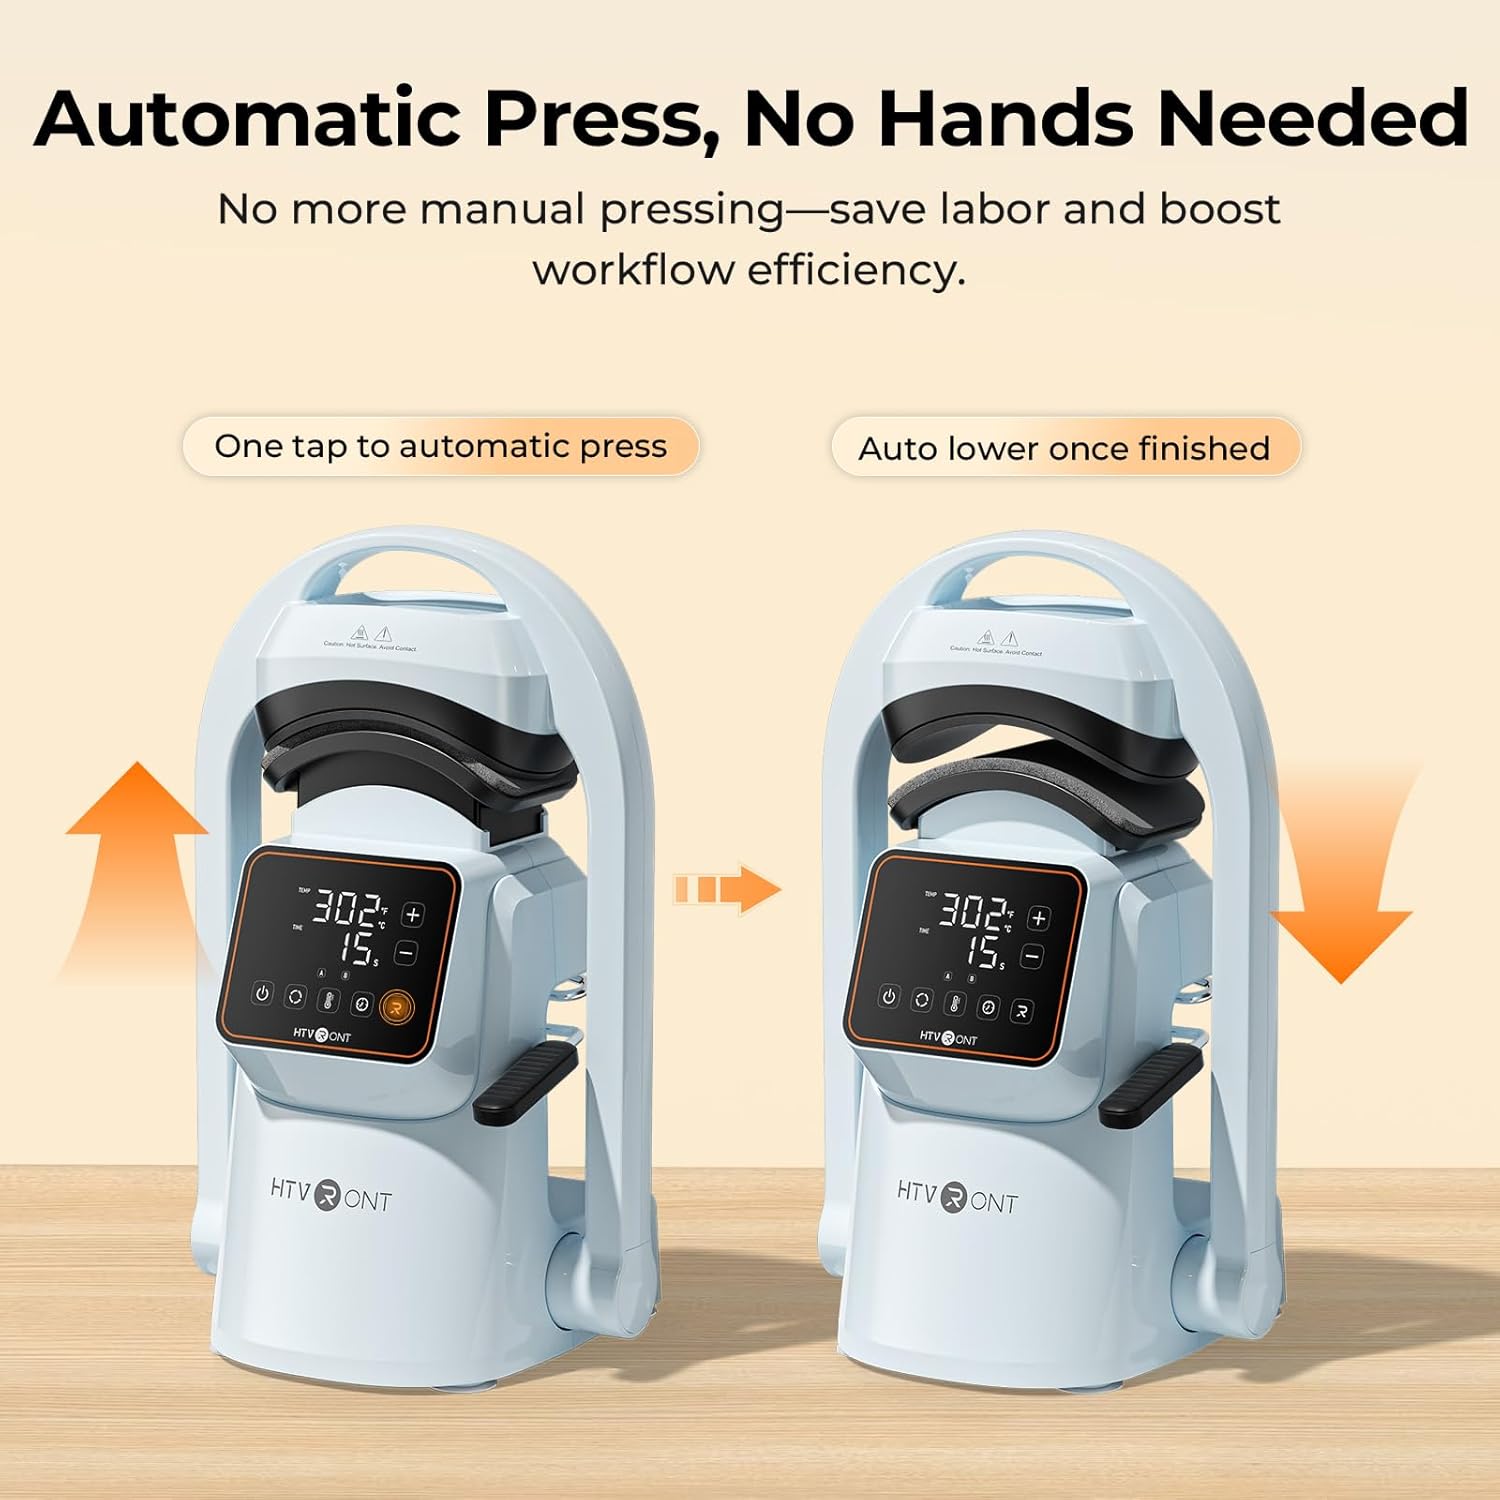
- One-Touch Automatic Press: The machine automatically lowers and lifts, applying consistent pressure and timing with a single touch, reducing manual effort.
- Strong Pressure: Delivers over 176 lb (80 kg) of pressure, suitable for various transfer materials including Hotfix rhinestones, embroidered patches, DTF transfer film, puff heat transfer vinyl, and sublimation paper.
- Dual Hat Platens: Includes two quick-swap platens for adult and children's hat sizes, ensuring even pressure and alignment for different cap styles.
- Smart Preset Modes: Features two customizable preset modes for saving preferred temperature and time settings, simplifying batch production.
- Precise Temperature & Time Control: Intuitive touchscreen allows precise adjustment of temperature (104–410°F / 40–210°C) and time (1–999 seconds).
- Even Heat Distribution: Cast-aluminum heat plate heats rapidly and distributes heat uniformly, preventing cold spots. The PTFE coating helps prevent sticking.
- Compact and Lightweight Design: Easy to store and transport.
- Strong Suction Cups: Ensures stability on your workspace during operation.
- Auto Shut-Off: Automatically powers off after 15 minutes of inactivity for safety.


5. Setup
- Unpacking: Carefully remove all components from the packaging. Retain packaging for future storage or transport.
- Placement: Place the HTVRONT A300 on a flat, stable, and heat-resistant surface. The integrated suction cups on the base will help secure the machine.
- Power Connection: Connect the power cord to the machine and then to a standard electrical outlet.
- Platen Installation: The large hat platen is typically pre-installed. To swap platens, simply remove the current platen by unscrewing it and snap the desired platen into place. Ensure it is securely fastened.

6. Operating Instructions
- Power On: Press the power button on the touchscreen display to turn on the machine.
- Set Temperature and Time: Use the intuitive touchscreen to adjust the temperature and time settings according to your transfer material's requirements. You can also select one of the two preset modes (A or B) for quick setup.
- Prepare the Hat: Pull back the handle to open the press. Place your hat onto the platen, ensuring it is centered and smooth. Use the hat stretcher (if applicable) to flatten the hat surface for optimal pressing.
- Position Transfer Material: Carefully place your DTF film, embroidery patch, sublimation paper, or other transfer material onto the desired area of the hat.
- Initiate Press: Push the handle forward to engage the lower platen. Press the 'Go' button (often indicated by 'R' or a play icon) on the touchscreen. The machine will automatically lower the heat plate, apply pressure, and begin the countdown.
- Completion: Once the timer finishes, the machine will beep, and the heat plate will automatically lift.
- Remove Hat: Pull back the handle to fully open the press. Carefully remove the hat using the heat-resistant gloves. Allow the transfer to cool before peeling (if required by your material).


Quick Reference Chart for Heat Transfer Settings
| Materials | Textile | Temp | Time | Note |
|---|---|---|---|---|
| Pure Heat Transfer Vinyl | 100% Cotton, Polycotton, Polyester, etc. | 145°C/293°F | 15s | Cold Peel |
| Giltter Heat Transfer Vinyl | 100% Cotton, Polycotton, Polyester, etc. | 150°C/302°F | 15s | Cold Peel |
| Holographic Heat Transfer Vinyl | 100% Cotton, Polycotton, Polyester, etc. | 150°C/302°F | 15s | Cold Peel |
| Chameleon Heat Transfer Vinyl | 100% Cotton, Polycotton, Polyester, etc. | 145°C/293°F | 15s | Cold Peel |
| Metallic Heat Transfer Vinyl | 100% Cotton, Polycotton, Polyester, etc. | 140°C/284°F | 10s | Cold Peel |
| Printable Heat Transfer Vinyl | 100% Cotton, Polycotton, Polyester, etc. | 145°C/293°F | 15s | Cold Peel |
| Reflective Heat Transfer Vinyl | 100% Cotton, Polycotton, Polyester, etc. | 150°C/302°F | 15s | Cold Peel |
| Flock Heat Transfer Vinyl | 100% Cotton, Polycotton, Polyester, etc. | 150°C/302°F | 15s | Cold Peel |
| Puff Heat Transfer Vinyl | 100% Cotton, Polycotton, Polyester, etc. | 155°C/311°F | 15s | Hot Peel |
| Heat Transfer Paper for Dark Fabric | 100% Cotton, Polycotton, Polyester, etc. | 160°C/320°F | 20s | Cold Peel |
| Heat Transfer Paper for Light Fabric | 160°C/320°F | 20s | Cold Peel | |
| Sublimation Paper | Polycotton, 100% Polyester, etc. | 200°C/392°F | 40s | Hot Peel |
| DTF Transfer Film | 100% Cotton, Polycotton, Polyester, etc. | 150°C/302°F | 15s | Cold Peel |
| Embroidered Patches | 100% Cotton, Polycotton, Polyester, etc. | 170°C/338°F | 20s | Cold Peel |
| Hotfix Rhinestones | 100% Cotton, Polycotton, Polyester, etc. | 175°C/347°F | 20s |
7. Maintenance
- Cleaning the Heat Plate: After the machine has cooled completely, wipe the PTFE-coated heat plate with a soft, damp cloth to remove any residue. Do not use abrasive cleaners or sharp objects that could damage the coating.
- General Cleaning: Wipe down the exterior of the machine with a dry or slightly damp cloth.
- Storage: Store the machine in a dry, dust-free environment when not in use.
8. Troubleshooting
If you encounter issues with your HTVRONT A300, refer to the following common problems and solutions:
- Machine Not Powering On: Ensure the power cord is securely plugged into both the machine and a working electrical outlet. Check if the outlet has power.
- Uneven Heat Transfer: Verify that the hat is placed smoothly on the platen and that the transfer material is flat. Ensure the correct temperature and time settings are used for your specific material.
- Transfer Material Not Sticking: Double-check the recommended temperature, time, and pressure settings for your material. Ensure the material is compatible with heat pressing.
- Machine Not Pressing Automatically: Ensure the handle is fully engaged and the 'Go' button has been pressed.
For further assistance, please contact HTVRONT customer support.
9. Specifications
| Feature | Detail |
|---|---|
| Brand | HTVRONT |
| Model | A300 |
| Material | Aluminum |
| Color | Blue |
| Product Dimensions (L x W x H) | 17.72" x 12.4" x 11.22" |
| Heat Plate Size | 5.70" x 3.68" x 2.28" (14.52 x 9.36 x 5.80 cm) |
| Hat Platen Sizes | Small: 6.69" x 2.76" (7 x 17 cm) / Large: 5.9" x 3.15" (8 x 15 cm) |
| Power | 350 W |
| Temperature Range | 104–410°F / 40–210°C |
| Time Range | 1–999 seconds |
| Maximum Pressure | ≥ 176 lb (80 kg) |
10. Warranty and Support
The HTVRONT A300 Auto Hat Heat Press Machine comes with a 1-year warranty from the date of purchase. This warranty covers manufacturing defects and malfunctions under normal use.
For warranty claims, technical support, or any questions regarding the product, please contact HTVRONT customer service through their official website or the retailer where the product was purchased. Please have your proof of purchase and product model number ready when contacting support.