1. Introduction
This manual provides detailed instructions for the proper use and maintenance of your Loewieta Wireless Microphone System, model X-G10B-Z. This system features a 500ft (150m) ultra-long range, 99 adjustable channels, and a 40-hour battery life, designed for clear audio transmission in various professional and recreational settings.
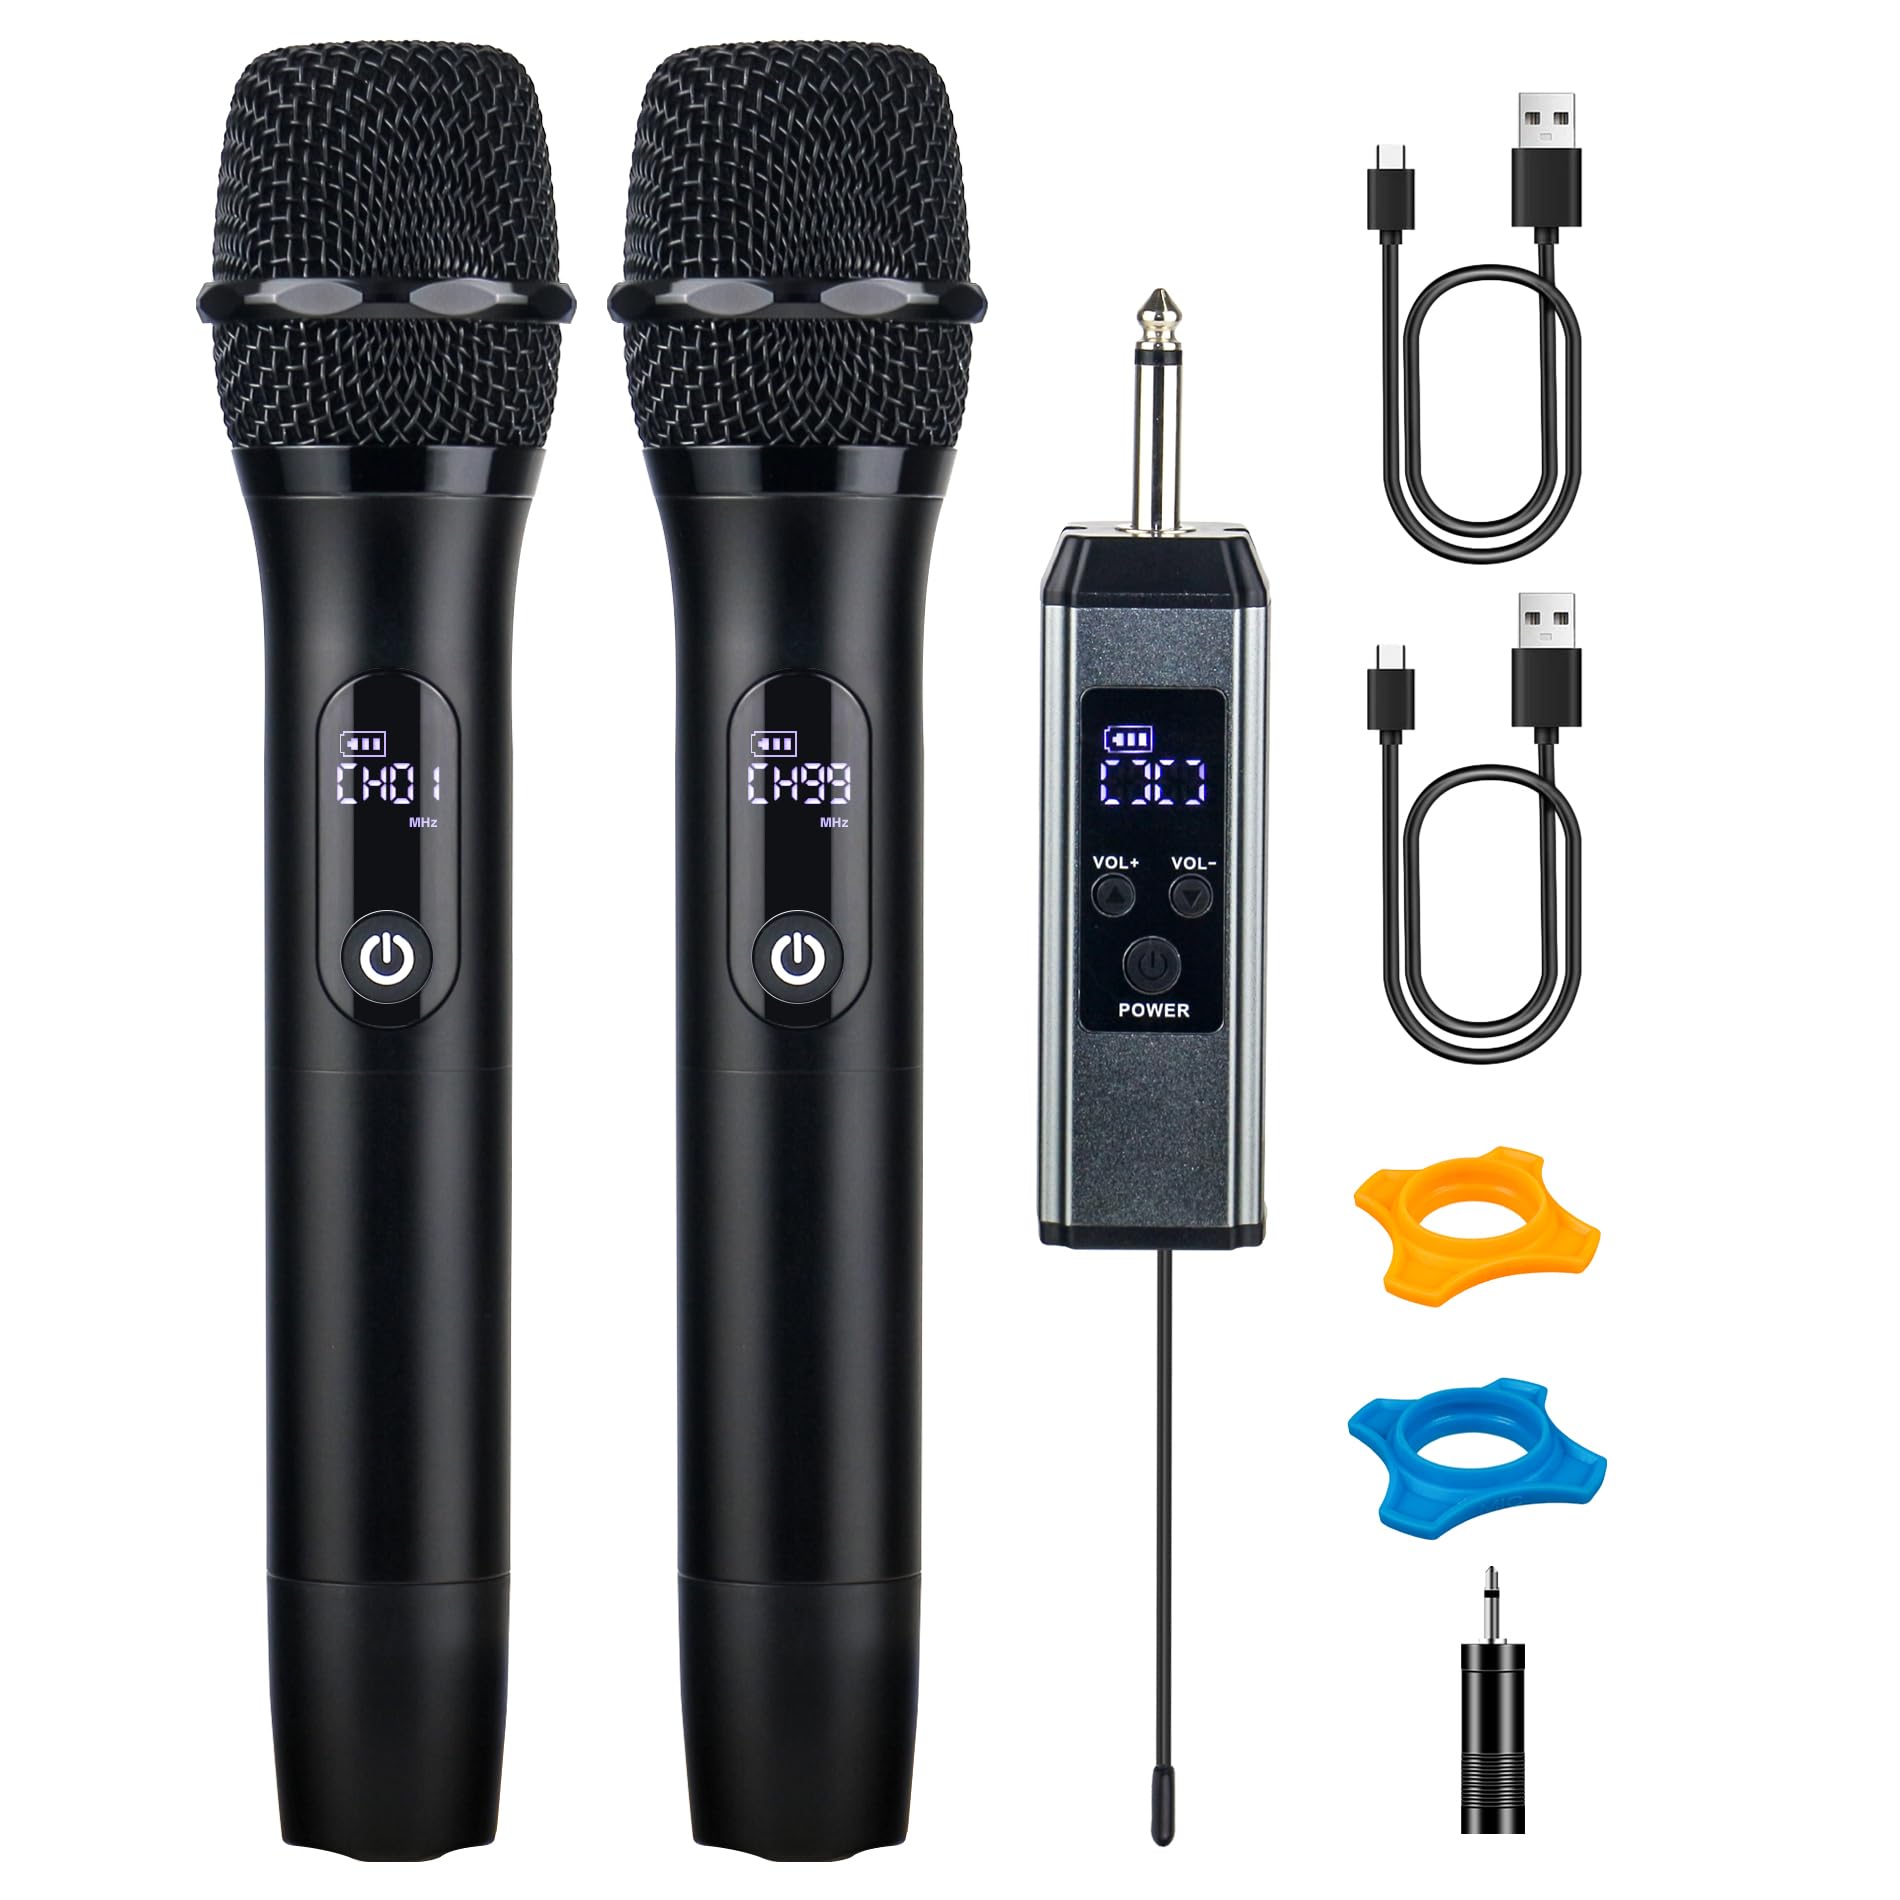
Figure 1: Loewieta Wireless Microphone System X-G10B-Z components.
2. Product Overview
2.1 Key Features
- Ultra-Long Range: Stable signal up to 500ft (150m) with advanced 2.4G dual-chip technology.
- Adjustable Channels: 99 selectable channels to avoid interference.
- Extended Battery Life: Up to 40 hours of continuous use on a single charge.
- Fast Charging: 3-hour Type-C fast charging.
- Hi-Fi Sound Quality: High-sensitivity dynamic capsule and multi-layer airflow system for clear audio.
- Noise Cancellation: Effectively blocks background noise and howling.
- Plug & Play: Automatic connection for easy setup.
- Smart LCD Display: Real-time display of battery status, signal strength, and current channel.
- Durable Construction: Metal integrated body for premium feel and reduced handling noise.
2.2 Included Components
- 2 x Wireless Microphones
- 1 x Wireless Receiver
- 2 x USB Type-C Charging Cables
- 1 x 3.5mm Adapter
- 2 x Anti-roll Rings (color may vary)
- 1 x User Manual

Figure 2: Overview of microphone and receiver features.
3. Setup Instructions
Follow these steps to set up your Loewieta Wireless Microphone System:
- Charge the Devices: Before first use, ensure both microphones and the receiver are fully charged using the provided Type-C charging cables. Refer to Section 5 for charging details.
- Connect the Receiver: Plug the wireless receiver into a 6.35mm (1/4 inch) MIC input jack on your PA system, amplifier, mixer, or karaoke machine. If your device has a 3.5mm input, use the included 3.5mm adapter.
- Power On the Receiver: Press and hold the power button on the receiver until its LCD screen illuminates.
- Power On the Microphones: Press and hold the power button on each microphone until its LCD screen illuminates. The microphones and receiver will automatically pair. The LCD display on the microphone will show the channel and volume level.
- Test Connection: Speak into the microphone to test the audio output from your connected sound system. Adjust the volume on your sound system and the microphone as needed.
Note: This system is not compatible with Bluetooth speakers that do not have a dedicated MIC input.
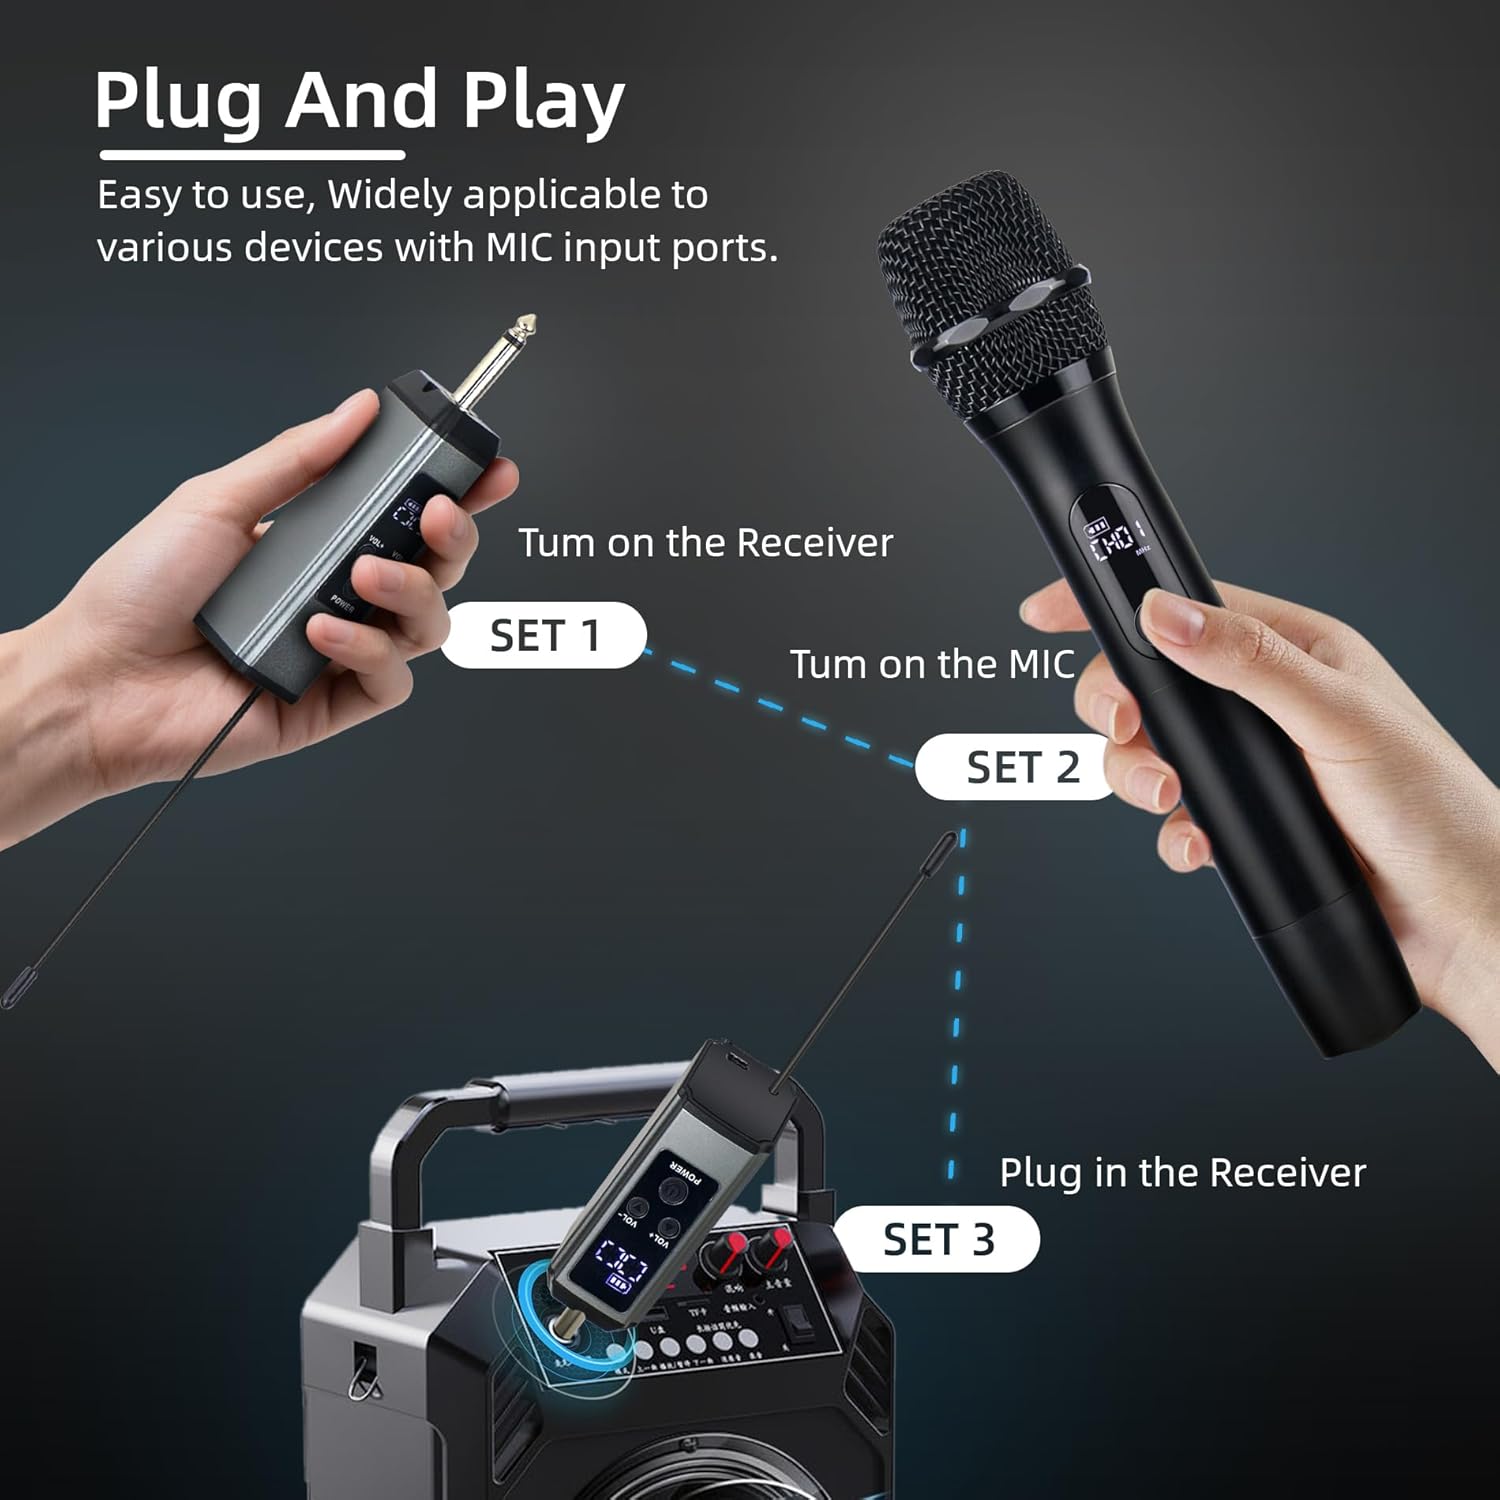
Figure 3: Plug and Play setup guide.
4. Operating Instructions
4.1 Power On/Off
- To Power On: Press and hold the power button on the microphone or receiver until the LCD screen lights up.
- To Power Off: Press and hold the power button on the microphone or receiver until the LCD screen turns off.
4.2 Channel Adjustment
The system offers 99 adjustable channels to prevent interference. If you experience signal drops or interference, you can change the channel:
- On the microphone, short press the power button to cycle through available channels. The LCD screen will display the current channel (e.g., CH01).
- The receiver will automatically synchronize with the microphone's channel.
4.3 Volume Adjustment
Each microphone has 26 levels of volume adjustment:
- Use the VOL+ and VOL- buttons on the microphone to increase or decrease the microphone's output volume.
- The current volume level (e.g., U01) will be displayed on the microphone's LCD screen.
4.4 LCD Display Information
The LCD screen on the microphone provides real-time information:
- Channel (CHxx): Indicates the currently selected operating channel.
- Volume (Uxx): Shows the microphone's current volume level.
- Battery Status: Displays the remaining battery charge.
- Signal Strength: Indicates the strength of the wireless connection.

Figure 4: Microphone DSP Audio Chip and LCD display details.

Figure 5: Demonstrating the 500ft wireless range.
5. Charging and Battery Life
The Loewieta Wireless Microphone System is equipped with high-capacity rechargeable batteries for extended use.
- Charging: Use the provided Type-C USB cables to charge both the microphones and the receiver. Connect the cables to a standard USB power adapter (not included).
- Charging Time: Approximately 3 hours for a full charge.
- Operating Time: Up to 40 hours of continuous use on a full charge.
- Battery Indicator: The LCD screen on the microphone displays the battery status. Charge the device when the battery indicator is low.

Figure 6: Type-C fast charging for microphone and receiver.
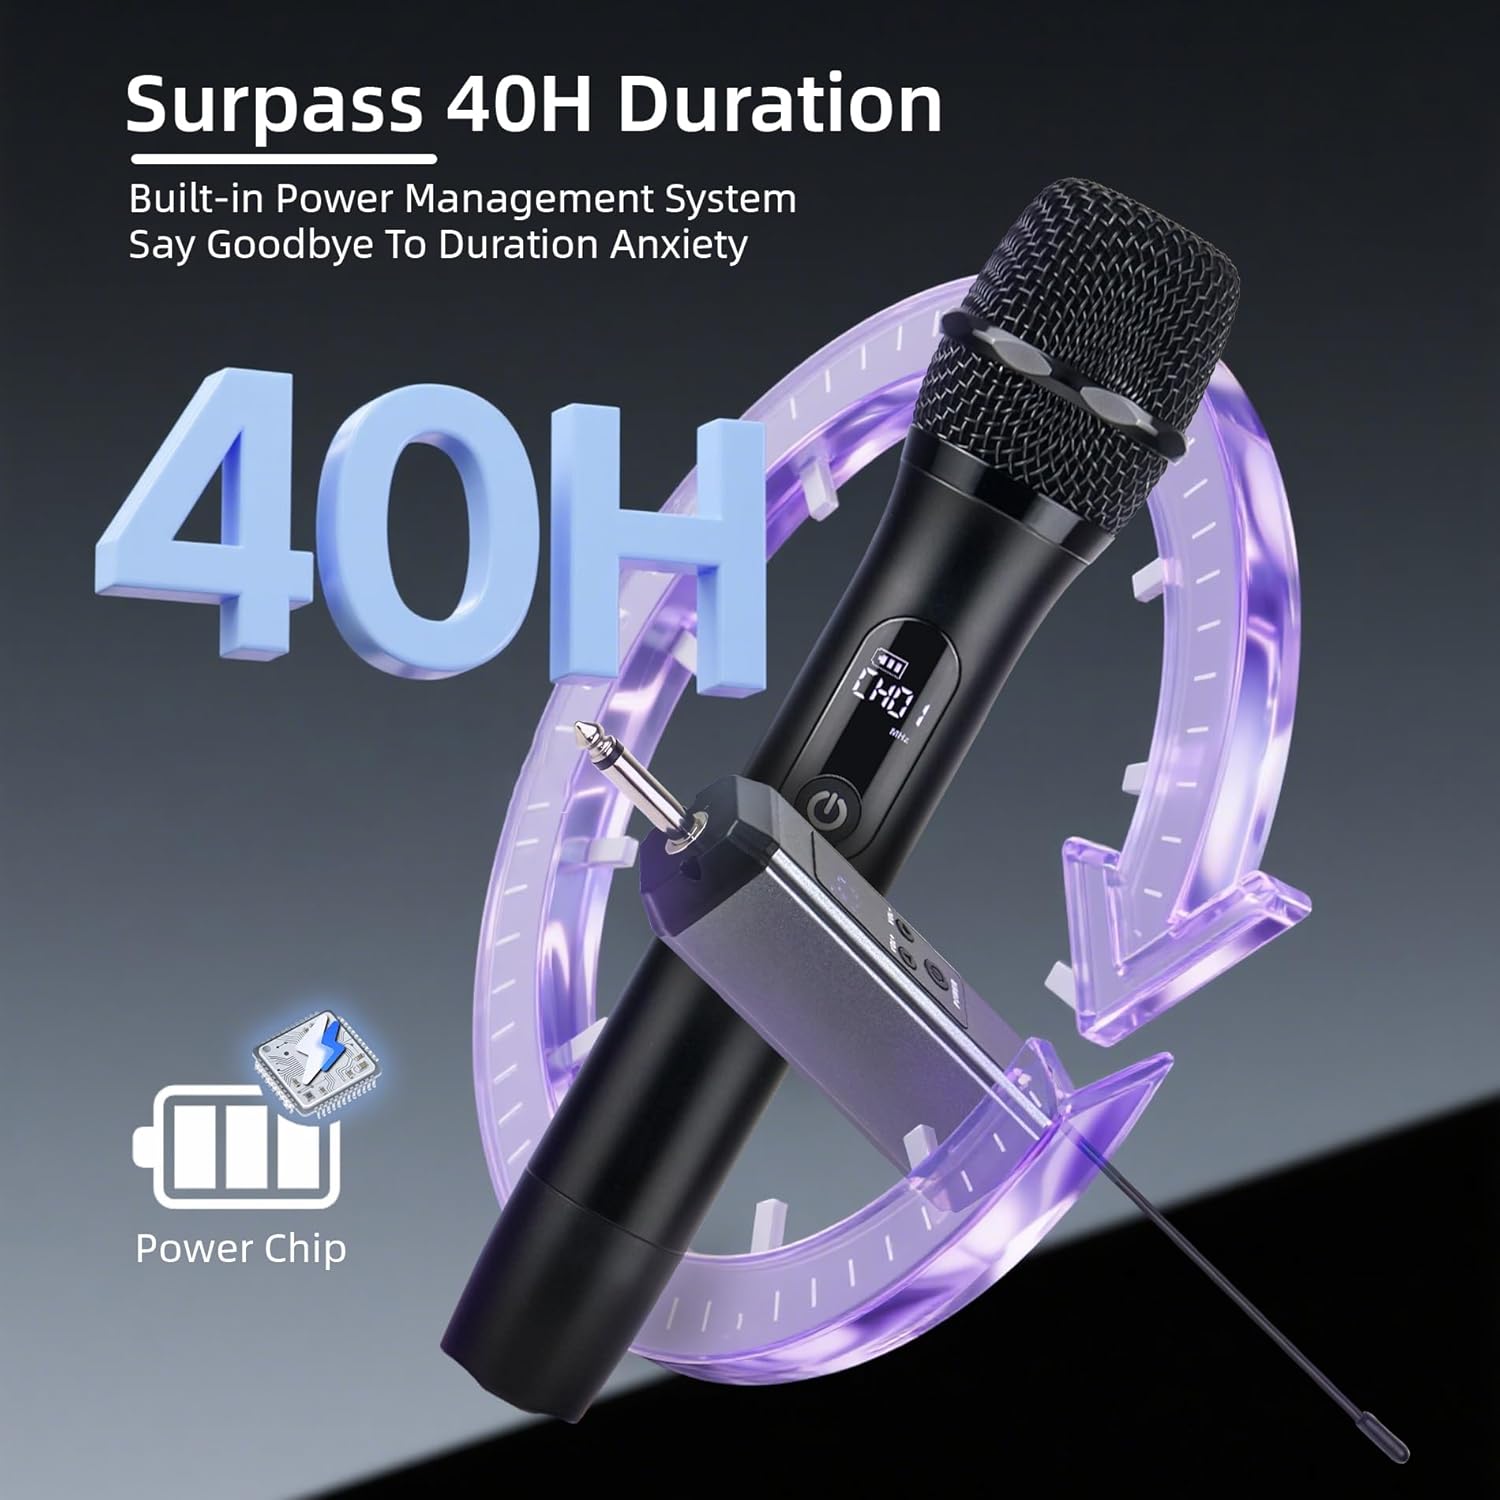
Figure 7: 40-hour battery duration.
6. Sound Quality and Noise Reduction
The Loewieta Wireless Microphone System is engineered for superior audio performance:
- Hi-Fi Sound Pickup: Features a highly sensitive dynamic capsule that captures the true richness of your voice.
- Cardioid Directional Pickup: Designed to pick up sound primarily from the front, minimizing unwanted noise from the sides and rear.
- Multi-Layer Airflow System: Effectively blocks external background noise and prevents howling.
- Integrated Metal Body: The durable metal construction not only provides a premium feel but also reduces handling noise during use.

Figure 8: Cardioid directional pickup for clear sound.
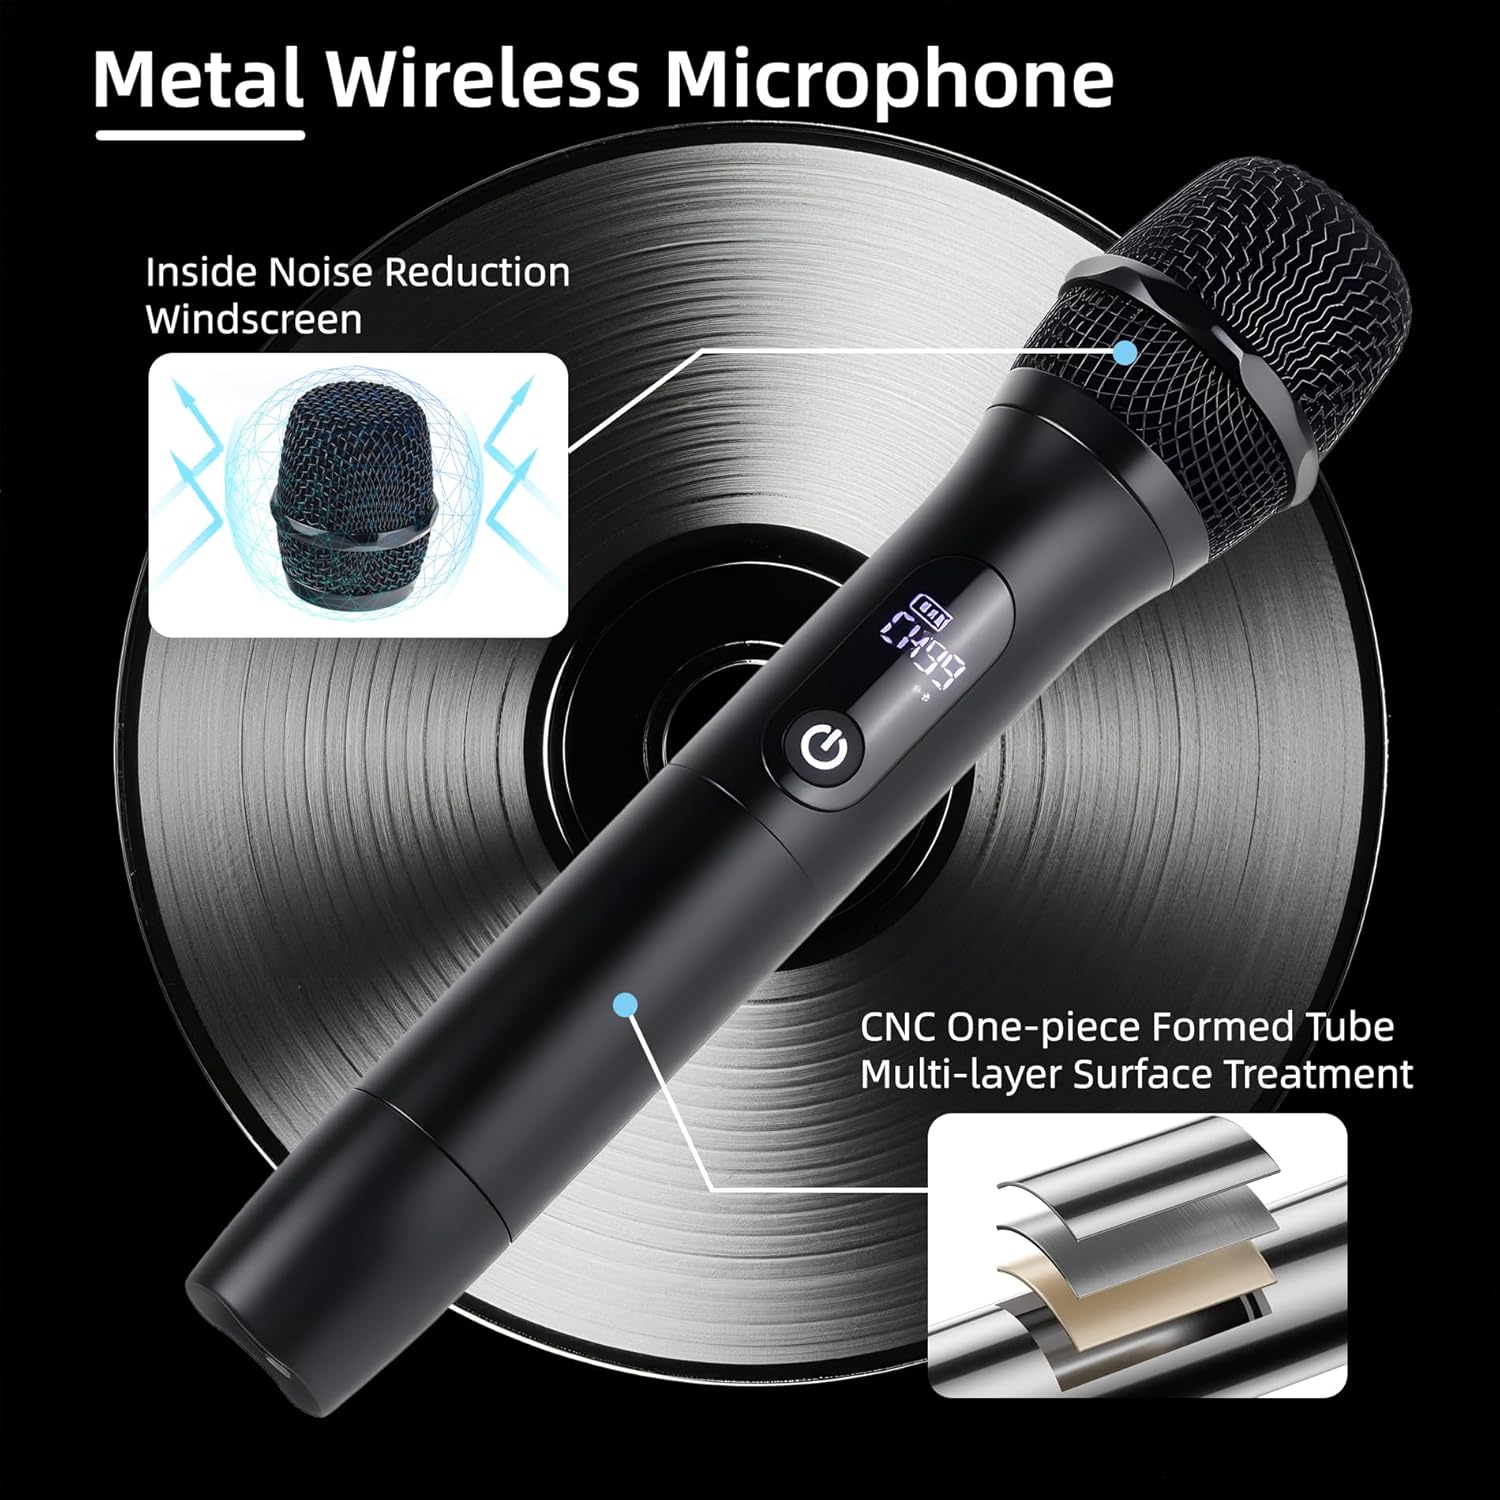
Figure 9: Metal microphone construction details.
7. Maintenance
Proper maintenance ensures the longevity and optimal performance of your microphone system:
- Cleaning: Use a soft, dry cloth to clean the exterior of the microphones and receiver. Do not use liquid cleaners or abrasive materials.
- Storage: Store the system in a cool, dry place away from direct sunlight and extreme temperatures.
- Battery Care: For long-term storage, charge the batteries to approximately 50% every three months to maintain battery health.
- Avoid Moisture: Keep the devices away from water and high humidity to prevent damage.
8. Troubleshooting
If you encounter issues with your Loewieta Wireless Microphone System, refer to the following troubleshooting guide:
| Problem | Possible Cause | Solution |
|---|---|---|
| No sound from microphone | Microphone or receiver is off; Low battery; Receiver not connected; Volume too low; Incorrect channel. | Ensure both devices are powered on. Charge batteries. Verify receiver is securely plugged into MIC input. Increase microphone and sound system volume. Check and adjust microphone channel. |
| Interference or static noise | Other wireless devices nearby; Obstructions; Channel interference. | Move away from other electronic devices. Ensure clear line of sight between microphone and receiver. Change the microphone channel (refer to Section 4.2). |
| Short wireless range | Obstructions; Environmental factors; Low battery. | Ensure clear line of sight. Avoid using in areas with heavy metal structures or dense walls. Fully charge devices. |
| Microphone not charging | Faulty cable; Power adapter issue; Charging port damage. | Try a different Type-C cable and USB power adapter. Ensure the charging port is clean and free of debris. |
| Microphone not pairing | Receiver or microphone not powered on; Out of range. | Ensure both devices are powered on and within close proximity during initial pairing. Power cycle both devices. |
9. Specifications
| Feature | Specification |
|---|---|
| Model Name | G10B-A (X-G10B-Z) |
| Brand | Loewieta |
| Microphone Form Factor | Handheld |
| Connectivity Technology | 2.4G Wireless, Auxiliary |
| Connector Type | 3.5 mm Jack, 6.35 mm Jack |
| Wireless Range | Up to 500ft (150m) |
| Number of Channels | 99 |
| Battery Type | Lithium Ion (Rechargeable) |
| Operating Time | Up to 40 hours |
| Charging Time | Approx. 3 hours (Type-C Fast Charging) |
| Item Dimensions (L x W x H) | 9.65 x 1.97 x 1.97 inches (24.5 x 5 x 5 cm) |
| Item Weight | 2.07 pounds (0.94 kg) |
| Compatible Devices | PA systems, Amplifiers, Mixers, Karaoke Machines, Audio Mixer, Camera, Laptop, Tablet, Voice Recorder |
10. Customer Support
For any technical assistance, questions, or concerns regarding your Loewieta Wireless Microphone System, please contact our customer support team. We are committed to user satisfaction and provide online technical support.

Figure 10: Loewieta Customer Care information.
10.1 Official Product Video
Watch this video for a visual guide on the features and operation of the Loewieta Wireless Microphone System.
Video 1: Overview of Loewieta Wireless Microphone System features and usage.